6.1 Installing the Management Console for Use with the Management and Policy Distribution Services
If you have installed the Management Service and Policy Distribution Service, complete the tasks in the following sections to install the Management Console and configure a connection to your directory service.
6.1.1 Installing the Software
You can install the Management Console on the server where the Management Service resides, or you can install it on another computer that has direct communication with the Management Service.
-
If you are not installing the Management Console on the same server as the Management Service:
-
Make sure the target computer meets the system requirements (see Section 2.2.3, Management Console Requirements)
-
Copy the ESM Setup Files folder from the Management server to the target computer’s desktop. Verify that the ESM Setup Files folder contains the following files before you copy it to the computer’s desktop: the Policy Distribution server’s SSL certificate, the Management server’s SSL certificate, and the STInstParam.id file.
-
-
If you are using Microsoft Active Directory as your directory service, make sure that the computer is logged in to the Active Directory domain.
-
At the target computer, insert the ZENworks Endpoint Security Management disk to run the Master Installer.
The Master Installer is a set of browser-based screens that helps you launch the setup programs for the various ZENworks® Endpoint Security Management components.
If the Master Installer does not auto-run, double-click default.htm at the root of the disk.
-
Click the language you want to use for the text displayed on the Master Installer pages.
-
Click or .
Both options enable you to install the Management Console.
-
Click to launch the Management Console installation program.
You can also launch the installation program directly from the installation media:
\Installs\MC\setup.exe
-
Select the display language for the installation program, then click .
-
Complete the installation, using information from the following table. Each row of the table corresponds to one of the installation program screens that requires input.
-
When the installation is complete, select the option, then click
You can also launch the Management Console by double-clicking the icon on the desktop or by selecting the menu > > > > .
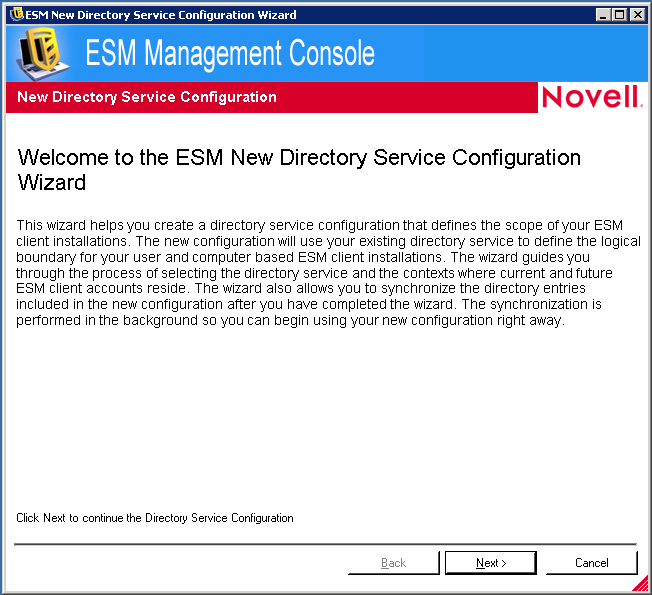
The Management Console starts with the New Directory Service Configuration Wizard displayed. The wizard lets you set up the connection to your directory service and specify the users and computers you want to manage with ZENworks Endpoint Security Management.
-
Continue with the next section, Creating a Directory Service Configuration.
6.1.2 Creating a Directory Service Configuration
ZENworks Endpoint Security Management integrates with Microsoft Active Directory and Novell eDirectory™ to enable security policies to be published to the users and computers in the directory. When the Security Client authenticates through a user or computer account, any policies associated with the account are applied to the computer.
When you create a directory service configuration for one of these directories, you define the connection information for the directory and identify the users or computers to whom policies can be published. The following sections provide instructions for creating configurations for the two directory services:
Defining eDirectory as the Directory Service
-
Make sure the New Directory Service Configuration Wizard is displayed.
If the wizard is not displayed, launch the Management Console by double-clicking the icon on the desktop or by selecting the menu > > > > .
-
Complete the wizard. The following table provides information for each of the pages.
IMPORTANT:Do not use the wizard’s Back button. Doing so can result in lost settings and incorrect data synchronization from the directory service to the Management database. If you make a mistake, cancel the wizard and begin again.
-
If you have not already done so, click to complete the directory service configuration.
The directory is added to the list.
If you selected containers to synchronize, the Management Console begins the synchronization. You can double-click
 in the Windows notification area to display the Directory Services Synchronization dialog box.
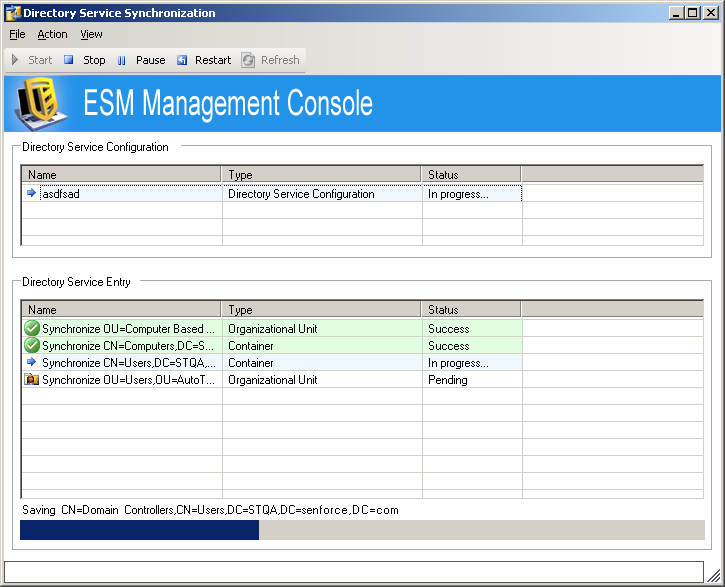
The synchronization occurs in the background. If you exit the Management Console, the synchronization stops. When you open the Management Console again, the synchronization resumes where it left off.
Defining Active Directory as the Directory Service
For the Active Directory domain you are connecting to, the Domain Controller must reside on Windows Server 2000 with SP4, Windows Server 2003, or Windows Server 2008.
If a Windows Server 2008 Domain Controller is down when you run the New Directory Service Configuration Wizard, the wizard might error out. If this occurs, set the port to 389 when running the wizard.
-
Make sure the computer is logged in to the Active Directory domain.
-
Make sure the New Directory Service Configuration Wizard is displayed.
If the wizard is not displayed, launch the Management Console by double-clicking the icon on the desktop or by selecting the menu > > > > .
-
Complete the wizard. The following table provides information for each of the pages.
IMPORTANT:Do not use the wizard’s Back button. Doing so can result in lost settings and incorrect data synchronization from the directory service to the Management database. If you make a mistake, cancel the wizard and begin again.
-
If you have not already done so, click to complete the directory service configuration.
The directory is added to the Directory Services Configuration list.
If you selected containers to synchronize, the Management Console begins the synchronization. You can double-click
in the Windows notification area to display the Directory Services Synchronization dialog box.
The synchronization occurs in the background. If you exit the Management Console, the synchronization stops. When you open the Management Console again, the synchronization resumes where it left off.