The Upgrade Wizard upgrades ZfS 2 Tiered Electronic Distribution (TED) objects and servers to ZfS 3. This wizard does not upgrade other ZfS components.
We recommend that you upgrade Policy and Distribution Services from the ZENworks for Servers program CD. However, if you need to copy the CD structure to a hard drive, the path between the root of the hard drive and the first CD directory can contain only directory names that conform to the 8.3-character DOS file naming convention. If any long directory names exist in the path, the upgrade program will not work.
Review the following to understand what the Upgrade Wizard does, and to understand the issues involved in upgrading Policy and Distribution Services from ZfS 2 to ZfS 3:
When you upgrade from ZfS 2 to ZfS 3, the wizard does the following:
Updates the ZfS 3 Novell eDirectoryTM objects you have selected for upgrading. The upgrade process is done only for the Distributor and Subscriber objects.
Maintains the existing attributes for each updated eDirectory object, so that you will not have to reconfigure the objects.
Maintains all working directories, so that Distributions created in ZfS 2 will continue to work, assuming that the events scheduled for a ZfS 2 Distributor or Subscriber would be recognized by a ZfS 3 Distributor or Subscriber in a mixed environment.
After you have upgraded a ZfS 2 Distributor, the next time Distributions associated with that Distributor are built, they will be automatically upgraded to ZfS 3 Distributions.
ZfS 3 Distributions can be sent to ZfS 2 Subscribers, except for the NAL/TED Distributions. However, new ZfS 3 Distribution features will not be applied to ZfS 2 Subscribers. For example, the File Distribution type for ZfS 3 has a new feature, the Synchronize Directory option, which does not exist in ZfS 2.
The NAL/TED type of Distributions (now called Desktop Application) will need to be re-created, because the software for these types of Distributions has changed. For more information on re-creating these Distributions, see Re -creating Desktop Application Distributions .
Installs the ZfS 3 software to the installation path you give for each target ZfS 2 server, which will be a different path than was used for installing the ZfS 2 software. The ZfS 3 installation program uses a specific subdirectory structure that is different than was used by ZfS 2.
Disables the ZfS 2 software on each upgraded server so that it cannot be started. Although you can have ZfS 2 and ZfS 3 servers running concurrently on your network, the two versions of ZfS cannot be run on the same server.
IMPORTANT: After you have upgraded a ZfS 2 server to ZfS 3, it can no longer receive Distributions from a ZfS 2 Distributor.
When you select to upgrade a Subscriber, the ZfS 2 Policy Package Agent is automatically upgraded to the ZfS 3 Policy/Package Agent.
WARNING: After the ZfS 2 Policy Package Agent has been upgraded on a server, you must re-create all ZfS 2 Policy Packages associated with the Subscriber server to be ZfS 3 Distributed Policy Packages. Associated policies are not enforced in ZfS 3; policy packages must be distributed for their enabled policies to be enforced.
Allows you to install the Distributor to a server without also installing the Subscriber or Policy/Package Agent. In ZfS 2, the Distributor and Subscriber software were separate (for example, DIST.NCF and SUB.NCF in NetWare); in ZfS 3, the agent software has been combined (now TED.NCF in NetWare, or the Novell ZfS Distribution service in Windows).
In summary, the Upgrade Wizard upgrades the ZfS 2 objects to ZfS 3 objects for the associated servers. It also installs ZfS 3 software on ZfS 2 servers, and disables the servers from using the ZfS 2 software.
What the Upgrade Wizard Does Not Do
The following are not done using the Upgrade Wizard:
The schema is not automatically extended. You must do this manually as you would for the ZfS 3 Installation Wizard. Select the Schema Extensions option before selecting the ZENworks for Servers 2 Upgrade option.
Because ZfS 3 enforces policies by distributing them, ZfS 2 policies that are used to manage servers will no longer work. You will need to re-create those associated policies as distributed policies. For more information, see Updating ZfS Policies .
For ZfS 2, if you installed the Policy Package Agent on a server, but not the Subscriber software, the Upgrade Wizard cannot upgrade the Policy Package Agent to the newer version.
The Upgrade Wizard must have a Subscriber object for selecting the servers to upgrade, because the Policy Package and Subscriber Agents have been combined in ZfS 3. Therefore, you will need to run the Installation Wizard to upgrade the agent on such a server. Also, you will need to re-create any Server Packages associated with that server to be Distributed Policy Packages in ZfS 3.
In ZfS 3, the Distributor can be installed without the Subscriber/Policy Package Agent.
The Upgrade Wizard does not install ZfS 3 to servers where ZfS 2 was not installed. It only upgrades existing ZfS 2 servers. If you are upgrading ZfS 2 servers and also have new servers for ZfS 3 (where ZfS 2 was not installed), you could first upgrade the ZfS 2 Distributors to ZfS 3, then use the Installation Wizard to install to the new servers (Distributors and Subscribers/Policy Packages).
The ZfS 3 snap-ins for ConsoleOne must be installed with the Installation Wizard after you have finished upgrading. However, the ZfS 3 snap-ins cannot be used to manage the ZfS 2 NAL/TED Distributions.
In ZfS 2, the Distributor and Subscriber software were separate; in ZfS 3, they use the software has been combined. If you have a ZfS 2 Distributor server that does not also have the ZfS 2 Subscriber software installed (including the associated Subscriber object), when you upgrade that server, it will only have the ZfS 3 Distributor object created for it.
Because the upgrade program keys off ZfS objects for installing ZfS 3 software and upgrading objects, if you also want the ZfS 3 Subscriber object created for this server, you must install the ZfS 2 Subscriber to that server before running the upgrade program.
WARNING: If you try to install a ZfS 3 Subscriber to a server that only had the Distributor upgraded, the Distributor's functionality would be lost. You must have both the Distributor and Subscriber for ZfS 2 installed on a server in order to upgrade that server to have both the Distributor and Subscriber for ZfS 3.
In summary, the Upgrade Wizard does not install ZfS 3 where ZfS 2 was not installed. ZfS objects are necessary for identifying target servers.
Issues Concerning Upgrading Incrementally
When using the Upgrade Wizard, you will be upgrading Distributor and Subscriber objects in a given tree, and the ZfS software on the corresponding servers.
If you have multiple trees with ZfS objects, you will need to run the Upgrade Wizard once per tree, because the wizard discovers your target servers by their corresponding Distributor or Subscriber objects contained in the tree.
For a variety of reasons, you might need to upgrade your ZfS 2 Subscriber objects incrementally per tree. For example, because the upgrade process is done one object and its server at a time, your network could have so many Subscriber servers that you might not want to perform the upgrade in one long session.
An incremental upgrade of your Distributors might not be necessary. Maintaining both ZfS 2 and ZfS 3 Distributors would only be warranted if you are using the NAL/TED Distribution type in ZfS 2. In this case, you would want to have one ZfS 2 Distributor manage all NAL/TED Distributions and your ZfS 3 Distributors manage the ZfS 3 Desktop Application Distributions. For more information, see Re -creating Desktop Application Distributions .
Review the following sections to determine whether to upgrade incrementally:
Review the following to understand the issues related to upgrading incrementally:
A single server cannot concurrently run ZfS 2 and ZfS 3 software. For example, you cannot have a ZfS 2 Subscriber and a ZfS 3 Distributor running on the same server.
ZfS 2 Distributors cannot send Distributions to ZfS 3 Subscribers. In other words, a ZfS 3 Subscriber can only receive Distributions originating from a ZFS 3 Distributor.
ZfS 3 Distributors can send ZfS 3 Distributions to ZfS 2 Subscribers, except for NAL/TED Distributions.
After a ZfS 2 Distributor has been converted to ZfS 3, before it sends any of its ZfS 2 Distributions, it converts them to ZfS 3 when it builds them.
The NAL/TED type of Distribution in ZfS 2 is not automatically converted to the ZfS 3 type (Desktop Application). Therefore, all NAL/TED Distributions must be re-created in ZfS 3. For more information, see Re -creating Desktop Application Distributions .
Policy packages that were created in ZfS 2 and associated for enforcement are no longer effective for servers running ZfS 3 software. Policies are distributed, rather than associated, in ZfS 3. Therefore, any policy associated with a server must be re-created in ZfS 3 as a distributed policy. For more information, see Updating ZfS Policies .
Because of the change in the Desktop Application type of Distributions, ZfS 2 NAL/TED Distributions cannot be built, sent, or received by ZfS 3 Distributors and Subscribers.
ZfS 2 Subscribers cannot receive or extract ZfS 3 Desktop Application types of Distributions.
Determining Whether to Upgrade Incrementally
We recommend (per tree) that you first upgrade all of your Distributors, then upgrade your Subscribers, incrementally if necessary. Consider the following in determining whether to upgrade your Subscribers incrementally:
You should upgrade your Distributors first, because ZfS 2 Distributors cannot send Distributions to ZfS 3 Subscribers. However, ZfS 3 Distributors can send ZfS 3 Distributions to ZfS 2 Subscribers, except for the NAL/TED Distributions.
If you have very many Subscribers, consider the time it might take to upgrade them in one session. If that time frame is too long, select your target Subscribers in groups so that you can upgrade one group at a time.
If you have ZfS 2 NAL/TED Distributions, you should maintain one ZfS 2 Distributor for sending NAL/TED Distributions to the ZfS 2 Subscribers requiring them. The upgrade process would then be:
1. Re-create the NAL/TED Distributions as Desktop Application Distributions in ZfS 3.
2. Upgrade the ZfS 2 Distributor that was sending NAL/TED Distributions to a ZfS 3 Distributor.
3. Upgrade the Subscribers that need the new Desktop Application type of Distributions.
Installing ZfS Software to New Servers When You Are Also Upgrading Incrementally
If you have ZfS 2 in your network, and also have servers where ZfS has not been installed and you want to install ZfS to those servers, then you must do the following to prevent incompatibility problems:
Upgrade your ZfS 2 servers.
Install to your non-ZfS servers.
This will ensure that all Distributors and Subscribers will work correctly together.
However, if your upgrade plan includes incrementally upgrading your servers and you also want to install the ZfS 3 Distributor on a newer server before completing the incremental upgrade cycles, then you might need to manually add a command line switch to the new Distributor's configuration file for the compatibility between a ZfS 3 Distributor and the remaining ZfS 2 Subscribers.
This is only necessary if you plan to use that new ZfS 3 Distributor to send Distributions to ZfS 2 Subscribers.
To do this:
Run the Upgrade Wizard to perform the necessary upgrades.
Run the Installation Wizard to install the Distributor to a server where ZfS has never been installed.
To set up compatibility between the ZfS 3 Distributor and existing ZfS 2 Subscribers, do the following to edit the Distributor's configuration file:
NetWare Servers:
Open SYS:\ZENWORKS\PDS\TED\TED.NCF in a text editor.
The path to your ZENWORKS directory might be different if you used a different volume or inserted other path information between the volume and the ZENWORKS directory.
Locate the line similar to the following (usually at the end of the file):
Save the configuration file > exit the text editor.
Windows Servers:
Open C:\ZENWORKS\PDS\TED\TEDSERV.CFG in a text editor.
The path to your ZENWORKS folder might be different if you used a different drive or inserted other path information between the drive and the ZENWORKS folder.
Add the following line in the file:
flags="-v2"
Save the configuration file > exit the text editor.
UNIX Servers:
Open usr/ZENworks/PDS/ted/TEDSERV.sh in a text editor.
Locate the line similar to the following (usually at the end of the file):
Save the configuration file > exit the text editor.
In order for this configuration file change to be recognized, restart the Distributor.
After editing the configuration file and restarting the ZfS 3 Distributor, ZfS 2 Subscribers will be able to receive Distributions from that Distributor.
Meeting Policy and Distribution Services Requirements for NetWare and Windows Servers
You can upgrade Policy and Distribution Services on the following NetWare and Windows* server platforms:
NetWare 5.1
NetWare 6
Windows NT* 4
Windows 2000
WARNING: If you intend to upgrade incrementally, be aware that some system requirements for ZfS 3 should not be performed on servers where you will continue to use ZfS 2. Therefore, meet the server requirements only for the servers you will be upgrading to ZfS 3.
The NetWare servers where you upgrade Policy and Distribution Services must meet the following system requirements:
Determine the trees where ZfS 2 objects have been installed. You will need to extend the schema on these trees before upgrading. Extending the ZfS 3 schema does not remove the ZfS 2 schema extensions.
If you have ZfS 2 installed across multiple trees, per tree you should first upgrade the Distributors, then incrementally upgrade the Subscribers in those trees.
Upgrading Incrementally?
ZfS 2 and ZfS 3 can coexist in your network. You can upgrade ZfS 2 objects incrementally, or all at once (per tree). Determine per tree whether you want to upgrade the ZfS 2 objects incrementally. For more information, see Issues Concerning Upgrading Incrementally .
Distributor Servers to Upgrade?
The upgrade wizard displays all ZfS 2 Distributor objects in the tree. If you will be upgrading all Distributor objects in one pass for a given tree, you do not need to make a list.
If you are upgrading incrementally in a given tree, make lists of the installed ZfS 2 Distributor objects that you want to upgrade together. If you need to temporarily keep a ZfS 2 Distributor for distributing NAL/TED Distributions, note this Distributors separately for upgrading later.
Subscriber Servers to Upgrade?
The upgrade wizard displays all ZfS 2 Subscriber objects in the tree. If you will be upgrading all Subscriber objects in one pass for a given tree, you do not need to make a list.
If you are upgrading incrementally in a given tree, make lists of the ZfS 2 Subscriber objects that you want to upgrade together. That way you can use that list to select which Subscribers to upgrade from the ones that will be displayed.
For servers that were both a ZfS 2 Distributor and Subscriber, when you upgrade the Distributor software (usually done first), the Subscriber software is also upgraded. Therefore, you do not need to list these Subscriber servers for upgrading again.
IMPORTANT: Make sure that you do not upgrade a server to be a ZfS 3 Subscriber when it is still a ZfS 2 Distributor. If you select to upgrade a ZfS 2 Distributor to be only a ZfS 3 Subscriber, all Distributor functionality will be lost. Keep this in mind for any NAL/TED Distributors you can upgrade later.
Upgrading on NetWare and Windows Servers
If you have ZfS objects installed to multiple trees, repeat the following upgrade instructions for each tree. Also, if you are upgrading incrementally, repeat the following upgrade instructions for each incremental group.
To upgrade ZfS 2 to ZfS 3, perform the following tasks in order:
IMPORTANT: Do not assume that your existing hardware and software on Distributor and Subscriber servers will meet ZfS 3 requirements. Some basic server requirements, such as minimum RAM, have changed between ZfS 2 and ZfS 3.
If Java has not been unloaded on the target NetWare servers, unload JAVA.NLM.
For example, at each NetWare server's console prompt, type:
java -exit
This will also cause all ZfS software to stop running on the server.
Make sure you have met the workstation requirements listed in Getting Started .
IMPORTANT: Make sure you have updated each of your ConsoleOne installations, because you will be updating the ZfS 3 snap-ins before completing the upgrade process (see Installing the New Snap-Ins to ConsoleOne ).
Select the workstation you will use to upgrade from.
If you have not already done so, log in to the eDirectory tree where you will be updating the ZfS objects.
If you are not logged into this tree, you will not be able to select it during the upgrade process.
You can upgrade Distributors and Subscribers one tree at a time. You can run the Upgrade Wizard as many times as needed.
You will be extending the schema for ZfS 3 on this tree. The ZfS 2 schema extensions will remain so that you can run both versions concurrently in your network.
Insert the ZENworks for Servers Companion CD on your upgrade workstation and install the new JVM from the CD to each target ZfS 2 server, using the following command:
On the upgrade workstation, insert the ZENworks for Servers program CD.
The startup screen is displayed. If the startup screen is not automatically displayed after inserting the CD, run WINSETUP.EXE at the root of the CD.
IMPORTANT: If you copied the ZENworks for Servers program CD structure to the upgrade workstation's hard drive, the path between the root of the hard drive and the first CD directory can contain only directory names that conform to the 8.3-character DOS file naming convention. If any long directory names exist in the path, the upgrade program will not work.
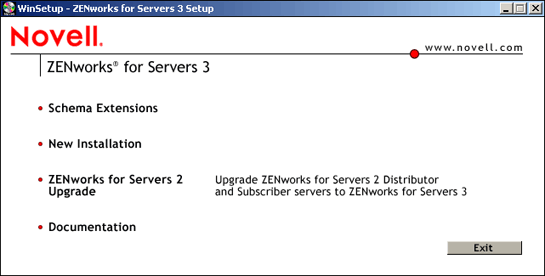
Click Schema Extensions > follow the prompts.
To upgrade ZfS 2 to 3, you must extend the schema on the trees where you will be updating ZfS objects.
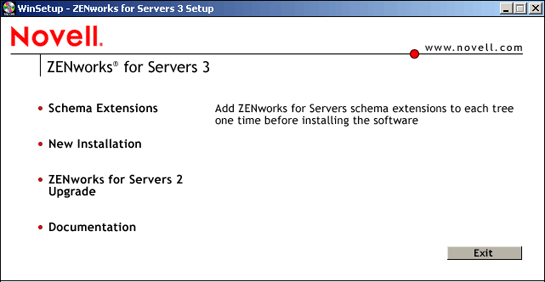
Click the ZENworks for Servers 2 Upgrade option.
This starts the Upgrade Wizard.
If you agree with the Software License Agreement, click Accept > Next.
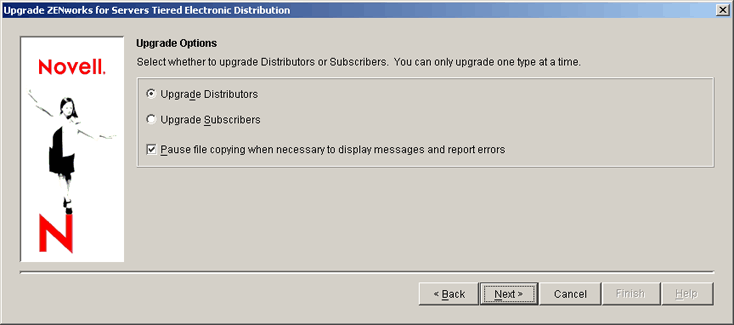
On the Upgrade Options page, click the Pause File Copying check box if during the upgrading process you want to unload Java where it is running.
Java cannot be running on a target NetWare server during upgrading.
On the Upgrade Options page, click one of the following radio buttons > click Next:
Upgrade Distributors
Upgrade Subscribers
You can only upgrade one type of object at a time.
IMPORTANT: You must upgrade Distributors first, because ZfS 3 Subscribers cannot receive Distributions from ZfS 2 Distributors; however, ZfS 2 Subscribers can receive Distributions from ZfS 3 Distributors, except as explained concerning NAL/TED Distributions (see Determining Whether to Upgrade Incrementally ).
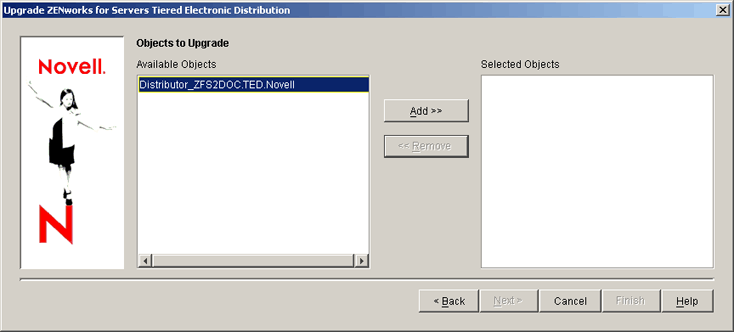
Browse for a target tree > click Next.
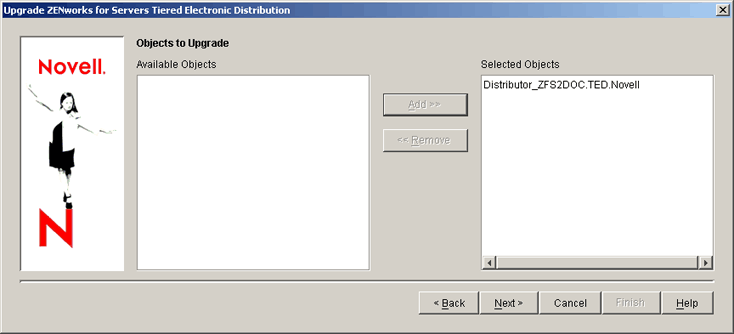
The Objects to Upgrade page is displayed, where you can select which Distributor or Subscriber objects to upgrade.
The objects displayed in the Available Objects box are all ZfS 2 objects in the current tree of the type your are upgrading (Distributor or Subscriber).
Select one or more objects in the Available Objects box > click Add.
The Add button moves the selected objects to the Selected Objects box.
Repeat Step 8 until you have selected all the objects you want to upgrade at this time > click Next.
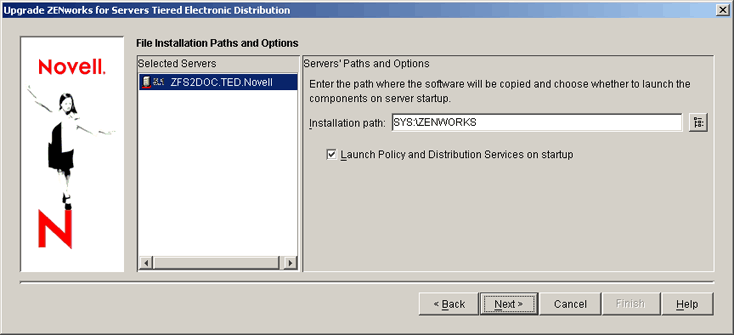
On the File Installation Paths and Options, select one or more objects in the Selected Objects box.
Select objects individually or in groups, depending on whether their servers share the same installation paths and ZfS software launching methods.
To have servers for the selected objects automatically start ZfS 3 on server startup, click the Launch Policy and Distribution Services On Startup check box.
To change the default, browse for or enter the new installation directory for the selected objects.
ZENWORKS is the default installation directory for the ZfS 3 software. For example, SYS:\ZENWORKS or C:\ZENWORKS. This is a different path than where the ZfS 2 software was installed. You should use a different path than was used for ZfS 2.
IMPORTANT: Do not use double-byte or extended characters in any part of an installation path, including a NetWare volume name.
If you select multiple server objects, the Browse button is dimmed. You must enter a directory that will be used by all of the selected servers.
Repeat Step 10 through Step 12 for each group of selected objects > click Next.
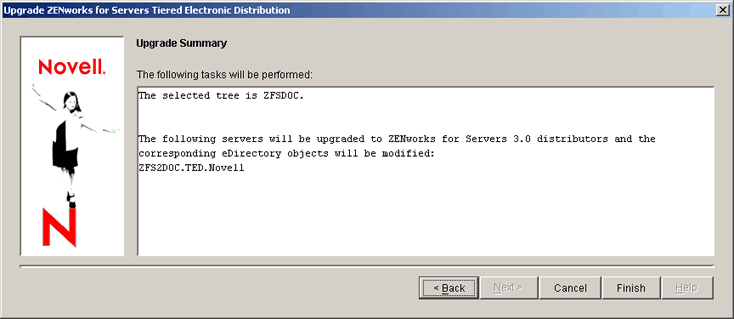
On the Upgrade Summary page, click Finish to begin the upgrade process.
IMPORTANT: You should not reboot the server at this time, because this would start ZfS before you have completed the upgrade process. You will be starting ZfS later (see Starting ZENworks for Servers ).
You must have upgraded to the newest version of ConsoleOne from the ZENworks for Servers Companion CD (see Installing ConsoleOne 1.3.3 from the ZENworks for Servers Companion CD ). This is required before installing the ZfS 3 snap-ins to any instance of ConsoleOne on a workstation or server.
To install the ZfS 3 snap-ins for ConsoleOne for each upgraded instance of ConsoleOne, do the following:
On the installation workstation, insert the ZENworks for Servers program CD.
The startup screen is displayed. If the startup screen is not automatically displayed after inserting the CD, run WINSETUP.EXE at the root of the CD.
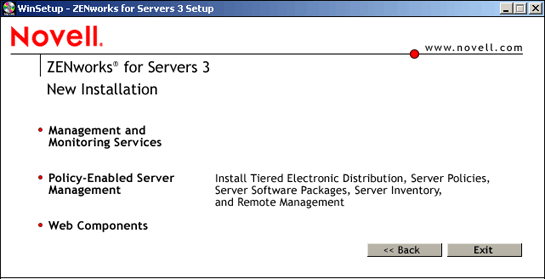
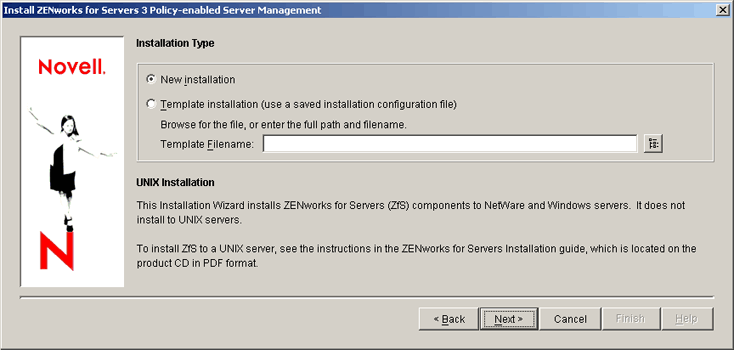
Click New Installation > click Policy-Enabled Server Management.
This starts the Installation Wizard.
If you agree with the Software License Agreement, click Accept > Next.
Click Next to perform a new installation.
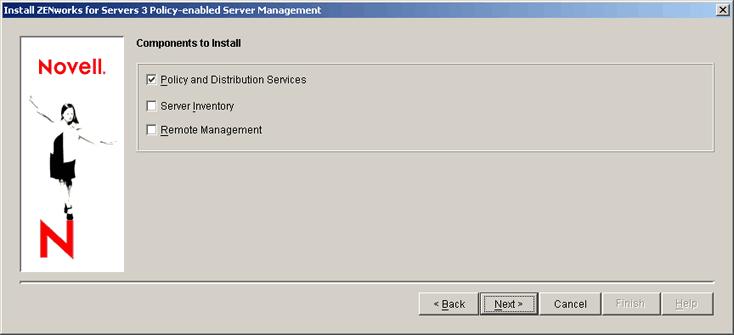
Click Next to install Policy and Distribution Services.
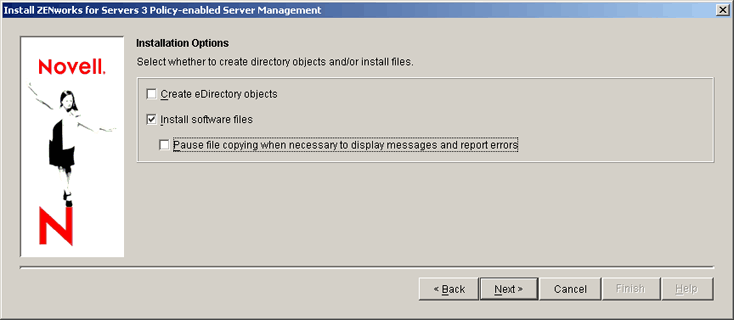
On the Installation Options page, click the Create eDirectory Objects and Pause File Copying check boxes to disable those options > click Next.
You will only be installing software (the snap-ins for ConsoleOne).
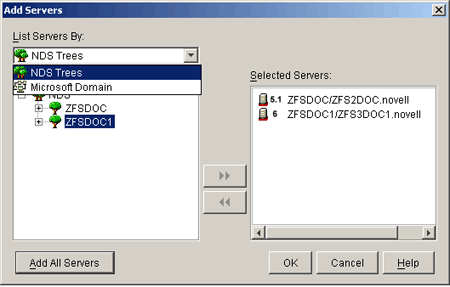
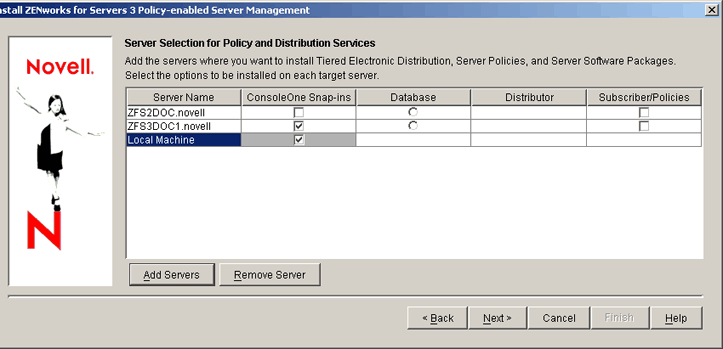
Click Add > browse for all server objects where you installed ConsoleOne to the server.
For these servers where you installed ConsoleOne, click the ConsoleOne Snap-ins check box.
If you installed ConsoleOne on your current workstation, click the ConsoleOne Snap-ins check box for Local Machine.
When you have finished configuring the selected servers, click Next.
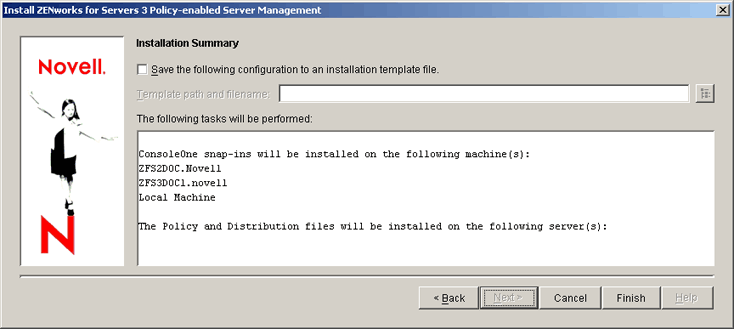
On the Installation Summary page, click Finish to install the ZfS 3 snap-ins to each copy of ConsoleOne you identified in Step 8 through Step 9.
After the Installation Wizard has finished, review the installation log file to determine whether any components failed to install.
The log file is located at:
C:\TEMP\_RESNumber.TXT
where Number is increased incrementally each time a new installation log is created.
If necessary, rerun the Installation Wizard.
Select only the components that failed to install.
Repeat Step 1 through Step 13 for each workstation where you need to update ConsoleOne with the new ZfS 3 snap-ins.
You must start ZfS 3 on servers where you have upgraded from ZfS 2 in order to complete the upgrade process for servers that are managed using policies.
To start ZfS on a server:
On a server where you upgraded from ZfS 2 to 3, do one of the following:
Server Platform
Procedure
Windows NT 4 or Windows 2000
Do the following on each Windows server:
Open the Control Panel.
Do the applicable:
On Windows NT, double-click Services. or On Windows 2000, double-click Admin Tools > double-click Services.
Start the Novell ZfS Policies service.
This will also start the Novell ZfS Distribution service, and the Novell Zen Web Server service. The Novell Sybase Database service is automatically started by the installation program.
NetWare 5.1 and NetWare 6
To start ZfS, enter the following command at the server's console prompt:
sys:\zenworks\pds\smanager\zfs.ncf
If you used a different volume, or added other path information before the ZENWORKS directory, replace the SYS: portion with the alternate path information.
Although the path to ZFS.NCF would be known by the ZfS 2 server because it had learned the path after you installed ZfS 2, you must enter the complete path because the ZfS 3 ZFS.NCF file and path are both different, and the server needs to learn the new path.
After you have started ZfS in this manner, and after the server has rebooted once, the full path will no longer be needed for start the software---you will only need to enter zfs thereafter. By entering the path the first time you run ZFS.NCF, or by rebooting the server after upgrading ZfS, the server learns that path.
TED.NCFand ZWS.NCF are started automatically by the ZFS command. The database is automatically started by the installation program.
Verifying That the Policy and Distributions Services Agents Loaded on NetWare Servers
To verify if ZfS is running properly on a NetWare server:
On the target server's console, press Ctrl+Esc to view the loaded software programs.
If the ZfS item (Policy/Package Agent) is not displayed, review the ZFSINIT.TXT file (under ZENWORKS\PDS\SMANAGER), which contains information about why the agent did not start.
Use this information to reinstall ZfS to the server.
This file is used to log startup problems only.
If the TED item (TED Agent) is not displayed, review the DEFAULTLOG.TXT file (under PDS\TED), which contains information about why the agent did not start.
Use this information to reinstall ZfS to the server.
This file is used to log startup problems only.
Repeat Step 1 through Step 3 for each NetWare server.
Verifying That the Policy and Distributions Services Agents Loaded on Windows Servers
To verify if ZfS is running properly on a Windows server:
On the target server, open the Control Panel > double-click Services (on Windows 2000, double-click Admin Tools > click Services) > determine if the following services are running:
If a server that was upgraded to ZfS 3 is managed using policies, you must create a Policy Package type of Distribution for those policies. ZfS 3 distributes policies to enforce them, whereas ZfS 2 associated those policies.
Because the software for the Desktop Application type of Distributions was changed, you will need to re-create all of your ZfS 2 NAL/TED Distributions.
Desktop Application Distributions must be built using a ZfS 3 Distributor and distributed to a ZfS 3 Subscriber.
The port broker is not used in ZfS 3. Therefore, you must disable it on all ZfS 2 Subscriber servers where Distributions will be received from ZfS 3 Distributors. Do this for all ZfS 2 Subscriber servers that need to be part of the ZfS 3 community, but have not yet been upgraded.
IMPORTANT: For each server where the port broker is disabled, ZfS 2 policies cannot be run for the server. You will need to reissue the server's policies via ZfS 3 Distributions. Also, this disables the Remote Web Console capability of ZfS 2 for the server. This capability has been replaced by the Novell iManager Web management role in ZfS 3.
To disable the port broker on ZfS 2 machines:
On a ZfS 2 server, open SYS:\TED2\SUB.NCF in a text editor.
Locate the line similar to the following (usually at the end of the file):
In this file, locate and remove the line that starts the port broker.
For example, search for "pbroker.ncf" and remove the line containing that text.
Save the configuration file.
Open SYS:\TED2\DIST.NCF in a text editor > locate and remove the line that starts the port broker.
Save the configuration file.
Open SYS:\SMANAGER\ZFS.NCF in a text editor > locate and remove the line that starts the port broker.
Save the configuration file > exit the text editor.
Unload Java and restart the ZfS 2 processes (ZFS.NCF or DIST.NCF or SUB.NCF).
This will make ZfS run without the port broker.
Repeat these steps on each ZfS 2 server.
Turning Off Security in Mixed JVM Environments
The security feature provides Subscribers with the ability to verify that a Distribution is being sent from a trusted Distributor.
However, if you are running TED in a mixed JVM environment (for example, some Distributors or Subscribers are running with JVM 1.1.7b, and others have JVM 1.2.2 or JVM 1.3), you must turn off the security feature of TED before Distributions can be sent successfully from ZfS 3 Distributors.
To turn off the security feature:
Delete or rename the security subdirectory.
On NetWare servers, this subdirectory is located at SYS:\TED2\SECURITY.
On Windows NT or Windows 2000 servers, the TED2 directory is located on the drive containing the SYS share. The default location is C:\NOVELL\TED2\SECURITY, with C:\NOVELL being shared as SYS.
IMPORTANT: If you fail to rename or delete the TED2\SECURITY subdirectory, the Subscriber will detect the presence of the security certificates and will start with security turned on.
In the TED2 subdirectory, locate and edit the SUB.NCF or SUB.BAT file:
In the .NCF or .BAT file, find the line at or near the bottom of the file that reads: