25.3 Configuring a Software Mirror
Configuring a software mirror consists of the following:
-
Creating a separate XML configuration file for each remote server you want to mirror. You can create the configuration file either by using the command line utility or by using the xzlmmirror utility.
See Section 25.3.1, Creating the Configuration Files by using the Command Line Utility and Section 25.3.2, Creating a Configuration File by Using the xzlmmirror Utility
-
Mirroring patch bundles.
-
Testing and running the mirroring operation. You can do this either by using zlmmirror or xzlmmirror.
See Section 25.3.4, Testing and Performing the Mirroring Operation by Using zlmmirror and Section 25.3.5, Testing and Performing the Mirroring Operation by Using the xzlmmirror Utility
25.3.1 Creating the Configuration Files by using the Command Line Utility
Run the following command to generate an empty configuration file:
zlmmirror conf-generate filename.xml
This command generates a template configuration file named zlmmirror-config.xml in the current directory.
You can also convert the configuration file from an earlier version of ZENworks Linux Management or Red Carpet, or create configuration files manually. Configuration files are specified using the -c flag:
zlmmirror command -c filename.xml
If no configuration file is specified, the default configuration file location is /etc/opt/novell/zenworks/zlmmirror.xml.
You can check the configuration file for errors and display the parsed configuration information by using the conf-validate (cv) filename command.
After you have a base configuration file created, the following tasks walk you through adding the necessary configuration information:
Step 1: Servers
You must provide details about a remote server containing the software you want to mirror, and a local server, which is your ZENworks Linux Management server receiving the mirrored software.
RemoteServer
<RemoteServer>
   <Base>http://red-carpet.ximian.com/</Base>
   <Type>rce</Type>
   <User />
   <Password />
</RemoteServer>
LocalServer
<LocalServer>
   <Base></Base>
   <Type>zlm</Type>
   <User>Administrator</User>
   <Password>password</Password>
</LocalServer>
|
Configuration Element |
Description |
|---|---|
|
Base |
If the Type element indicates STATIC mirroring, use the Base element to define the destination path where files will be stored (/path/on/filesystem, for example). If the Type element indicates ZLM mirroring, leave the Base element empty. |
|
Type |
Type of mirroring you want performed: ZLM: Mirrors catalogs and bundles directly to your ZENworks Linux Management server. After mirroring, mirrored catalogs and bundles are displayed in the ZENworks Control Center. STATIC: Mirrors packages to the file system of your ZENworks Linux Management server, but does not add them to ZENworks. |
|
User |
Name to use when connecting to your ZENworks Linux Management (local) server. The Administrator user should be specified if you want to use the default administrator account. |
|
Password |
Password for the account provided in User. If you are using the Administrator account, this is the password you specified during the server installation. For information about encoding your password, seeSection 25.8, Encoding the ZENworks Server Password |
Step 2: Catalog and Bundle Configuration
You must provide details about the catalogs and bundles you want mirrored to your server.
Before you mirror the catalogs and bundles to your server, you can view the available catalogs and bundles on the remote server.
To view the available catalogs, run the following command:
zlmmirror slc -c filename.xml
To view the available bundles, run the following command:
zlmmirror slb -c filename.xml
CatalogConf
Each catalog you want to mirror must have a separate CatalogConf section:
<CatalogConf>
   <Name>Red Carpet 2</Name>
   <LocalName>Red Carpet 2</LocalName>
   <Target>sles-9-i586</Target>
   <Package>lib.*</Package>
</CatalogConf>
NOTE:The use of regular expressions (regexes) has changed in ZENworks 7.2 Linux Management. ZENworks 7.2 Linux Management does not use wildcard character matching. In ZENworks Linux Management 6.6.x, you can use a wildcard expression string instead of a regular expression string. In ZENworks 7.2 Linux Management , you should use <Bundle>patch-.*</Bundle> to mirror all bundles with the name starting with “patch-”. ZENworks Linux Management supports all the Java regular expressions. For more information on the Java regular expressions, see the Java documentation .
25.3.2 Creating a Configuration File by Using the xzlmmirror Utility
The xzlmmirror utility is a graphical user interface that lets you to create or edit the mirror configuration files, and store it in an XML file that is compatible with the existing zlmmirror utility. The file consists of the configuration information for the remote servers, proxy servers, local servers, and catalogs.
Do the following tasks in the order listed to create a configuration file:
You can also edit the configuration file. For more information, see Editing the Configuration File.
Configuring the Servers
-
To start the xzlmmirror utility, enter the following command at the command line:
xzlmmirror
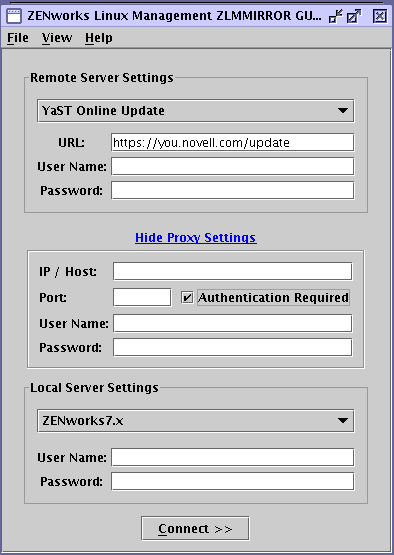
The xzlmmirror-Server Settings window is displayed.
-
Configure the remote server that contains the software you want to mirror:
-
Select the remote server type that contains the software you want to mirror.
-
ZLM: ZENworks 7.2 Linux Management
-
DELL: Dell Update Package FTP Server
-
RCE: Red Carpet® Enterprise™ or ZENworks 6.x Linux Management
-
YAST: YaST Online Updates
-
RHN: Red Hat Network
-
YUM: YUM
-
NU: Novell Updates
The default URL of the server you want to mirror is displayed automatically in the following format, depending on the server type you have selected:
-
ZLM: https://server
-
DELL: http://ftp.dell.com
-
RCE: https://server/path
-
YAST: http(s)://server/path or ftp://server/path
-
RHN: http(s)://server/path
-
YUM: http://server/path
-
STATIC: /path/on/filesystem
-
NU: https://nu.novell.com/repo
-
-
Specify the username and password to connect to the remote server.
-
-
(Conditional) If you are connecting to the remote server through a proxy server, configure the proxy server settings. If the remote server does not connect through a proxy server, skip to Step 4.
-
Click .
-
Specify the IP address or the host name of the proxy server.
-
Specify the port number of the proxy server.
-
To authenticate to the proxy server, select the check box, and specify the username and password for the proxy server.
-
-
Configure the local server that you want to receive the mirrored software. You can mirror the software either directly to your ZENworks Linux Management server, or to the file system of your ZENworks Linux Management server. However, mirroring the software to the file system does not add it to ZENworks.
-
Select the local server that you want to receive the mirrored software.
-
Specify the username and password to connect to the local server.
-
To validate the credentials for the servers, and to connect to the remote server, click .
-
-
To view the log information of the server configurations, go to /var/opt/novell/log/zenworks/zlmmirror.log file.
-
Continue with Configuring the Catalogs.
Configuring the Catalogs
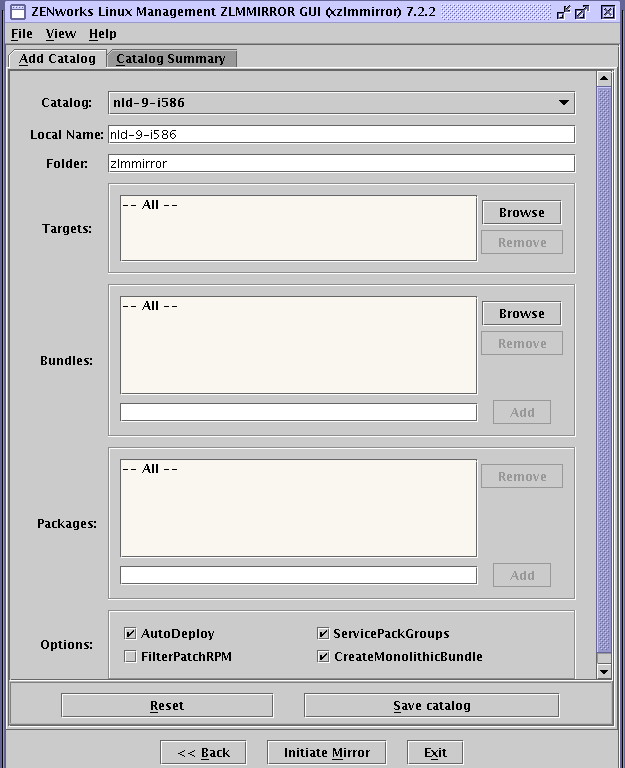
The xzlmmirror-Catalog Settings window is automatically displayed after the credentials are validated for the servers that you have specified in the xzlmmirror-Server Settings window. You must provide details about the catalogs and bundles you want mirrored to your server in the xzlmmirror-Catalog Settings window.
Review the following sections:
Adding Catalogs
The Add Catalogs page lets you configure each catalog you want to mirror.
-
In the drop-down list, select the catalog that you want to configure.
-
In the field, specify a name for the selected catalog.
The local name for the catalog should not be same as that reserved for the <catalogname>-patches folder. If the name is not specified, then the name of the catalog selected in the field is used.
-
In the field, specify the eDirectory folder in which the bundles and catalogs are created and updated.
If no folder is specified, then the catalogs and bundles are created and updated in the /zlmmirror folder.
-
In the list, click to browse for and select the targets you want to mirror. By default, all the targets in the selected catalog are mirrored.
To remove a target from the list, select the target, then click .
-
(Conditional) The field is displayed only if you have selected the NU type servers of SLES 10, SLED 10, and OES 2 in the xzlmmirror-Server Settings window. Select the categories you want to mirror. The available options are , , and . By default, all the categories are mirrored.
-
In the pane, specify the bundles you want to mirror by using one of the following ways:
-
Click to browse for and select the bundles you want to mirror. By default, all the bundles in the selected catalog are mirrored.
-
Specify the bundle name you want to mirror, and click to add it to the list.
Deselect the check box next to the bundle to exclude it from the list.
To remove a bundle from the list, select the bundle, then click .
-
-
(Conditional) If you are not using the YOU patches, specify the package you want to mirror in the pane by using one of the following ways:
-
Click to browse for and select the packages you want to mirror. By default, all the packages in the selected catalog are mirrored.
-
Specify the package name you want to mirror, and click to add it to the list.
To remove a package from the list, select the package, then click .
-
-
To restrict the deployment of a new bundle when mirroring packages to an existing bundle, deselect the check box.
This option is selected by default.
-
Configure the following additional options in the group if you are using YOU patches:
ServicePackGroups: Automatically creates bundle groups. This option is selected by default.
FilterPatchRPM: Allows the mirroring operation of the YOU patch bundles to filter all the packages of the .patch.rpm type. Select this check box to restrict the mirroring operation of the YOU patch bundles to filter all the packages of the .patch.rpm type. This option creates an equivalent RPM package bundle in the local server.
CreateMonolithicBundle: Creates monolithic package bundles consisting of only latest package RPMs. It creates a separate monolithic bundle for each Service Pack release, and a separate monolithic bundle with the updates after the latest Service Pack release. This option is selected by default.
-
(Optional) To set the default values for the catalog, click .
-
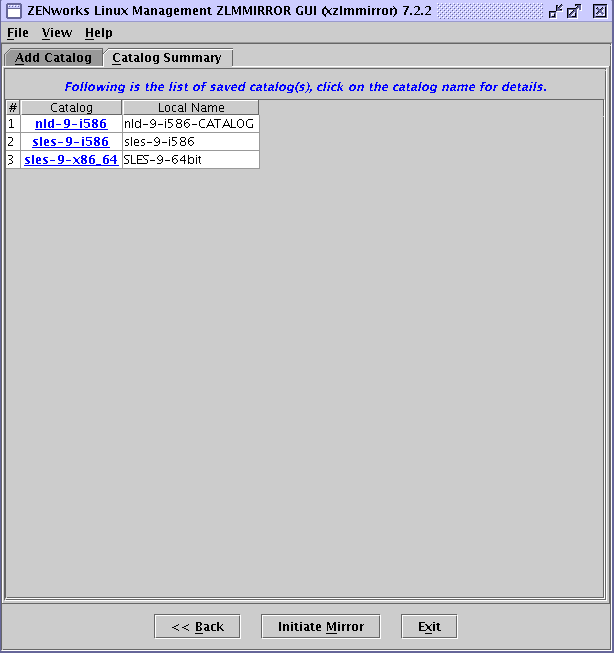
To save the catalog settings in the Catalog Summary page, click .
To save the catalog settings to a file, click > . You can only save those catalog settings that are listed in the Catalog Summary page to a file.
-
(Optional) To configure a different server, or to reset the server settings that you have already configured, click .
-
Continue with initiating the mirroring process. For more information, see Section 25.3.5, Testing and Performing the Mirroring Operation by Using the xzlmmirror Utility.
Editing Catalog Settings
-
Click.
The page displays the catalog names, the local names, and the category of the catalogs that you configured in the Add Catalogs page.
-
To view or edit the settings for a specific catalog, click the catalog.
The Catalog Details dialog box is displayed.
-
Click to edit the catalog information displayed in the window.
Editing the Configuration File
-
Launch the xzlmmirror utility by entering the following command at the command line:
xzlmmirror
-
Click > .
-
Browse for and select the configuration file you want to edit.
The xzlmmirror-Server Settings window is displayed, where you can edit the desired settings.
For more information, see Section 25.3.2, Creating a Configuration File by Using the xzlmmirror Utility.
25.3.3 Mirroring Patch Bundles for SLES 10 / SLED 10 / OES 2 from the NU and RCE Type Repositories
You can mirror patch bundles for SLES 10, SLED 10, and OES 2 from the NU and RCE type repositories such as nu.novell.com and update.novell.com.Review the following sections for more information:
Mirroring the Monolithic and Patch Bundles for SLES 10 / SLED 10 / OES 2
Mirroring updates for SLES 10, SLED 10, and OES 2 platforms from NUServer and RCEServer by using the zlmmirror m -c conf.xml command creates patch bundles and a monolithic bundle<catalogname>-bundle with all the packages in it.
Mirroring the Patch Bundles for SLES 10 / SLED 10 / OES 2
To mirror only the patch bundles for SLES 10, SLED 10, and OES 2 platforms from RCE type and NU type remote servers, use the -p option in the zlmmirror m -p -c mirror-conf.xml command.
Mirroring the Monolithic Bundles for SLES 10 / SLED 10 / OES 2
To mirror the monolithic bundles without creating the patch bundles, use the <Bundle> tag of the mirror configuration file.For example, use <Bundle>SLED10-Up dates-bundle</Bundle> to mirror the SLED10-Updates catalog.The slb option displays both monolithic and patch bundles. You can download the desired bundle by using the <Bundle> tag. To download the specific packages in the monolithic bundle, use the <Bundle> tag for the monolithic bundle and <Package> tags for the specific packages.For example, a sample <Catalog> section to mirror the Mozilla packages of the monolithic bundle is as follows:
<Catalog>
<Name>SLED10-Updates</Name>
<LocalName>SLED10-Updates</LocalName>
<Folder></Folder>
<Target>sled-10-i586</Target>
<ExcludeTarget></ExcludeTarget>
<Bundle>SLED10-Updates-bundle</Bundle>
<ExcludeBundle></ExcludeBundle>
<Package>Mozilla*</Package>
  <ExcludePackage></ExcludePackage>
</Catalog>
NOTE:The local name for the catalog should not be same as the name reserved for the folder <catalogname>-patches. In other words, the <localName> tag of the mirror configuration file should not use the same name as the <catalogname>-patches.
25.3.4 Testing and Performing the Mirroring Operation by Using zlmmirror
Before starting the mirroring operation, make sure that at least 10 GB of diskspace is available on the device.
After you have created the configuration file for a remote server, run the following command to perform a dry run of the mirroring operation, and optionally add the verbose flag to see detailed messages:
zlmmirror mirror -c filename.xml --dryrun --verbose
If this operation provides the intended results, run the mirror command without the dry run flag to complete the operation:
zlmmirror mirror -c zlmmirror-config.xml
If you mirror a bundle that contains multiple packages with multiple install type/freshen flags set, a unique version of the bundle is created for each install type/freshen combination.
For example, suppose you mirror a bundle that contains four packages assigned to one OS target. Of these four packages, one package has the install type flag set to false, the second package has the install flag set to true, the third package has the freshen flag set to false, and the fourth package has the freshen flag set to true. In this situation, four unique versions of the bundle are created.
The number of unique bundles created also depends on the number of OS targets. In the previous example, suppose the four packages, each with a different install type/freshen combination, have two OS targets. In this situation, a unique bundle is created for each install type/freshen combination and another unique bundle is created for each OS target. In this example, eight unique bundles are created.
The number of unique bundle versions created equals the number of unique install type/freshen combinations times the number of unique OS targets.
25.3.5 Testing and Performing the Mirroring Operation by Using the xzlmmirror Utility
Before you begin the mirroring process, you need to create the mirror configuration file. For more information, see Section 25.3.2, Creating a Configuration File by Using the xzlmmirror Utility.
To mirror the software:
-
Click in the Catalogs Settings window to initiate the mirroring process. The Mirror Options dialog box is displayed.
-
Select the options that you need:
Dry run: Prints the packages to be mirrored or added.
Packagesets: Mirrors only the patch bundles for RCE and NU servers. This excludes the package set bundles.
Force nevra: Overwrites an existing package with a new package with a conflicting NEVRA (name, epoch, version, release, and architecture).
Re-Download: Downloads the contents even if they are already mirrored.
Sync-local: Synchronizes the local server repository with the remote server repository.
Debug: Displays the debug output.
Verbose: Displays the verbose output.
-
Click . The Configuration Summary dialog box is displayed, where you can view the mirror options and all the mirror configuration settings.
-
Click to begin the mirroring process.