1.2 Configuring the Appliance
The initial setup and configuration of the PlateSpin Forge 2.5 hardware appliance is a one-time procedure. Record all pertinent information on the Configuration Worksheet in case you need to contact PlateSpin Technical Support with any setup issues.
IMPORTANT:Unsupported modifications to the PlateSpin Forge Appliance or Management VM, including running other virtual machines on the PlateSpin Forge Appliance, can impact its performance and might violate the End User License Agreement, voiding your warranty. For further information, you can review your License Agreement by logging in to Platespin’s download page, selecting the tab on the left, and downloading the PlateSpin Forge End-User License Agreement.
1.2.1 Initial Setup and Configuration
To fully configure the PlateSpin Forge 2.5 hardware appliance, you need to configure the Application Host (the hardware) and the Management VM (the software).
-
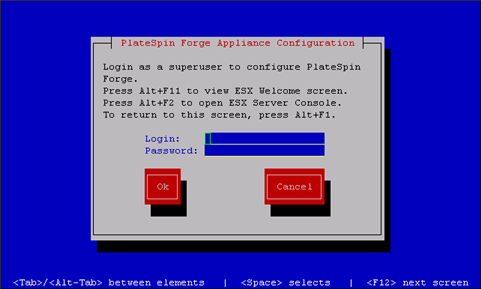
Ensure that the PlateSpin Forge Appliance Configuration dialog box is displayed.
-
Type root in the field and password in the field. Click .
The dialog box is displayed. You must change the default password before proceeding.
-
Type a new password in the field and again in the field. Click .
A notification that the password has been changed is displayed.
-
Click .
You are logged out so that you can log back in with your new password.
-
Log back in.
The VMware ESX EULA dialog box requesting acceptance of the end user license agreement is displayed.
-
Select , then select .
See the VMware Web Site for the latest end user license agreement.
The PlateSpin Forge EULA dialog box requesting acceptance of the PlateSpin Forge end user license agreement is displayed.
-
Select , then select .
The PlateSpin Forge Appliance Host Configuration dialog box is displayed.
-
Specify the address, , and IP Address you want to assign to the Appliance Host. Optionally, you can also enter a , but you will need to reboot the Forge appliance.
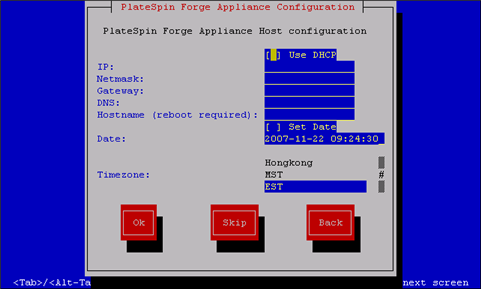
You can also use DHCP, but assigning a static IP address is recommended. It is also highly recommended to assign hostnames to the appliances in multiple-appliance environments to avoid hostname conflicts.
-
Select and specify a date and time.
-
Select a . Click .
The PlateSpin Forge Appliance Host Credentials dialog box is displayed. This is where you enter the credentials you want to use to access the ESX server, which is the hypervisor layer of the PlateSpin Forge appliance.
-
Specify a login name in the field.
-
Type a password, then confirm by retyping the password. Click .
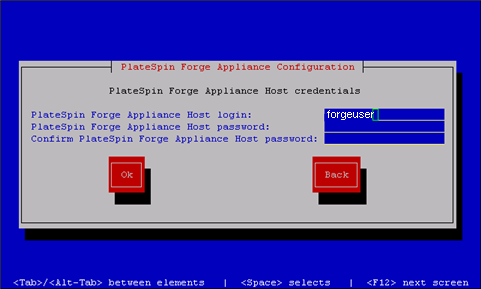
This creates a new ESX user that is a member of the root group. Unlike the root user, the new user has SSH permissions on ESX.
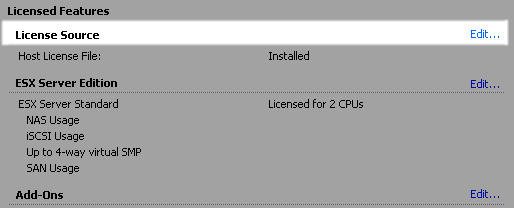
An ESX license warning is displayed:

The ESX license key cannot be added directly from the console of the appliance.
-
If you are configuring the Forge appliance locally (directly on the Forge appliance), go to another workstation.
You will be downloading and installing the VMware Infrastructure Client on the workstation. If you are not sure that the workstation meets the necessary requirements, you can visit VMware’s Web site to verify the required specifications.
-
Open a browser and enter the IP address you assigned to the Forge appliance in Step 8.
The VMWare ESX Server’s Welcome page is displayed.
-
Click the hyperlink, then follow the instructions to download and install the software.
-
Launch the VMware Infrastructure Client by clicking .
The VMware Infrastructure Client login is displayed.

-
Specify the VMWare ESX Server credentials and log in, ignoring any SSL certificate warnings.
The VMware Infrastructure Client interface is displayed.
-
Click the tab, and in the section, click .
-
In the row, click .
The window is displayed.
-
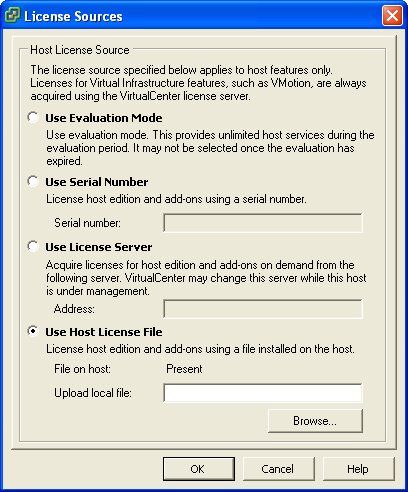
Select .
-
Click and select the License file you downloaded in Section 1.1.2, Obtain the ESX Licenses. Click .
-
In the row, click .

The dialog is displayed.
-
Select and click .
You can now return to the Forge appliance to continue the configuration.
-
Click .
The PlateSpin Forge Management VM network settings dialog box is displayed.

-
Deselect and provide the PlateSpin Forge Management VM address, , address, and (optionally) a . The IP address entered here is used to access the PlateSpin Forge Web Interface.
You can also use DHCP, but assigning a static IP address is recommended.
-
(Optional) Type the name of a DNS server in the field and provide a .
-
Click .
The PlateSpin Forge Appliance Configuration dialog box prompts whether or not to join a workgroup or domain.
-
Select to open the Join PlateSpin Forge Management VM to workgroup or domain dialog box:
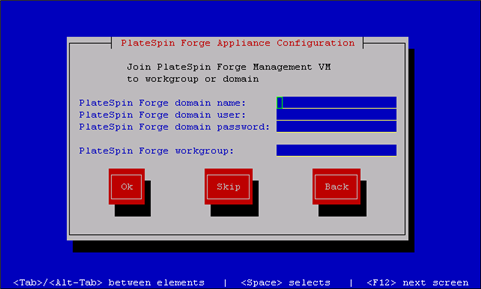
Joining a domain allows you to give selected domain users permissions for the application. See Section 1.5.1, Changing the Administrator Password and Adding Users for information about adding domain users.
-
Do one of the following:
-
Type a domain name, user, and password, or type a workgroup. If the domain fields are populated, the field is ignored. Select .
-
Leave the fields empty and click to proceed to the next step and use WORKGROUP as the default workgroup name.
A Configuration review dialog box is displayed with a summary of the parameters you have selected. Use the information to verify your settings.
If necessary, select to display an error message or to exit the PlateSpin Forge configuration. Select to edit previous settings.
-
-
Select .
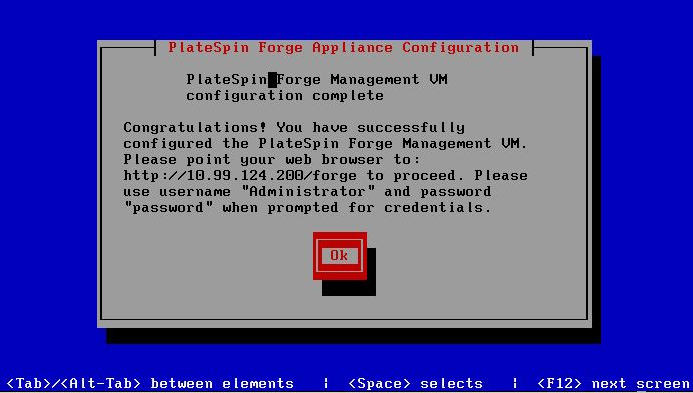
A configuration progress dialog box is displayed. Configuration can take several minutes. A final dialog box is displayed confirming the configuration’s success or failure. If the process is successful, the dialog box presents a URL you can use to access the PlateSpin Forge Web Interface. Record this URL for future use.
-
Select .