9.4 The Project View
The Designer Project view lists all of your projects so that you can quickly find, open, view, navigate, manage, close, or delete any project.
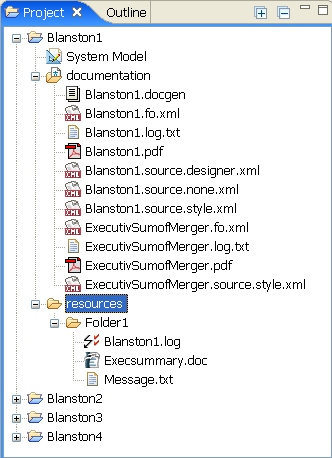
Figure 9-10 The Project view
9.4.1 Viewing and Editing Projects: The Project View
To open the Project view:
-
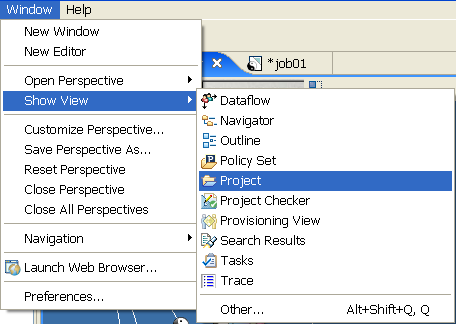
Click the tab in the upper left view of Designer.
-
If the view is not present, click > from the main menu, then click .
9.4.2 Tasks You Can Perform from the Project View
You can perform the following operations in the Project view.
Table 9-1 Project View Operations
|
Operation |
Description |
|---|---|
|
Creating |
You can create projects with an easy-to-use wizard. You can also import projects from the file system or an Identity Vault. Right-clicking a folder allows you to create a new folder or a new file within that folder. |
|
Importing |
You can import projects from the Identity Vault, from an iManager export file, or from the file system. |
|
Opening |
Double-clicking the icon opens the project into the Modeler view. If more than one editor is registered for the item you are opening, you can select which editor you want to open it with. Double-clicking the tab in the Modeler expands the Modeler to full screen and double-clicking the tab again brings the Modeler back to its default view size. All tabs work this way, including the tab. |
|
Deleting |
To delete a project (or multiple projects), right-click the project, then select . Or select a project, then press the key. |
|
Copying and Moving a Project |
To copy a project, right-click the project, then select . Give the project a name, select where to place the project contents, then click . To move a project, right-click the project, then select . In the Move Project window, select the location for the project, then click . |
|
Copy and Paste |
You can copy files from one project to another by using and . Dragging and dropping a file from one documentation folder to another works like a copy and paste menu selection. |
|
Drag and Drop |
You can drag and drop files from one project to another and from one documentation or resource folder to another. |
|
Viewing Properties |
You can view the properties of a project by right-clicking a project and selecting . For convenience, the Properties view is located just below the Project view and allows you to edit the properties. |
|
Saving |
When a project is first created, it doesn’t need to be explicitly saved because it’s already created in the file system. Whenever a project changes (through modifications made in an editor) and you are exiting that project, you see a dialog box, which allows you to save your work. To manually save after opening the project in an editor, do one of the following:
For information on the file format, see What is XMI?. |
Right-click any of the view tabs in the Project Group view to perform the following functions.
Figure 9-11 Options in the Project Functions
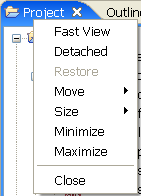
Table 9-2 Right-Click Operations
Icons to the right of the Project view tab change, depending on the tab you have open. With the Project tab selected, you see the following icons:
Figure 9-12 Project Tab Icons

Table 9-3 Project Tab Icons


9.4.3 What You See in the Project View
What you see when you click the Project tab depends on what is open. Below is an open Project tab showing most of the items you can see for a project.
Figure 9-13 Project View Icons
Table 9-4 Project View Icons
|
Icon Name |
Description |
|---|---|
|
|
The name of the created project. It is the name of the project stored in the selected workspace directory. Double-clicking the Project name expands and collapses the entries under the project. Right-clicking a project name allows you to do the following:
|
|
|
Double-clicking the entry puts the project into the Modeler view. You can create or import driver sets, drivers, channels, or policies into the Modeler to modify the project as needed. Then you can deploy the driver set, drivers, channels, or policies into an Identity Manager system. Right-clicking the System Model allows you to:
|
|
|
Shows all of the files that have been saved under the documentation folder. For example, under Blanston1 you see XML Source files (icon), PDF documents (icon), and the log file. In addition, Blanston2 contains a Document Generator style ( .docgen with the * icon) that can be used as a template for all documents generated, as well as PDF, RTF, and text files. Right-clicking the documentation folder allows you to:
Right-clicking an entry under Documentation allows you to open the file in a text or a system editor, where you can do the following:
|
|
|
The new resources folder under each project allows you to place any files that you want included with your Designer projects. For example, you can place DSTrace, HTML, XML, OpenOffice, etc. files in this folder and then double-click the file to use the default editors within Eclipse or on the file system to edit those files. You can drag and drop files from the desktop or from your favorite file browser. Right-clicking the resources folder allows you to:
|
|
.
|
Right-clicking the .docgen file entry allows you to:
|
|
Additional File Types
|
Because the resources folder can contain many different files, you can see different icons displayed, depending on the file extension. Right-clicking these any of these files allows you to:
|


