The NWCONFIG Utility
Before you configure NSS, if you have not already done so, check "3. Prepare the server." Then use the following options to go through the steps.
WARNING: If NSS uses free space from a NetWare volume to create an NSS volume, and an administrator deletes the NetWare volume, the NSS volume will be deleted also. All data will be lost. If your NSS volumes will be used long term, we suggest that you use unpartitioned free space to create your NSS volumes. This could be unpartitioned free space on a hard disk that also contains a NetWare partition or on a new hard disk that has not been partitioned.
When you open the NWCONFIG utility and select NSS Disk Options, the following screen appears.
Figure 4.
The NWCONFIG Utility
This section provides instructions for assigning and viewing free space using the NWCONFIG utility. See "Planning and Setup Examples" for examples of NSS storage groups and NSS volumes you can create. To create storage groups and NSS volumes, see "NSS Volume Options."
The Storage option locates and converts free space in an existing hard disk with unpartitioned free space or free space in a NetWare volume to an NSS partition. Some media types, such as CD-ROMs, do not require partitions. The NSS provider still recognizes that device and adds it to the object bank as a storage deposit.
IMPORTANT: These instructions assume you have read through the Understanding and Planning modules and that you know how you want to set up storage groups and NSS volumes.
To assign free space to NSS, do the following.
Enter nwconfig at the server console.
Select NSS Disk Options and press Enter.
Select Storage.
The following screen appears.
Figure 5.
Storage Options 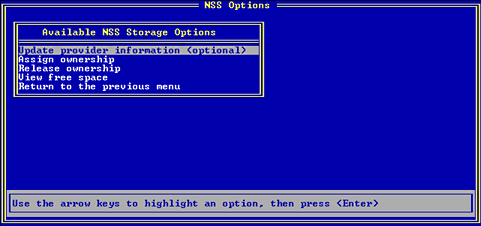
Select the following options in order.
Press Esc or Return to the previous menu at any time to return to the previous screen.
Press F1 for Help on a particular option or screen.
Follow the screen prompts to move through each of the following options in turn. For detailed information on each of these options, see the example in "Create One NSS Volume with One Hard Drive."
(Optional) View your free space.
See "View the NSS Configuration" for information.
Go to "NSS Volume Options" to create your storage groups and NSS volumes.
This section shows you how to create storage groups and NSS volumes using the NWCONFIG utility.
NOTE: In NSS Volume Options, NSS does not recognize CD-ROMs or removable media.
To create a volume in this procedure, NSS Volume Options uses the default NSS volume attributes, lists all managed objects, and allows you to create a storage group (if you want several NSS volumes) and/or an NSS volume (if you want one NSS volume or if you have already created a storage group for multiple NSS volumes).
If you want to create only one NSS volume, it is not mandatory that you create a storage group. If you want to create multiple volumes from a hard drive or expand your NSS volumes, you must create a storage group.
To save time and effort, we recommend that you plan your configuration. You can use NSS Volume Options any time you want to add more storage groups and NSS volumes or change your current configuration.
To create storage groups and NSS volumes, do the following.
Enter nwconfig at the server console.
Select NSS Disk Options.
The following screen appears.
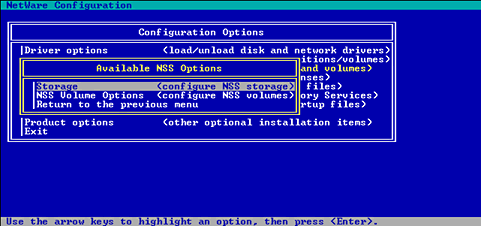
Figure 6.
Available NSS Options
At the Available NSS Options screen, select NSS Volume Options.
Authenticate to NDS by entering your full context and password.
The NSS Options screen displays.
Figure 7. NSS Options 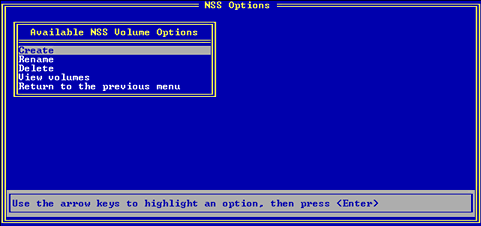
NSS Volume Options creates storage groups and NSS volumes from the list of managed objects. You can repeat this option for each storage group and NSS volume you want to create. If you create more than one NSS volume now, make sure each volume corresponds to the correct storage group you create. The default NSS volume name is NSSVOL. A maximum of 15 characters is allowed. We recommend you use the standard NetWare volume naming conventions.
Select Create.
Configure your storage group.
If you have more than one managed object, a list will appear. Otherwise, NSS will skip to Step 6c.
Create your NSS volume or volumes.
The Select a Managed Object screen displays.
Figure 8. Select a Managed Object 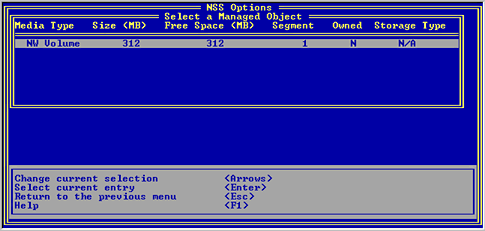
If you have not created a storage group and you are creating one NSS volume for each storage deposit, select the object marked Single. You can never increase the size of this NSS volume, however.
If you have created a storage group and you are creating multiple NSS volumes for each storage deposit, select the object marked Group, and enter the size of your first NSS volume.
The default NSS volume name is NSSVOL. A maximum of 15 characters is allowed. We recommend you use the standard NetWare volume naming conventions.
Your new NSS volume is added to NDS automatically.
Mount your NSS volume.
See "Mount an NSS Volume" for information.
(Optional). View your new NSS volume. See "View the NSS Configuration."