3.4 Modifying a Schema Map
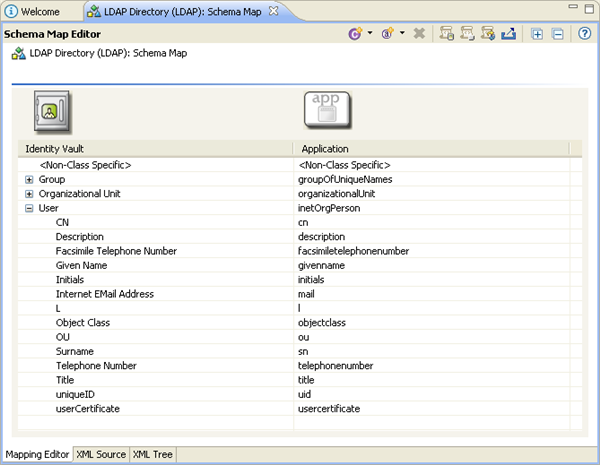
Analyzer creates a schema map object in each connection profile and flat file profile. The schema map associates an application’s schema attributes to the corresponding schema attributes in Analyzer’s base schema. This lets you ensure that your data analysis and cleaning operations properly associate similar values between the disparate systems.
Using a schema map allows you to create analysis profiles independent from a specific connection profile or flat file profile. You can create a single analysis profile and apply it to multiple connection or flat file profiles because the analysis profile leverages the schema map to provide the schema information it needs to perform its analysis.
Use the Schema Map Editor to create or modify schema map settings for a given connection profile or flat file profile. The Schema Map Editor lets you do the following:
-
Modify Analyzer’s base schema classes and attributes
-
Modify application schema classes and attributes
-
Add class mappings
-
Add attribute mappings
The Schema Map Editor includes several icons in a toolbar. For more information about these icons, see Section 1.4.3, Schema Map Editor. The Schema Map Editor provides access to the Schema Manager from Designer for Identity Manager. For detailed information about Designer’s Schema Manager, see Managing the Schema
in the Novell Designer 3.0 for Identity Manager 3.6 Administration Guide.
To modify a schema mapping:
-
In the Project View, double-click the icon to open the Schema Map editor.
Depending on the preconfigured settings for the selected application, the schema map might be prepopulated with basic mapping information.
-
In the Schema Map editor, specify a class mapping between the Identity Vault and the Application if none exists:
-
Click .
-
Under the Identity Vault, select the class you want to map from the drop-down list.
-
Under the Application, select the class you want to map from the drop-down list.
-
-
In the Schema Map editor, specify the appropriate attribute mappings between the Identity Vault and the Application.
-
Select the class mapping for which you want to specify attribute mappings.
-
Click .
-
Under the Identity Vault, select the attribute you want to map from the drop-down list.
-
Under the Application, select the attribute you want to map from the drop-down list.
-
Repeat steps 3a through 3d as needed to map the necessary attributes.
-
-
Click to save the changes.