10.5 Configuring Drivers
A driver provides the connection between an application and the Identity Vault. The driver is the connector that enables data synchronization and sharing between systems.
10.5.1 Driver General Settings
Figure 10-7 The Driver’s General Property Page

Table 10-7 The Driver’s General Settings
The driver property page is dynamic. Labels and descriptions are dynamically read from the driver configuration file for the Authentication ID an. connection information
10.5.2 Driver Global Configuration Values
Global configuration values (GCVs) are settings that are similar to driver parameters. Global configuration values can be specified for an individual driver as well as a driver set. If a driver does not have a GCV, the driver inherits the value for that GCV from the driver set.
GCVs allow you to specify settings for Identity Manager features such as password synchronization and driver heartbeat, as well as settings that are specific to the function of an individual driver configuration. Some GCVs are provided with the drivers, but you can also add your own. You can refer to these values in a policy to help you customize your driver configuration.
To edit the driver set's GCV settings, double-click the Driver object. From the Global Configuration Values page, you can add, edit, remove, or edit the XML for GCVs.
To view or change the driver’s GCV settings, double-click the driver. From the Global Configuration Values page, you can add, edit, or remove values, or edit the XML file for the driver.
10.5.3 Driver Log Level
The Driver Log Level options enable you to view high-level information. For lower-level information, use the Trace option. See Section 10.5.8, Driver Trace Levels.
Figure 10-8 Settings for the Driver Log Level
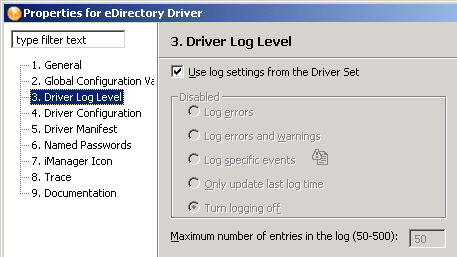
By default, logging inherits the setting from the driver set. To change the default:
-
Double-click the driver.
-
Select
-
Select a logging option.
The option that you select determines which information is available in the log.
To configure the audit instrumentation, select , click the event selector button, select events, then click .
-
Specify the number of entries in the log.
The default is 50 entries (lines) in the log. If you want a longer history, increase the number.
-
Save changes by clicking .
The driver log contains messages from the driver. The messages are related to operations that the driver performed or tried to perform. To view the log, use iManager. Select the log icon on the Driver object in the Identity Manager Overview.
10.5.4 Driver Configuration
Driver Module
Table 10-8 Driver Module Settings
|
Setting |
Description |
|---|---|
|
J |
Specify the name of the Java class that will be instantiated for the shim component of the driver. This class can be located in the classes directory as a class file, or in the lib directory as a . jar file. |
|
|
Specify the name of the . dll file that will be instantiated for the application shim component of the driver. |
|
|
Select this option if you want to connect the driver to the Metadirectory engine that uses the Remote Loader. |
|
|
Set a password for the Driver object. If you are using the Remote Loader, you must enter a password on this page or the remote driver cannot run. The Remote Loader uses this password to authenticate itself to the remote driver. |
|
|
Enables you to document your Remote Loader configuration for the driver. From the drop-down list, select a name that you specified on the driver’s documentation property page. To use this option, see Section 10.5.9, Engine Control Values |
Authentication
Table 10-9 Authentication Settings
|
Setting |
Description |
|---|---|
|
|
The server that the driver is associated with. |
|
|
Enter the application user ID. This ID is used to pass Identity Vault subscription information to the application. If you have enabled SSL/TLS for eDirectory drivers, this option is dimmed. |
|
|
Enter the address or name of the server that the application shim should communicate with. |
|
|
Enables you to set or change an application password (for example, Active Directory). |
|
|
Deletes the password to the application. |
|
|
Enables SSL/TLS and sets the direction of trust. This option displays for eDir-to-eDir drivers only. See Opening a Web Browser. |
|
|
Specifies the address or name of the machine where the Remote Loader runs. For example, enter hostname=192.168.0.1. If you don't enter this communication parameter, this value defaults to |
|
|
Specifies the port that the Remote Loader uses to accept connections from the remote interface shim. For example, enter port=8090. If you don't enter this communication parameter, this value defaults to 8090. |
|
|
Specifies the Key Name of the Key Material Object containing the keys and certificate used for SSL. For example, enter kmo=remote driver cert. If you don't enter this communication parameter, no value is stored for this parameter. SSL won’t be available. |
Driver Cache Limit
Figure 10-9 Options for the Driver Cache
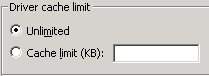
The driver cache is a file that holds Identity Vault events until a driver can process them.
This file can become very large in the following situations:
-
Events occur at a steady rate that is faster than Identity Manager can process them over a long period of time.
-
The driver is shut down for long period of time but is not disabled.
By default, the driver cache (file) size is limited only by available disk space. This is the recommended setting.
The only reason to set some other limit is to protect against accidentally filling up the disk. The number that you use depends on the difference between projected amount of available disk space without anything in the cache and the amount of free disk space that you want to ensure will always be left available, divided by the number of drivers on the server.
The primary reason that the cache file becomes very large is if the driver is left not running over a long period of time. In this case, the recommendation is to disable the driver rather than set a cache limit. After the limit is reached, all the cached events are discarded.
Startup Options
Table 10-10 Startup Settings
Driver Parameters
From this tab, you can enter common driver options, Subscriber and Publisher channel options, as well as edit XML. Because the options here differ between drivers, refer to the Identity Manager Drivers for configuration information.
10.5.5 Driver Manifest
The driver manifest is like a resume for the driver. The driver manifest states what the driver supports, and includes a few configuration settings. The driver developer should provide the driver manifest. Usually a network administrator does not need to edit the driver manifest.
For more information, see the developer documentation for Identity Manager drivers.
10.5.6 Driver Named Passwords
You can store multiple passwords securely for each of your drivers. This functionality is referred to as Named Passwords because each different password is accessed by a key, or name.
Named Passwords are useful because you can refer to the password by name in a driver policy. When the driver needs to use the password, it requests the password from the Metadirectory engine. This method lets you avoid revealing the actual password in the code for a driver policy.
The following example shows how a Named Password can be referenced in a driver policy on the Subscriber channel in XSLT: <xsl:value-of select=”query:getNamedPassword($srcQueryProcessor,’mynamedpassword’)” xmlns:query=”http://www.novell.com/java/com.novell.nds.dirxml.driver.XdsQueryProcessor/>
You can store and retrieve Named Passwords for any driver without making changes to the driver shim.
As a security measure, in addition to using Named Passwords, you should control access to all Identity Manager objects in eDirectory.
NOTE:A driver developer can also customize a driver to use Named Passwords in other ways, such as retrieving Named Passwords when the driver starts up, instead of requesting them from the Metadirectory engine each time they are needed.
For example, the Identity Manager Driver for Lotus Notes* driver has been customized to support additional ways of using Named Passwords, and examples of those methods are included in the sample driver configurations. For more information, see the Identity Manager driver guides.
10.5.7 Editing or Creating a Driver iManager Icon
You can see and edit the iManager icons that each driver uses. This is important because iManager renders driver icons in a particular way. However, those icons don't appear anywhere in Designer. Conversely, Designer's application icons don't appear anywhere in iManager's user interface.
To help bridge that gap, you can view the iManager icon to be used in Designer:
Figure 10-10 The Option to View the iManager Icon

-
Right-click a driver (for example, eDirectory) in the Modeler, then select .
-
Select .
Designer displays an icon. It is associated with the driver in Designer, unless a different one was imported and stored on the driver.
-
To change the icon, click or , browse to and select an image file, then click twice.
The next time that the driver deploys, Designer sets the icon in eDirectory, and iManager uses it.
Also see Section 23.0, Editing Icons for Drivers and Applications.
10.5.8 Driver Trace Levels
Through the Modeler, you can add a trace level to your driver. With the trace level set, DSTRACE displays the Identity Manager events as the engine processes the events. The trace level only affects the driver it is set on. Use the trace level for troubleshooting issues with the driver when it is deployed. DSTRACE displays the output of the specified trace level.
The following tables describes each trace field:
Table 10-11 Driver Trace Settings
NetWare
Use dstrace.nlm to display trace messages on the system console or trace messages to a file ( sys:\system\dstrace.log). Dstrace.nlm displays the trace messages to a screen labeled DSTrace Console.
Use the following commands at the server console:
DSTRACE SCREEN ON: Allows trace messages to appear on the DSTRACE Console.
DSTRACE FILE ON: Captures trace messages sent to the DSTRACE Console to the dstrace.log file.
DSTRACE FILE OFF: Stops capture trace messages to the log file.
DSTRACE -ALL: Turns off all Trace flags.
DSTRACE +DXML DSTRACE +DVRS: Displays the Identity Manager (DirXML) events.
DSTRACE +TAGS DSTRACE +TIME: Displays the message tags and times tamps.
Windows
Open the Control Panel, select , then click > . A window named NDS Server Trace Utility opens.
To set the filters to capture the DirXML trace information:
-
Click > > .
-
Click the boxes next to and , then click .
To save the information to a file:
-
Click > .
A dialog box prompts for a filename.
-
Enter a filename with the extension of . log.
-
To stop capturing information, click > .
The file is saved.
UNIX
Use the ndstrace command at the console to display the Identity Manager events. The exit command quits the trace utility.
Table 10-12 ndstrace Commands
iMonitor
Use iMonitor to get DSTRACE information from a Web browser.
Table 10-13 Platforms and Commands for Web Browsers
|
Platform |
Command |
|---|---|
|
NetWare® |
ndsimon.nlm |
|
Windows |
ndsimon.dlm |
|
Linux/Solaris/AIX/HP-UX |
ndsimonitor |
-
Access iMonitor from http://server_ip:8008/nds (the default port).
-
Click .
-
Click .
-
Click and .
-
Click , then click .
-
Click the document icon to view the live trace.
10.5.9 Engine Control Values
Engine Control Values can change default behaviors on the Metadirectoy engine. These values can be access only if a server is associated with a driver set.