16.3 Importing a Driver Configuration File
You can import an Identity Manager driver configuration file into the selected driver set for a project by using the Import from File option, which imports an XML configuration file that can be a driver set, an individual driver, driver channels, or policies. If you import a driver configuration file that contains only a policy, Designer creates the framework for parent containment objects, such as a channel, a driver, or a driver set. Such parent containment objects do not contain attributes; they are only the framework of the channel, driver, or driver set from where the policy came.
These configuration files are in XML format, which you can save to a local, removable, or network directory through the Export to Configuration File option. After you select the driver configuration file to import, you are prompted to provide driver-specific information for setting up the driver and building policies. The exported . xml files are compatible with those used by the iManager driver configuration file plug-ins for Identity Manager 2.0.2 and above. This allows you to export configuration files from Designer and import those files through iManager or through Designer’s Import feature.
You can also use the Import from File option as a backup method. For example, if you are working on a group of policies in an Active Directory* driver, you can use the Export to Configuration File to back up your work, adding dates to the exported files so you can select a particular driver configuration that you want to use as the basis for your Active Directory driver. If something goes wrong, you can re-import the base driver. You can also use this export/import feature to export and import just the policies you are working on.
You can import a configuration from a file in three ways:
16.3.1 Importing an Identity Manager Project from the File System
The option allows you to import an Identity Manager project that has been saved to the file system through the > option. The project must have a valid . project file and accompanying file structure for the project to completely import. This topic is covered under Section 16.1.2, Importing a Project from the File System.
16.3.2 Importing a Driver Configuration from a File in the Modeler View
A driver configuration file can contain one or more driver configurations. You can import a previously exported configuration file or one of the sample . xml driver configurations that are included with Designer.
To import a configuration file containing one or more Identity Manager driver configurations into a driver set:
-
Select an Identity Vault in the Modeler view.
-
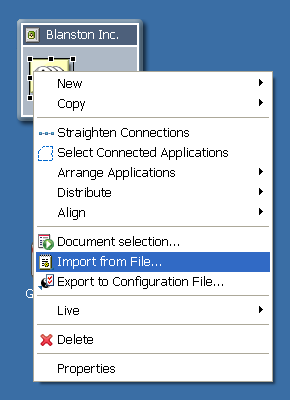
Right-click a DriverSet object within the Identity Vault, then click .
-
In the Import a Driver Configuration File window, type the name of the configuration file, or browse to and select the . xml file.
If you use the Browse feature, by default Designer takes you to the C:\Program Files\Novell\Designer\eclipse\plugins\com.novell.designer.idm_2.0.0.x\defs\driver_configs directory where the Identity Manager driver templates that come with Designer are stored on Windows workstations. On Linux workstations, the default drivers are stored in the C:\home\username\designer\eclipse\plugins\com.novell.designer.idm_2.0.0.x\defs\driver_configs directory (The “x” after the idm_2.0.0 number refers to Designer build numbers). You can use one of these driver files or you can browse to a directory containing an exported configuration file.
-
Complete the import by filling out the Import Information Requested forms for the driver configuration file.
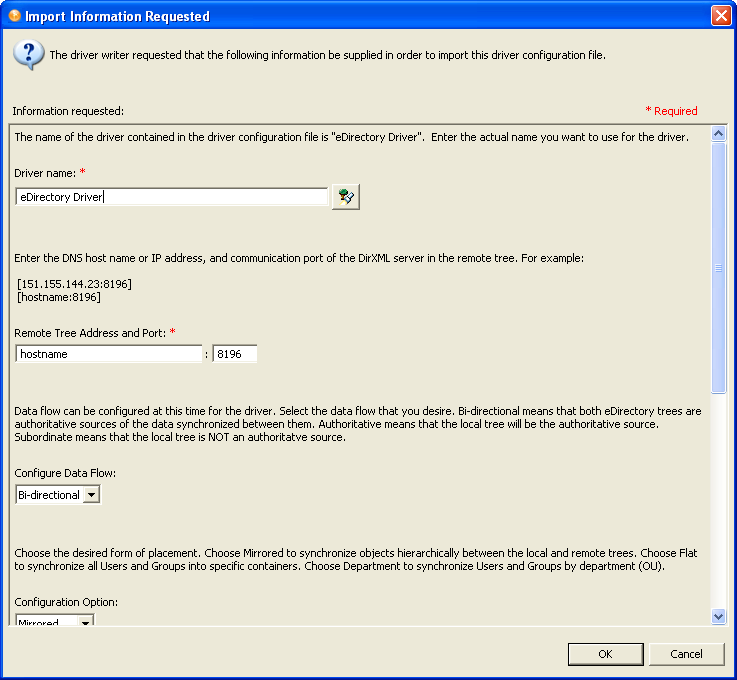
The form varies, depending on the driver configuration file selected. Saved files might only prompt for a driver name. You might have imported a single driver or a collection of drivers (a driver set). If you are importing a driver set, fill out an Import Information Requested template for each imported driver.
If you fail to provide the information requested in the Import Wizard page, your driver configuration is incomplete, and the exported driver is also incomplete. Do not use the Configuration Wizard on the driver configuration file that you exported. The wizard brings up the Import Information Requested forms, but these forms are pulled from the default driver file and overwrite the driver file you exported.
-
Click , then click in the Import Configuration Results window.
16.3.3 Importing from a File through the Outline View
You can use the Outline View to import driver sets, drivers, channels, and policy configuration files from the file system. The following example demonstrates how to import a driver, but the procedure also works for the other files.
-
Double-click the icon under a project name in the Project view. This brings up the project model in the Modeler view.
-
Click the tab.
-
Right-click the Driver Set object and select .

-
In the Import a Driver Configuration File window, type the name of the configuration file, or browse to and select the . xml file.
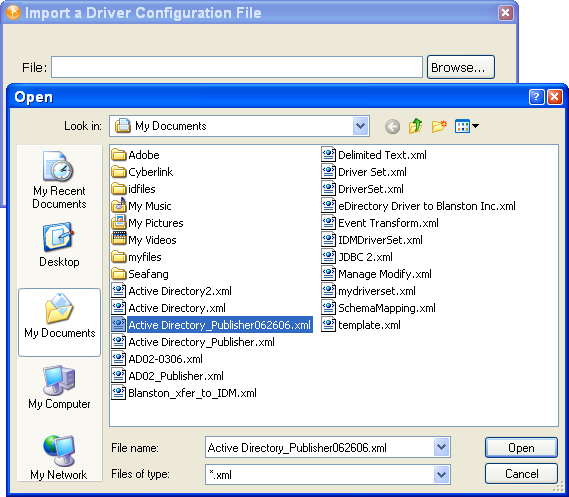
Then a driver is exported, Designer uses the name of the driver set or driver object, to which you can add dates. In this example, it is an Active Directory driver that was exported June 26th and is now being imported.
-
Click , then click to import the configuration file.
To import a policy into a driver set:
-
In the Outline view, click the icon, then click .
-
In the Import a Driver Configuration File window, type the name of the configuration file, or browse to and select the . xml file.

-
Click , then click to import the selected policy.
Each policy is saved to its own . xml file. By default, Designer uses the name of the policy or rule selected.
-
In the Perform Prompt Validation window, you are asked if you want to fill in required driver information. If you answer , you see the Import Information Requested dialog box as described in Step 5 and you must provide values to all of the required fields. If you answer , you still see the Import Information Requested dialog box, but it isn’t necessary to fill in the required information.
-
Complete the import by filling out the Import Information forms for the driver configuration file as necessary. Policies are saved with a skeleton driver configuration structure, which designates where the policy resides. In this case, the driver already existed and the imported policy was initially written for that driver.
-
Click .
-
When the policy or rule is imported, you see the Import Configuration Results window, which indicates if there were any problems with the import procedure.

Errors during the import procedure are displayed with a red icon, and you see an Error description that is related to the operation results. If you have multiple errors, selecting an error displays the error’s description in the field. See Error Messages and Solutions for further information.
-
Click to finish the import process and close the Import Configuration Results window.