Upgrading Existing Driver Configurations to Support Identity Manager Password Synchronization
This section explains the process for adding support for Identity Manager Password Synchronization to existing driver configurations, instead of replacing your existing driver configurations with the Identity Manager sample configurations.
IMPORTANT: If you are upgrading a DirXML Driver for AD or NT Domain, and it is being used with Password Synchronization 1.0, you should follow the upgrade instructions in the driver implementation guides for the DirXML Drivers for Active Directory and NT Domain, at DirXML Drivers.
NOTE: The policies added in this procedure are for supporting Password Synchronization using Universal Password and Distribution Password. If you are using the eDirectory driver to synchronize only the NDS Password, you should not use these policies in the eDirectory driver configuration. NDS Password is synchronized using Public Key and Private Key attributes instead of these policies, as described in Scenario 1: eDirectory to eDirectory Password Synchronization Using NDS Password.
The following is an overview of the tasks you must complete, using the procedure in this section:
- Convert the driver to Identity Manager 2 format.
- Add driver manifest, global configuration values, and password synchronization policies to the driver configuration. For a list of the policies you add, see Policies Required in the Driver Configuration.
- Change the Filter settings for the nspmDistributionPassword attribute.
- Set up password synchronization flow.
Prerequisites
- Create a backup of your existing driver using the Export Drivers Wizard.
- Make sure you have installed the new driver shim. Some password synchronization features such as Check Password Status won't work without the new Identity Manager driver shim.
IMPORTANT: If you are upgrading a DirXML Driver for AD or NT Domain, and it is being used with Password Synchronization 1.0, don't install the driver shim until you have reviewed the upgrade instructions. Follow the upgrade instructions in the driver implementation guides for the DirXML Drivers for Active Directory and NT Domain, at DirXML Drivers.
Procedure
-
Make sure your environment is ready to use Universal Password. See Preparing to Use Identity Manager Password Synchronization and Universal Password.
-
Convert the driver to Identity Manager format using a wizard. See Upgrading a Driver Configuration from DirXML 1.x to Identity Manager Format.
-
In iManager, click DirXML Utitities > Import Drivers.
You add support for Identity Manager Password Synchronization to each driver you want to participate in password synchronization, by importing an "overlay" configuration file to add the policies, driver manifest, and the GCVs, all at once.
After adding them, you must also add the nspmDistributionPassword attribute to the Filter.
These tasks are described in subsequent steps.
-
Select the driver set where your existing driver resides.
-
In the list of driver configurations that appears, select only the item labeled Password Synchronization 2.0 Policies. It is listed under Additional Policies. Click Next.
A list of import prompts appears.
-
Select your existing driver to update.
-
Select the driver type from the drop-down list.
Based on the type of driver, the Import Driver Wizard makes entries in the driver manifest that indicate the capabilities of the driver configuration and the connected system:
- Whether the connected system can provide passwords to Identity Manager. This refers to the users's actual password on the connected system, not to a password that can be created using a style sheet. Only AD, eDirectory, and NIS can do this.
- Whether the connected system can accept passwords from Identity Manager
- Whether the connected system can check a password to see if it matches the password in Identity Manager.
Correct entries in the driver manifest are required for Password Synchronization policies to work. The driver manifest indicates the combined ability of the connected system, the Identity Manager DirXML driver shim, and the driver configuration policies, and usually should not be edited by the network administrator.
-
Click Next. Choose to update everything about the driver.
This option gives you the driver manifest, global configuration values (GCVs), and policies necessary for password synchronization.
The driver manifest and GCVs overwrite any values that already exist, but these kinds of driver parameters are new in Identity Manager 2, so for a DirXML 1.x driver there should be no existing values to be overwritten.
The password synchronization policies don't overwrite any existing policy objects. They are simply added to the Driver object.
NOTE: If you do have driver manifest or GCV values that you want to save, choose the option named Update Only Selected Policies in That Driver, and select the check boxes for all the policies. This option imports the password policies but does not change the driver manifest or GCVs. You need to manually paste in any additional values.
-
Click Next, then click Finish to complete the wizard.
At this point, the new policies have been created as policy objects under the driver object, but are not yet part of the driver configuration. To link them in, you must manually insert each of them at the right point in the driver configuration on the Subscriber and Publisher channels.
-
Insert each of the new policies into the correct place on your existing driver configuration. If there are multiple policies in a policy set, make sure these password synchronization policies are listed last.
The list of the policies and where to insert them is in Policies Required in the Driver Configuration.
Repeat the following steps for each policy.
-
Click DirXML Management > Overview. Select the driver set for the driver you are updating.
-
Click the driver you just updated. A page opens showing a graphical representation of the driver configuration.
-
Click the icon for the place where you need to add one of the new policies.
-
Click Insert to add the new policy. In the Insert page that appears, click Use an Existing Policy and browse for the new policy object. Click OK.
-
If you have more than one policy in the list for any of the new policies, use the arrow buttons

 to move the new policies to the correct location in the list. Make sure the policies are in the order listed in Policies Required in the Driver Configuration.
-
-
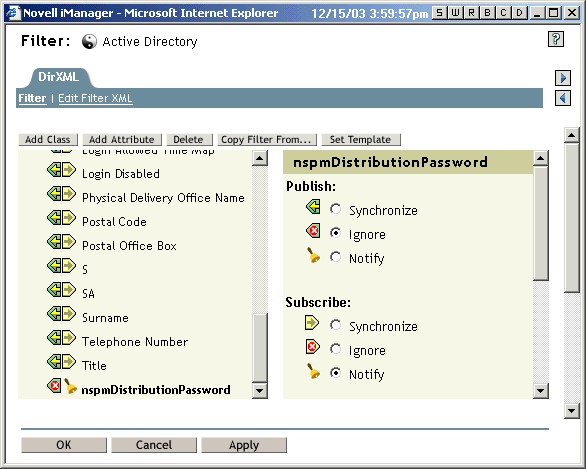
For the object classes that you want to synchronize passwords for (such as User), make sure that nspmDistributionPassword attribute is in the filter and has the following settings:
- For the Publisher channel, set the Filter to Ignore for the nspmDistributionPassword attribute.
- For the Subscriber channel, set the Filter to Notify for the nspmDistribution Password attribute.
-
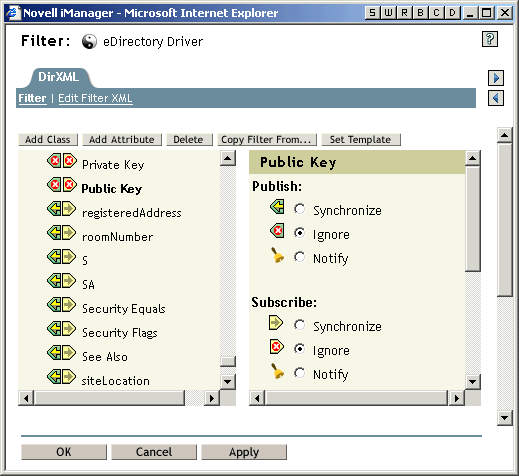
Ignore both the Public Key and Private Key attributes in the driver Filter for all objects that have Notify set for the nspmDistributionPassword attribute.
-
Repeat Step 2 through Step 12 for all the drivers that you want to upgrade to participate in password synchronization.
At this point, the driver has the new driver shim, Identity Manager format, and the other elements that are necessary in the driver configuration to support password synchronization: driver manifest, GCVs, password synchronization policies, and filter settings.
-
Check the individual driver implementation guides to see if there are any additional steps or information for setting up Identity Manager Password Synchronization, at DirXML Drivers.
-
Turn on Universal Password for users by creating Password Policies with Universal Password enabled.
See Creating Password Policies. If you previously used Universal Password with NetWare 6.5, note that there are some extra steps described in (NetWare 6.5 only) Re-Creating Universal Password Assignments.
We recommend that you assign Password Policies as high up in the tree as possible.
In the Password Policy, Universal Password > Configuration Options, there are options for how you want NMAS to keep the different kinds of passwords synchronized. The default settings should work for most implementations. See the online help for that page for more information.
For examples of scenarios for using Password Synchronization, and how Password Policies fit in, see Implementing Password Synchronization.
Password Policies are assigned with a tree-centric perspective. By contrast, Password Synchronization is set up per driver, and drivers are installed on a per-server basis and can manage only those users who are in a master or read/write replica. To get the results you expect from Password Synchronization, make sure the containers that are in a master or read/write replica on the server running the drivers for Password Synchronization match the containers where you have assigned Password Policies with Universal Password enabled. Assigning a Password Policy to a partition root container ensures that all users in that container and subcontainers are assigned the Password Policy.
-
Make sure your password flow is set the way you want it for each connected system.
-
In iManager, click Password Management > Password Synchronization, and search for the drivers for connected systems you want to manage.
-
View the current settings for password flow. This is a graphical interface for the global configuration values (GCVs). Edit them by clicking the name of a driver.
You can edit settings for
- Whether Identity Manager accepts passwords from this system
- Which password you want Identity Manager to update: Universal Password directly, or Distribution Password directly. Identity Manager controls the entry point, meaning which password Identity Manager updates. NMAS controls the flow of passwords between each different kind of password, based on what you have set in the Password Policy in Universal Password > Configuration Options.
- Whether the Password Policy for the user is enforced on password changes coming in to Identity Manager
- Whether the Password Policy for the user is enforced on the connected system by resetting passwords that don't comply
- Whether passwords are accepted by this connected system
- Whether e-mail notifications are sent when password synchronization fails
For more information and screen captures for these options, Implementing Password Synchronization. See also the online help.
-
-
Test password synchronization:
- Confirm that the Identity Manager password is distributed to the systems you specified
- Confirm that the connected systems you specified are publishing passwords to Identity Manager.
For troubleshooting tips, see Implementing Password Synchronization.