7.4 Settings Exclusive to Evolution Exchange
There are some settings in Evolution that are available only with Evolution Exchange, like delegation and permission handling, creating “Out of Office” messages, changing password and viewing folder size.
7.4.1 Send Options
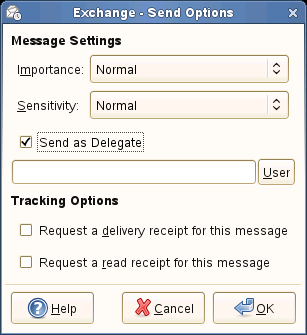
You can set the priority and sensitivity of the sent message from an exchange account so that the recipients will know how important the message is.The priority can have one of the three options - High, Normal or Low and sensitivity can have one of the four options-Normal, Personal, Private and Confidential respectively. You can also enable delivery receipt request and read receipt request for the messages sent.
Tracking Options
Evolution lets you track the status of an item you have sent. You can enable the Delivery Receipt request as well as Read Receipt request so that you will know when the item reached the recipients or read by them.
To set the importance and sensitivity of the message:
-
Open a Compose Message window.
-
Select the exchange account from the From field.
-
Click Insert > Send Options to open the Send Option dialog box
-
Select the priority for your sent message from the given three options (Normal, High, Low)
-
Select the sensitivity for your sent message from the given four options (Normal, Personal, Private, Confidential).
-
Message Access Delegation: Click Send as Delegate to send the message to the recipient on behalf of someone else.
IMPORTANT:To send a calendar item as delegate, you should subscribe to the delegator's message and also you should have necessary rights assigned to you by the delegator.
-
Click User to open Show Contacts dialogue box.
-
Select the contact from the desired Address book and click Add, then close the dialogue box.
WARNING:You are not permitted to send a message on behalf of more than one person at a time.
When the recipient opens the mail, he or she can also read a message that ‘The message was sent by <Delegator's name> on behalf of <Delegate's name> on the preview pane header bar.
-
-
Select the Request a delivery receipt for this message check box to get a delivery receipt from your recipient.
-
Select the Request a read receipt for this message to get a read receipt for the message you have sent.
-
Click OK to confirm your selection.
Delegating Calendar Items
You can send Meetings or Appointments on behalf of someone else if you have subscribed to his or her Calendar.
To delegate a Meeting,
-
Select the delegator's calendar.
-
Open a new Meeting composer window.
-
Add the recipients.
-
Click Send after filling in all other informations required.
When the recipient receives the calendar item, he or she can read the message on top that the <Delegator> through <Delegate> requests your presence at the following meeting.
When a delegate receives the calendar item from another delegate, he or she can read that the <Delegator> through <Delegate> request the presence at the following meeting. Please respond of behalf of his or her <Delegator>.
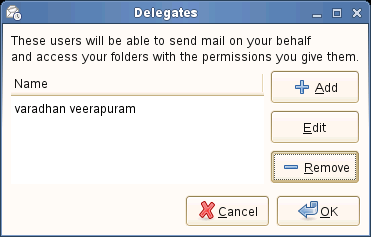
7.4.2 Access Delegation
You can allow other people in your organization's Global Address List to access your calendar, address book, and messages, and they can let you manage theirs. Delegation allows people to do anything from check on each other's schedules to completely manage their personal information.
Delegating Access to Others
To add someone to your list of delegates:
-
Click Edit > Preferences or press Shift+Ctrl+S, then click the Exchange Settings tab.
-
Click Delegation Assistant to open the Delegates dialogue box.
-
Click Add, then search for a contact in the Global Address List.
Remember that the Global Address List (GAL) appears empty until you have searched for something in it.
-
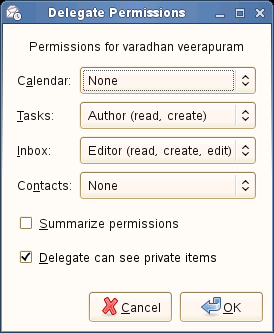
Select the delegate and click Edit to open the delegate permission dialogue box.
-
Select from the following access levels for each of the four types of folders:
None: Do not allow this person to access any folders of this type.
Reviewer (read-only): Allows the delegate to see items in this type of folder, but not create new items or edit existing items.
Author (read, create): The delegate can view items in your folders, and can create new items, but cannot change any existing items.
Editor (read, create, edit): The delegate can view, create, and change items in your folders.
-
Click OK.
The delegate will be notified through a separate mail that he/she is being added to your list of delegates. The mail summarizes all the rights that has been assigned to him or her.
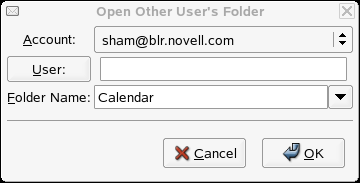
Subscribe to Other Users' Folders
To access the folders delegated to you:
-
Click File > Subscribe to Other User's Folder.
-
Specify the e-mail address of the user who has delegated to you, or click User to select the user from your address book.
-
Select the folder you want to open.
-
Click OK.
Folders delegated to you appear in your folder list inside a folder labeled with the name of its owner. For example, if Martha Thompson delegates folders to you, you see a folder called Martha Thompson's Folders in the folder tree at the same level as your Personal Folders and Public Folders.
If the folder fails to open properly, check with the folder owner to make sure that you have been granted the correct access permissions.
7.4.3 Subscribe to Public Folders
You can subscribe to public folders available on the Exchange server.
-
Click Folder > Subscriptions.
-
Select the Exchange account.
-
Check the folders you want to subscribe to.
-
Click OK.
The folders you have subscribed to appear in the folder list at the left.
-
To view contents of a folder, click it.
7.4.4 Reminders
Reminders for meetings in your Exchange calendar do not work until you have run Evolution at least once after logging in. This is different from locally stored reminders, which work from the moment you log in, regardless of whether you have run Evolution in the session so that you can fix a convenient time for a meeting.To enable Reminder setting in your Exchange account, select ‘Remember the password'checkbox. To find more information about Reminders seeReminders
7.4.5 Setting an Out of Office Message
An Out of Office message is an automatic reply that you can send as a reply to messages, explaining why you aren't immediately responding to their messages. For example, if you go on vacation for a week and won't access your e-mail, you can set an automatic reply so that people know that you aren't ignoring them.
-
Click Edit > Preferences > Mail Accounts.
-
Select the Exchange account, then click Edit.
-
Select the Exchange Settings tab. The top option allows you to set an Out of Office message.
-
Click I Am Currently Out of the Office.
-
Type a short message in the text field.
-
Click OK.
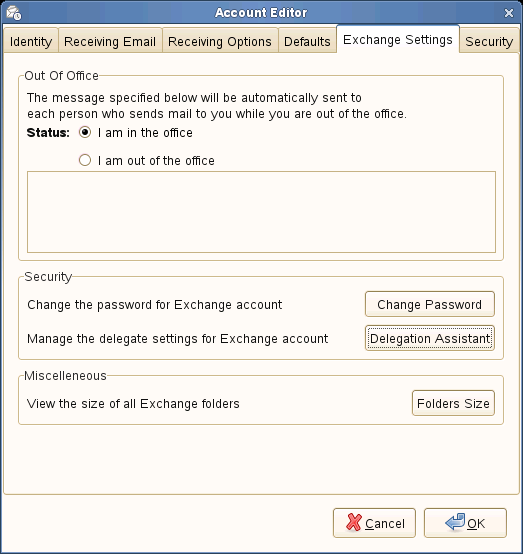
Your message is automatically sent to anyone who sends you mail until you return and select I Am in the office.