5.3 Organizing your Contacts
Evolution allows you to organize your contact list. You can create several individual address books, or contact groups. Within a given address book, you can have several categories of contacts.
5.3.1 Contacts Groups
Contacts Groups are nothing but Address Books.The simplest way to organize contacts is to create additional address books. You can create a new one by clicking File > New > Address Book. For contacts groups on your computer, you only need to provide a name. For contacts on the network, you need to provide more information about the contacts server you are trying to access.
To move a card from one group to another, just drag it from the main display of contacts. You cannot change the contents of most network contact groups.
NOTE:Contacts groups are not the same as contact lists. A contact group is like a folder or address book full of contacts. A contact list is a single contact that contains other contacts, and is most often used to e-mail several people at once.
5.3.2 Importing Contacts
You can import contacts from other contact management tools with the Import tool.
-
Click File > Import.
or
Mail yourself a contact as vCard attachment.
Currently VCF and LDIF are supported. CSV and TAB format files are supported from Microsoft Outlook, Thunderbird, Mozilla, and Evolution.
5.3.3 Creating a List of Contacts
A contact list is a set of contacts with a single nickname that you create. When you send e-mail to the nickname, it is sent to every member of the list. This differs from a network mailing list in that it exists only on your computer as a convenience to you, rather than as an actual e-mail address managed by a mailing list application on a server.
For example, you could create one card for each family member, then add those cards to a contact list called “Family.” Then, instead of entering each person's e-mail address individually, you can send e-mail to “Family” and the message would go to all of them.
To create a list of contacts:
-
Open the list creation dialog box by clicking the New List button.
or
Click File > New > Contact List.
-
Specify a name for the list.
-
Specify the names or e-mail addresses of contacts.
or
Drag contacts from the main window into the list.
-
Choose whether you want to hide the e-mail addresses when you send a message to the list.
Unless it is a very small list, it is recommended that you leave the addresses hidden. This is the same thing as using the “Bcc:” feature discussed in Section 3.2.7, Specifying Additional Recipients for E-Mail.
-
When you are finished, click OK.
The list appears as a contact card, which you can use as you would any other card, including mailing the list to another person and sending e-mail to the list.
To mail the list, open a new e-mail and type the name you chose for the list. Evolution addresses the message to the entire list when you send the message. You can also right-click the list's address card in the contacts tool and select Send Message to List.
Evolution cannot store contact lists on Microsoft Exchange servers.
5.3.4 Grouping with Categories
Another way to group cards is to mark them as belonging to different categories. You can mark a card as being in several categories or no category at all. For example, you put a friend's card in the “Business” category because he works with you, the “Friends” category because he's a friend, and the “Frequent” category because you call him often.
To mark a card as belonging to a category,
-
Double click the card to appear the Contact Editor window
-
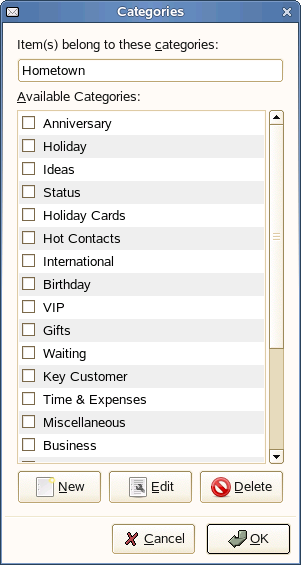
Click the Categories button at the left.
You can view the Categories dialogue box as given below.
-
Select the category from the list. You can select as many or as few categories as you like.
If the master list of categories doesn't suit you, you can add your own categories. To add new category,
-
Enter the new category in the entry box at the top
-
Click OK.
You can view the category name appeared in the field next to Categories button in the Contact Editor
-
Press OK at the right bottom of the Contact Editor window.
-
To set the category properties:
-
Select the category, and click Edit to open the Category Properties dialog box.
-
Click Category Color to choose a color for the category.
-
Click Category Icon and select an icon and click Open.
-