3.2 Composing New E-Mail Messages
You can start writing a new e-mail message by clicking File > New > Mail Message, by pressing Ctrl+N when in the mailing tool, or by clicking New in the toolbar.
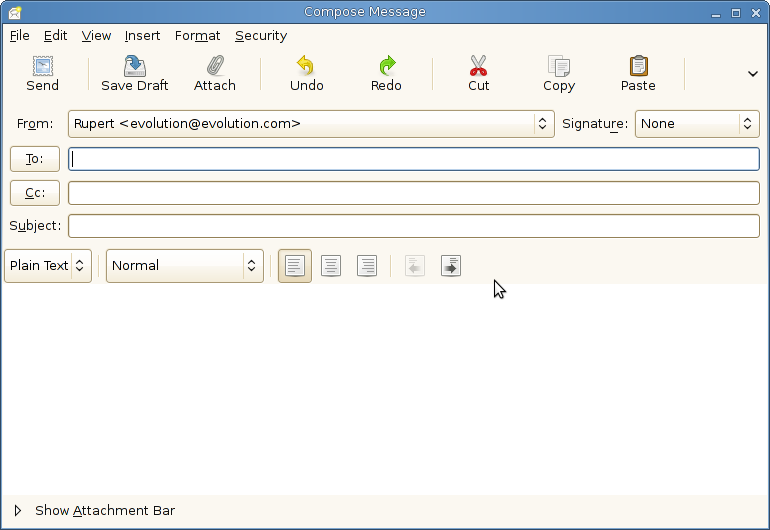
Enter an address in the To field. If you want to enter multiple email addresses, type in the addresses separated by comma. You can also use contact list to send messages to multiple recipients.Enter a subject in the Subject field, and a message in the box at the bottom of the window. After you have written your message, click Send.
New mail message window look like this:
This section contains the following topics:
3.2.1 Unicode, ASCII, and Non-Latin Alphabets
If you want to write in a non-Latin alphabet while using a Latin keyboard, try selecting a different input method in the message composer. Right-click in the message composition area and select an input method from the Input Methods menu, then begin typing. The actual keys vary by language and input style. For example, the Cyrillic input method uses transliterated Latin keyboard combinations to get the Cyrillic alphabet, combining letters where necessary. “Zh” and “ya” produce the appropriate single Cyrillic letters, and the single-quote (‘) produces a soft sign character.
For greater language display capabilities, click Edit > Preferences, then select the character set choices in the Mail Preferences and Composer Preferences sections. If you aren't sure which one to use, select UTF-8, which offers the greatest range of character displays for the greatest range of languages.
Using Character Sets
A character set is a computer's version of an alphabet. In the past, the ASCII character set was used almost universally. However, it contains only 128 characters, meaning it is unable to display characters in Cyrillic, Kanjii, or other non-Latin alphabets. To work around language display problems, programmers developed a variety of methods, so many human languages now have their own specific character sets, and items written in other character sets display incorrectly. Eventually, standards organizations developed the UTF-8 Unicode(thrdmrk) character set to provide a single compatible set of codes for everyone.
Most e-mail messages state in advance which character set they use, so Evolution usually knows what to display for a given binary number. However, if you find that messages are displayed as rows of incomprehensible characters, try selecting a different character set in the mail settings screen. If your recipients can't read your messages, try selecting a different character set in the composer options dialog box. For some languages, such as Turkish or Korean, it might work best for you to select the language-specific character set. However, the best choice for most users is UTF-8, which offers the widest range of characters for the widest range of languages.
3.2.2 Custom Header
You can configure custom headers to set sensitivity and caveats to the outgoing messages.
To enable the Custom Header plugin:
Select Edit > Plug-ins, then select the Custom Header check box.
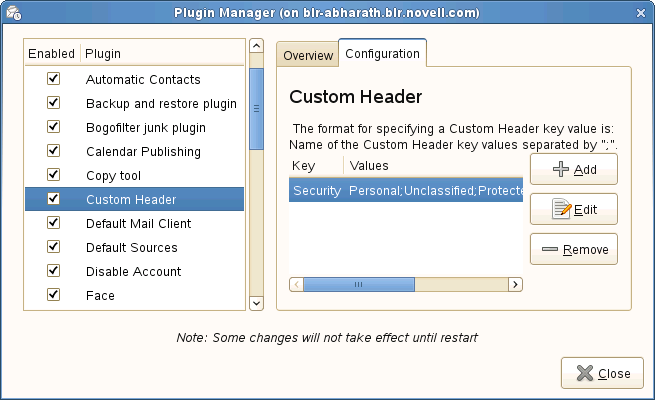
In the Plugin Manager, select the Configuration tab to customize your header fields. You can add, edit, or remove the header fields. For every header field you add, you can specify the keys and values. The key is used as the title of the custom header. You can enter multiple values for the keys. You must use a semicolon to separate every value you enter.
To add a custom header to an outgoing message:
-
Select New > Mail Message or Shift+Ctrl+M to open a Compose Message window.
-
Select Insert > Custom Header to open the Email Custom Header window.
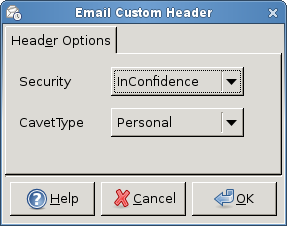
In the Email Custom Header window, you can view all the header fields and values you add.
-
Set the values for the header fields by using the respective drop-down list.
-
Click OK.
3.2.3 Sending Composed Messages Later
Evolution normally sends mail as soon as you click Send. However, can save a message to be sent later:
-
If you are offline when you click Send, Evolution adds your message to the Outbox queue. The next time you connect to the Internet and send or receive mail, that message is sent.
-
Click File > Save Draft to store your messages in the drafts folder for later revision.
-
If you prefer to save your message as a text file, click File > Save As, then specify a filename.
3.2.4 Working Offline
Offline mode help you communicate with remote mail storage systems like GroupWise®, IMAP or Exchange, in situations where you are not connected to the network at all times. Evolution keeps a local copy of one or more folders to allow you to compose messages, storing them in your Outbox to be sent the next time you connect.
POP mail downloads all messages to your local system, but other connections usually download just the headers, and get the rest only when you want to read the message. Before you go offline, Evolution downloads the unread messages from the folders you have chosen to store.
To mark a folder for offline use,
-
Right-click the folder, then click Properties.
-
Click Copy Folder Content Locally for Offline Operation.
Your connection status is shown by the small icon in the lower left border of the Evolution main window. When you are online, it displays two connected cables. When you go offline, the cables separate.
To cache your selected folders and disconnect from the network,
-
Click File > Work Offline, or click the connection status icon in the lower left of the screen.
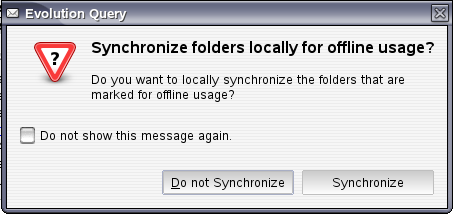
A message pop-ups and asks you whether you want to go offline immediately or cache before you go offline.
-
Click Synchronize to download all the messages to the folders marked for offline.
Or
Click Do not synchronize to go offline immediately, without downloading the messages locally for offline operations.
Select Do not show this message again to switch off this popup. The default is to not synchronize while going offline.
When you want to reconnect,
-
Click File > Work Online, or click the connection status icon again.
Download Messages for Offline Operations
This features prepares you for going offline and for offline operations. It helps you download all the messages locally before you go offline. If otherwise, by default, it goes offline when you click the offline button without downloading the message.
To download messages for offline operations,
-
Select File > Download messages for offline.
Automatic Network State Handling
Evolution automatically understands the network state and acts accordingly. For instance, Evolution switches to offline mode when the network goes down and automatically switches on when the network is up again. Ensure that your system has Network Manager installed on to enable this feature.
3.2.5 Attachments
To attach a file to your e-mail:
-
Click the Attach icon in the composer toolbar.
-
Select the file you want to attach.
-
Click OK.
You can also drag a file into the composer window. If you want to send it as an inline attachment, right-click the attachment and click Properties, then select Automatic Display of Attachments.
When you send the message, a copy of the attached file goes with it. Be aware that large attachments can take a long time to send and receive.
3.2.6 Attachment Reminder
Evolution has an Attachment Reminder plugin you can use to remind yourself to attach a file to an e-mail. If it determines that you have not attached the file, it displays the following message:
-
Click Continue Editing to attach the missing file you are reminded of, or click Send to send the message without any attachment.
To enable the Attachment Reminder,
-
Select Edit > Plugins > Attachment Reminder.
-
Click Configure to add the keywords.
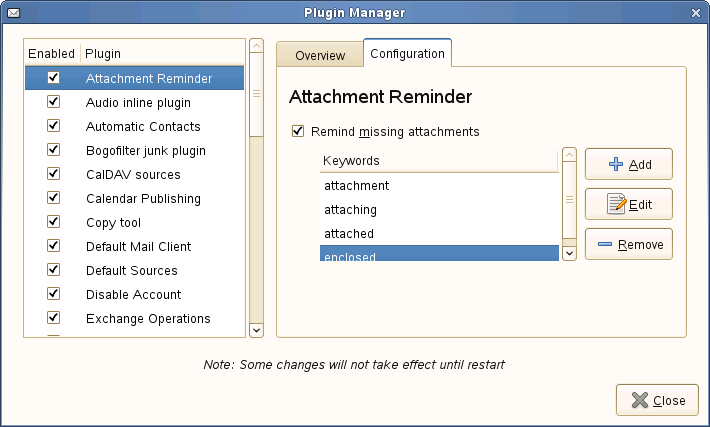
-
Click Add to add keywords such as “Attach” or “Attachment”.
Based on the keywords you have added here, it searches every email you are sending. If it finds the keywords such as “attach” in your e-mail and no actual attached file, you are reminded of missing attachments.
-
To edit any of the existing keywords, select the keyword and click Edit and modify.
3.2.7 Specifying Additional Recipients for E-Mail
Evolution, like most e-mail programs, recognizes three types of addressee: primary recipients, secondary recipients, and hidden (blind) recipients. The simplest way to direct a message is to put the e-mail address or addresses in the To: field, which denotes primary recipients. Use the Cc: field to send a message to secondary recipients.
Addresses on the Bcc: list are hidden from the other recipients of the message. You can use it to send mail to large groups of people, especially if they don't know each other or if privacy is a concern. If your Bcc: field is absent, click View > Bcc Field.
If you frequently write e-mail to the same groups of people, you can create address lists in the contacts tool, and then send them mail as though they have a single address. To learn how to do that, see Section 5.3.3, Creating a List of Contacts.
Evolution has the ability to let you specify the Reply-To in an e-mail. Using this, you can set up a special Reply-To for an e-mail.To do this:
-
Open a compose window.
-
Open the Reply-To field by clicking View > Reply To.
-
Specify the address you want as the Reply-To address in the new Reply-To field.
-
Complete the rest of your message.
-
Click Send.
3.2.8 Choosing Recipients Quickly
Address auto completion is by default enabled in Evolution when you create contacts.Evolution makes it easy for you to quickly fill in the address field without having to remember the email address of recipients. You can type nicknames or other portions of address data in the address field and Evolution will display a drop-down list of possible address completions from your contacts. If you type a name or nickname that can go with more than one card, Evolution opens a dialog box to ask you which person you meant.
If Evolution does not complete addresses automatically, click Edit > Preferences, then click Autocompletion. There, select the groups of contacts you want to use for address auto completion in the mailer.
Alternately, you can click the To:, Cc:, or Bcc: buttons to get a list of the e-mail addresses in your contacts. Select addresses and click the arrows to move them into the appropriate address columns.
For more information about using e-mail with the contact manager and the calendar, see Section 5.5, Send Me a Card: Adding New Cards Quickly and Section 6.2, Scheduling With the Evolution Calendar.
3.2.9 Replying to E-Mail Messages
To reply to a message, click the message to reply to in the e-mail list and click Reply, or right-click within the message and select Reply to Sender. This opens the message composer. The To: and Subject: fields are already filled, although you can alter them if you prefer. In addition, the full text of the old message is inserted into the new message, either in grey with a blue line on one side (for HTML display) or with the > character before each line (in plain text mode), to indicate that it is part of the previous message.
If you're reading a message with several recipients, you can use Reply to All instead of Reply. If there are large numbers of people in the Cc: or To: fields, this can save substantial amounts of time.
Using the Reply To All Feature
Susan sends an e-mail to a client and sends copies to Tim and to an internal company mailing list of co-workers. If Tim wants to make a comment for all of them to read, he uses Reply to All, but if he just wants to tell Susan that he agrees with her, he uses Reply. His reply does not reach anyone that Susan put on her Bcc list, because that list is not shared with anyone.
If you subscribe to a mailing list, and want your reply to go just to the list, rather than to the sender, select Reply to List instead of Reply or Reply to All.
3.2.10 Searching and Replacing with the Composer
The message composer makes several text searching features available to you.
Find: Enter a word or phrase, and Evolution finds it in your message.
Find Regex: You can search for a complex pattern of characters, called a regular expression or “regex” in your composer window. If you're not sure what a regular expression is, you should ignore this feature.
Find Again: Select this item to repeat the last search you performed.
Replace: Find a word or phrase, and replace it with something else.
For all of these menu items, you can choose whether to search backwards in the document from the point where your cursor is. You can also determine whether the search is to be case sensitive in determining a match.
3.2.11 Enhancing Your E-Mail with HTML
Normally, you can't set text styles or insert pictures in e-mail. However, most newer e-mail programs can display images and text styles in addition to basic alignment and paragraph formatting. They do this with HTML, just like Web pages do.
Some people do not have HTML-capable mail clients, or prefer not to receive HTML-enhanced mail because it is slower to download and display. Because of this, Evolution sends plain text unless you explicitly ask for HTML.
Basic HTML Formatting
You can change the format of an e-mail message from plain text to HTML by choosing Format HTML.
To send all your mail as HTML by default, set your mail format preferences in the mail configuration dialog box. See Section 9.5, Composer Preferences for more information.
HTML formatting tools are located in the toolbar just above the space where you actually compose the message. They also appear in the Insert and Format menus.
The icons in the toolbar are explained in tool-tips, which appear when you hold your mouse pointer over the buttons. The buttons fall into five categories:
Headers and Lists: At the left edge of the toolbar, you can choose Normal for a default text style or Header 1 through Header 6 for varying sizes of header from large (1) to tiny (6). Other styles include preformat, to use the HTML tag for preformatted blocks of text, and three types of bullet points for lists.
For instance, instead of using asterisks to mark a bulleted list, you can use the Bulleted List style from the style drop-down list. Evolution uses different bullet styles, and handles word wrap and multiple levels of indentation.
Text Styles: Use these buttons to determine the way your e-mail looks. If you have text selected, the style applies to the selected text. If you do not have text selected, the style applies to whatever you type next.
Alignment: Located next to the text style buttons, the three paragraph icons should be familiar to users of most word processing software. The left most button aligns your text to the left, the center button centers text, and the right button aligns the text to the right.
Indentation Rules: The button with the arrow pointing left decreases a paragraph's indentation, and the right arrow increases its indentation.
Color Selection: At the far right is the color section tool, where a box displays the current text color. To choose a new color, click the arrow button to the right. If you have text selected, the color applies to the selected text. If you do not have text selected, the color applies to whatever you type next. You can select a background color or image by right-clicking the message background, then selecting Style Page.
Advanced HTML Formatting
Under the Insert menu, there are several more items you can use to style your e-mail. To use these and other HTML formatting tools, make sure you have enabled HTML mode by using Format HTML.
Inserting a Link
Use the Insert a Link tool to put hyperlinks in your HTML messages. If you don't want special link text, you can just enter the address directly, and Evolution recognizes it as a link.
-
Select the text you want to link from.
-
Right-click in the text, then click Insert Link.
-
Type the URL in the URL field.
-
Click Close.
Inserting an Image
-
Click Image.
-
Browse to and select the image file.
-
Click OK.
Inserting a Rule
You can insert a horizontal line into the text to help divide two sections:
-
Click Rule.
-
Select the width, size, and alignment.
-
Select Shade if necessary.
-
Click Close.
Inserting a Table
You can insert a table into the text:
-
Click Table.
-
Select the number of rows and columns.
-
Select the type of layout for the table.
-
Select a background for the table.
To insert a picture for the background, click Browse and select the desired image.
-
Click Close.
3.2.12 Mail Send Options
You can set the following options when sending mails in Evolution.
Read Receipts: Evolution allows you to request a receipt for your sent messages to indicate when your message is being viewed by the recipient. Receipts are useful when sending e-mail that is time-sensitive. To request a receipt, click Insert > Request Read Receipt in the composer window.
Prioritize Message: You can prioritize a message to be sent, so that the recipient sees its relative importance.To prioritize a message, click Insert > Prioritize Message in the composer window.
NOTE:Evolution will ignore the message priority, because it assumes that the recipient should decide whether the message is important or not.
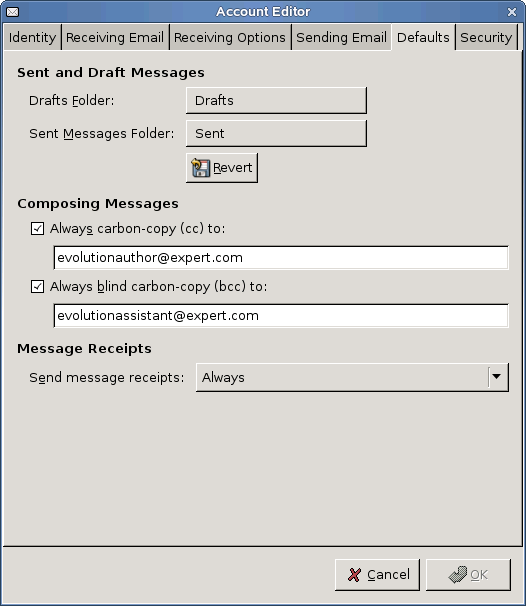
3.2.13 Default Settings
Evolution allows you to change the default settings. You can organize your draft folder and sent folder, set the addresses to which you want to sent carbon copies and blind carbon copies to. You can also change the settings for message receipts from Default setting window.
To change your default settings,
-
Select Edit > Preferences to open Evolution Preferences window.
-
Select the mail account you want to change the default settings.
-
Click Edit to open Account Editor window.
-
Click Defaults tab.
-
Click the respective check boxes and enter the email addresses you want CC and BCC to.
-
Select the desired option for send message receipts from the drop-down list.
Changing Default Folder for Sent and Draft Items
By default, all the sent messages directly goes to Sent folder and those messages marked as drafts are saved in Draft folder. To change the default setting for draft items,
-
Click Drafts button to open Folder view.
-
Select the folder you want to save the drafts to.
-
Click OK.
-
Click Revert button to revert back to previous settings.
To change the default folder for sent items,
-
Click Sent button to open the Folder view.
-
Select the desired folder for sent items.
-
Click OK.
-
Click Revert button to revert back to previous settings.
3.2.14 Forwarding Mail
When you receive an e-mail, you can forward it to other individuals or groups that might be interested. You can forward a message as an attachment to a new message (this is the default) or you can send it in line as a quoted portion of the message you are sending. Attachment forwarding is best if you want to send the full, unaltered message to someone else. Inline forwarding is best if you want to send portions of a message, or if you have a large number of comments on different sections of the message you are forwarding. Remember to note from whom the message came, and whether you have removed or altered content.
To forward a message you are reading:
-
Click Forward on the toolbar.
or
If you prefer to forward the message inline instead of attached, click Message > Forward As > Inline from the menu.
-
Select an addressee as you would when sending a new message; the subject is already entered, although you can alter it if you want.
-
Add your comments on the message in the composition frame, then click Send.
Attachments to a message you are forwarding are forwarded only when you send the original message as an attachment. Inline messages do not forward any attachments.
3.2.15 Tips for E-Mail Courtesy
-
Don't forward chain letters. If you must, watch out for hoaxes and urban legends, and make sure the message doesn't have multiple layers of greater-than signs, (>) indicating multiple layers of careless in-line forwarding.
-
Always begin and close with a salutation. Say “please” and “thank you,” just like you do in real life. You can keep your pleasantries short, but be polite.
-
WRITING IN CAPITAL LETTERS MEANS YOU'RE SHOUTING! Don't write a whole message in capital letters. It hurts people's ears.
-
Check your spelling and use complete sentences. By default, Evolution puts a red line beneath words it doesn't recognize, as you type them.
-
Don't send nasty e-mails (flames). If you get one, don't write back.
-
When you reply or forward, include enough of the previous message to provide context.
-
Don't send spam.