Composer User's Guide
CHAPTER 8
The previous chapter introduced you to the basic actions you can use when building components. The actions discussed in this chapter are of a more advanced nature than those discussed earlier. They include I/O-related actions, control-flow constructs, and miscellaneous additional actions.
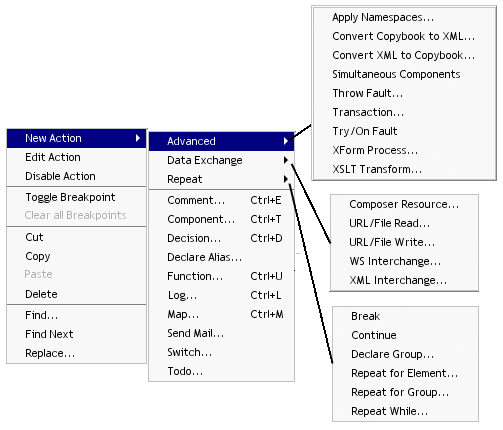
The actions discussed in this chapter can be created using commands under the Action menu's nested submenus. The submenus include Advanced, Data Exchange and Repeat. They can also be accessed via right-mouse-click inside the action model.
The menu structure looks like this:
The table below summarizes the Advanced actions. (The Data Exchange and Repeat actions are discussed in their own sections further below.)
NOTE: See Chapter 11, "Applying Actions to Common Tasks" for examples of using some of these actions.

Ideally, a component will always receive valid XML documents (i.e. the documents validate against their schema), map and transform data appropriately, and send valid XML documents. But in the real world, this is not always the case. Therefore, it is important to have some means of validating XML documents.
Schemas combined with Namespaces provide a mechanism that allow validation enforcement. However, Schemas, Namespaces and Prefixes can easily become problematic when performing XML transformations. For simple straight-through processing involving document validation and marshalling, Composer's schema support, XML Template features, and drag and drop mappings mean you won't normally have to worry about managing Namespaces and Namespace Prefixes. But there are many cases involving document transformations where documents may need special treatment of Namespaces and Namespace Prefixes, such as when
Business partners exchange valid documents belonging to the same Namespace but each uses a different Namespace Prefix. For one party to validate or work with the other's document, the Namespace Prefix of each partner needs to be declared in the document.
An XML Template is not available to resolve a Prefix to a Namespace for a document (i.e. the Input XML Template is System {Any}). Yet for Map actions to work properly, the Prefixes used in the Map Source and Target need to be resolvable to a Namespace.
And there are still other cases where you simply wish to ignore Namespaces altogether. These and many other XML processing cases require a method of modifying or overriding the Prefix and Namespace handling provided by Composer's default Schema and XML Template support.
The Apply Namespaces Action provides a mechanism for managing Namespaces and Namespace Prefixes in effect for XML documents within a component's Action Model. The action allows you to consolidate all your Namespace and Prefix declarations for a document in one place as well as override those declared in the XML Templates used by the component, or ignore Namespaces altogether.
The Apply Namespaces action can be applied to any Message Part (Input, Input1, Temp, Temp1 or Output.) You may also have multiple Apply Namespaces actions for a single Message Part, effectively changing Namespaces in effect based on conditions specified in your Action Model. The Namespaces declared for any part will be in effect until the end of the Action Model is reached or another Apply Namespaces action for that Part is executed. In other words, only the most recent Apply Namespaces action is in effect for any single Part.
When creating a new component, an Apply Namespaces action is created automatically for the Output Part if it's XML Template declares any Namespaces. After component creation, you can manually create additional Apply Namespaces actions for any or all Message Parts. In both cases, the Namespaces and Prefixes initially specified when you first open the action dialog, are pulled directly form the XML Template. You can then add, change or delete Namespaces and Prefixes as needed within the action.
 To Create an Apply Namespaces action:
Open a component that you want to apply the Namespace action.
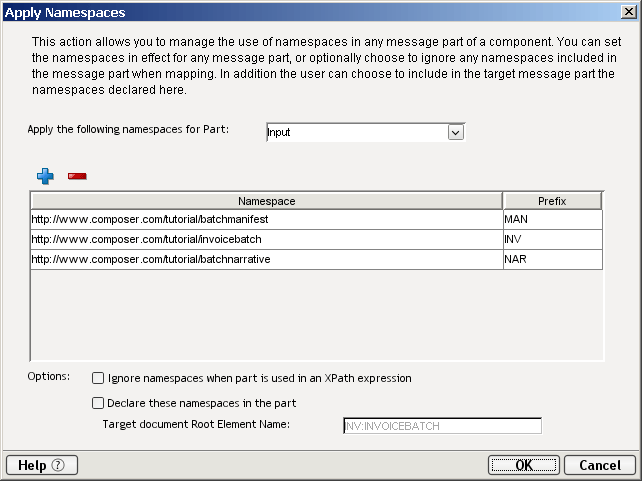
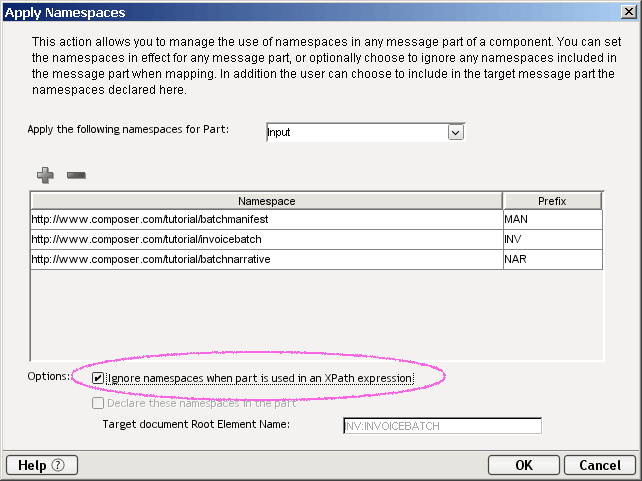
From the Action menu, select New Action>Advanced>Apply Namespaces. The Apply Namespaces dialog box appears as below.
Select from the dropdown list, For Part, where you want to apply the NameSpace (i.e. Output). This control displays available Message parts to which the list of Namespace declarations can be applied.
Click on the (+) icon to add a row, conversely, click on the (-) minus icon to delete a row. When adding a NameSpace, enter the URI and Prefix in the columns displayed.
NOTE: The Prefix table displays all the Namespace declarations in effect for the document displayed in For Part control. After creating a new Apply Namespaces action, the table may or may not contain a list of declarations for a selected Part. The list of declarations is initially constructed from the declarations defined in the XML Template's Namespace Declarations panel. If the XML Template for the Part is System{Any} or not Schema based, then the list will be empty, unless declarations have been added in the Template's Namespace Declarations panel.
NOTE: Within the declaration list for a single Message Part, the Prefixes must be unique. However, you are allowed to have duplicate Namespace URI entries provided they are associated with unique Prefixes. This allows you to declare multiple Prefixes that are associated with the same Namespace URI.
Options: Click in the checkbox to Ignore Namespaces when document is used in a Map action Source option when you want Map Action Source XPaths to find elements by their XML local name only.
NOTE: This provides for a less restrictive method of specifying Map actions and is useful when Map actions under some processing circumstances may contain the wrong or no Prefixes in their Source specifications. This allows you to put the Apply Namespaces action inside a Decision action that tests whether the Input Message contains Prefixes or not yet still have one set of Map actions to Map the Input to another document. In other words, the component normally expects the Input to contain Prefixes so you design all your Map actions with Prefix names. For the occasional Input that has no Prefixes, the Decision action activates the Apply Namespaces action defined to ignore Namespaces for Input allowing the Map actions to work in either case.
NOTE: This option performs the same function as the setSkipNameSpaces() method available for any Part (i.e. Input.setSkipNameSpaces(true)). Between this method and the Apply Namespaces action, whichever was executed last in an action Model will be in effect.
Options: Click in the checkbox to Declare These NameSpaces when document is used in a Map Target when you want to declare a set of Namespaces in the root element of an Output document built by your Action model. This option is almost always checked for Output to insure that prefixed elements created in the Output, as a result of Map actions, will resolve to the proper namespaces.
NOTE: This allows a recipient of the Output to validate the document properly. The Apply Namespaces action with this option checked could also be used to add new declarations to an existing document that already contains declarations.
Target Document Root Element Name specifies the name of the root element to contain the Namespace declaration attributes. If the target Message Part is based on a XML Template with Schema validation, then this control will be filled in automatically by Composer. If the target Message part is not an XML Template with Schema validation (e.g. System{Any}), then you must enter a value.
Click OK and the new action will be added to the Map Action Pane in your component.

XML Templates and the Namespaces and Prefixes in XML documents processed by a component may all have an impact on whether a Map action works as expected. By default, for a Map action to work, the prefix / element name combinations in the Source XPath are expanded to their full names. A similar process occurs in the Message Part referred to by the Map action. If a match is found between the Source specification and the Message Part, the data or content model is mapped to the Target of the Map action. The most critical factor is whether Prefixes are expanded to their Namespace when a Map Action's Source is compared to an XML Message Part. If Namespace resolution is not performed (i.e. turned off) then Map actions will always work.
By default, Composer performs Namespace resolution. There are however, two ways to prevent Namespace resolution in Composer. The first technique is to use the setSkipNameSpaces() method for a Part as in Input.setSkipNameSpaces(true). The second technique is to add an Apply Namespaces action and check Ignore Namespaces when document is used in a Map Action Source control.
When Namespace resolution is performed, two additional conditions must be met in order for a Map action to work. The Prefixes used in the Map action and the Prefixes present in the document must: 1) be resolvable to Namespace URIs, and 2) the Namespace URIs must match. The first condition is a pre-requisite for the second.
The first condition requires that the Prefixes used in the Map Action Source (what you expect to receive) and the Prefixes used for elements in the runtime document (what you actually receive) must be expanded and resolvable to Namespace URIs. If either cannot be resolved, then the Map action fails. In order for a Map action to work, the expanded form of its Source specification Prefixes must match the expanded form of an element in the XML document being mapped (the second condition). The Map action Prefix is expanded by resolving it to a Namespace URI specified in the XML Template or in an Apply Namespaces action. Prefixes for the element in the XML document are expanded by resolving to a Namespace URI declared in the XML document (i.e. an xmlns:someprefix="someURI" attribute in the root element). If the expected Namespace URI of the Map action does not match the actual Namespace URI from the document, the Map action will fail.
When a new component is created and its Output Message is based on an XML Template containing Namespace declarations, Composer automatically adds an Apply Namespaces action to the Action Model. When the component executes, this action creates the appropriate root element, Namespace Prefix for the root element, and root element Namespace declaration attributes in the Output XML Message. Normally, this action is appropriately left at the start of the Action Model. In addition, the action allows you to add new Namespace declarations to the Output Message that are not declared in the XML Template. The following graphic shows how a Declare Namespaces action is defined for a typical Output message.
If a component or program that receives this component's Output is designed to work with the same Namespace but uses different Prefixes, you can use the Apply Namespaces action to add an alternate Namespace Prefix in the Output Message. Simply open the Apply Namespaces action and press the Add button. Copy the Namespace URI you wish to associate with another Prefix and paste it into the new line. Then specify the alternate Prefix.
NOTE: Note: When a Temp document is going to be used as the target of Map actions, you need to define a similar Apply Namespaces action for it. Since Temp documents can be both a Source and Target for a Map action, Composer does not know your intentions and so does not create the action automatically for you.
In some cases namespaces and their associated Prefixes are irrelevant to the mapping or transformational purposes of the component. Perhaps, a document has already been validated but needs to be re-structured before being inserted into a back end data store (e.g. a relational database via a JDBC component or a CICS transaction via a CICS/RPC component). In this case the Map actions are concerned only with re-structuring the Input XML message into a different hierarchy which would be much easier and quicker to design by referencing local names only in the document. In this case, an Apply Namespaces action can be added that ignores Namespaces altogether. This allows you to construct Map actions that omit any Namespace Prefixes in the Source XPath's you define. So instead of expressing the Source of a Map action as
INV:INVOICEBATCH/INV:INVOICE/INV:INVOICEHEAD/INV:INVOICENO
you can write:
INVOICEBATCH/INVOICE/INVOICEHEAD/INVOICENO
which is also more readable.
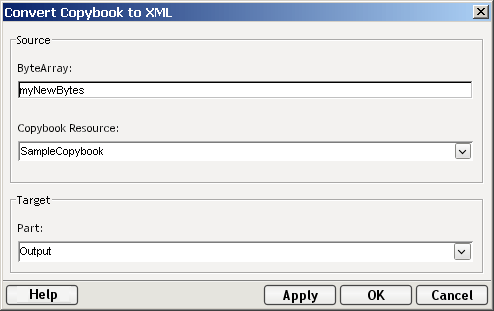
This action to converts a ByteArray into XML data using a COBOL Copybook Resource so as to map COBOL fields in the ByteArray to XML elements. The XML can then be used like any other XML inside the component.
To create a Convert Copybook to XML Action
Select a line in the Action Model where you want to place a Convert Copybook to XML action.
From the Action menu, select New Action>Advanced, then Convert Copybook to XML. A dialog window appears:
Under Source, type in the name of an existing ByteArray whose data you would like to convert to XML format.
Select a previously defined Copybook Resource (see "About Copybook Resources" on page 221).
Under Target, select an XML Message Part to be used to receive the converted ByteArray.
Click on Apply to see the results of your action, or click on OK to finish creating the new action and it it to your action model.

NOTE: Experienced CICS RPC users will recognize that this action performs the same function as the Auto Map Copybook feature available in the CICS RPC Component Editor. The only difference is that no Map actions are created for the user. In order for the mappings performed by the Convert action to work, the user must have a properly formatted XML document that accurately represents the structure of the Copybook. Creating an XML Sample for this is easy inside a CICS RPC component or JMS Component. Simply use Auto Map in the CICS RPC component to create an XML Template which can then be used as the target for this action. Refer to the CICS RPC Component Editor User's Guide for more information on this topic.
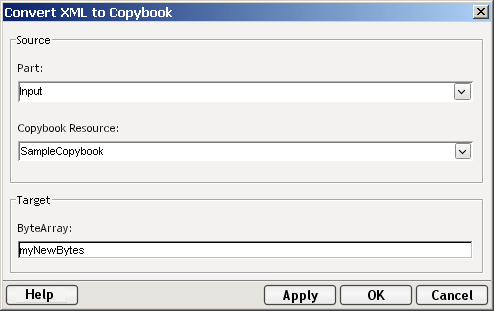
This action converts XML data into a ByteArray object using a COBOL Copybook Resource to properly map XML elements to COBOL fields in the ByteArray. The ByteArray can then be used directly by an ECI Execute action in a CICS RPC component or, perhaps, by a JMS Send action whose Body Message Type is Copybook (JMS bytes). The created ByteArray object can then be published globally using the Extended ECMAScript Component method named exportObject() making it reference-able by other components by its name.
To create a Convert XML to Copybook Action
Select a line in the Action Model where you want to place a Convert XML to Copybook action.
From the Action menu, select New Action>Advanced, then Convert XML to Copybook. A dialog window appears:
Under Source, select an existing Message Part whose XML data is to be converted into a ByteArray.
Select a previously defined Copybook Resource (see "About Copybook Resources" on page 221).
Under Target, type in name for the ByteArray to receive the converted data.
Click on Apply to see the results of your action, or click on OK to finish creating the new action and it to your action model.

NOTE: Experienced CICS RPC users will recognize that this action performs the same function as the Auto Map Copybook feature available in the CICS RPC Component Editor. The only difference is that no Map actions are created for the user. In order for the mappings performed by the Convert action to work, the user must have a properly formatted XML document that accurately represents the structure of the Copybook. Creating an XML Sample for this is easy inside a CICS RPC component or JMS Component. Simply use Auto Map in the CICS RPC component to create an XML Template which can then be used as the source for this action. Refer to the CICS RPC Component Editor User's Guide for more information on this topic.
The Simultaneous Components Action allows you to execute two or more components simultaneously (which is to say, in their own separate threads of execution). This is an important capability to have in an XML integration application that relies on inquiries to legacy systems which might be relatively slow to respond. For example: Imagine that your service needs to retrieve information via CICS RPC and JDBC from two data sources. The CICS inquiry might have a round-turn time of five seconds and the JDBC inquiry might require four seconds. If the two inquiries are performed one after the other, the total time spent waiting for data would be nine seconds. But if both back-end systems can be queried at the same time, the total wait-time is cut to approximately five seconds. This is a significant performance improvement.
The Simultaneous Components Action places a "Simultaneous Components" header line in the action model, below which you can insert any number of Component (or other) actions.
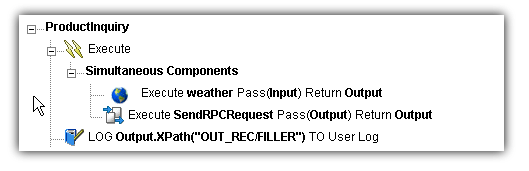
In the above illustration, the action list under "Simultaneous Components" contains a call to a 3270 Component, a call to a JDBC Component, and a Send Mail action. The two Component actions will be spawned in separate threads. The Send Mail action will then be executed immediately (whether or not the 3270 and JDBC components have returned).
NOTE: You can include any type of Action (Map, Decision, etc.) in the list beneath a Simultaneous Components Action. But no action in the list should depend on return values from any Component actions, because Component Actions are not guaranteed to return before other actions in the block execute.
Downstream actions that are outside of the Simultaneous Components block can depend on return values from spawned components, because the Simultaneous Components action does not pass control to downstream actions until all spawned components have returned. Synchronization is guaranteed to occur, in other words, before execution continues beyond the Simultaneous Components block.
To create a Simultaneous Components action:
Select a line in the Action Model where you want to place a Simultaneous Components action.
From the Action menu, select New Action>Advanced, then Simultaneous Components. A Simultaneous Components header line appears in the action model (per the illustration above).
Place any number of actions below the header line. (Right-click on the header line and choose an action from the context menu, or Paste actions into the Simultaneous Components block.)
NOTE: No actions other than Components Actions will be spawned as new threads.
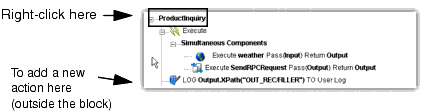
To place new actions outside of (downstream of) the Simultaneous Components block, right-click on the line above the Simultaneous Components header line, and choose a new action. The new action will be added below the Simultaneous Components block. See below.
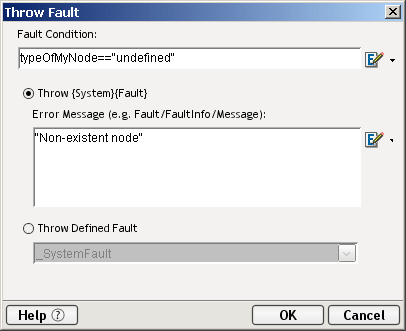
The Throw Fault action allows you to write information to an XML message on failure of an action, perform any number of "Before Throw" actions, and finally halt execution of a component. Throw Fault is only executed when a condition that you specify is true. The Message Part that gets written when a Throw Fault action is executed is called a Fault document, and the XML within this message will also be contained in a global object called ERROR. For a discussion on Fault Parts, refer to "Creating a Fault Message Part" on page 119.
Throw Fault actions can be used in a number of different ways:
Using a Throw Fault Action by itself. You can easily specify a Fault Condition and it's accompanying error message within the Throw Fault Action dialog. An example of this procedure is given below. When the action is executed, the Fault Condition is evaluated and if true the following occurs:
Any "Before Throw" actions you specify are executed. This can be very useful as a way to leave your application in a particular state before halting execution. You might want to, for example, send a mail message stating that the execution did not complete.
The contents of the Error Message are written to the Fault document in a node you specify, as well as to the global object ERROR.
Using a Throw Fault Action within a Decision Expression in the Decision action. You might want to specify your Fault Condition by entering it in the Decision Expression of a Decision Action. Then you put your Throw Fault statement in the True branch of the Decision action. Here you can either specify additional conditions in the Throw Fault dialog's Fault Condition or leave it blank and simply specify the Fault document to which the fault information should be written. When the action is executed and all your conditions are true, the Throw Fault action is executed as described above. If the Fault Condition in the Decision action or Throw Fault action is false, the next action in the action model is executed.
Using a Throw Fault inside a Try / On Fault action. By putting either of the above methods inside the Execute branch of a Try / On Fault action (which is described in "The Try/On Fault Action" below), you prevent the component from halting execution and have an opportunity to respond or recover from the fault. You create your fault condition using one of the previous two methods inside the Execute branch of a Try / On Fault action after other actions whose output you want to test worked correctly. You can specify any number of unique faults so that your component can branch into several different directions depending on which fault actually occurs. This works in a similar fashion to a Switch action. When the Throw Fault action for the given fault fires, instead of halting execution of the component, control passes into the appropriate On Fault branch of the Try / On Fault action. Here you can specify other actions to remedy or respond to the error.
You can decide where it is appropriate to deal with error conditions and use Throw Fault accordingly. For instance, during runtime, if you want a component to stop running when an error condition is encountered, (and return control to the service in which it is running) use Throw Fault alone. The action throws an exception, which is displayed as a dialog box in Composer, and a stopped component on the application server.
On the other hand, suppose a service calls another component from within a Try/On Fault action (specifically under the Try branch). Inside the other component, a Decision action inspects some data in an XML document. If the data is valid, the component continues executing. If the data is not valid, the Throw Fault action executes,writing to the Fault document , and the component stops execution, returning control to the service. The Try/On Fault detects that a Throw Fault occurred and logic transfers to the appropriate On Fault branch of the Try/On Fault action. In the On Fault branch, you can process the Fault Message Part any way you like. You might, for example, write a message out to a Log file.
Select a line in the Action Model where you want to place the Throw Fault action. The new action is inserted below the line you selected.
From the Action menu, select New Action>Advanced, then Throw Fault. The Throw Fault Action dialog box appears.
In the Fault Condition field, type a valid ECMAScript expression that, when true, causes the action to throw a fault. (You can also click the Expression Builder button and build an expression.)
Select Throw {System}{Fault} to write your error message to the _SystemFault document. By default, the message you type in the Error Message field will be placed in the Fault/FaultInfo/Message node of that document. Specify another node if desired. You also have access to the ECMAScript Expression Builder button so that you can build an expression.
Select Throw Defined Fault if you wish to select a Fault document that is one of the Message Parts you have associated with your component
The new Action is added to your model. Place any actions you wish to execute before the application halts in the Before Throw Actions area.

The Transaction action allows you to insert begin, commit, or rollback commands in your Action Model, thereby making it possible for you to exercise low-level control over transaction boundary demarcation within components that use transactions.
NOTE: This action is not available in Composer when installed as part of the Professional Edition suite.
Any Transaction actions that you place in your action list will result in the appropriate corresponding Java pass-throughs being generated in your service's application metadata. The details of how this occurs are beyond the scope of this discussion. See the Transaction Management chapter of the Novell exteNd Composer User's Guide for the Novell exteNd application server. (If you are using another application server, see the appropriate exteNd User's Guide.)
NOTE: Successful use of Transaction actions requires an in-depth understanding of Java transaction models. The services you create in exteNd Composer can be deployed using Servlet triggers or Enterprise Java Bean (EJB) triggers. The choice of deployment mode will have significant implications for transaction management.
Select a line in the Action Model where you want to place a Transaction action. The new action will be inserted below the line you've selected.
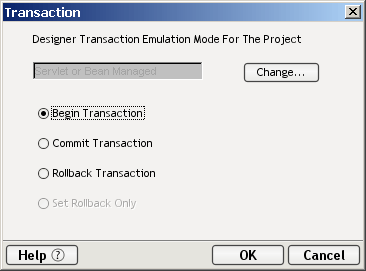
From the Action menu, select New Action>Advanced, then Transaction. The Transaction dialog appears.
Select from one of the available transaction command types.
NOTE: Radio buttons are enabled or greyed out depending on which Transaction Mode you've selected in the Designer Tab of the Preferences dialog available under the Tools menu. For example, in the above illustration, the first three radio buttons are enabled while the Set Rollback Only button is greyed out. This is because the current transaction emulation mode is Servlet or Bean Managed. The Set Rollback Only button is available only in the context of a Container-managed EJB deployment; it is not applicable to Servlet or Bean-managed EJB deployments. To change emulation modes (and cause a corresponding change in which radio buttons are enabled in the Transaction dialog), click the Change button.
The following illustration shows a pair of Transaction actions as they appear in the Action Model pane.
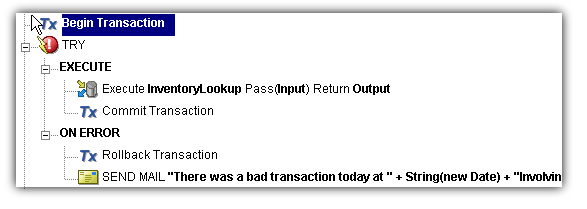
Once you have generated Transaction actions in your Action Model, you can test them by executing the component in Composer (or by stepping through the action list as part of an animation/debug session). Appropriate error messages will appear based on any problems that might exist with your use of Transaction commands in your Action Model. For example, if you have used two begin commands in your action list with no intervening commit, you will see a warning dialog based on the fact that nested transactions are not supported.
The Try/On Fault action executes a set of actions when a fault occurs within the Execute branch of the Try/On Fault action. Any number of defined faults can be specified within the Execute branch. You can use the Try/On Fault action to trap anticipated errors and run other actions to remedy or report on the fault. For instance, you can use Try/On Fault to respond to an XML Interchange action that fails to find a file.
When you add a Try/On Fault action, a dialog appears from which you select a number of pre-defined Fault Part Names. These are the Fault Messages you defined when you set up your component. Several lines are then added to the Action Model pane: the beginning of the Try action, the Execute branch, a branch for each Fault you specified and an "All other Faults" branch. When you are aware of potential faults an action can produce, you put those actions under the Execute branch. You then put error handling actions under each On Fault branch to handle unique situations. If a fault does occur, the actions under the On Fault branch execute.
Following the example given previously, if you anticipate a fault with the XML I/O action, you put the action under the Execute branch. Under one On Fault branch, you might add another XML I/O action that attempts to read the file from an alternate location. Under another On Fault branch, you might add another XML I/O action that looks for a file with a different extension.
Select a line in the Action Model where you want to place the Try/On Fault action. The new action is inserted below the line you selected.
From the Action menu, select New Action>Advanced, then Try/On Fault.
Use the blue + icon to add Fault Part Names you have previously associated with your component. Use the red - icon to remove them. Use the up and down arrows to change the order of the faults.
NOTE: If you do not define any custom Fault Parts, corrective actions can be placed in the default "All Other Faults" branch of the Try/On Fault action.
The Try On Fault action icon, with an Execute, one or more On Fault Branches, and an All Other Faults branch appears in the Action Model pane.
Add any actions that might cause potential errors under the Execute branch.
Add actions that resolve the error under the On Fault branch.
The following illustration shows a complete Try/On Fault action in the Action Model.
NOTE: It is good programming practice to use Try/On Fault actions liberally throughout your action model.
NOTE: This action is not available in Composer when installed as part of the Professional Edition suite. For XForm-related functionality in Novell exteNd Professional Edition, you will use exteNd Director. See the Director documentation for details.
The XForm Process action allows you to specify an XForm document and subject it to various kinds of preprocessing before mapping it to output. Before using this action, you would typically already have created an Form Resource (see the chapter on Resources) in the current project, or you would (alternatively) be using an XForm as your component or service's Input message part. A typical scenario would be one in which a JSP, in response to a user request, kicks off a Composer service to handle a forms session. The key responsibility of the service would be to serve out the appropriate XForm.
In normal usage, an XForm is not transmitted to the user (the client) in its raw state, because an XForm is not renderable directly and embodies few assumptions as to what the final "rendered form" will look like. The same XForm may have an entirely different appearance on a desktop PC than it has on a palm device, for example. The decision of how to final-encode the form for presentation to the user is done at runtime, and the transformation from raw XForm to, say, XHTML must be handled at the server level since web browsers and client devices have no native support for XForm-rendering.
A typical roundtrip scenario might look like this:
A customer goes to Company A's web site and decides to place an order. He or she clicks the "Order Now" button on the web page.
The button click results in a redirect to a URL that triggers a Composer service. Some user params (perhaps the user's first and last name, pulled from a cookie) are passed on the end of the URL.
The service calls a component that invokes an XForm Process action.
Maps the user's name to the appropriate "instance data" locations in the form
Sends the form to the Novell exteNd XForm Processor to be converted to the appropriate output format (whether XHTML, SMIL, WML, or whatever)
And finally, appends, copies, or otherwise maps the transcoded document produced by the XForm Processor to a suitable Output message part
When the service has finished executing any additional business logic that might be dictated by the request, it serves the output document (containing the transcoded, prepopulated form) back to the user.
The user fills out the form and clicks the Submit button, triggering a redirect or another XForm session, or whatever action is necessary.
NOTE: This discussion is not meant to be a primer on XForms. For more information on XForm technology see http://www.w3.org/MarkUp/Forms/. For further discussion of the XForm capabilities provided by exteNd, see the documentation for exteNd Director.
To create an XForm Process action:
Select a line in the Action Model where you want to place the XForm Process action. The new action will be inserted below the line you selected.
From the Action menu, select New Action > Advanced, then XForm Process. A dialog appears.
In the upper portion of the dialog, choose one of the radio buttons:
Choose the Form radio button if you want to specify an existing Form Resource as the source document. The pulldown menu will be prepopulated with the names of any Form Resources in your project. Select the Form Resource of interest.
Choose the Part radio button if the XForm you want to use is already loaded into a message part (e.g., Input, Input1, Temp). In this case, choose from among the message parts shown in the pulldown menu, and in the text field just below, enter the XPath expression that points to the root of the XForm.
Under Target, specify (via either XPath or an Expression) the DOM node that will be the root of your XForm. (The example shown in the above illustration represents a typical use case where the target message part is Output, and the root node of the output document is <html>.)
Click OK to dismiss the dialog. The new action is added to your action model.
The XSLT Transform action takes a DOM and an XSL stylesheet you specify as input and sends the output to another DOM in the component. This process is also referred to as Server Side XSL Processing.
To create XSL output you need to specify three parameters of the action. The Source Document Expression is a valid ECMAScript expression that results in the name of a DOM or document handle (such as Input). The XSL URL expression is a valid ECMAScript expression that points to an XSL Stylesheet. This parameter is optional if the DOM already has an XSL Processing Instruction that specifies an XSL Stylesheet. If an XSL Stylesheet is not specified in the DOM, then you must specify this parameter. If you specify this parameter, and the DOM also has an XSL Stylesheet processing instruction, then your parameter will override it.
The Target Document/Element Expression specifies which DOM is to receive the results of the XSL processing.
To add a XSLT Transform action:
Select a line in the Action Model where you want to place the XSLT Transform action. The new action is inserted below the line you selected.
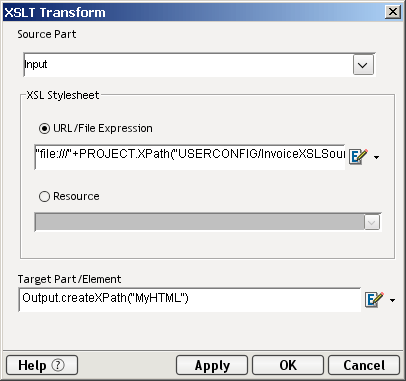
From the Action menu, select New Action>Advanced, then XSLT Transform. The XSL Process dialog box appears.
Type the name of the Source Document you want rendered, or click the Expression Builder button and create an ECMAScript expression that resolves to a valid Part.
Type the name of the XSL stylesheet you want to use for transforming in the XSL URL Expr field, or click the Expression Builder button and create an ECMAScript expression that points to a valid stylesheet.
Type the name of the Target Part/Element you want to use, or click the Expression Builder button and create an ECMAScript script expression that specifies a Part.
The following illustration shows a complete XSLT Transform action in the Action Model.

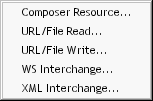
This submenu contains actions concerned with the reading and writing of files and the interchange of data in web services and in XML.
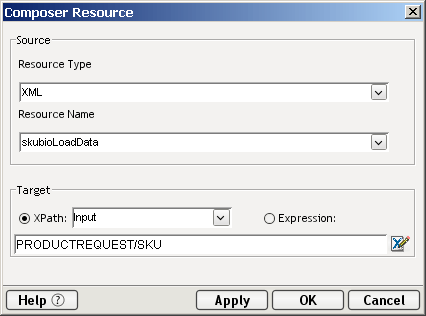
The Composer Resource Data Exchange Action allows you to load an XML or XSL resource into a Message Part.
To create a new Composer Resource action:
From the Action menu, select New Action>Data Exchange>Composer Resource. The following dialog appears.
Under Source, select a Resource Type. The available choices are XML or XSL.
Select a Resource Name. You must already have added the XSL or XML file as a Resource in order for it to appear in this list. Refer to Resources for instructions on how to accomplish this.
Under Target, use XPath to select a Part to contain the results of your XML or XSL, or click on Expression to enter the ECMAScript Expression Builder.
NOTE: Composer Resources will add the text of an XML or XSL document to a Part you specify. It can then be manipulated like any other Part. However, it will remain read-only.
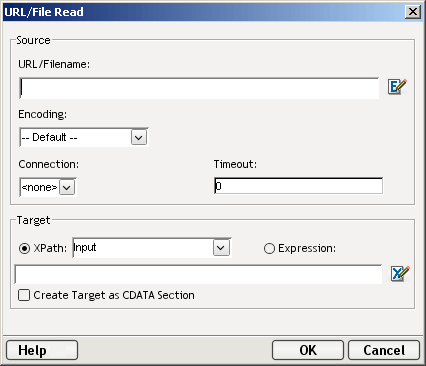
If a file is in a format other than XML, use this action to read the file into an XPath location.
To create a new URL/File Read action:
From the Action menu, select New Action>Data Exchange>URL/File Read. The following dialog appears.
In the Source File portion of the screen, enter the file's URL. Since this is an ECMAScript expression, a URL string must be enclosed in quotation marks.
If applicable for the file format, select an Encoding algorithm from the dropdown menu.
NOTE: One common use case is shown above. The file in question might be binary, in which case it would be appropriate to select "Binary to Base64" from the dropdown. The appropriate decoding method can be specified in the URL/File Write action (below).
Select a Connection Name. Any HTTP, HTTPS and FTP connections resources you have created will appear in this list.
Specify a Connection Timeout value (in seconds), or leave as zero. Whatever value you place here will override any value specified in your connection resource.
In the Target File portion of the screen, select XPath>Input and enter the XPath destination of the file contents. You can also select Expression by clicking on the radio button. Doubleclick the Expression icon at right to bring up the Expression Builder, if desired.
Click the Create Target as CDATA Section checkbox if you want the contents of the file wrapped in a CDATA section. (This is not necessary for binary files that are to be encoded as Base64 per the above example.) This allows characters such as the angle brackets ( < > ) to be used inside an XML document without being interpreted as part of a start or end tag.
If a file needs to be in a format other than XML, use this action to write the file from a DOM or message part.
NOTE: This action is, in every respect, the functional complement of the URL/File Read action described above.
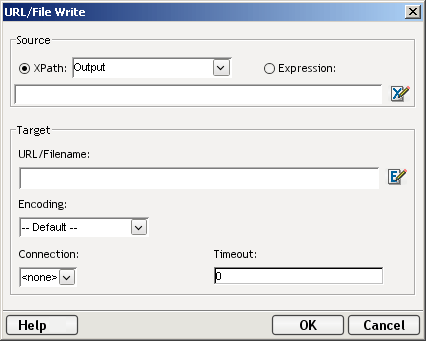
To create a new URL/File Write action:
From the Action menu, select New Action>Data Exchange>URL/File Write. The following dialog appears.
In the Source File portion of the screen, Select Source XPath>Output.
Enter the XPath containing the file content. (Alternatively, select the Expression radio button and enter an ECMAScript expression that specifies the location of the file contents.)
In the Target portion of the screen, enter the URL where the file is to be stored.
If applicable for the file format, select from the Encoding list box to specify a decoding before the file is written.
Select a Connection Name. Any HTTP, HTTPS and FTP connections resources you have created will appear in this list.
Specify a Connection Timeout value (in seconds), or leave as zero. Whatever value you place here will override any value specified in your connection resource.
In most cases, you will use Composer to build consumable services, but in some situations, you may have a need for your service to act as a consumer of other services.
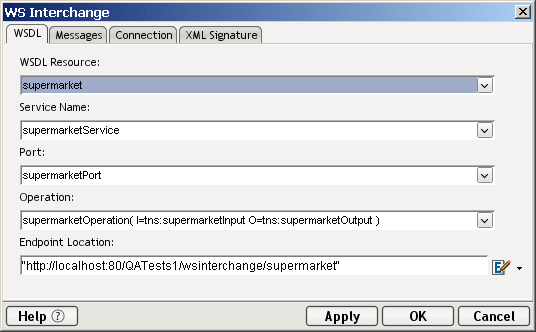
The Web Service Interchange action allows your component to invoke a Web Service according to calling conventions specified in a WSDL Resource. (See "About WSDL Resources" on page 245 for more information about WSDL Resources.) You will use this action in scenarios that might require your component or service to act as a client in a web-service interaction involving a remote service.
Note that before you can create a Web Service Interchange action, you must have a WSDL Resource that describes the service.
To create a Web Service (WS) Interchange action:
Select a line in the Action Model where you want to place the Web Service Interchange action. The new action is inserted below the line you selected.
From the Action menu, select New Action/Data Exchange, then WS Interchange. The Web Service Interchange dialog appears.
Choose the desired WSDL Resource, Service Name (if applicable), Port, and Operation from the dropdown menus provided. (These menus will be prepopulated with choices taken from the information in your existing WSDL Resources. For information, refer to the section on WSDL Resources in Resources)
Enter the Endpoint Location (usually a URL pointing at a servlet) for the Web Service you wish to use, wrapped in quotation marks. (Alternatively, enter an ECMAScript expression that will evaluate to an Endpoint Location at runtime.)
NOTE: This is the only field on the WSDL tab of the dialog that you should have to fill out by hand.
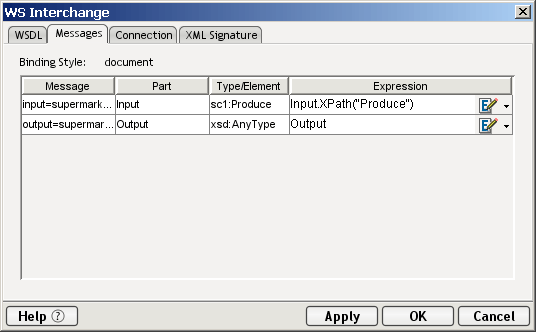
Specify the input and output messages for the particular service you are going to invoke. The Message, Part, and Type/Element fields will be prepopulated. Under Expression, enter the ECMAScript expression that describes the source and target for each message. Usually, this will be an expression that specifies an XPath location in an Input Part or Output Part. Click the Expression Builder icon at the far right to go to the Expression Builder dialog, where you can easily build the appropriate expression(s) via point-and-click.
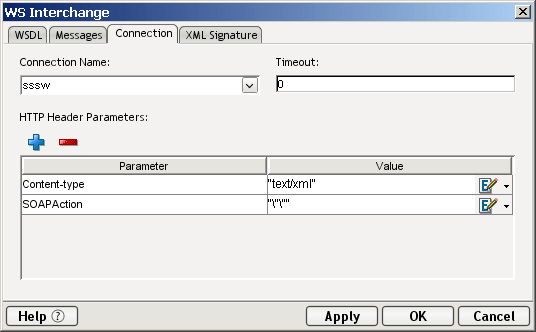
Choose an HTTP Connection Resource (as needed) from the Connection Name dropdown menu.
NOTE: For ordinary HTTP connections, you can specify <none> here. The intent of this field is to let you connect via HTTPS to a secure site using the user ID and password information stored in an HTTP Connection Resource.
Specify a Connection Timeout value (in seconds), or leave as zero. Whatever value you place here will override any value specified in your connection resource.
The Parameter and Value fields in this dialog should already be populated, based on the Operation and Message information given in other tabs of the dialog. If the Value fields are empty, enter appropriate strings or expressions for the type of SOAP action and/or the content type (MIME type) of the exchange.
If you wish to specify additional HTTP header information, click the Plus sign above the combo box to add new HTTP parameter fields.
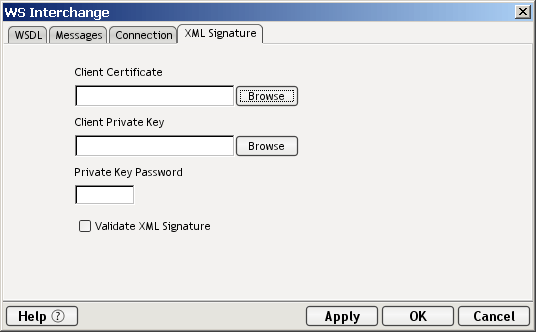
Click the XML Signature tab to bring up the next panel: (Optional)
Use the prepopulated pulldown menu to select an existing Certificate Resource in your project. (See "About Certificate Resources" for details on how to create this kind of resource.)
Check the box if you would like to Validate the XML Signature on the way out.
Click Apply to test the Web Service action in real time, or click OK to dismiss the dialog.
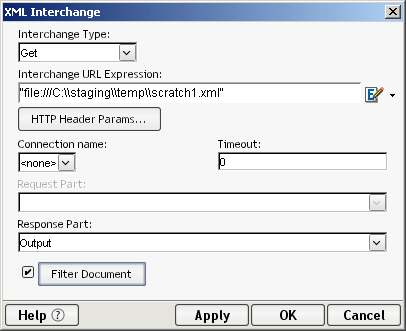
The XML Interchange action reads external XML documents into a component's DOM and writes data from a component's DOM out as XML files. There are four types of XML Interchange actions:
When using the Get interchange, fill in the "Interchange URL Expression" field with a URL that points to the XML document you want to bring into the component. If you have created an HTTP or FTP Authentication connection resource, you can specify it under "Connection Name." Otherwise, the connection information would need to be embedded in the URL. In the "Response Part" field, you will specify a DOM which is to receive the XML. If the DOM name you specify does not exist, it will be created.
When using the Put interchange, fill in the "Interchange URL Expression" with a URL that points to the location to which you want to write the XML document. Select a "Connection Name" from the list if you have already created an HTTP or FTP Authentication connection resource. Otherwise, the connection information will need to be embedded in the URL. For "Request Part", you will specify the name of a DOM in your component to send its data as XML.
When using the Post interchange, fill in the "Interchange URL Expression" with a URL that points to the location to which you want to write the XML document. Select a "Connection Name" from the list if you have already created an HTTP or FTP Authentication connection resource. Otherwise, the connection information will need to be embedded in the URL. For "Request Part", you will specify the name of a DOM in your component to send its data as XML.
When using the Post with Response interchange, you supply the same parameters as for Post, with one additional parameter. You must also specify a "Response Part" DOM to receive the Response XML document from the Post with Response action. The difference between the two interchanges is that Post with Response expects a response XML object back from the origin server.
To add an XML Interchange action:
Select a line in the Action Model where you want to place the XML Interchange action. The new action is inserted below the line you selected.
From the Action menu, select New Action/Data Exchange then XML Interchange. The XML Interchange Action dialog box appears.
In the Interchange URL Expression field, type an expression that defines a fully qualified URL for an XML document using any of the following supported protocols:
Depending on the Interchange Type selected, this URL is the source or the destination of the XML file for the XML Interchange action. For example:
file:///g:/xmldata/invoicebatch1.xml
ftp://accounting:password@123.456.789.987:21/invoices/inv1.xml
Since this is an ECMAScript expression, a URL string must be enclosed in quotation marks.
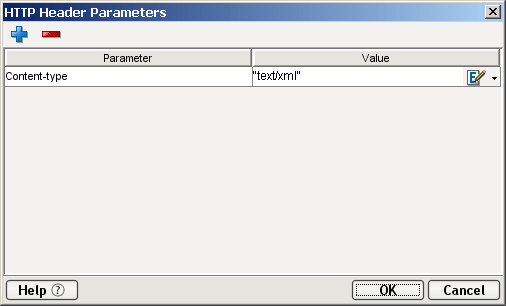
Optionally click the HTTP Header Parameters button. Th e HTTP Header Parameters dialog appears.
Click the plus (+) icon to add new header parameters. Enter a Parameter name and the desired corresponding Value. Common HTTP header parameters include "Content-Type," "Content-Length," and "Keep-Alive." You can add any number of Parameter-Value pairs in this dialog.
Click OK to close the HTTP Header Parameters dialog. The XML Interchange dialog reappears.
Select a Connection Name. Any HTTP and FTP connections resources you have created will appear in this list.
Specify a Connection Timeout value (in seconds), or leave as zero. Whatever value you place here will override any value specified in your connection resource.
NOTE: A value of zero means that no time limit is placed on the connection, unless you are using an HTTP Connection Resource (which is optional for non-authenticated connections). If a timeout value is specified in that connection resource, it will be used.
In the Request Part field, specify the name of a DOM in your component to send its data as XML. Request Part is used for Put, Post and Post with Response Interchange types.
In the Response Part Field, specify the name of the DOM tree that will receive XML. Response Part is used for Get and Post with Response.
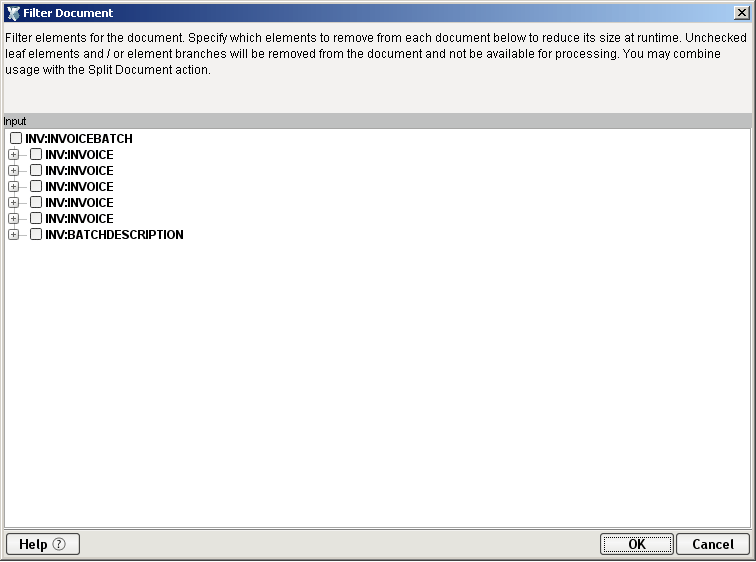
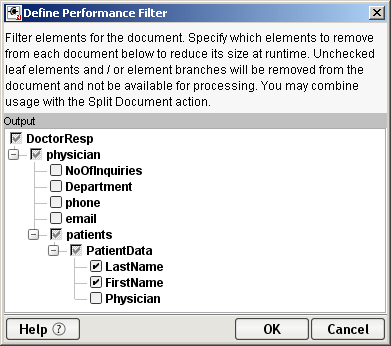
Optionally check the checkbox next to the Filter Document pushbutton (thereby enabling it). If document filtering (see discussion below) is desired, click the pushbutton. A dialog will appear:
NOTE: The document shown in the dialog will be the one selected in Response Part in the XML Interchange dialog.
The purpose of this dialog is to allow you to specify individual nodes that are to be retained (rather than stripped off) the incoming XML document in real time for purposes of improving performance and reducing RAM overhead.
Check the checkbox next to the nodes you want to keep in the document. Unchecked nodes will be stripped off (discarded) prior to parsing the DOM. (See additional discussion in the section following this one.)
When you have selected nodes that you wish to be kept, click OK to dismiss the dialog.
Click OK. Alternatively, you can press the Apply button to see the affect of the XML Interchange action without closing the dialog. This allows you to make repetitive edits to a XML Interchange action and quickly see the results.
The Filter Document button in the XML Interchange dialog (further above) offers the potential for greatly improved performance when processing large incoming documents. It also offers potential benefits in terms of memory conservation, since a filtered document will require less memory.
The Filter Document button brings up a resizable dialog containing a tree view of the document in question.
For XML Interchange actions, the document shown in this dialog will depend on the interchange mode (GET versus POST with Response) as well as the target message part you've selected in the combo boxes provided. (Note that you cannot get to this dialog if PUT or POST have been selected, since in those cases there will be no incoming document; only an outgoing one.) In the tree view display, every element of the document will have a checkbox next to it. Any elements that you check will be kept when the document is DOM-parsed for use in your component. Any boxes that are unchecked will result in the associated elements (and their attributes) being discarded, so that the parsed DOM is smaller than it would otherwise be.
In the above illustration, the incoming document, with root node DoctorResp, will have a /physician node with a /patients node under it, and the /patients element, in turn, will have a PatientData element under it. Likewise, the latter will have child nodes LastName and FirstName. But since Physician is not checked, the incoming document will not have anything under the XPath:
DoctorResp/physician/patients/PatientData/Physician
Similarly, there will not be anything under /physician/NoOfInquiries, /Department, etc., because those nodes were not checked.
It's quite common to encounter scenarios in which only a few nodes or XPath locations in a given input document are of interest to a particular component or service. When this is the case, it makes sense to use the Filter Document dialog to strip away unneeded portions of the input document. Careful use of document filtering will allow you to create services that process documents efficiently and quickly, with minimal RAM impact.
NOTE: You can apply document filtering (using the above dialog) to any input document for any kind of service (not just documents arriving via the XML Interchange action). See the discussion in Creating an XML Map Component, for further information on how to filter Input documents.
This submenu contains actions that implement looping and loop-control constructs.
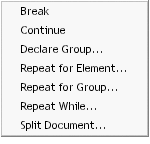
The Break Action stops the execution of a Repeat for Element, Repeat for Group, or Repeat While loop. The Action Model continues execution with the next action outside the loop.
The use of a Break is appropriate when, for example, you are using a loop to search a node list for one particular item. When the target item is found, there is no need to continue iterating; hence a Break can be used to terminate the loop immediately.
NOTE: A Break action will typically occur in one branch of a Decision action (within a loop). You'll place the Break action in either the True or False branch of the Decision action, as appropriate.
Open a component that contains a Repeat action you wish to modify to include a Break action.
Select a position inside the loop where you wish to place the Break action. Generally, this will be in one leg or the other of a Decision action (as shown below).
From the Action menu, select New Action>Repeat then Break. The Break action appears immediately in the action model. (There is no setup dialog.) See below.
The Continue action causes execution of the current iteration of a Repeat for Element, Repeat for Group, or Repeat While loop to stop and execution to begin at the top of the loop, with the next iteration. The Continue action provides a way to short-circuit downstream actions inside the loop while allowing the loop to continue on to the next iteration.
A Continue action is appropriate in a situation where, for example, one item in a list should be skipped over some reason, yet execution of the loop must continue.
NOTE: A Continue action will typically occur in one branch of a Decision action (within a loop). You'll place the Continue action in either the True or False branch of the Decision action, as appropriate.
Open a component that contains a Continue action you wish to modify to include a Continue action.
Select a position inside the Loop actions where you wish to place the Continue action. This will generally be inside one fork or the other of a Decision action; see illustration below.
From the Action menu, select New Action>Repeat>Continue. A Continue action appears in the action model.
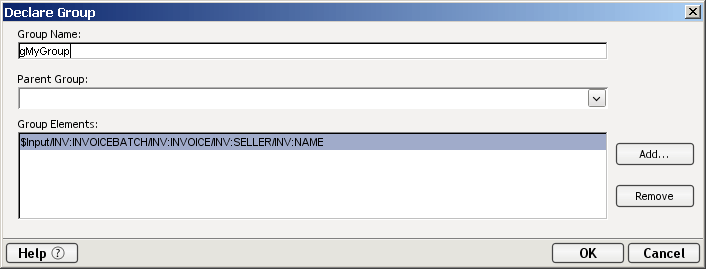
The Declare Group action allows you to create two special lists, each in reference to a DOM. These group lists can then be used as the basis for a loop in the Repeat for Group action. To create the lists, you supply a Group Name and specify an XPath. Composer then creates the lists as follows: a Group list is created that contains one entry for each unique value found among all the elements that match the XPath. The Group list is referred to by the Group Name you supply. Then a Detail list is created for each unique entry in the Group list that contains as many entries as there are members in the Group (i.e., a non-unique list). The Detail list is referred to by the Group Name you supply post-fixed with the label "(Detail)."
Grouping allows you to select a repeating element in your Input DOM and create fewer elements based on the unique values across all instances (siblings) of that repeating element. So instead of having multiple elements, you end up with one element for each unique element value in your Output DOM.
To add a Declare Group action:
Select a line in the Action Model where you want to place the Declare Group action. The new action is inserted below the line you selected.
From the Action menu, select New Action>Repeat then Declare Group. The Declare Group dialog box appears.
Optionally, select a parent group. This is used if you want to create multiple group levels.
When you have all the elements you want in the group, click OK.
NOTE: An example of this can be found in the Action Examples sample project installed on your computer.
The Repeat action creates looping structures within an Action Model. Loops give you the ability to repeat a set of one or more actions. There are three types of loops: Repeat For Element, Repeat For Group, and Repeat While.
XML allows multiple instances of an element in a document (analogous to multiple records in a database table). The number of instances can vary from document to document and is defined in the Document Schema (DTD or XML Schema). For instance, you might receive an XML document containing lineitems for an invoice on a daily basis. Each day the XML document has a different number of lineitems. Not knowing how many instances of "lineitem" are in the XML document poses a problem if you want to transfer these item numbers from the input XML document to an output XML document programatically. The Repeat For Element action solves this problem.
The Repeat For Element action allows you to mark an element that occurs multiple times. The action then sets up a processing loop that executes one or more actions for each instance of the marked element until no more instances exist. In the example above, the processing loop would contain a single Map action to transfer the lineitem number and this action would be repeated until all lineitems had been mapped.
The Repeat for Element action also uses the concept of an alias. An alias performs two functions. It is an alternate name or shorthand for the marked repeating element, which saves you the work of re-specifying long XPath expressions. In some cases, the repeating element may be several levels down in the document hierarchy. When you create Map actions in the Repeat loop that transfer child elements of the marked element, using the alias is quicker than re-typing a long XPath expression. An alias is also an indicator to Map actions within the Repeat loop to use the next instance of the repeating element each time the loop processes. A Map action within a Repeat for Element loop that does not use the alias always refers to the first instance of the element in the source Part.
NOTE: Hovering the mouse over a Repeat alias in the Map dialog will display a tool tip showing the XPath represented by the alias.
The Repeat For Element action allows you to process more than one action within the loop. In the simplest case, the repeat loop might only contain one Map action that transfers the value of the current element instance from the input Part to the output Part. You can also define multiple actions in the processing loop, for example: a Map action to transfer the current value and a Log action that writes to a file, creating an audit of each transfer.
To use a Repeat For Element processing loop:
To create a Repeat For Element action:
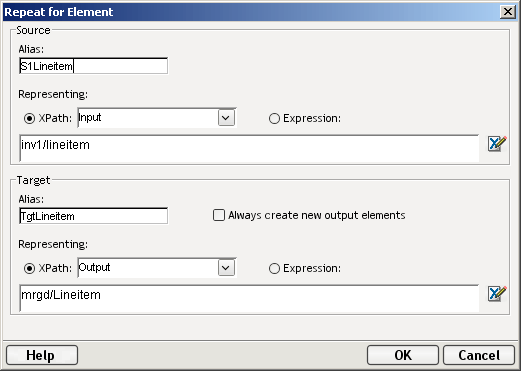
Select the first instance of a repeating element in an XML Document tree.
Right-click on the repeating element in the Part or, from the Action menu, select New Action>Repeat, then Repeat for Element.
Begin by identifying your Source.
Type in the Alias field. A good naming convention for an alias is to use the element name with a prefix indicating sources or target and the type of repeat action such as "S1Lineitem."
Enter an XPath expression, or click the Expression Builder button and build an XPath expression for the repeating element. The example above show an XPath which points to a root node of "inv1" and it's child node "lineitem."
The next step is to identify your Target.
Use the checkbox to indicate if you want to Always create new output elements. This box would be used in situations where you had multiple input documents containing similar node structures which you wanted to merge into a single Output DOM with common node names. Refer to the Action Model following the final step of this procedure for an example.
Enter an XPath expression, or click the Expression Builder button and build an XPath expression for the repeating element. In this case, we are using "mrgd/Lineitem."
Click OK. Your Repeat for Element loop is added to the Action Model.
Highlight Loop Actions to begin adding Map actions or whatever other actions are necessary for your component.
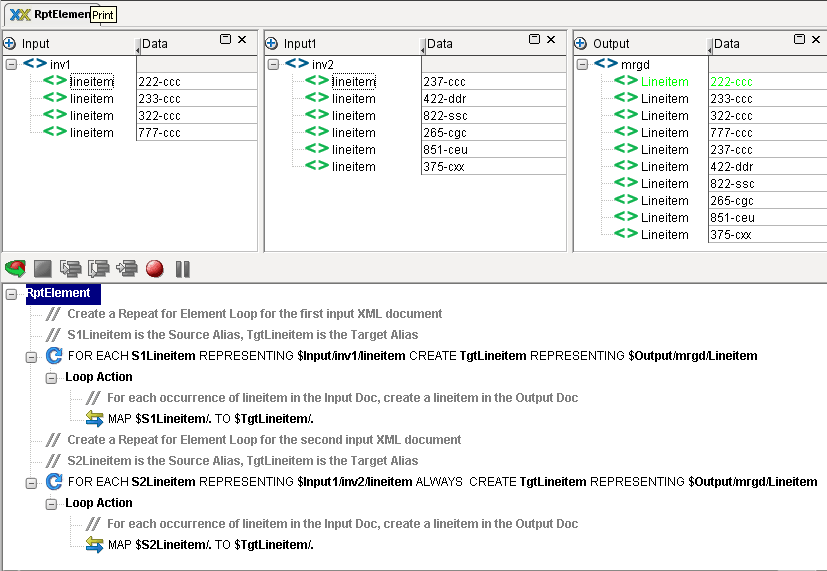
The following illustration shows an Action Model for a component containing two Repeat For Element actions and the input and output XML documents that are used by the component. This model contains two Repeat For Element groups because the user has two very similar input DOMs containing an unspecified number of lineitems. Map actions are used within the processing loop to transfer the lineitems from the two input DOMs to the single output DOM.
The format of an XML document that you receive is not always the format that meets the requirements of your business process. For instance, an XML document might contain invoices from different sellers. The data is received as individual invoices, but in the context of a business-to-business transaction, you might need to summarize the data and send the summary data to a manager, and at the same time, send the invoice data to the Accounts Payable department.
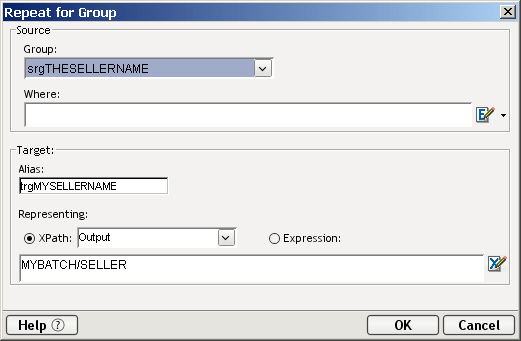
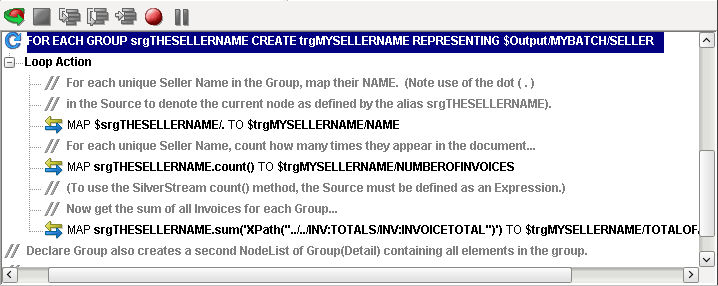
A Repeat for Group action allows you to re-structure your data and/or establish a framework to calculate aggregates on your data. Grouping allows you to select a repeating element in your input Part and create fewer elements based on the unique values across all instances (siblings) of that repeating element. Instead of multiple seller elements across the invoices (some with the same seller value), you end up with one element for each unique seller value in the output Part.
The Repeat For Group action sets up a processing loop based on one of two lists created by the Declare Group action. The loop executes as many times as there are entries in the list you use (either the Group list or Group (Detail) list). In the above example, if you use the Group list, once you have one element per seller, you can add Map actions to the processing loop to calculate how many invoices each seller had. You can also list the individual invoice numbers beneath each seller. By combining a Repeat for Group with Map commands, you can create a new XML document whose structure and data are different from the original.
In a way similar to the Repeat for Element action, a Repeat for Group action also uses the concept of an alias. The values for Source Group used in the Repeat for Group dialog are the list names created by the Declare Group action. The list names perform two functions. They are an alternate name or short-hand for the XPath source of any Map actions within the loop. This saves you the work of re-specifying long XPath expressions. The group list name when used in place of a DOM name in a Map action source, is also an indicator to the Map action within the Repeat loop to use the next instance in the group list each time the loop processes. A Map action within a Repeat for Group loop that does not use the group name always refers to the first instance of the element in the source Part.
The target aliases created in the Repeat for Group action also serve two functions. They are an alternate name or short-hand for the XPath target of any Map actions within the loop. This saves you the work of re-specifying long XPath expressions. The target alias when used in place of a Part name is also an indicator to Map actions within the Repeat loop to create a new instance of the Source in the target Message Part. A Map action within a Repeat for Group loop that does not use a target alias always overwrites the first instance created in the target Message Part with subsequent instances from the Source group list.
To create a Repeat for Group action, you need to complete these three tasks:
To add a Repeat for Group action:
From the Action menu, select New Action>Repeat, then Repeat for Group. The Repeat for Group dialog box displays.
Under Source, select a Group name on which to base the Repeat for Group action loop.
Optionally, type in a Where clause to filter the group list, or click the Expression Builder button and create a Where expression.
Under Target, you can optionally create an Alias name to be used by Map actions in their target expressions.
Create an XPath or Expression to be represented by the alias.
The following illustration shows a complete Repeat For Group action in the Action Model pane.
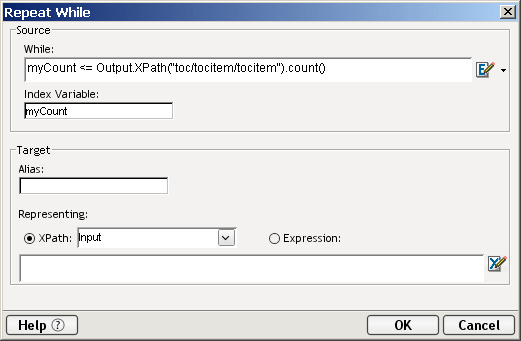
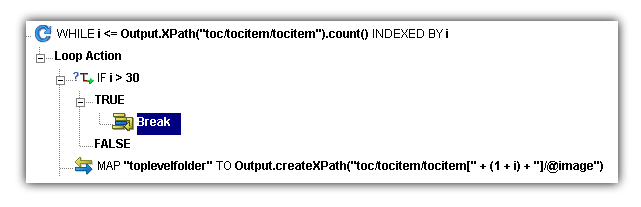
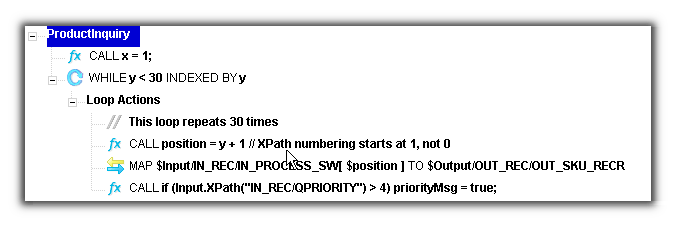
The Repeat While action repeats one or more actions as long as a condition that you specify remains true. For instance, you can create a variable that contains the total sales from line items within invoices. You can then create a Repeat While action that reads invoices, totals the line items, and stops when the line item total reaches a certain amount.
The target alias created in the Repeat While action serves two functions. It is an alternate name or short-hand for the XPath target of any Map actions within the loop. This saves you the work of re-specifying long XPath expressions. The target alias when used in place of a DOM name in a Map action is also an indicator to Map actions within the Repeat loop to create a new instance of the Source in the target DOM. A Map action within a Repeat for Group loop that does not use a target alias always overwrites the first instance created in the target DOM with subsequent instances from the Source.
NOTE: Unlike the Repeat for Element and Repeat for Group, the Repeat While does not have to be based on data in a DOM tree. The loop can operate independently of data in the DOM tree.
Select a line in the Action Model where you want to place the Repeat While action. The new action is inserted below the line you select.
From the Action menu, select New Action>Repeat, then Repeat While. The Repeat While dialog box appears.
Under Source, type an expression to test the While loop, or click the Expression Builder button and build an expression.
Type a name for a variable that keeps track of the condition of the loop.
If you know the alias for the Target element, type in the Alias field.
If you do not know the alias, select either XPath and a Part element, or Expression and type in a valid expression.
Enter a criteria statement, or click the Expression Builder button and build an expression.
The following illustration shows a complete Repeat While action in the Action Model pane.
When a service receives an input document, Composer's default behavior is to read the entire document into memory at once, then parse it into a DOM. Message Parts (Input, Input1, Temp, etc.) are then passed between components—or from service xObjects to components—as self-contained DOMs. This approach is appropriate for most services. But in some circumstances, such as when a service routinely encounters large documents, machine memory and parsing overhead become significant issues. In such situations, it can make more sense to process large documents in pieces.
The Split Document action is a special-purpose action designed to enable piecewise processing of large XML documents. With the Split Document action, input documents are treated as streams. A stream can be consumed in arbitrarily defined chunks; the chunks, in turn, can be processed serially. The net result is a much reduced demand on system RAM, and (potentially) higher throughput from reduced DOM-handling overhead.
You should consider using the Split Document action when:
Your service can be expected to encounter large input documents (200+ Kbytes) containing repeating elements, or
Your service runs out of memory on the server due to large DOM sizes, or
Your deployed service has a performance bottleneck that you think may be related to DOM parsing, or
The nature of your business logic (and/or your input documents) is such that it would be more natural to process the data streamwise, in chunks, than to create and debug a single large Repeat For Element loop.
The Split Document action is subject to some important caveats. The most obvious limitation is that the document in question should be piecewise-processable; which is to say, it should contain repeating elements (identifiable split points where the document can be separated into chunks). The split points are defined in terms of an XPath expression representing the type of node on which to break. (While it is technically possible to split a non-repeating XML Document into two parts using the Split Document action, this would be an abnormal use case and is not recommended.)
It's important to understand that because the document is encountered in chunks, and because each chunk is released from memory (goes out of scope) after it is processed, any business logic that has to "know about" data in downstream parts of the document (such as a footer section) while processing upstream parts can't be expected to work. In general, any dependencies that span "document chunks" will, at the very least, require custom workarounds involving operations that "keep track of" document characteristics as processing occurs.
NOTE: If global knowledge of document statistics is required—or if it is necessary to use aggregate-oriented XPath methods like count(), last(), etc.—then stream-based processing using the Split Document action is not appropriate, because the entire document needs to be read into memory.
The Split Document action should be used in the top-level Service xObject that wrappers all of your service's components. It also should be the first "DOM-processing" action in that service's action model. That is to say, no other action preceding the Split Document action should reference the Message Part (typically Input) that will be split.
The first action in the action model that references a document determines how that document will be handled. If the first action to reference Input is a Map action (or other non-Split-Document action), then Input will be treated as a single, monolithic DOM. If, on the other hand, the first action to reference Input is a Split Document action, the source document for Input will be treated as a stream. At that point, no self-contained "DOM version" of the streamed document will ever be available, for the life of that service instance.
NOTE: Within a given service, a particular document can be processed either as a DOM or a stream, but not both. However, if an Input document is processed in stream fashion, only that document is handled that way. Other documents (Temp, Output, etc.) will be subject to the normal DOM parsing.
The Split Document action requires you to specify an XPath expression representing the type of document element on which to split. Consider the following hypothetical XML document, representing a batch of invoices.
  <DATA>
  <PrologInfo/>
          <BatchDate/>
  <InvoiceBatch>
      <Invoice/>
          <Line Item/>
          <Line Item/>
      <Invoice/>
          <Line Item/>
          <Line Item/>
      <Invoice/>
          <Line Item/>
          <Line Item/>
      <Invoice/>
          <Line Item/>
          <Line Item/>
      <Invoice/>
          <Line Item/>
          <Line Item/>
  </InvoiceBatch>
  <SummaryLog/>
       <NumberOf<Invoices/>
  </DATA>
The natural "split point" for this document might be an XPath of
DATA/InvoiceBatch/Invoice
Using this XPath with a Split Document action, the above document would be read in the following chunks:
  <PrologInfo/>
          <BatchDate/>
  <InvoiceBatch/>
       <Invoice/>
          <Line Item/>
          <Line Item/>
followed by:
  <InvoiceBatch/>
       <Invoice/>
          <Line Item/>
          <Line Item/>
  <InvoiceBatch/>
       <Invoice/>
          <Line Item/>
          <Line Item/>
  <InvoiceBatch/>
       <Invoice/>
          <Line Item/>
          <Line Item/>
  <InvoiceBatch/>
       <Invoice/>
          <Line Item/>
          <Line Item/>
  <SummaryLog/>
       <NumberOf<Invoices/>
There would be five chunks, total. The first and last chunks would be "special" in the sense that they contain header and trailer (or prolog/epilog) data in addition to the Invoice data. There is nothing special about how they were created, however. The document was simply split wherever DATA/InvoiceBatch/Invoice occurred.
NOTE: Each time a split occurs, the chunk that gets created contains the entire subtree under the parsing node. If the chunk is the first chunk in a document that contains prolog information before the first parsable node, then the first chunk will contain all of the document (including prolog) up to and including the first parsable node and its children. Similarly, if the document has information following the last parse-tree, anything trailer-nodes will travel with the chunk.
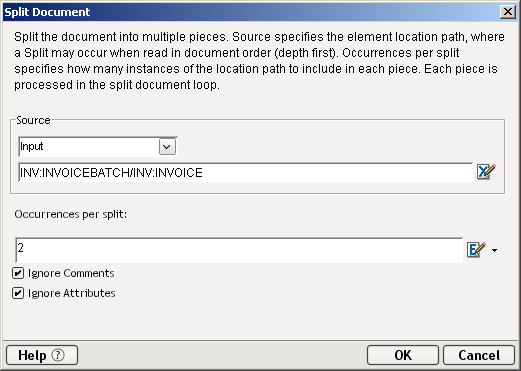
If the document in the foregoing example had contained thousands of invoices, splitting it into one-invoice chunks probably would not be wise. (Component-calling overhead could be expected to result in a performance hit.) For efficiency, it would be better to break the document into larger-sized pieces. The Split Document action allows you to do exactly that. You can override the default "strict parsing" behavior shown above by specifying a value greater than one in the "Occurrences per split" portion of the Split Document dialog. (See further below.) This way, in a document containing a thousand invoices, one could split on every ten or every hundred invoices. It would be up to the invoice-handling component (the component to which "chunks" are passed) to loop through individual invoices at the action-model level.
Suppose the document in the previous example were processed with a Split Component action in which the "Occurrences per split" parameter is set to 2. The resulting chunks would look like:
  <PrologInfo/>
          <BatchDate/>
  <InvoiceBatch>
      <Invoice/>
          <Line Item/>
          <Line Item/>
      <Invoice/>
          <Line Item/>
          <Line Item/>
followed by
  <InvoiceBatch/>
       <Invoice/>
          <Line Item/>
          <Line Item/>
  <InvoiceBatch/>
       <Invoice/>
          <Line Item/>
          <Line Item/>
followed by
  <InvoiceBatch/>
       <Invoice/>
          <Line Item/>
          <Line Item/>
  <SummaryLog/>
       <NumberOf<Invoices/>
Notice that once again, header elements come as part of the intial chunk, while footer elements are contained in the final chunk. The first two chunks contain two invoices each. The final chunk contains just one, since 5-modulo-2 is one. The final chunk, in other words, contains the "remainder" (or leftover pieces) from the splitting operation. This means that the Repeat loop in your chunk handler will need to be able to deal gracefully with situations where a chunk contains less than the expected number of pieces. One way to do this is to base the loop's termination condition not on a fixed number, like 2 or 10 or 100 (representing the "Occurrences per split" value), but on an actual count of the number of target nodes contained in the incoming chunk.
For example, the following ECMAScript expression would tell you how many <Invoice> elements are in a given chunk, in the previous example:
Input.XPath('InvoiceBatch/Invoice').length
You can safely continue iterating until the loop counter variable reaches the amount returned by this expression.
The Split Document action is itself a looping action: Composer places a "Loop Action" block under the Split Document line in the action model automatically. You will probably put a Component action within the Loop Action block, along with pre- and post-processing logic for chunks, exception-handling code, etc.
Loop termination is handled automatically, in the sense that you do not have to declare a counter variable (nor specify a termination condition). Composer simply performs the appropriate number of stream-reads and splits, and stops when there are no more "chunks" in the stream.
You can terminate the loop prematurely (or continue on to the next iteration at any point in the loop) by, for example, placing a Break (or Continue) action in the True branch of a Decision action. More sophisticated loop control can be achieved using Try/On Fault (see "The Try/On Fault Action" above) in the service and Throw Fault in the chunk-handler component, or by analyzing a custom Output doc returned by the chunk handler, etc.
Typically, you will place a Split Document action in a service that calls a chunk-handling component (which might be an XML Map component, a JDBC component, or any other component type). The service will call the component via a Component action. The component will operate on the chunk's contents, using whatever business logic is necessary. The component may or may not hand an Output document back to the original service; and the service itself may or may not construct an Output document for the benefit of the invoker.
The service containing the Split Document action will typically be splitting the Input message part. The Component action (calling the chunk handler) will in turn specify "Input" as the input to the handler component. In effect, a chunk becomes a DOM (a first-class document) in its own right. Any of the normal DOM operations can be performed against it. It can be passed component-to-component, written to disk, appended to other DOMs, mapped into or out of, etc.
When you open a service containing a Split Document action, the Input document window will initially be empty. (Ordinarily, you would expect to see your Input template document in tree view.) As you step through the action model in animation mode, the document window will populate as soon as you execute the Split Document action. The window will show the first "chunk" of the input stream, based on a parsing of the Input template. If you continue to use Step Into, each trip through the Loop Action block will re-load the Input window with the appropriate chunk from the input stream. At any time, during any of these iterations, you can Stop the animation and then perform drag-and-drop mapping of data from Input to other message parts (such as Temp or Output) as needed.
After the Split Document action is complete, the last chunk of the document will remain in the Input pane. Footer data can be mapped at that point (using drag-and-drag or an ordinary Map action) to Output, or otherwise processed, as desired.
NOTE: At no time will the entire Input template document be visible in the document window. Only pieces will be visible. If you need to see the entire document, open the appropriate Template itself, outside the component.
An important behavior to be aware of at design time is that the document-handling mode (stream versus DOM) is not set until you Save the component or service you're editing. In other words, if you add a Split Document action to an action model and immediate animate it (without Saving), the stream processing behavior will not be evident. You should Save the service or component after making any change to the action model that would change the document-handling behavior (stream vs. single DOM) of the service/component.
Another important principle to be aware of at design time is that if you happen to place an action that references Input anywhere upstream of the Split Document action in your action model (even if it's merely a Function or Log action used for debugging purposes), Input will be treated as a single large DOM at animation time. When you then Step Into the Split Document action, an exception occurs, because there is no stream. (The stream has already been fully consumed in order to create the DOM.) As mentioned earlier, the Split Document action must be the first action that references the document in question. Any other actions that reference that document must occur downstream of Split Document in the action model.
A final consideration to bear in mind is that although the Split Document action is designed to facilitate working with large documents, you should not actually use a large document as a sample at design time. Composer needs a large amount of memory at design time when large sample documents are loaded. This is true even though a particular service might use stream processing (via Split Document) to process the document. For design time, you should use a relatively small sample document—a reduced-size version of the "real thing," just large enough to prove out the action model. Use fullsize documents after deploying to the app server.
The following procedure steps you through the process of creating and using a Split Document action. It assumes that you have an Input sample document to work from, representing (in structure, if not in actuality) a large, splittable XML document. It also assumes that you have created a component to handle the processing of individual document chunks (a "chunk handler"), and a Web Service that calls that component.
To create a Split Document action:
Open the service in which you plan to use a Split Document action, if it is not already open.
Place the cursor at the point in the action model where you intend to add the new action. (Highlight or select the line preceding the intended location.)
NOTE: Be sure to heed the earlier warning about not placing the Split Document action after (downstream of) any existing action that references the document to be split (typically Input). If Input will be split, no action in the action model should reference Input unless the action in question comes after (downstream of) the Split Document action.
Either use the Action menu to create the new action, or right-mouse-click and choose New Action > Repeat > Split Document... from the context menu. A dialog appears.
Under Source, use the dropdown menu to select the message part (e.g., Input) representing the document to be split.
Also under Source, enter (in the text field provided) an XPath expression representing the node axis on which to split the document. (Click the small X-icon at the far right to bring up the XPath Expression Builder, if you'd like to have Composer help you build the expression in point-and-click fashion.)
Under Occurrences per Split, enter a positive integer representing the number of repeating pieces to include in a chunk. The default is one, meaning that Composer will split the document on every occurrence of the specified parsing node. To split on every third occurrence, enter 3. For every fourth occurrence, enter 4. And so on.
(Optional) Check the Ignore Comments checkbox if you would like XML comments to be automatically stripped from the input stream as the document is processed. This is a performance-enhancing option designed to speed the processing of (and reduce memory usage related to) documents that might contain large quantities of comments (possibly machine-generated).
(Optional) Check the Ignore Attributes checkbox if you would like Composer to discard attribute data while reading the input stream. Again, this is a potential performance-enhancer, meant to conserve memory and reduce processing overhead when dealing with large documents.
Click OK. A new action is added to the action model of the service.

Note that a "Loop Action" block appears automatically under the Split Document action.
Add a Component Action to the Loop Action block, so as to call the chunk handling component that will process individual pieces of the input doc. (See "The Component Action" for information on how to create and use this action.) In the above example, an XML Map Component called "Mapping" is called, with the service's Input passed as input to the component.
NOTE: Remember that at execution time, Input (in this case) actually represents a piece of the service's input doc.
Optionally add any other pre- or post-processing actions your service might need, in the Loop Action block.
IMPORTANT: Your Split Document action will not work (in animation mode) unless you have first Saved your service.
Copyright © 2004 Novell, Inc. All rights reserved. Copyright © 1997, 1998, 1999, 2000, 2001, 2002, 2003 SilverStream Software, LLC. All rights reserved. more ...