Composer User's Guide
CHAPTER 9
A resource is a reusable xObject that a component may need in order to carry out a task. For example, most XML integration applications communicate with a "back end" system of some sort; and to do this usually requires establishing a connection of some kind involving the specification of IP or JNDI addresses, ports, driver location, user ID and password, etc. This type of info can be stored in a reusable object and then accessed by a component at runtime. Resource xObjects accomplish this.
A Resource consists of the resource itself (whether a JPEG image, a JSP, an XSL stylesheet, or what have you) plus XML metadata about the resource, so that the characteristics of the resource are known to Composer Enterprise Server and to other runtime processes. At deployment time, all of your project's resource are packaged into the deployment archive (usually a JAR inside an EAR), and they become available on the application's classpath.
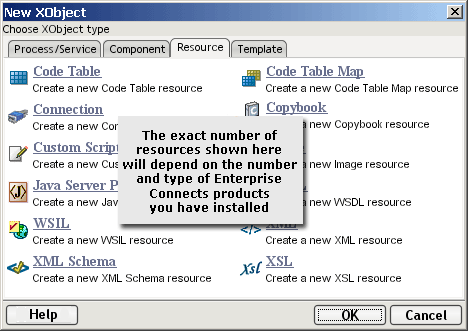
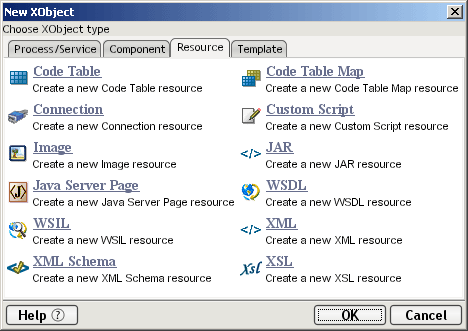
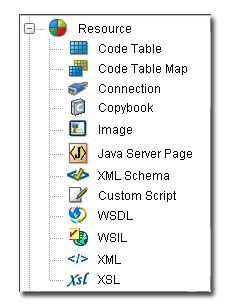
The core resource types available in Composer include those listed below. (Asterisks are shown next to resource types that are not available in the Professional Edition version of Composer.)
In addition to these core types, various Composer Connect products use additional resource types specific to the connector. For example, the EDI Connect allows you to specify EDI Document Metadata and EDI Interchange Metadata resources.
NOTE: The creation of Connect-specific resource types is explained in the documentation for the connector. Only core Composer resource types are discussed in the sections to follow.
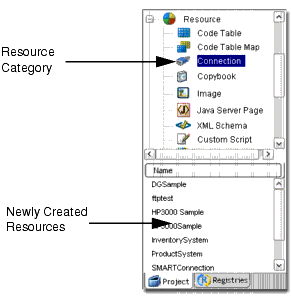
Resource types have distinguishing icons (which are displayed in the Category Pane of Composer's main navigation frame). The resource categories and their associated icons look like this:

Custom-created resources of a given type appear in the Instance Pane when you select (highlight) a particular resource category (Code Table, Connection, etc.) in the Category Pane. Each resource instance is reusable by the various components and/or services in your current project (and can be imported into other projects as well).
At component creation time, the wizard for the component will prompt you for the name(s) of the resource(s) you would like to be used by the component. This means that resources need to be created first, so that components can use them.
All resources are created using the same basic procedure, indicated below.
 To add a new Resource to a Project:
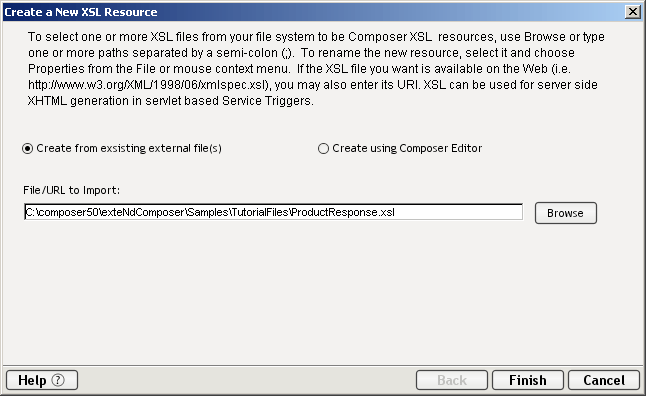
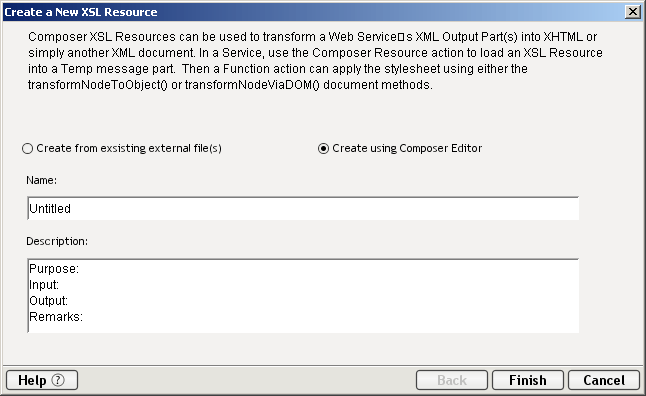
From Composer's File menu, select New, then xObject. From the Resource tab, select the desired category of Resource. See below.
Once you select your resource type, a wizard will appear, prompting you for the name of your custom resource and other information pertinent to the type of resource being created. Fill in the information requested by the wizard.
On the final screen of the wizard, click OK. The new resource is added to the Resource Category in question, and its name is displayed in the Instance Pane.
Composer supports a mechanism for dynamically selecting a language-appropriate version of an XML resource at runtime based on filename hints. The way it works is as follows. Suppose you have have two versions of an XML Resource file named MyInvoice_en.xml and MyInvoice_jp.xml. The "_en" file would contain Latin characters while the "_jp" file would have Japanese characters. (The language specifier is the two-character ISO-639 code.) At runtime, a Load Resource action can choose the appropriate language version of the XML resource in question, based on the language settings specified in design time.
To take advantage of this scheme, you must adhere to the following rules:
You must use file-naming protocol mentioned earlier. (Namely: Every file name must end with an underscore followed by the two-character ISO-639 code for the language.)
You must create one resource for each individual file. The applicable resource types are XSL, XML, and Form (i.e., XForm).
You will specify a Language option when creating a Composer Resource action, or when specifying a stylesheet resource in a deployment object.
In Composer dialogs that offer a resource-picker dropdown list, such as the Composer Resource action, you will see a Language button. If you press that button, you will bring up the following dialog.
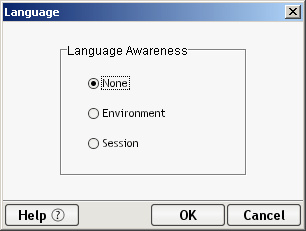
Choose one of the radio buttons:
Depending on which button you choose, the resource picker will update dynamically to show the list of available resource choices. Choosing None above means that every available resource (of all languages) will be displayed in the picklist. Choosing Environment or Session means the Resource Name list box will be populated with only the unique names of resources for the selected Resource Type after stripping the language and locale suffixes from the file names. In other words, the list is filtered according to the language-awareness preference chosen in the above dialog.
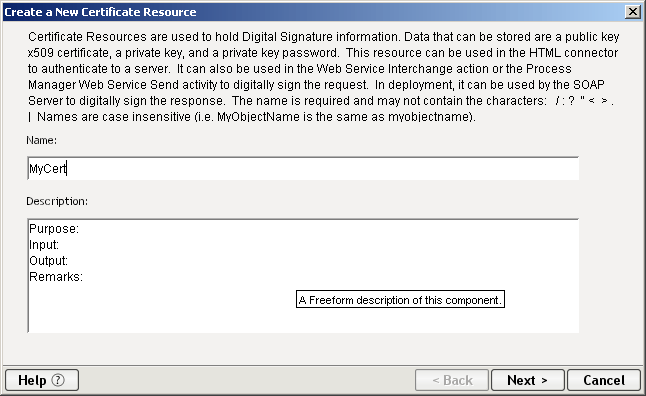
Certificate Resources are used to hold Digital Signature information. Data that can be stored in this kind of resource include a public key x509 certificate, a corresponding private key, and a private key password.
The Certificate Resource can be used in several ways:
In the Web Service Interchange action, it can be used to digitally sign a request.
In SOAP deployment, it can be used to signal the SOAP Server to digitally sign the outgoing response. (This option can be set in the options-panel UI for the SOAP HTTP trigger.)
In the HTML Connect, it can be used to authenticate to a server.
In the Process Manager, you can use a Certificate Resource to sign the outbound request of a Web Service Send activity.
NOTE: Since the Certificate Resource is a first-class Composer resource, it can be shared among components and services within a project.
To create a Certificate Resource:
In Composer's navigator pane, right-click on Certificate (under Resource) and choose New from the context menu. A dialog will appear.
Enter a Name for the resource.
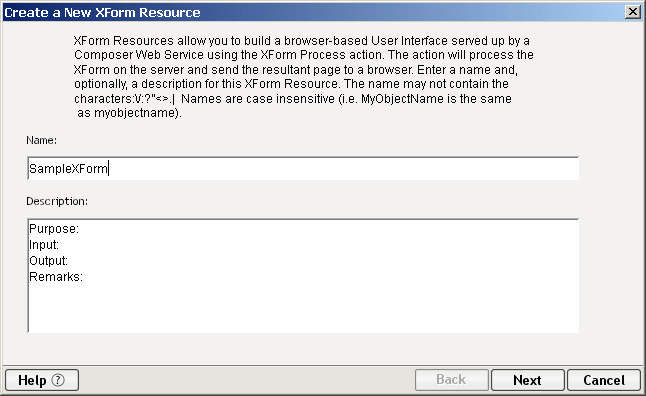
NOTE: The name is required and may not contain the characters: / : ? " < > . | Names are case- insensitive (i.e. MyObjectName is the same as myobjectname).
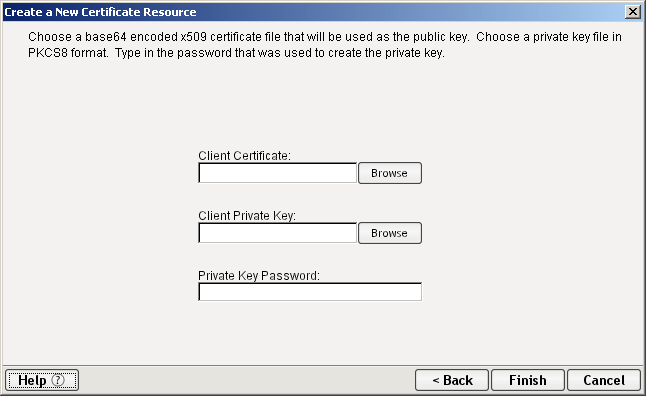
Use the Browse button to navigate your local drive or network to locate a suitable Client Certificate (x509).
Use the Browse button to navigate your local drive or network to locate a corresponding Private Key file. This key will be used for encryption of outbound digests and payloads. It will not be transmitted nor exposed to processes other than those residing in your Composer project.
Enter a Private Key Password (as applicable) so that your private key can be retrieved from the local keystore.
Click Finish. The resource is added to the navigator detail pane.
In building your Composer applications you are often faced with the requirement to repetitively transform data you receive. Typical examples for this type of conversion include changing state codes (e.g., Alabama, Illinois) to regions for classification or accounting codes as they are moved between systems. Composer provides the capabilities to assist you with this type of conversion. For example, a "Code 1" for a bookstore may represent the fiction category, or a department store may use "Code M" to represent men's clothing.
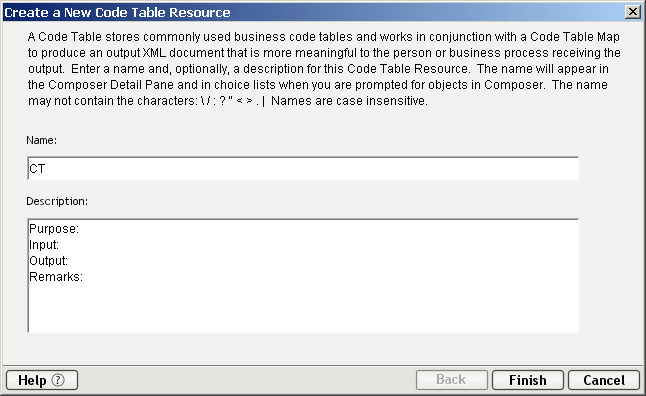
If you were to design your application so that the output XML only included "Code 1" or "Code M," with no other description, the result could be cryptic and confusing. This is where a code table comes into play. A code table stores commonly used business code tables and works in conjunction with a code table Map to produce an output XML document that is more meaningful to the person or business process receiving the output. In the case of the bookstore, the input XML that included "Code 1," might be mapped using a code table to produce an output XML with a category "fiction."

The Code Table Editor includes both menu options and a tool bar. In addition to the menu options, the Code Table Editor includes a tool bar with the following buttons:
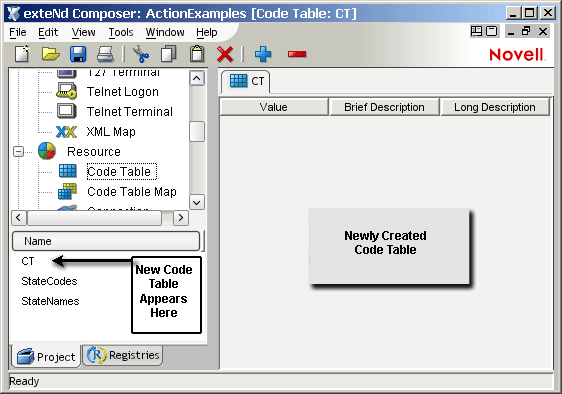
Select File>New>xObject. From the Resource tab, select Code Table. The Create a New Code Table xObject wizard appears.
Click Next. The Code Table Editor appears with the name of your empty code table in the title bar.
When you close the Code Table Editor, the name of your new code table appears in the Resource category of the Composer window, under Code Table, as shown.
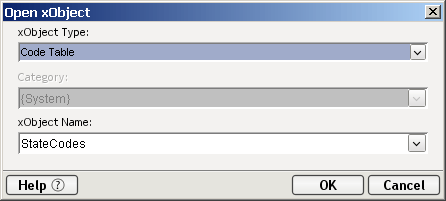
Select the code table you wish to open from the xObject dropdown list.
Click OK. The code table you selected opens in the Code Table Editor.
NOTE: Optionally, you may select Code Table in the category pane of the Composer window and doubleclick a code table from the detail pane.
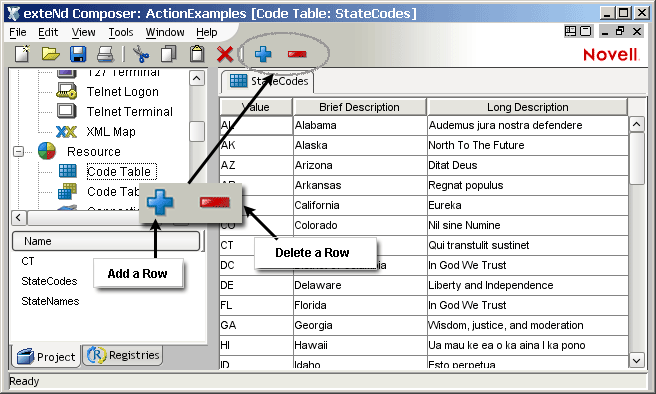
Open the code table to which you'd like to add data. The code table you open appears in the Code Table Editor.
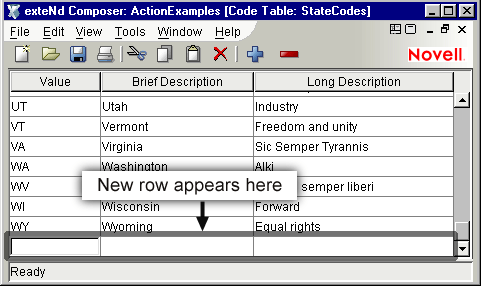
Click on the Add Row button. A blank row appears in the Code Table Editor window.
NOTE: Alternate and faster ways to enter data are to copy data from a spread sheet and paste it into the code table. Make sure your selection contains three columns. The first column must contain data; the second and third columns are optional. Open the spreadsheet, copy the three columns and as many rows as needed. Open the code table and immediately press the Paste button. You can also copy data from tables in a Microsoft Word® document using the same technique.
Use the Edit menu or the Code Table Editor tool bar buttons to cut, paste, or copy your selected data.
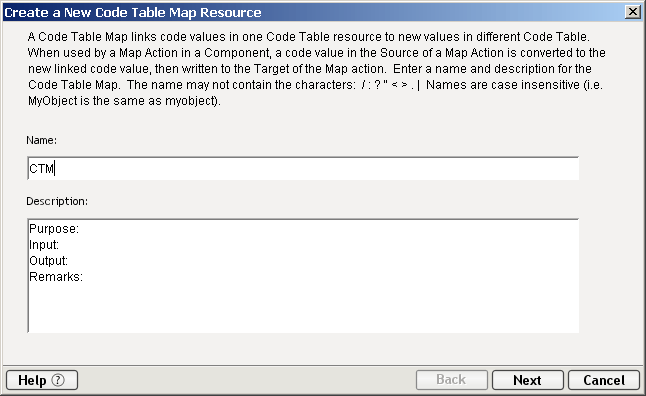
A code table map is a resource used to automatically transform one set of codes into another set of codes. These maps are useful in translating and exchanging data between XML samples within a component. For example, one company may use numeric codes to store a status field while another uses alphabetic codes.
NOTE: You must create two individual code tables before you can create a code table map, since a code table cannot map to itself (See About Code Tables).
Select File>New>xObject. From the Resource tab, select Code Table Map. The Create a new Code Table Map xObject wizard appears.
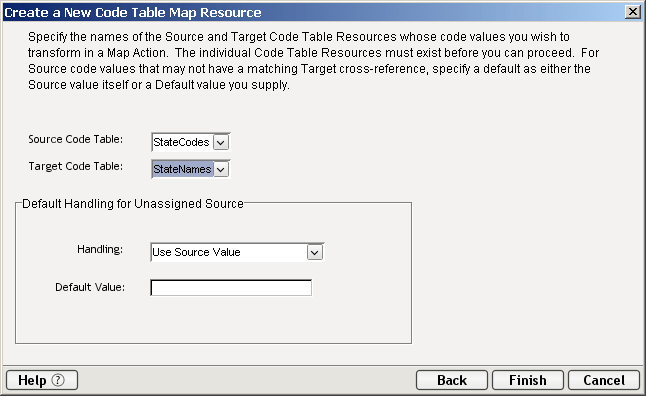
Click Next. The second page of the Create a New Code Table Map xObject appears.
Select an Input Code Table. (These codes represent the data content as it will be received into a component.)
Select an Output Code Table. (These codes represent the desired code values.)
Select a Handling method. This feature allows you to instruct Composer on how to deal with values from the input Code Table that have no corresponding value in the output Code Table to which you are mapping. For example, if there are six values in Code Table 1 and only five values in Code Table 2, you must let Composer know how to deal with the additional value. You have two choices:
Use Source Value—This choice simply uses the input value as the output value. For example, an input of "Warehouse1" would simply map to an output value of "Warehouse1."
Use Default Value—This choice would default to the value you set in the Default Value field. For example, you may enter "Not Applicable" in the Default Value field.
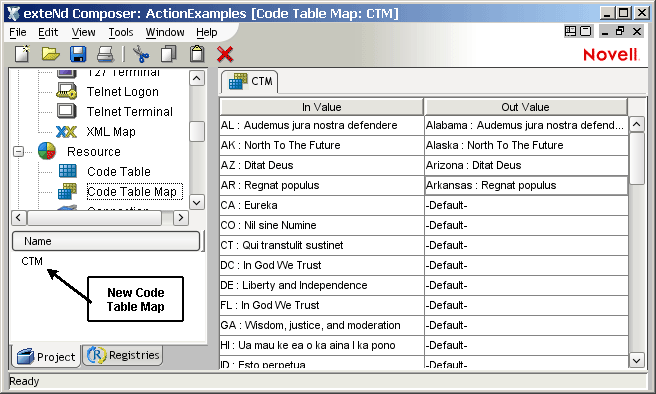
When you close the Code Table Map Editor, the newly-created code table map appears in the Resource category of the Instance Pane, under Code Table Maps, as shown above.
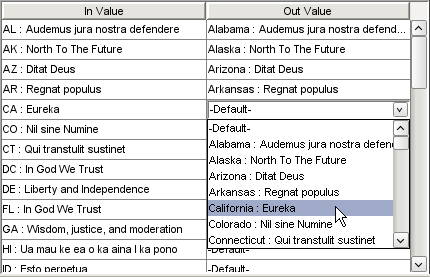
Once you've selected the Input and Output Code Tables, you need to map the values. The code table map initially displays the In Value mapped to a Default setting in the Out Value field. The In Value is grayed out, since it cannot be edited. Once you click in a Default field, a dropdown list allows you to map the In Value to any one of the values in the Out Value field. This enables you to map more than one In Value to the same Out Value.
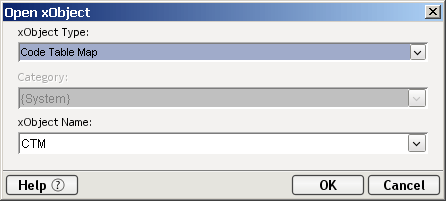
Select the code table map you'd like to open from the xObject dropdown list.
To map values in the code table map:
Click the Out Value field in the first record. A dropdown list with all the available values from the Output Code Table appears.
Open the code table map to which you'd like to make edits (See "To open a Code Table Map" above).
Click inside the Out Value cell to which you'd like to make edits.
Select File then Save or click the Save button on the tool bar.
Once you've created a code table map, you use it as you build components. For example, in the XML Map component editor, you could create an action that would map an element from an input DOM via a code table map to an output DOM. The action might look like this:

By using the code table map in the Map action, you not only transfer the input data, but also transform it before placing it in the output.
See Basic Actions for more information.
A Connection Resource is a reusable object that wrappers connection-related information: typically an IP address, port number, and authentication credentials in the simplest case. The Connection Resource also stores critical information about driver names and/or JNDI names, LDAP distinguished names, time-out and retry settings, code pages, and/or whatever endpoint specifications might be needed to set up a connection with a given type of data store or stream.
Connection resources are needed not only for various data sources (such as database connections) but also for the URL File/Read, URL File/Write and XML Interchange actions—three of Composer's core actions. These Data Exchange actions allow you to transfer XML and non-XML documents via HTTP, HTTPS or FTP. The FTP Authentication Resource allows you to perform a simple FTP login and specify a connection time-out. The HTTP Connection Resource stores user-authentication and security information needed to set up an HTTPS session.
Some of the user-supplied information in a Connection Resource can be bound dynamically at runtime through the use of ECMAScript expressions. (See discussion below.) Not every piece of user info in the Connection Resource need be static.
Because Connection Resources specify detailed access information for the data stream or endpoint in question, you will generally need to create one Connection Resource for every type of data source that your component or service will use. For example, if your application requires you to interact with a database as well as a directory, you will need at least one JDBC Connection Resource and one LDAP Connection Resource. (You do not necessarily need one resource for each data store or system, however, since connection parameter values can be bound dynamically via ECMAScript; see the next section.)
It's worth noting that Connection Resources may be reused by multiple components. They are true resources.
You can specify Connection parameter values in one of two ways: as constants or as expressions.
A constant based parameter uses the literal value you provide every time the Connection is used. An expression based parameter allows you to specify the value using an ECMAScript expression, which means the value might be different each time the connection is used at runtime. This late binding allows for flexible runtime behavior, since connection parameters can be determined using business logic or looked up from a backing store (including, potentially, an LDAP directory).
One simple use of an expression driven parameter in an HTTP Connection would be to define the User ID and Password as PROJECT Variables (e.g. PROJECT.XPATH("USERCONFIG/MyDeployUser"). At runtime, your service can populate these variables with values that are calculated or looked up on-the-fly (or derived from the service's input data); any connection resources used by any of your components can then obtain these values from the PROJECT variables at instantiation time (via ECMAScript).
A more sophisticated use of expression-driven parameters would be a case in which user credentials are looked up in a directory using LDAP queries. The procedure for doing this is described in the section called "Using LDAP to Obtain Connection Parameters" further below.
Any parameter in a Connection Resource (not only User ID and Password, but IP address, port number, etc.) can be expression-driven. The steps for setting this up are outlined below.
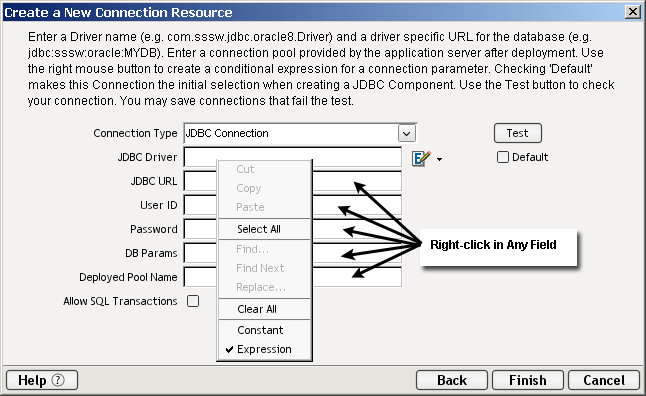
To switch a parameter from Constant to Expression driven:
Click the RMB in the parameter field you are interested in changing.
Select Expression from the context menu. A flyout menu control will appear to the far right of the field, containing two buttons: an ECMA Expression button and an LDAP Expression button. If you will be looking up the connection parameter value from a directory, select the LDAP button. Otherwise, accept the ECMA Expression button (which is the default).
NOTE: For information on how to use the LDAP Expression button, see the section called "Using LDAP to Obtain Connection Parameters" further below.
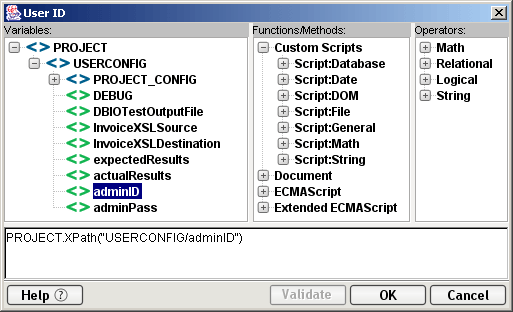
Click the ECMA Expression button. The expression editor appears:
Use the expression editor to build an ECMAScript expression that will evaluate to a valid parameter value at runtime. (Note that most of the nodes in the various picktrees will autogenerate ECMAScript code for you if double clicked.) In the above example, a project variable ("adminID") is consulted for the UserID value in a connection.
Dismiss the expression editor (click OK) to return to the connection-resource dialog.
Repeat the above steps as necessary for any other parameter fields to which you wish to apply expressions.
User names and passwords are often stored in a directory (such as Novell eDirectory). The ability to look up user data at runtime is important in any application that has access control requirements. Composer allows you to leverage LDAP for this purpose. No matter what kind of back-end system you're connecting to, you can set up your Connection Resource in such a way that any or all of the connection parameters are obtained via directory lookup at runtime (with or without extra business logic to fine-tune connection particulars).
In order to obtain connection parameters by LDAP query, you must first create (or already have in your project) an LDAP Connection Resource. This resource tells Composer which directory to use, which port to go out on, the Base DN to use, etc., so that a connection (secure or non-secure) can be established to the target directory. (Detailed information on how to create an LDAP Connection Resource is contained in the LDAP Connect User's Guide.)
Once you have an LDAP Connection Resource, you can set up LDAP-driven connection parameters for any Connection Resource, using the technique outlined below.
To bind a connection parameter to a directory lookup:
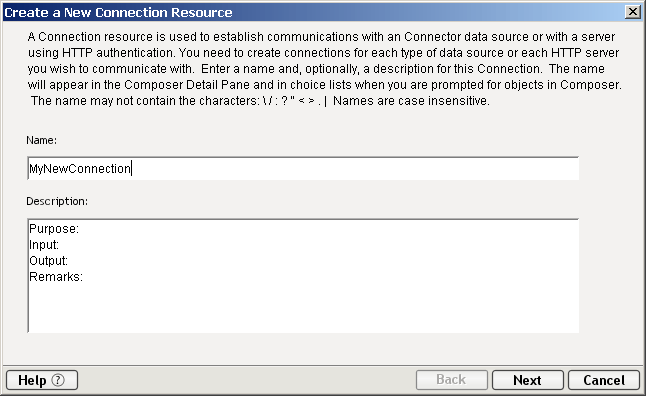
In the "Create a New Connection Resource" dialog, right-mouse-click inside the text field to which you wish to assign a directory-lookup value. A context menu will appear.
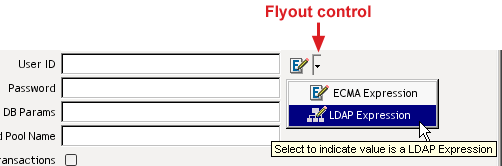
Choose Expression from the menu. A flyout control (note the small triangle) will appear at the far right of the text field in question.
Click the flyout and choose LDAP Expression. The button next to the flyout changes to the LDAP Expression Editor button.
Click the LDAP Expression Editor button. The LDAP Expression Editor window appears.
NOTE: You will get an error dialog at this point if you do not have at least one LDAP Connection Resource in your project.
At the top of this dialog, choose the LDAP Connection you will use. (The dropdown menu is pre populated with the names of LDAP Connection Resources in your current project.)
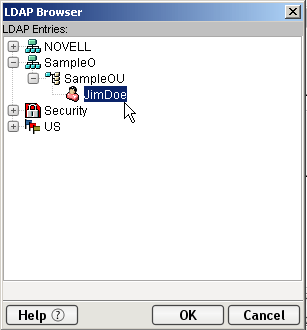
Under Distinguished Name, enter the LDAP Distinguished Name of the user or entity for which you are looking up data. If you don't know the proper LDAP syntax, use the DN Editor (also known as the LDAP Browser):
Click the small DN-and-pencil icon to the far right of the Distinguished Name text field. A new screen appears:
Navigate the directory's tree view until you get to the node (object) that contains the information you need. Click the node to highlight it.
Click OK. You're returned to the LDAP Expression dialog. Notice that the DN field of the LDAP Expression dialog now contains the properly formatted Distinguished Name for the object you intend to query.
Under "Object Classes," select the type of object appropriate to the search you want to use, if it is not already showing.
NOTE: This control will normally already be showing the name of the object that corresponds to the DN you specified in the previous step. You should not have to do anything.
Using the Attribute pulldown menu control, select the name of the attribute that contains the data you wish to look up. (This control is prepopulated with the names of all attributes defined on the object class chosen in the previous step.)
Click OK to return to the Connection Resource setup dialog. An appropriately formatted ECMAScript expression will be generated for the connection-param field in question. The expression uses the Composer extension method getLDAPAttr( ). At runtime, the connection parameter will be determined dynamically by LDAP lookup. You can test this capability at design time, of course, either by clicking the Test button in the connection setup dialog, or by running your component (the component that uses this connection) in animation mode.
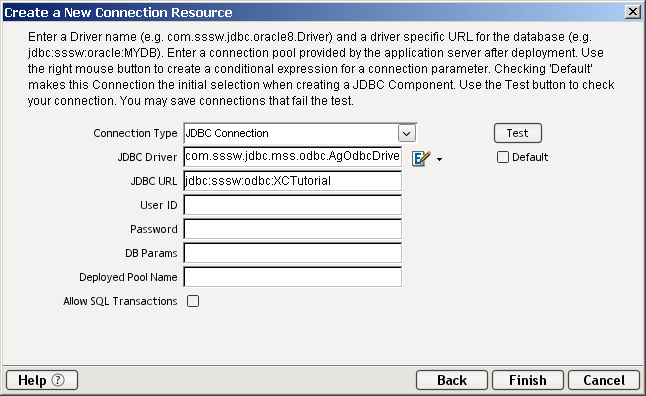
Composer supports many types of connection resources, including LDAP, JDBC, FTP Authentication, HTTP (in three flavors, depending on the type of authentication specified), and SMTP in the core product; plus 3270, 5250, Telnet, HP3000, CICS RPC, JMS, SAP, Tandem, Data General, and Unisys-terminal connectivity in the various Connect products. Since the basic procedure for creating connection resources is the same for most of these different types, the following example (using HTTP Basic Authentication as the resource type) can be considered typical.
NOTE: See the user guide for the Connect product in question if you would like detailed information on how to create a connection resource for a particular back-end system, device, or protocol. Also, see the discussion at "Mail via SMTP Simple Authentication" (further below) for detailed instructions on how to create a mail-server connection resource.
To create an HTTP Basic Authentication Connecti
on Resource:
Select File>New>xObject. From the Resource tab, select Connection. The Create a New Connection xObject wizard appears.
Click Next. The second page of the Create a New Connection Resource wizard appears.
Select HTTP Basic Authentication from the drop down list. This will be used in conjunction with an XML interchange which uses HTTP connections.
Enter a UserID and Password. These are not actually submitted during the establishment of a connection. They are simply defined here (password is encrypted). The user will have access to UserID and Password variables from ECMAScript, allowing them to map UserID and Password as values into the screen. This way, no one ever sees the passwords.
Choose a Client Certificate by clicking on the Browse button and selecting the certificate file you want to use for this service connection.
Choose a Client Private key by clicking on the Browse button and selecting the client key file for security.
Enter the Password for the Private key. Private key is a another level of security for the owner of the Client Private Key.
Select the Default check box if you want this particular Connection to appear as the default connection in the appropriate Component wizards.
NOTE: For more details on Connection Resources, see the "Getting Started" section in each Connect Guide.
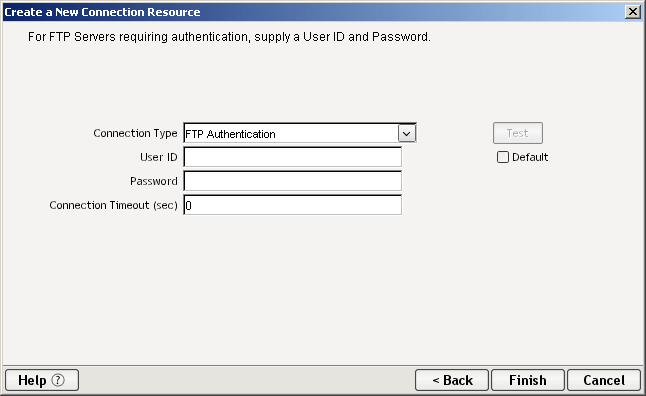
Most FTP connections require a user name and password. The FTP Authentication Resource wrappers basic credential information so that you can reuse the credentials as needed in various components that might use FTP to read or write remote documents. FTP access is supported, for example, in the XML Interchange Action. (See previous chapter.) In the setup dialog for that action, you can specify an FTP Authentication Resource to use when executing the action.
To create an FTP Authentication Connecti
on Resource:
Select File>New>xObject. From the Resource tab, select Connection. The Create a New Connection xObject wizard appears, as shown earlier (see Step 1 of procedure above).
Click Next. The second panel of the Create a New Connection Resource wizard appears.
Select FTP Authentication from the drop down list. The panel changes appearance:
In the screen that appears, enter a User ID, Password, and Connection Timeout value (in seconds).
NOTE: The timeout value represents the amount of time that will be spent trying to obtain a connection, not the amount of time devoted to keeping the connection open.
E-mail account information can be stored in a Mail Simple Authentication Connection Resource. Any of your services or components that make use of the Send Mail action (see "Mail via SMTP Simple Authentication" for details) can take advantage of a Mail Simple Authentication resource for obtaining account information.
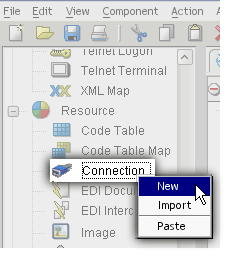
To create a Mail Simple Authentication connection resource:
Under Resource in the navigation (explorer) frame, right-click on Connection and choose New from the context menu as shown below:
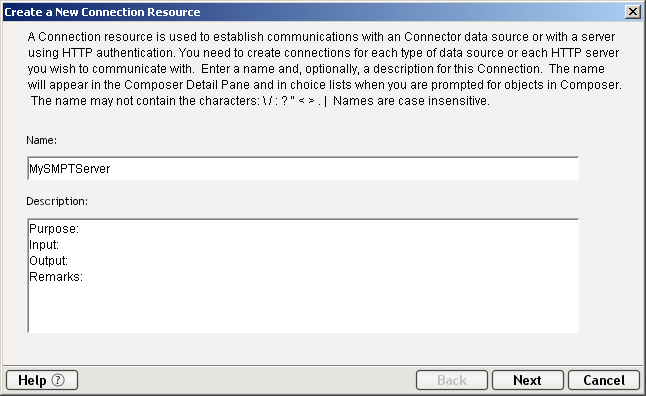
In the wizard pane that appears (see below), enter an arbitrary Name for this connection resource and (optionally) descriptive text.
Click Next. The second (and final) panel of the wizard appears:
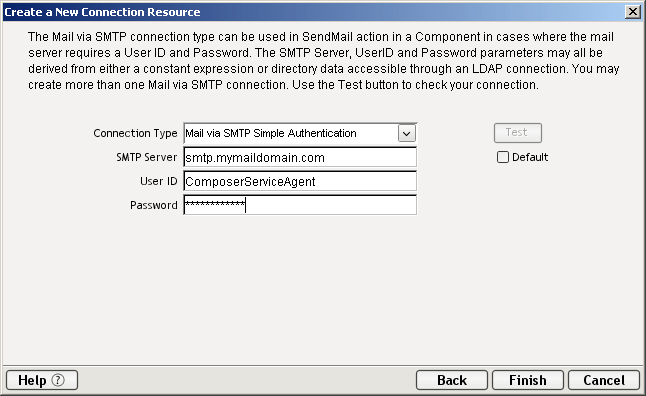
Using the pulldown menu control, select Mail via SMTP Simple Authentication as the Connection Type.
Next to SMTP Server, enter the name or IP address of the mail server you intend to use.
Next to User ID, enter the user name associated with the mail account you wish to use.
Next to Password, enter the password associated with the user account in question.
If you are accessing a COBOL CICS mainframe or using a JMS system, your application may need to use a Copybook source file to define its data layout. Similarly, if your Composer project uses any kind of file manipulation (via FTP, EDI data exchange, etc.) you may have a need to work with COBOL Copybooks. exteNd Composer has a Resource called Copybook that allows you to convert XML data into a ByteArray that can be used as Input to CICS RPC or JMS components. It can also be used to convert the ByteArray Output from these components back into XML format using Convert actions, which are described in Chapter , "Advanced Actions" beginning on page 166.
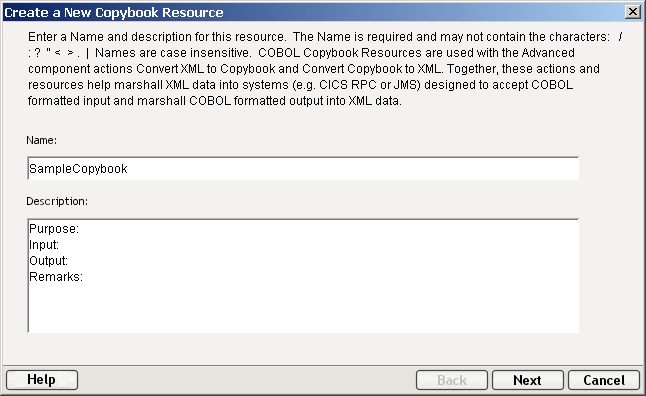
To create a Copybook resource:
Select File>New>xObject. From the Resource tab, select Copybook. The Create a New Copybook wizard appears.
NOTE: Alternatively, you can select Copybook from beneath the Resource tree in the Navigator pane and click on New.
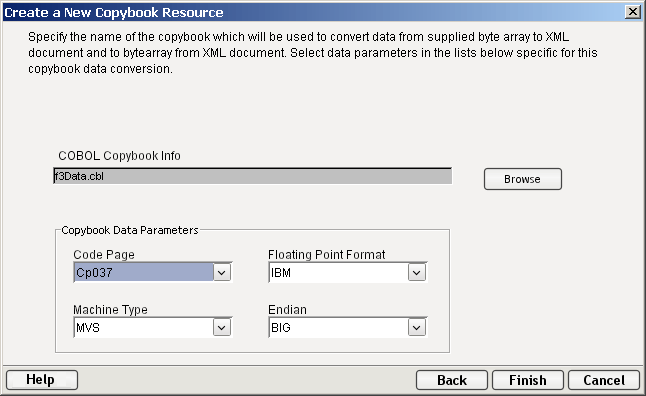
In the Code Page field, from the drop down menu, select the appropriate code page for the type of operating system character data standard your machine uses (i.e., CP037 for EBCDIC or 8859_1 for ASCII).
In the Machine Type field, from the drop down menu, select the platform of your CICS Region/Server (MVS, OS2, NT, AIX).
In the Floating Point Format field, from the drop down menu, select a name dependent upon the machine type selected: IBM or IEEE.
In the Endian field, from the drop down menu, select the order of the most/least significant bytes in integers (BIG if the most significant byte precedes the least significant byte in memory, otherwise select LITTLE).
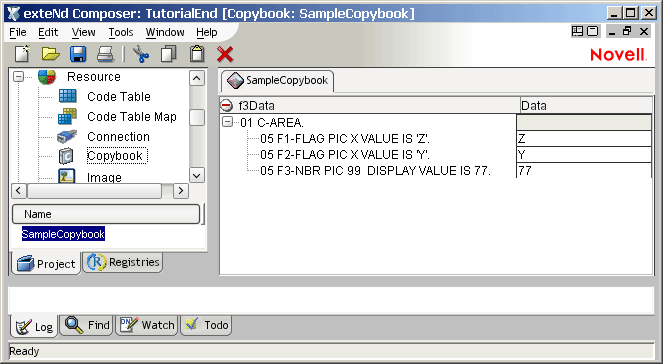
Click Finish to add the Copybook Resource to your list of available Resources and open it in the Component Editor. An example of an open Copybook Resource is shown below:
NOTE: Copybook Resources must be created prior to the use of any Convert XML to Copybook or Convert Copybook to XML Actions.
A Custom Script Resource is a library of user-developed functions created in the ECMAScript programming language. You can make the functions available to be used throughout components and within other functions. Using custom scripts, you can develop functions that perform:
Almost all the same functionality as the basic XML Map components, with your own customizations
Data manipulations involving Strings, dates, numbers, regular expressions, etc.
XML document manipulations using the W3C ECMAScript-to-DOM Binding methods
NOTE: You must have a thorough understanding of the ECMAScript language in order to create custom functions. The following sections are intended only as general guidelines, not a tutorial in scripting. For more information on scripting in Composer, see the next chapter.
You may prefer to organize functions into different libraries. For example, you may have several math, string, or database functions that you'll need for your application. If you group similar functions (i.e., create all string functions in the same library), you can also use the Custom Script Editor to declare global variables that can be used by all functions within the same library.
As you create and validate functions, Composer makes them available in all expression editors within component actions.
For example, if you write a custom function library called "String" containing ten functions, they will appear in the Expression Editor under the Custom Scripts label with the other standard functions.
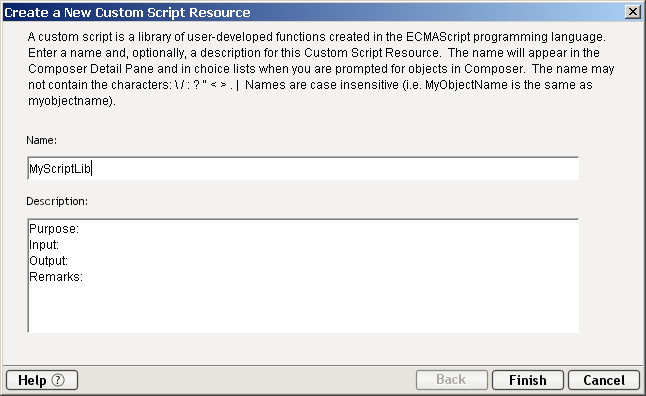
Select File>New>xObject. Then, from the Resource tab, select Custom Script. The "Create a new Custom Script xObject" dialog appears.
Click Next. The Custom Script editor appears with your newly-created Custom Script name in the title bar.
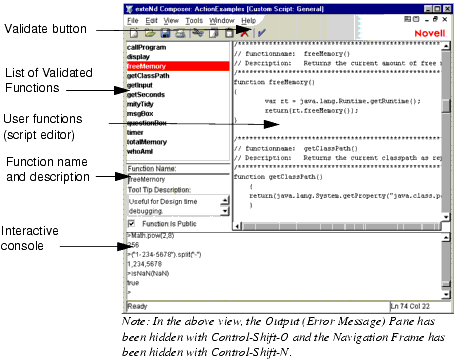
The Custom Script Editor window is divided into several panes. You can change the view of the panes to include the content you need.
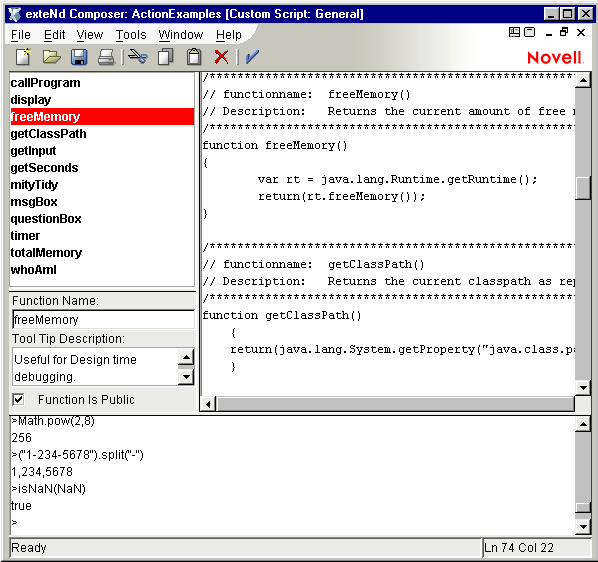
The illustration below shows the editor after several functions have been added.
You create a function by typing it in from scratch. You can also use the Expression Builder in creating your function. For more information, see Using the Expression Editor to Build Functions.
To create and validate a function:
On the same line, type the function name after the word function.
On the same line, type any function parameters, separated by commas, and enclosed with parentheses.
Your function should look similar to the following example:
To validate the syntax of your function:
If your function is valid, Composer adds the function name to the validated function list. If your function contains an error, Composer presents a detailed error message.
Before you can test your function, it must pass the syntax validation described in the previous section.
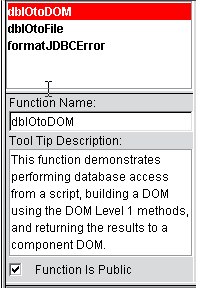
Once your function has been validated, and is added to the validated function list, you can write a description for it. The description appears as a "tool tip" when your mouse rests on the function name, wherever the function appears in Expression Builders throughout Composer.
In the Description text box, overwrite the default description with the text for your function, as shown.
Select the Function is Public check box as desired. When you check this box, two things happen:
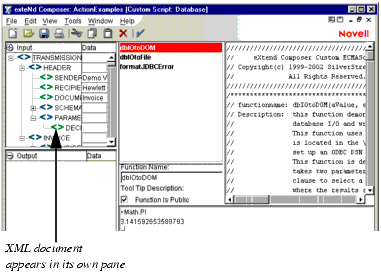
For many of the custom script functions that you create, you will want to reference or work directly with data in specific XPath location in your XML documents. To make this easier, the Custom Script Editor allows you to display XML documents (in any of the three available views: text, tree, or stylized) in the editor. This makes specifying XPath references easier by allowing you to drag and drop XML elements into the body of your function definition.
To show an XML document in its own pane:
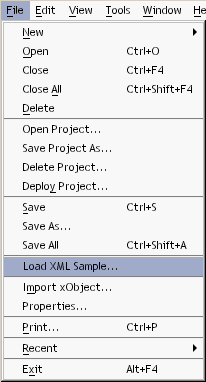
Be sure you have opened a Custom Script and are in the Script Editor environment.
In Composer's main menus, select File then Load XML Samples. (See illustration below.)
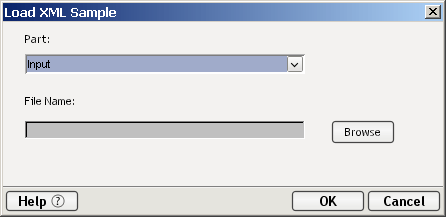
When you choose this command, the Load XML Sample dialog will appear:
In the pulldown menu control labeled Part, choose which DOM (Input or Output) to associate the file with.
Use the Browse button to bring up the file-navigation dialog. Navigate to the XML file you wish to load, and dismiss the navigator. If you wish to load in a file from a URL, you must explicitly type "http://," "https://," or "ftp://."
Click OK to dismiss the Load XML Sample dialog. The file you chose appears in its own pane.
Navigate to the directory of the XML document you wish to use and select a file. An Input and Output Mapping Pane appear.
NOTE: If you want to use XML documents from your XML Templates, go to the appropriate "Imports" directory below the "XMLCategories" directory in your project (e.g.: /Tutorial/XMLCategories/OfficeSupply/Imports).
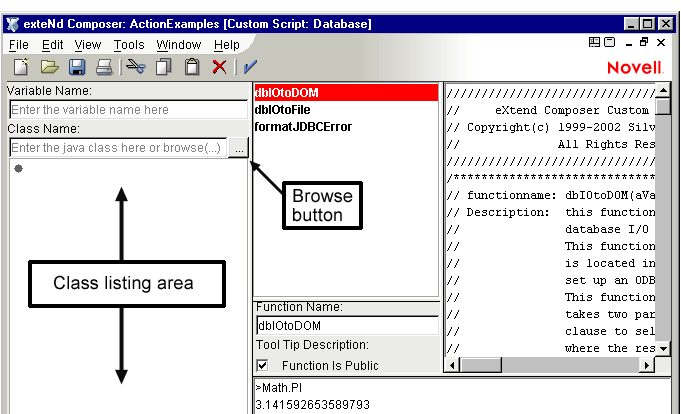
If you are building a custom script that needs to invoke Java methods or instantiate custom Java classes, you can expand the view for the Custom Script Editor window to show the information you need in a browsable class navigator. The Java class browser scans your current CLASSPATH (as well as any JAR Resources you have added to your project) and displays the classes, methods, and properties it finds. This makes specifying and using Java constructors, methods, and properties easier by allowing you to drag and drop these items into the body of your function definition, or into the test (console) area, to test your functions.
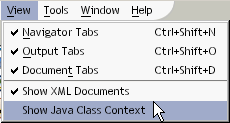
Select View > Show Java Class Context from the Custom Script Editor menubar.
After choosing this command, the Java Class panel appears in the main editor.
Navigate the context tree to get to the class you want to use. (Click the small plus signs to the left of the context nodes to expand them.)
Select the class you want to use, then click OK to dismiss the dialog. The class becomes visible in the class-list area of the editor.
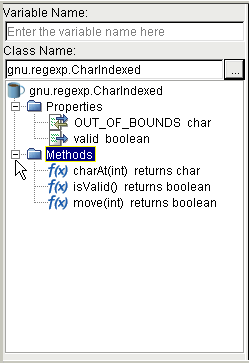
Expand the class (by double clicking it or clicking the adjacent plus sign) to show its constructors, methods, and properties. See below.
(Optional) Drag and drop individual methods or properties into the editor pane or the console to use the properties in question.
If you want, you can add your own classes into the Class Browser by either putting them into the Composer CLASSPATH or extending Composer's CLASSPATH to include your classes.
NOTE: If you are using custom Java classes, be sure to install those classes on the Application Server (or include them in your EAR/WAR files) when you deploy the application. You can use exteNd Director to do this. See the Director documentation for details.
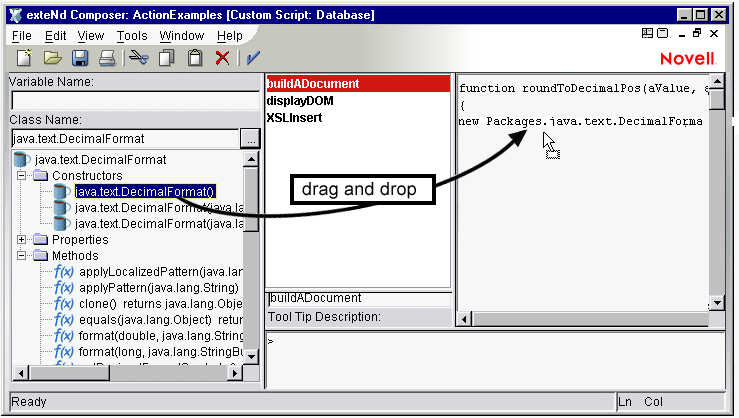
The following example shows you how to create a script function named RoundToDecimalPos() that uses the Java DecimalFormat class. In this example, your function accepts two parameters, a number to round, and the number of places to round.
To create a script function that uses Java:
With the Java class panel displayed, enter a function signature in the function pane as shown.
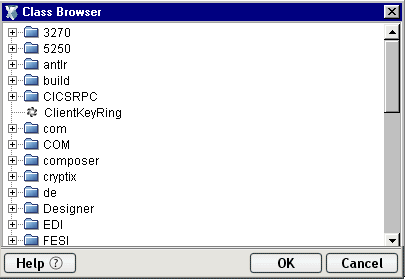
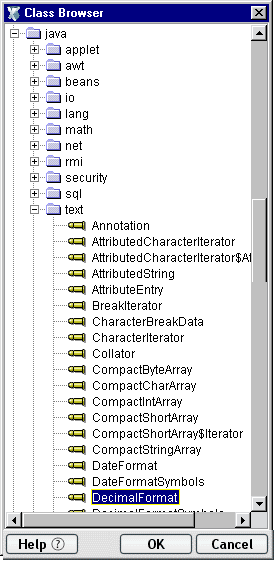
In the Class Name control, select the Browse button. The Class Browser dialog appears.
Click OK. The Custom Script window's Class Name field is now populated.
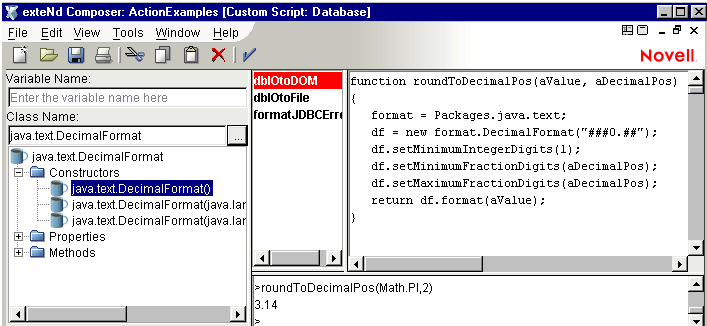
Drag and drop the desired Constructor to the function pane. Fill in the parameters for the constructor.
Edit your ECMAScript function as desired. One possible function is shown below.
Rather than writing functions from scratch, you can use the Expression Editor to build them. The advantage of using this feature is that the Expression Editor exposes virtually all DOM methods, Composer extensions, built-in ECMAScript methods, and DOM node targets, via point-and-click pick-lists. Building an expression by the use of pick-lists is not only convenient and quick, but less prone to result in typos. It's also a useful reference, since the calling syntax for every available method is shown in rollover tooltips for each leaf node in the picktree(s).
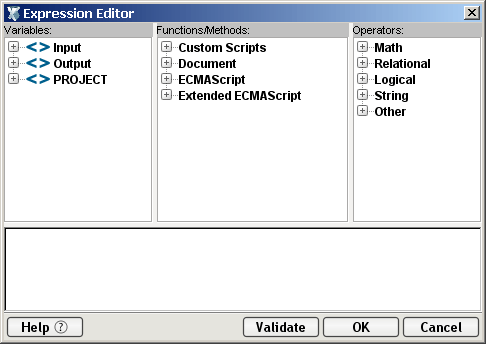
The Custom Script Editor displays two different views in the Expression Editor, based on the view you select. The basic view lists the ECMAScript objects and operators available for building your own functions, as shown.
If you select, View, then Show XML Documents in the Custom Script Editor, the Expression Editor appears with an additional pick-list for selecting elements in the DOMs, as shown.
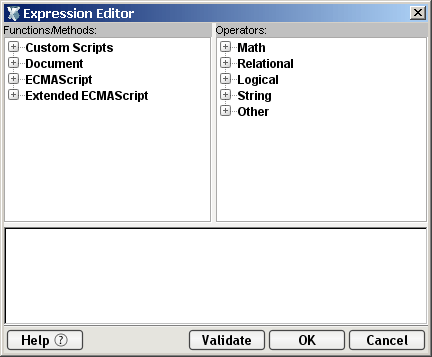
From the main menubar, select Tools then Expression Editor. The Expression Editor appears.
Expand the trees in the Variables, Functions/Methods or Operators panes and doubleclick on the elements to build your functions. Once you doubleclick an element, it appears in the bottom Expression pane.
Alternatively, you can use the right-mouse button to bring up the Expression builder in either the Function editing pane or the test area.
NOTE: For additional tips regarding ECMAScript, see the subsequent chapter called "Custom Scripting and XPath Logic in exteNd Composer" in this guide.
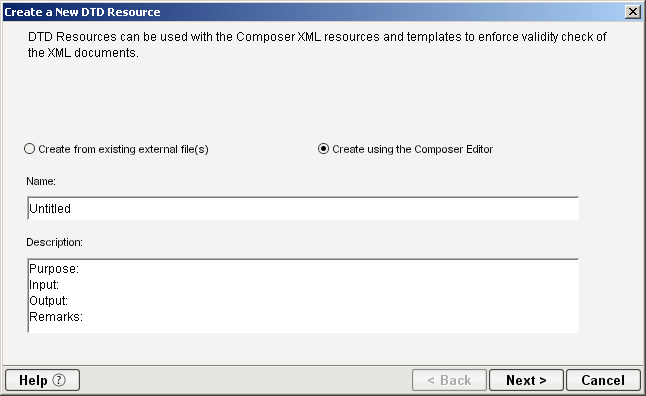
You can package DTDs into your project for deployment as part of your application. The procedure is as follows.
From Composer's File menu, select New, then xObject, then from the Resource tab, select DTD. (Alternatively, right-click on the DTD Resource icon in the Category pane, and choose New.) The first pane of the DTD Resource wizard appears.
Provide a Name by which you will refer to the DTD, add descriptive information if desired, and (if you are creating this DTD using the Composer Editor) click on Next to proceed to the next screen.
Optionally click the "Associate Public Identifier" checkbox and enter the appropriate identifier string in the text field shown.
Click Finish. The Composer Editor opens with your DTD showing in text view.
The Composer Form Resource gives you the ability to create XML-based forms (XForms) for use within your project.
NOTE: When installed as part of the Novell exteNd Professional Edition suite, Composer does not support this resource type. The following discussion applies only to users of the Enterprise Edition product.
The Form wizard will guide you through the necessary steps to create the initial instance data.
From Composer's File menu, select New, then xObject, then from the Resource tab, select XForm. (Alternatively, right-click on the XML Schema Resource icon in the Category pane, and choose New.) The first pane of the Form Resource wizard appears.
Provide a Name by which you will refer to the XForm, add descriptive information if desired and click on Next to proceed to the next screen.
If you select a Data Source Type of Schema, you will need to indicate which Schema Root should be used for the instance data.
If you select a Data Source Type of XML Sample, select the Location of the XML Source using the dropdown lists under Project Resources for templates that already exist as part of the project. The first box contains Template Categories, the second contains Template Names, and the third box will be populated with Sample Names.
Alternatively, you can Browse to select a local file or type in the fully qualified URL to locate the XML Source for the XForm.
If you select a Data Source Type of WSDL, you must select a Service and and an Operation that are associated with the instance data.
Then, select a WSDL Resource using the dropdown below Project Resource. Alternatively, you may Browse to select a local file or type in a fully qualified URL to locate the WSDL Source for the XForm.
Click on Finish to create the Form Resource object and open it in the Forms editor.
NOTE: The forms editor interface is described in detail in the exteNd Director documentation and help.
It is sometimes useful to package image files into a Composer project. For example, if your project contains Java Server Pages that reference GIF, JPEG, or PNG files, it's often convenient to package images within the same JAR or WAR file as the JSP that uses them. The JSP can then refer to the images via a relative URL (as described below).
NOTE: When installed as part of the Novell exteNd Professional Edition suite, Composer does not support this resource type. This discussion therefore applies only to users of the Enterprise Edition product.
The first time you create an Image resource, Composer creates a subdirectory called \image in your project folder and puts a "src" folder under the image directory. Every image resource you create results in two files:
The former appears in the \image subdirectory. The latter appears in the \src subdirectory.
So for example, if your project is called MyProject and you created an Image resource based on an image called Sample.jpg, you would be able to find the following directory structure:
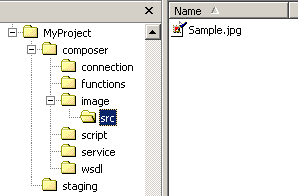
Inside the \image folder, you would also find a file called Sample.jpg.xml, representing the xObject wrapper (the metadata) associated with the Sample.jpg resource.
By default, when you create an Image resource, it acquires a name identical to that of the image you are assigning to the resource. Nevertheless, you can rename the Image resource after creating it (the same way you would rename any other resource): Just right-mouse-click on the resource instance in the object pane in Composer's main view, and choose Rename from the popup menu that appears. Then enter a new name for the resource. (Renaming the resource in this way changes the name of the actual image file as well as the xObject.)
NOTE: As with other resource renaming operations, you will need to close the resource in question (if it is open) before you can rename it.
At deployment time, your Image resource will be packaged inside a JAR file (along with all the other xObjects in your project) and placed inside the deployment EAR. Each physical image will have a default deployment context of
[Your project context]/image/src
Therefore, any Java Server Page that lives at root level in the JAR can refer to a given image using a relative URL of /image/src/imagename. For example:
<img src="MyProject/image/src/Sample.jpg"/>
Creating an Image resource is much like creating any other resource xObject, except that in this case, the object's default name is chosen for you.
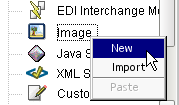
Either right-mouse-click on the word Image under Resources in Composer's navigation frame and choose the New command from the context menu (as shown below), or go to the File menu and select File > New > xObject. From the Resources tab, select Image and OK.
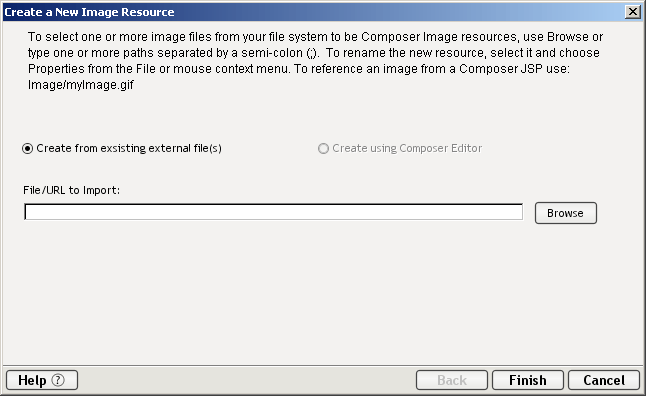
In the dialog that appears, choose the radio button labelled Create from existing external file(s). See below.
If you know the location of the file, you can enter it directly in the text field (either as a file-system address or a fully qualified URI beginning with http:// or ftp://). Otherwise, click the Browse button and navigate to an image file.
NOTE: Supported file types are GIF, JPEG, and PNG.
TIP: When using the file-chooser dialog (via Browse), you can Control-click or Shift-click to select multiple images; then all will be brought into Composer at once. Each image will retain its original name.
Click the Finish button. The dialog goes away and a new Image resource appears in the instance pane of Composer's navigator frame.
You may find that you want to import an existing Image resource from another project into your current project. You can do this as follows.
To Import an Image resource from another project:
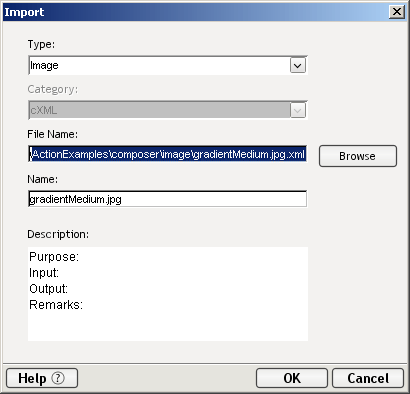
Right-mouse-click on the Image resource category (as shown in the last section) and choose Import from the context menu. The Import dialog appears:
Use the Browse button to go to a file-chooser dialog. Browse your network or file system as necessary, and when you have located the Image resource you wish to import, click Open to return to the above dialog. If you wish to load in a file from a URL, you must explicitly type "http://," "https://," or "ftp://."
NOTE: Image resources are XML files. They will always be found in the \image folder of a Composer project.
The name of the resource is shown in the Name field of the dialog. Use this text field to change the resource's name if you wish to do so at this time. (You can also rename it later.)
Click OK. The resource is added to the instance pane of Composer's navigation frame.
Once you have created or imported Image resources into your project, you can view an image by double clicking the resource in the instance pane (or by highlighting it and using RMB, then Open). The image will be rendered in its own tabbed window in the Composer desktop:
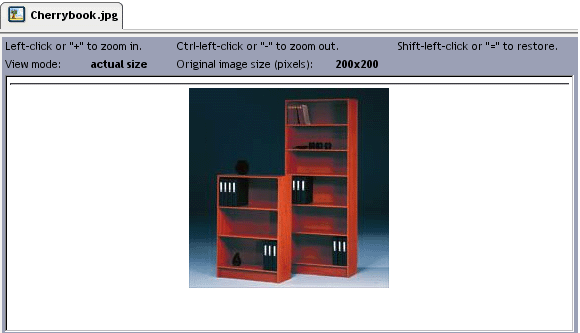
The size of the view (the magnification factor) can be controlled in various ways. If you right-click on the image itself, a context menu appears:

In addition to using the various Zoom commands on the context menu, you can control the magnification factor of the image view by means of the mouse and/or keyboard:
To zoom in: Use the plus (+) key on the numeric keypad, or left-click anywhere on the image.
To zoom out: Use the minus (-) key on the numeric keypad, or Control-left-click anywhere on the image.
To restore the original view: Use the equal sign (=) key or Shift-left-click anywhere on the image.
NOTE: When installed as part of the Novell exteNd Professional Edition suite, Composer does not support this resource type. The following discussion applies only to users of the Enterprise Edition product.
JAR resources provide you with the ability to add custom utility classes or business objects to a Composer project. Custom scripts and components you create within your project can then use these classes. The Custom Script editor's class browser provides access to the JAR resource, allowing you to drag and drop Java objects in to your custom scripts. You may also use function calls within your components to instanter objects of the imported class type, and invoke the class methods.
NOTE: If you wish to add another Composer project as a subproject, do not use the JAR Resource mechanism. Instead, use Tools > Project Serttings > Subprojects to import another Composer project into your current project.
The first time you create a JAR resource, Composer creates a subdirectory called \JAR in your project folder and puts an import folder under the JAR directory. Every JAR resource you create results in two files:
The former appears in the \JAR subdirectory. The latter appears in the \import subdirectory.
For example, if your project is called TutorialStudent and you created a JAR resource based on a JAR called mycontacts.jar you would be able to find the following directory structure:
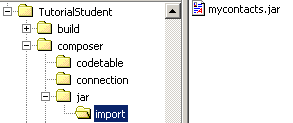
Inside the \jar folder, you would also find a file called mycontacts.xml, representing the xObject wrapper (the metadata) associated with the mycontacts.jar resource.
By default, when you create an JAR resource, it acquires a name identical to that of the JAR file you are assigning to the resource. You can rename the JAR resource after creating it, if you wish. From Composer's main view click the right mouse button on the resource instance in the object pane. Choose Rename from the popup menu that appears. Then enter a new name for the resource. Renaming the resource in this way changes the name of the actual JAR file as well as the xObject.
NOTE: The JAR file resource must be closed in order to rename the resource.
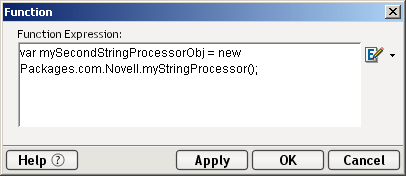
To reference classes in the JAR resource you reference the context of the class package. If the class is in the root of the jar no context is needed. In the example below two jar object classes are referenced, the first myFirstStringProcessorObj references a class at the root of the JAR. The second, mySecondStringProcessorObj is referenced by its context, com.Novell. Notice that in both cases the Packages keyword precedes the context. To avoid name collisions between classes with identical method names, you should package your classes within a context.

The following example depicts the function expression used to instantiate an object of the myStringProcessor class residing in the com.Novell context.
At deployment time, your JAR resources will be packaged inside a WAR file (along with your project JAR) and placed inside the deployment EAR. Each physical JAR will have a default deployment context of
/JAR/import
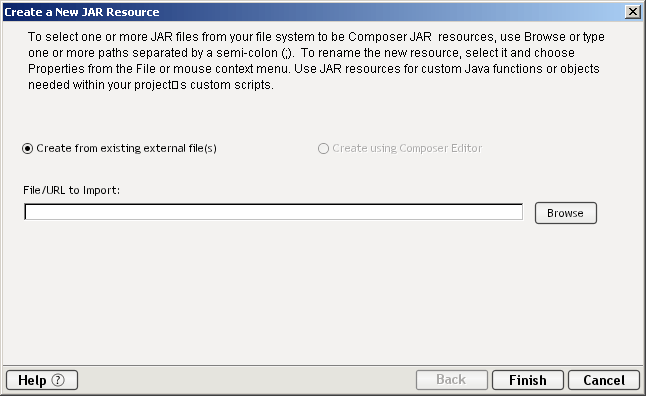
Either right-mouse-click on the word JAR under Resources in Composer's navigation frame and choose the New command from the context menu, or from the File menu select File > New > xObject. Select the Resources tab from the New xObject dialog (shown below), select JAR.
In the dialog that appears, the radio button labelled Create from existing external file(s) is selected. See below.
If you know the location of the file, you can enter it directly in the text field (either as a file-system address or a fully qualified URI beginning with http:// or ftp://). Otherwise, click the Browse button and navigate to the JAR file.
TIP: When using the file-chooser dialog (via Browse), you can Control-click or Shift-click to select multiple jars; then all will be brought into Composer at once. Each jar will retain its original name.
Click the Finish button. The dialog goes away and a new jar resource appears in the instance pane of Composer's navigator frame.
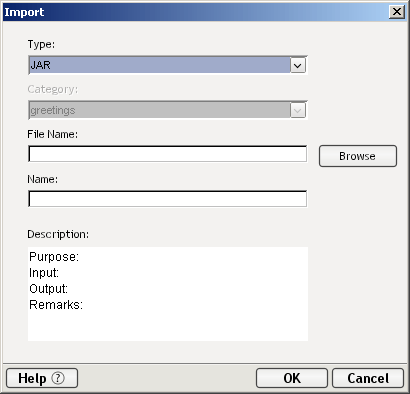
Right-mouse-click on the JAR resource category and choose Import from the context menu, alternatively you may select File > Import xObject from the menu. The Import dialog appears:
Use the Browse button to go to a file-chooser dialog. Browse your network or file system as necessary, and when you have located the JAR resource you wish to import, click Open to return to the above dialog. If you wish to load in a file from a URL, you must explicitly type "http://," "https://," or "ftp://."
The name of the resource is shown in the Name field of the dialog. Use this text field to change the resource's name if you wish to do so at this time. (You can also rename it later.)
Click OK. The resource is added to the instance pane of Composer's navigation frame.]
NOTE: When installed as part of the Novell exteNd Professional Edition suite, Composer does not support the JSP Resource xObject. (You can, however, create Composer-aware JSPs in Director. See the "Director JSP Wizard" discussion in the chapter on Deployment.) The following discussion applies only to users of the Enterprise Edition product.
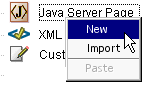
You can create Java Server Pages directly in Composer (and then store them in your project as JSP Resources), import JSPs from a local drive or URI, or import existing JSP Resources from another Composer project. Once you create a JSP Resource, it is deployed as part of your project's deployment JAR.
Composer's native JSP editor offers a convenient way not only to edit and create JSPs but to generate JSP-based triggers for Composer services (using Composer's custom tag libraries). This is described further below.
To cre
ate a new JSP Resource from an existing file:
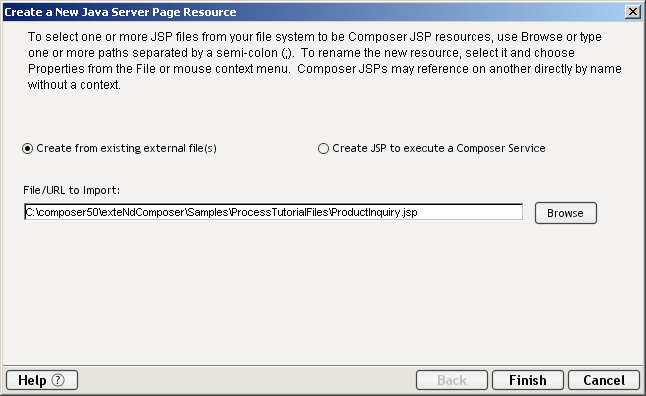
Either right-mouse-click on JSP under Resources in Composer's navigation frame and choose the New command from the context menu (as shown below); or go to the File menu and select File > New > xObject. From the the Resources tab, select Image and OK.
In the dialog that appears, choose the radio button labelled Create from existing external file(s). See below.
If you know the location of the JSP file that you want to use in this resource, manually enter it in the text field under File/URL to Import. Otherwise, use the Browse button (and the file chooser) to navigate to the file and select it.
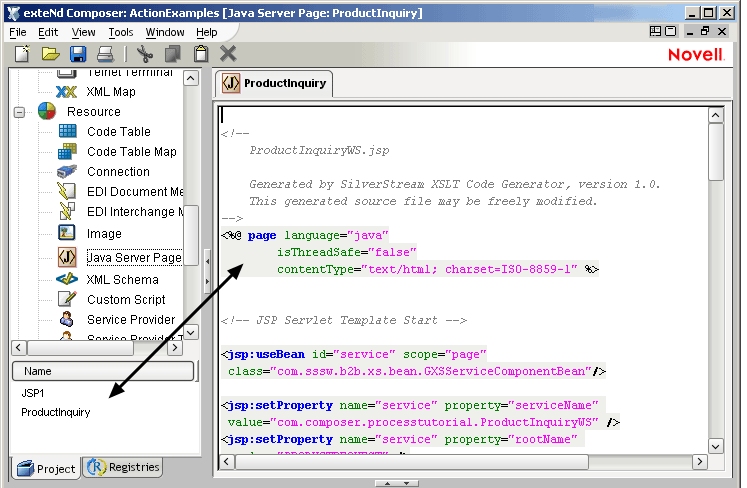
Click Finish. A new resource is added to the instance pane and the JSP in question opens in Composer's JSP editor as shown below.
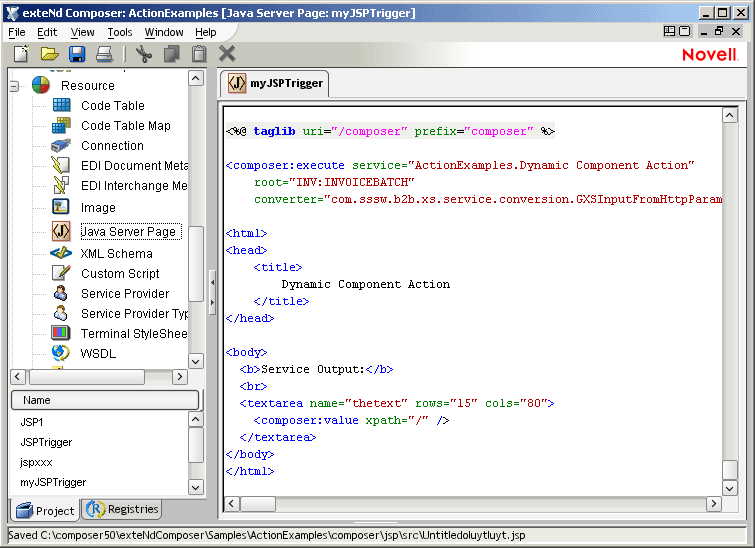
Composer can, if you wish, automatically generate a JSP that contains code for triggering an existing service in your project. The following steps tell how.
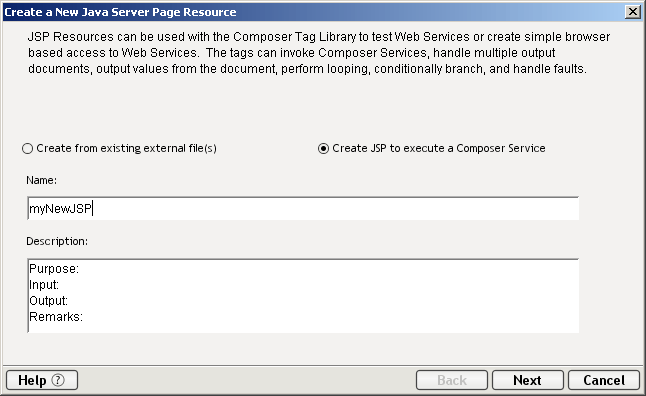
To create a new JSP Resource containing service-trigger code:
Either right-mouse-click on JSP under Resources in Composer's navigation frame and choose the New command from the context menu (as shown in the previous section); or go to the File menu and select File > New > xObject. from the Resources tab, select JSP and OK.
In the dialog that appears, choose the radio button labelled Create JSP to execute a Composer service. When you click this radio button, the dialog will change to have the appearance shown below.
(Optional) Under Description, enter any descriptive text that might apply to this resource.
Check the Execute a Composer Service checkbox if you want Composer to generate the custom-tag code to trigger a particular service. (If you do not check this box, you will simply be creating an empty JSP. Click Finish now if your intent is to hand-write a new JSP.) When you check the checkbox, the controls below it become enabled.
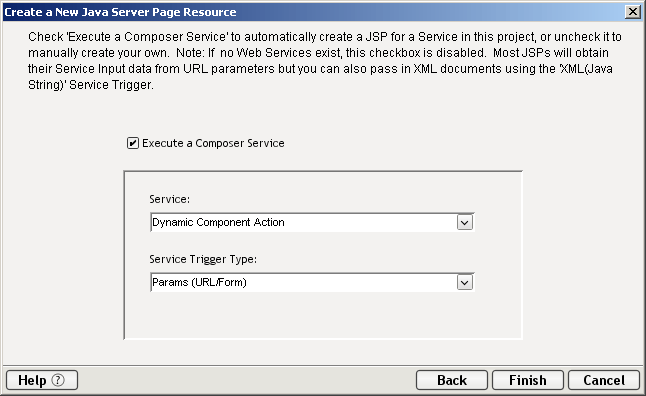
Under Service, select a service from the dropdown menu. The menu will be pre populated with the names of services in your project.
Under Service Trigger Type, select one of the available values.
Click Finish. A new JSP containing code that executes your service will appear in the editor pane as shown below.
WSDL (Web Services Description Language) is an XML vocabulary for describing web services. Using WSDL, it is possible to describe (in a standardized manner) the interface, protocol bindings, and various other types of information about web-based services, at a level of detail sufficient for businesses to begin to interact online. The complete standard can be seen at http://www.w3.org/TR/wsdl
There are three ways to create or acquire WSDL Resources.
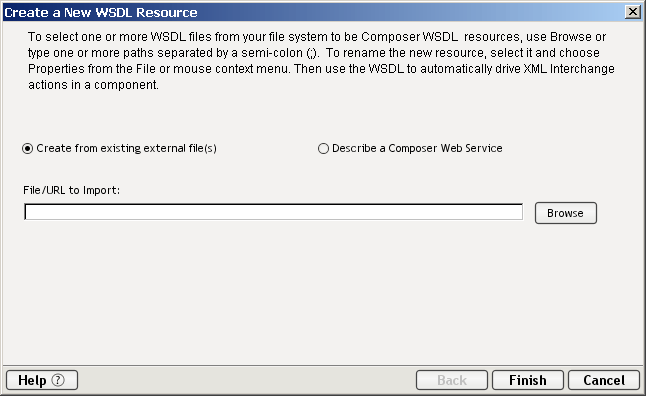
Let Composer generate WSDL for you. (Composer can generate a WSDL file automatically for any Web Service that you have added to your project.) The procedure for this is described below.
Acquire WSDL from a registry (such as a UDDI public registry) by downloading it directly into your project. This method will be discussed further below.
To generate a WSDL Resource from an existing service or create one in the XML editor:
From Composer's File menu, select New, then xObject. From the Resource tab, select WSDL.
Right-click on the WSDL Resource icon in the Category pane, and choose New. (This will associate the WSDL resource with an existing service.)
Right-click on the WSDL Resource listed in the Instance pane of the Navigator and choose Create WSDL. (This method will also associate the WSDL resource with an existing service.)
Any of these methods will cause the first pane of the WSDL Resource wizard to appear.
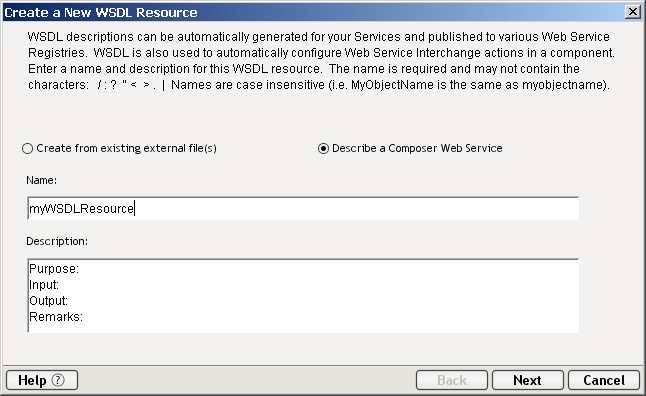
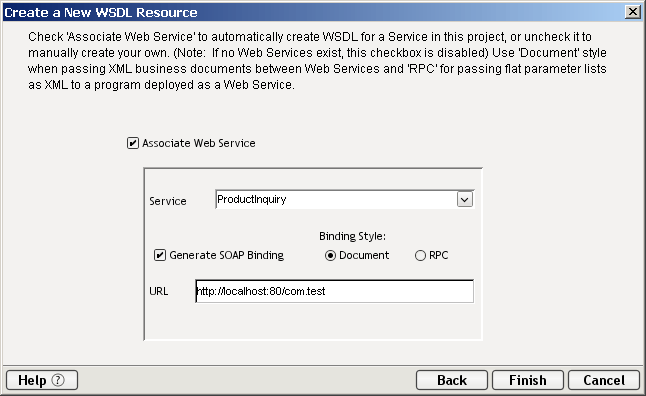
As indicated by the radio buttons, you have the choice to Create WSDL from an existing file, or describe a new Composer Service.
Enter a Name for the resource. (This will also show up in the name attribute of the /service element in your WSDL.)
Check the Associate Web Service checkbox if you intend to create WSDL based on an existing Web Service in your project.
NOTE: If you wish, instead, to hand-create your own WSDL in the XML editor environment, leave the Associate Web Service checkbox unchecked and click Finish. After the dialog goes away, right-click in Composer's content pane and select View As Text from the context menu, then begin typing.
Check the Generate SOAP Binding checkbox if you wish to have Composer automatically create SOAP Binding information in your WSDL. Choose the binding style that you want from the radio buttons labelled Document and RPC.
Enter the URI that you want to appear in the location attribute of the WSDL's /service/port/address element.
Click Finish. The newly generated WSDL appears as a DOM tree in a content window in Composer. Right-click on the DOM and choose View > As Text to see a text view of the WSDL document, which you can then edit manually if need be. See below.
To acquire WSDL from an external service via the Registry browser:
Begin a search (either of Organizations or Services) as described in "Registry Browsing" on page 333.
Choose a service for which detail information is available in the Service Pane.
Acquire the WSDL for that service as described in "Retrieving WSDL from the Registry" on page 340. The tree view for the acquired WSDL will appear automatically in the component editor's content pane. (To choose other views, right-click inside the content pane and select View As from the context menu.)
Choose Save As from Composer's File menu. Enter a name for the resource and click OK.
The new WSDL Resource, based on the retrieved WSDL, appears in the Instance pane of Composer's nav frame. (The WSDL is also persisted to disk at this point.)
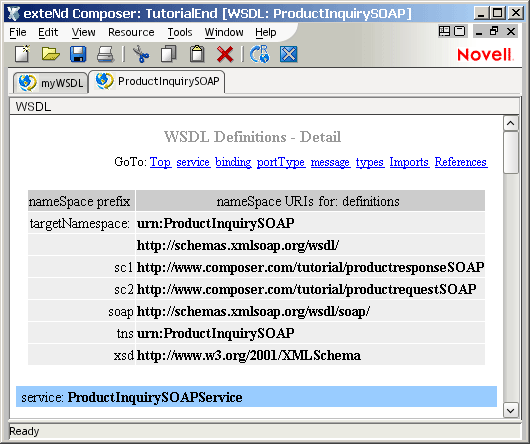
By default, when you first open a WSDL Resource, the document is displayed in a syntax-colored text-edit view. But you can also see a stylized view of WSDL documents, created by applying an XSL stylesheet to your document.
To see a stylized view of a WSDL document:
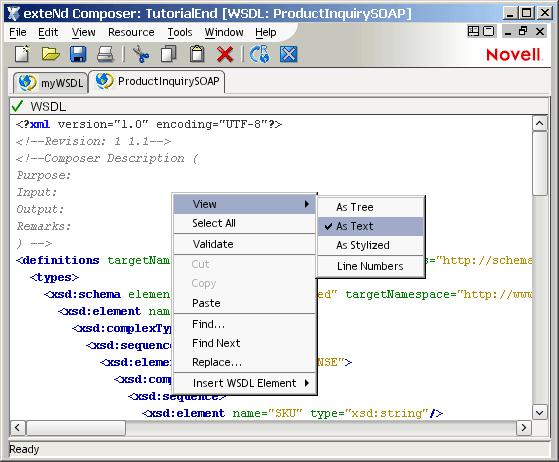
Right-click in the WSDL editor pane and choose View > As Stylized from the context menu. After a short delay, tview changes to a stylized view.
In this case, the Summary stylesheet has been applied to the document. You can apply a custom stylesheet instead, if you prefer; see procedure below.
To choose a custom stylesheet for the stylized view:
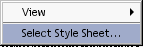
With the WSDL document already visible in Stylized form, right-mouse-click inside the pane. A contextual menu appears. Click Select Stylesheet.
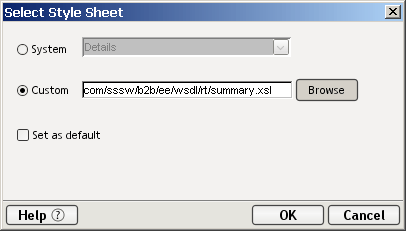
Choose the System radio button if you wish to select one of the existing standard stylesheets (Details or Summary) as the basis for the stylized view.
Otherwise, choose the Custom radio button and enter the path to the stylesheet of your choice (or use the Browse button to bring up a standard file navigation dialog). If your path is in the form of a URL, you must explicitly type "http://," "https://," or "ftp://."
Check the Set as default checkbox if you want to apply the stylesheet you've chosen as the default in Stylized views. Your preference is now set across Composer sessions.
Although Composer can automatically generate WSDL for you, there are times when you may want or need to edit (or create) WSDL elements by hand. Composer's WSDL Editor (a WSDL-aware version of the Composer XML editor) allows normal text insertion and cut-and-paste editing, the same as any text editor. But you can also make use of special context features that are designed to let you create standard WSDL document elements quickly and easily.
WSDL documents contain (either directly, or by importation) a minimum of four standard element types: message, portType, binding, and service. These elements build upon one another with cascading cross-references, so it is advisable that when you create a WSDL file without the use of the dialogs, you create the message section first, followed by the portType section, then the binding section and finally the service section. The WSDL Editor offers dialog-based assistance in creating each of these four types.
In WSDL, the Message is an abstract, typed definition of the data being exchanged. At runtime, the actual message is represented as a DOM.
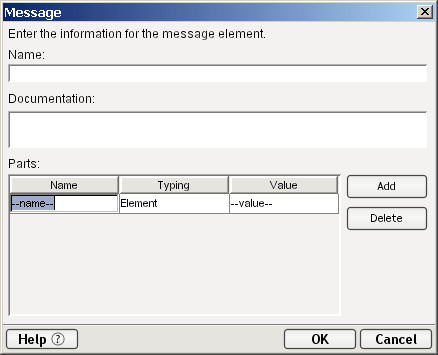
To create a new Message element:
Be sure the WSDL document is in Text View mode. (Right-click anywhere in the document and choose View > As Text.)
Click the right mouse button inside the Text View pane. A context menu appears.
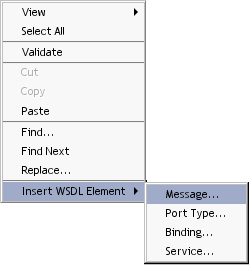
Select Insert WSDL Element > Message . . . to bring up the Insert New Message dialog.
Click on the Add button to add a blank row in the parts table.
In the Name text field, enter the value of the name attribute for the main <message> element.
In the Documentation field, enter any human-readable comment or descriptive language you would like to associate with the definition element.(Optional.)
Under Parts, in the Name column, enter the name attribute for the first <part> element of your message section.
Select a Typing value from the pulldown menu (Element or Type).
Click the Add button to add another part entry to this message.
To remove an entry, first click into the entry to highlight the row in question, then click the Remove button to remove that entry.
Click OK. The dialog box closes and a new section is added to your document:
  <message name="GetLastTradePriceOutput">
  	      <part name="body" element="xsd1:TradePriceResult"/>
  </message>
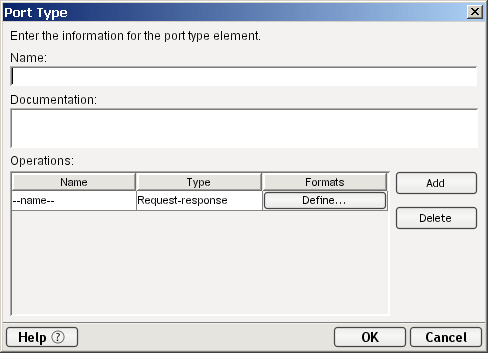
The WSDL Port Type is an abstract definition of the operations supported by a service and the communications mode (one-way, request-response, etc.) that will be used in the service.
To add a new Port Type to a WSDL document:
Place the mouse inside the Text View pane of the editor and click the right mouse button. A contextual menu appears.
Select Insert > Port Type . . . to bring up the Insert New Port Type dialog.
Click on the Add button to add a blank row in the parts table.
In the Name field, enter the value of the name attribute for the <portType> element you are creating.
In the Documentation field, enter any human-readable comment or descriptive language you would like to associate with the definition element.(Optional.)
In the Type column, select One-Way, Request-Response, Solicit-Response, or Notification, as appropriate, from the pulldown menu.
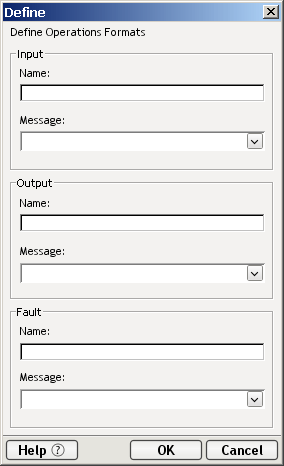
Under Formats, enter an input and output message or build the appropriate messages using the Edit Operation dialog. To open the Edit Operation dialog, click the Set. . . button at the end of the row. A new dialog appears.
The Edit Operation dialog has several control groupings. Only those that are appropriate to the Operation in question (Request-Response, Solicit-Response, etc.) are enabled. For example, if you chose Notification in the Type column in Step 6 above, only the Output control group is enabled. For each enabled group, a Name and Message appropriate to the operation is required for Input and Output. However, Fault group is not required but optional.
Click Add to add more operations to the current Port Type section.
To remove operations, select the operation you want to remove, then click the Delete button.
Click OK to close the Insert New Port Type dialog. A new section is added to your WSDL document:
  <portType name="StockQuotePortType">
      <operation name="GetTradePrice">
          <input name="input" message="tns:GetLastTradePriceInput"/>
          <output name="output" message="tns:GetLastTradePriceOutput"/>
      </operation>
  </portType>
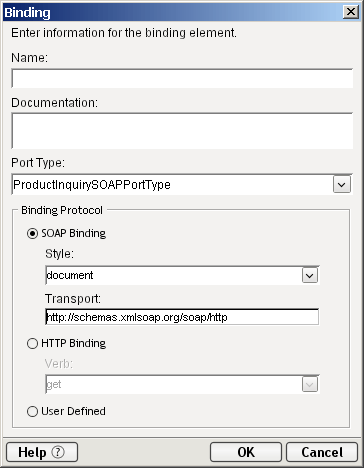
The Binding specifies concrete protocol and data format specifications for the operations and messages defined by a particular Port Type.
To add a new Binding to a WSDL document:
Place the mouse inside the Text View pane of the editor and click the right mouse button. A contextual menu appears.
Select Insert > Binding . . . to bring up the Insert New Binding dialog.
In the Name field, enter the value of the name attribute for the <binding> element you are creating.
In the Documentation field, enter any human-readable comment or descriptive language you would like to associate with the definition element.(Optional.)
Select the proper Port Type for this binding, using the pulldown menu next to Port Type. The pulldown menu contains the names of Port Types that you have previously created (if any) for this document; see "Adding a Port Type Element" above.
If your WSDL document will specify a SOAP binding, check the SOAP Binding checkbox, then select a Style (RPC or Document) from the pulldown menu and enter a Transport value (or accept the default).
If an HTTP Binding will be used, check the HTTP Binding checkbox and enter the appropriate Verb (GET or POST).
Click OK to dismiss the dialog. A new Binding section is added to your WSDL document:
  <binding name="StockQuoteSoapBinding" type="tns:StockQuotePortType">
      <soap:binding style="rpc" transport="http://schemas.xmlsoap.org/soap/http"/>
      <operation name="GetLastTradePrice">
          <soap:operation soapAction="http://example.com/GetLastTradePrice"/>
          <input>
              <soap:body use="literal" namespace="http://example.com/stockquote.xsd
  encodingStyle="http://schemas.xmlsoap.org/soap/encoding/"/>
          </input>
          <output>
              <soap:body use="literal" namespace="http://example.com/stockquote.xsd"
  encodingStyle="http://schemas.xmlsoap.org/soap/encoding/"/>
          </output>
      </operation>
  </binding>
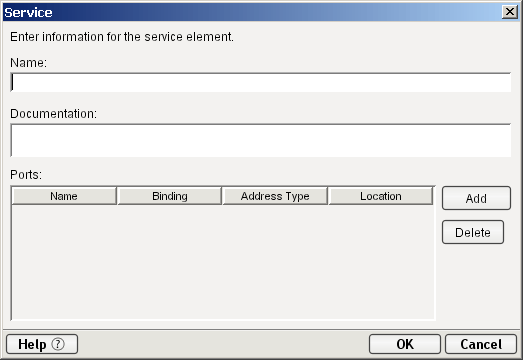
The Service element names the entry-point address (or addresses) for the service in question. These addresses are in the form of URIs and constitute ports.
To add a new Service to a WSDL document:
Place the mouse inside the Text View pane of the editor and click the right mouse button. A contextual menu appears.
Select Insert > Service . . . to bring up the Insert New Service dialog.
Click on the Add button to add a blank row in the service table.
In the Name field, enter the value of the name attribute for the <service> element you are creating.
In the Documentation field, enter any human-readable comment or descriptive language you would like to associate with this service element. (Optional.)
In the Ports section, under Name, enter the name of this <port> element.
In the Binding column, select an existing binding from the pulldown menu. The available bindings will reflect Binding sections that have already been created for this document (if any).
In the Address Type column, specify None, SOAP, or HTTP, as appropriate, using the pulldown menu.
Under Location, enter the URI via which your service will be available.
Click Add to add more rows (more port entries) to the Service.
To remove an entry, select the entry, then click the Delete button.
Click OK to close the dialog. A new Service entry is added to your WSDL document:
  <service name="StockQuoteService">
      <port name="StockQuotePort" binding="tns:StockQuoteBinding">         <soap:address location="http://example.com/stockquote"/>
      </port>
  </service>
The WSDL editor incorporates a "smart type-ahead" feature that comes into play whenever you type a less-than sign (i.e., the start of an element tag). A contextual menu will pop up automatically, displaying available tag-name choices based on the schema specified for the file and where you are in the document.
For example, if you are creating a WSDL document manually and you are near the top of the document, typing `<` will cause a menu to appear near the cursor location, with the following choices:
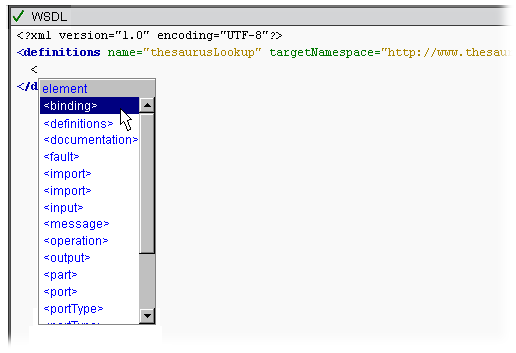
Notice that the element names in this menu correspond to legal tag names in WSDL. To choose a menu item, just doubleclick it.
The menu choices are highly context-sensitive in that if you are deep in some portion of an element tree and you type a less-than symbol, the choices that appear in the type-ahead menu are constrained to just the values that would be legal in the XPath context in which you are typing. For example, if you are inside a <documentation> node anywhere in a WSDL file and you type `<`, the type-ahead menu will appear with only one choice, namely </documentation>, because the only legal tag you could create at this point would be a closing tag. (The WSDL schema does not permit child elements inside documentation elements.)
You can, of course, always ignore the type-ahead menu altogether and enter whatever you want, as the occasion requires. For example, you might want to enter a comment.
NOTE: Type-ahead hints are based on the schema that applies to the document. Obviously, if the document does not specify namespaces or schemas, there is no way for the editor to "know" what the valid tag choices are, and you'll get no type-ahead menu.
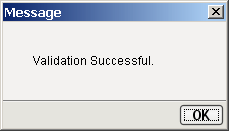
When a WSDL document is open and its contents are visible in the editor, you can validate it by changing the View to "As Text" and clicking the small green check-mark icon in the top left corner of the WSDL document window. If the document validates successfully, you will see a dialog:
Otherwise, you will see an error alert giving information identifying the malformed statement(s) in the document.
NOTE: You should carefully review your WSDL even if the document validation is successful. The W3C WSDL specification does allow for extensibility elements throughout all levels of a WSDL document. So if you built the document without using the dialogs, or did an extensive amount of cut and paste from other sources, it's possible the document will test as valid, but not necessarily be what you want.
WSIL (Web Services Inspection Language) is a specification for the discovery and publishing of Web services. It was designed to be more lightweight and portable than the previous standard, UDDI (Universal Description, Discovery and Integration), and in a sense, to pick up where UDDI leaves off. Although WSIL has yet to be submitted to one of the standards bodies (W3C and OASIS) it is gaining in popularity. To read the WSIL specification, see http://www-106.ibm.com/developerworks/webservices/library/ws-wsilspec.html.
Like WSDL, WSIL is an XML vocabulary. Its focus, however, is on exposing services rather than describing them. It is meant to facilitate discoverability of Web Services.
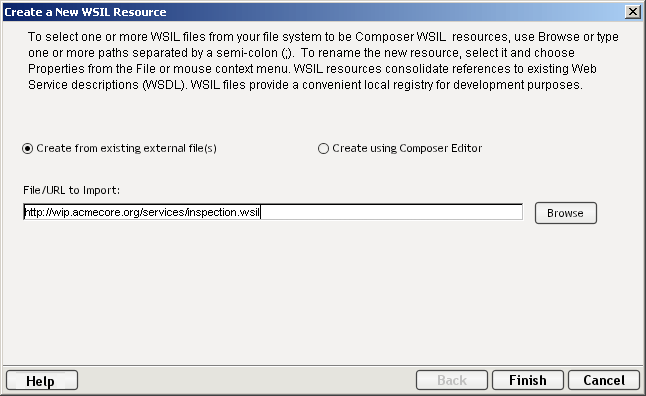
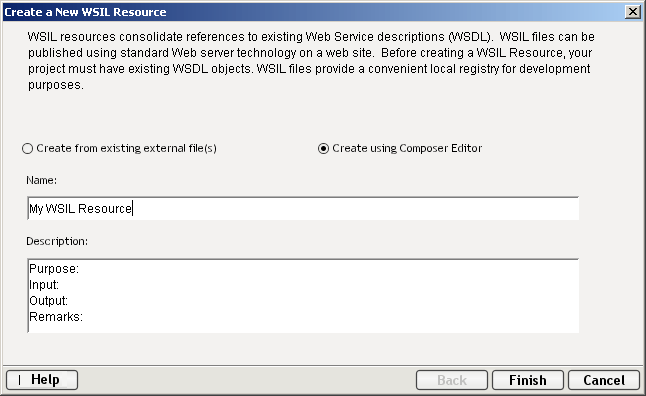
There are two ways to generate WSIL Resources. One way is to acquire WSIL from an external, existing file. A second way is to create a WSIL document using Composer's WSIL wizard and XML editor. The wizard will generate a stub file containing empty <service> and <description> elements which you can then fill in.
To generate a WSIL
Resource from an existing file:
From Composer's File menu, select New, then xObject. From the Resource tab, select WSIL.
Right-click on the WSIL Resource icon in the Category pane, and choose New.
Either of these methods will cause the first pane of the WSIL Resource wizard to appear.
If you choose to create your WSIL from existing external files, type in the fully qualified URL or click on Browse to locate a file on your local hard drive or network.
Click Finish to open the WSIL file in the XML Content editor (see below).
To generate a WSIL Resource manually:
From Composer's File menu, select New, then xObject. From the Resource tab, select WSIL.
Right-click on the WSIL Resource icon in the Category pane, and choose New.
Click Finish. Begin entering your WSIL in the Content Editor Screen.
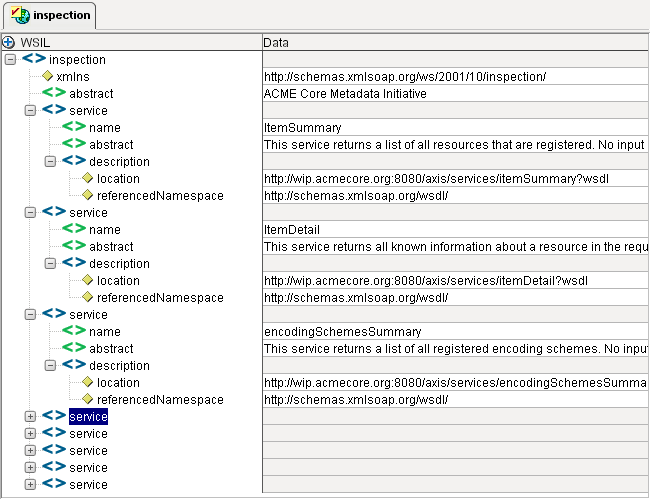
The XML Content Editor Pane, with an open WSIL resource, is depicted below:
As with a WSDL document, if you right-click on the content editor and choose View > As Text, you will see a text view of the WSIL document, which you can then edit manually, including the node names. Similarly, you can select View>As Stylized for a Stylized view of the WSIL. Type-ahead code-completion and text validation (described above) also apply to editing WSIL documents.
Composer allows you to specify individual XML files as first-class resources (xObjects). When you specify a file as an XML resource, a copy of the file is made in a folder called \xml_resource under your project hierarchy. This file then gets included in the deployment JAR (in that context) so that, for example, your Java Server Pages can refer to the file with a relative URL in an href attribute. More commonly, you'll access XML resource documents in a component's action model by using the Composer Resource action (see previous chapter, and further discussion below) to bring the document into an Input or Temp message part (DOM).
XML Resources are different from XML Template documents. An XML Template is merely a design-time aid (a hint, if you will) that allows you to work with a "scratch copy" of a particular type of document (which, in turn, may or may not be based on a schema) at design time. Instance data in the template doc is visible at design time but not at runtime. At runtime, the template doc is never used as a data source.
An XML Resource, by contrast, is a physical document that can be used as a static data store for "pre-canned" instance data of various kinds. Such data might consist of legal notices (copyirghts, disclaimers, warranties, etc.); names and addresses of key people who may need to be notified during the execution of a component; lookup-table data with hierarchical structure (or data that's too complex to use in a Code Table resource, but too straightforward to warrant the connectivity overhead of RDBMS storage); or common data needed by more than one service in the project.
If the dataset in question is of reasonable size, you may be able to realize significant performance benefits by using an XML Resource instead of a relational database for data lookups.
Think of an XML Resource is as a lightweight structured data store—a low-overhead container for hierarchically organized static (read-only) data.
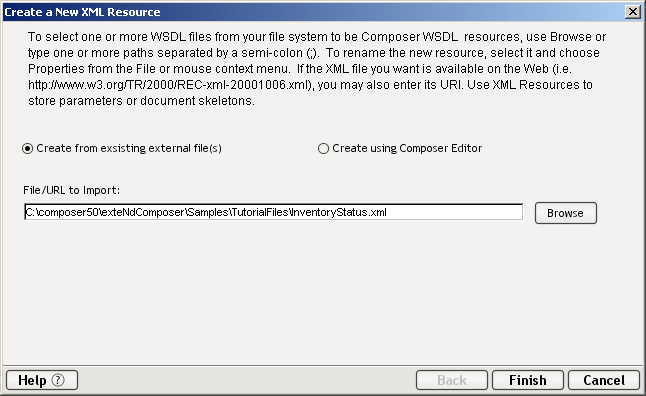
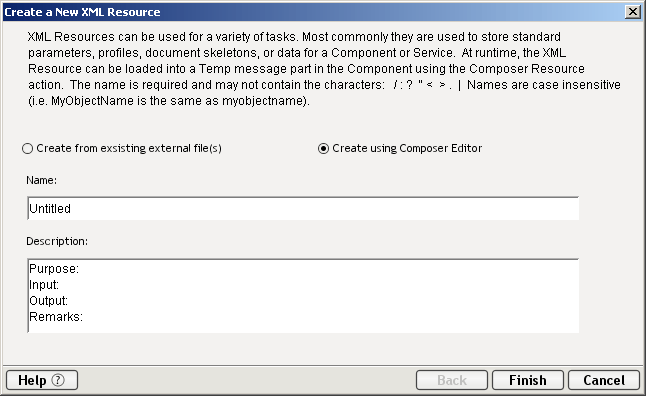
Either right-mouse-click on the XML category under Resources in Composer's navigation frame, then choose the New command from the context menu (as shown below); or go to the File menu and select File > New > xObject, then the Resources tab, then XML and OK.
In the dialog that appears (see below), choose one of the two available radio buttons as described below.
Choose the Create from existing external file(s) radio button if you wish to use a preexisting XML file. (A copy of the file will be brought into your project.) Then specify the file's URI in the text field provided, explicitly typing "http://," "https://," or "ftp://," or use the Browse button to navigate to the file of interest.
Alternatively, choose the Create using Composer Editor radio button if you want to create the XML file yourself, by hand. If you select this radio button, the dialog changes appearance:
At this point, you can enter a Name (and optionally, descriptive information) for the resource.
Click Finish to exit the dialog. A new XML Resource appears in the instance pane of Composer's nav frame, and the file itself opens in tree view in the editor pane.
Unlike non-XML resource types (such as Image, JSP, and JAR), XML Resources are not indirected through xObject metadata stored in a separate file. Therefore, when you import an XML Resource, you are not restricted to importing xObjects from other Composer projects. Instead, you are actually importing an XML file directly (into a folder called \xml_resource under your project-folder hierarchy). That is to say, the resource and the underlying data file are one and the same. So although the steps below are slightly different from those in the previous section, they essentially give the same result.
Right-click on XML under Resources (as described above) and choose the Import menu command.
The Import dialog appears. (See the discussion, and screen shot, at "To Import an Image resource from another project:" earlier in this chapter.) Enter the file name or URI of the XML file you want to import, or use the Browse button to navigate to an XML file.
Click Finish. The newly imported XML file will be added to the instance pane of the navigation frame, but the file itself will not automatically open in the editor pane. (If you wish to open it for editing, you can either doubleclick the file name in the XML resource instance pane, or right-mouse-click on it and choose Open from the context menu.)
To load an XML Resource into a Part (DOM) at runtime, use the Composer Resource action type. The document and its data will be accessible via XPath or ECMAScript like any other document. You can map its nodes to other Parts, selectively pull data from certain elements, or even map the entire document to Output. Of course, you should bear in mind that an XML Resource document is a static resource (i.e., read-only). If you try to modify it or write to it using XPath or ECMAScript, it may appear as though you are changing the document—and you are—but the changes will last only for the life of the component instance in which changes are made. In other words, changes are volatile and do not get saved or carried over to future invocations of the component/service.
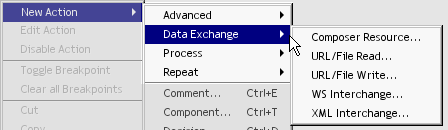
To load an XML Resource document into a Part:
In the action model, right-mouse-click at the point where you want to load the XML resource. In the context menu that appears, select New Action > Data Exchange > Composer Resource. See below.
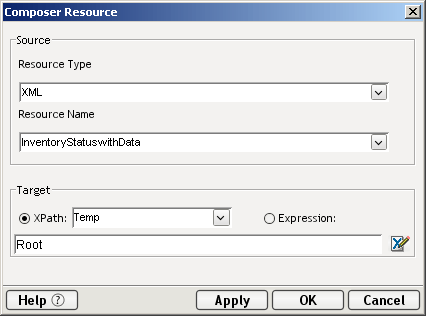
In the dialog that appears, under Resource Type, use the pulldown menu to select XML. (See below.)
Under Resource Name, select the (preexisting) XML Resource that you wish to bring into your component. (The pulldown menu will be pre populated with the names of all XML Resources that exist in the current project.)
Under Target, select either the XPath or the Expression radio button. Assign a target location for the XML Resource DOM.
NOTE: You can assign the contents of the XML resource doc to any node of any existing DOM. If you want to assign it to a Temp Part, you will need to create the Temp Part in advance, or else go to File > Properties > Messages to add a Temp Part to the currently open component.
(Optional) Click Apply if you want to test the action now. You should see the XML resource appear in the expected location, in the specified target DOM.
Click OK to dismiss the dialog. A new Composer Resource action is added to your action model, and from this point on in that model, you can map to or (more likely) from the nodes of the XML resource doc.
XML Schema Definition (XSD) files are specified in their own resource type so that they can be reused by various components, services, and Composer projects, and also so they can be edited or modified over time without having to be re-imported one at a time into every project or component that uses them.
There are two ways to create an XSD Resource for use in your project.
Generate XSD directly from a sample document using Composer's schema generator, or
Designate a preexisting XSD document as an XSD Resource using the Create XSD Resource wizard
We will discuss each option in turn.
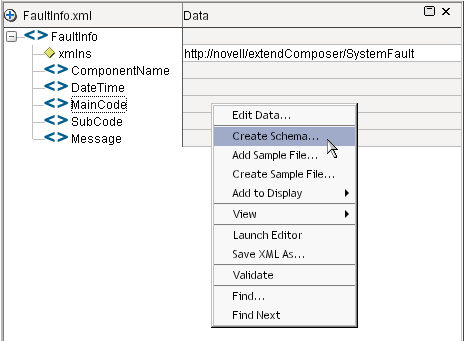
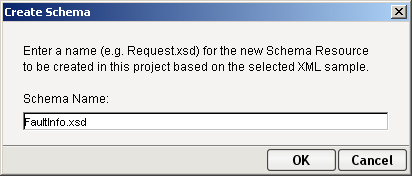
You can tell Composer to generate a schema (XSD Resource and corresponding .xsd file) from any existing XML sample document. The procedure is as follows.
To generate a Schema (XSD) Resource from an existing XML document:
Add the XML document to an existing XML Template, or create a new XML Template based on the XML sample document.
Open the XML Template containing your sample document. (Right-click on the template instance's name in Composer's explorer frame, and choose Open... from the context menu.)
Be sure the sample document is showing in Tree View in the document window. (If you were looking at it in Text View, right-click on the editor pane and choose View > As Tree from the context menu.)
Right-click inside the document, in Tree View, to bring up a context menu.
Click OK. Note that a new resource appears in the instance pane under the XSD Resource category.
NOTE: You may need to edit your original sample document to use the namespace prefixes shown in the generated schema before the sample will validate against the schema.
If you wish to use an existing .xsd file as the basis of an XSD Resource, you can do so by following this procedure.
To add a Schema (XSD) Resource based on an existing .xsd file, using the resource wizard:
From Composer's File menu, select New, then xObject, then from the Resource tab, select XML Schema. (Alternatively, right-click on the XML Schema Resource icon in the Category pane, and choose New.) The first pane of the XML Schema Resource wizard appears.
If you wish to create the Schema using an external file, check the Create from existing external file(s) button and type in a file or URL to import. You can also Browse to navigate your file system to select a file on your disk or network.
If you wish to create the Schema using the Composer Editor, check the Create Using Composer Editor button.
Click Finish. If you chose to import an existing file, the file will be opened in the Composer Component Editor. If you chose to create a schema definition file manually, you will be able to create your schema in the content window of Composer.
In either case, an XML Schema Resource is added to the Instance Pane.
Optionally right-click in the content pane and choose View As > Text to go to the XML editor.
The XSL Resource offers a convenient way to package XSL stylesheets into your project's deployment JAR. You can refer to them via relative URLs from other documents, or you can load an XSL Resource into a DOM, dynamically, using the technique described at "How to Access an XML Resource in a Component" further above.
Either right-mouse-click on the XSL category under Resources in Composer's navigation frame, then choose the New command from the context menu (as shown below); or go to the File menu and select File > New > xObject, then the Resources tab, then XSL and OK.
In the dialog that appears (see below), choose one of the two radio buttons as described below.
Choose the Create from existing external file(s) radio button if you wish to use a preexisting XSL file. (A copy of the file will be brought into your project.) Then specify the file's URI in the text field provided, or use the Browse button to navigate to the file of interest.
Alternatively, choose the Create using Composer Editor radio button if you want to create the XSL file yourself, by hand. If you select this radio button, the dialog changes appearance:
At this point, you can enter a Name (and optionally, descriptive information) for the resource.
Click Finish to exit the dialog. A new XSL Resource appears in the instance pane of Composer's nav frame, and the file itself opens in text view in the editor pane.
Unlike non-XML resource types (such as Image, JSP, and JAR), XSL Resources are not indirected through xObject metadata stored in a separate file. Therefore, when you import an XSL Resource, you are not restricted to importing xObjects from other Composer projects. Instead, you are actually importing an XSL file directly (into a folder called \xsl under your project-folder hierarchy). That is to say, the resource and the underlying data file are one and the same. So although the steps below are slightly different from those in the previous section, they essentially give the same result.
Right-click on XSL under Resources (as described above) and choose the Import menu command.
The Import dialog appears. (See the discussion, and screen shot, at "To Import an Image resource from another project:" earlier in this chapter.) Enter the file name or URI of the XSL file you want to import, or use the Browse button to navigate to an XSL file.
Click Finish. The newly imported XSL file will be added to the instance pane of the navigation frame, but the file itself will not automatically open in the editor pane. (If you wish to open it for editing, you can either doubleclick the file name in the XSL resource instance pane, or right-mouse-click on it and choose Open from the context menu.)
Copyright © 2004 Novell, Inc. All rights reserved. Copyright © 1997, 1998, 1999, 2000, 2001, 2002, 2003 SilverStream Software, LLC. All rights reserved. more ...