8.3 Setting Up the Filr Appliances

Figure 8-4 illustrates that the Filr appliances are deployed after all other components are in place.

Figure 8-4 The Filr Appliances Are Set Up Last

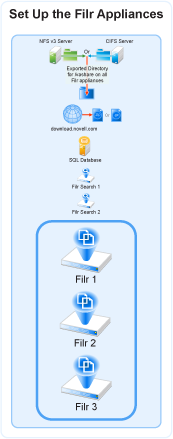
Table 8-4 Logging in and Starting the Configuration Wizard

Page, Dialog, or Option

Do This


  1. Open a management browser on your administrative workstation and access the Port 9443 Administration Utility on the first Filr appliance using the following URL:

    https://filr_IP_Address:9443

    Where IP_Address is the IP address of the first Filr appliance.

Filr Appliance Sign In

  1. Log in as the vaadmin user with the password that you set for the appliance in Vaadmin password and confirmation:.

Filr Appliance Tools

  1. Click the Configuration icon to launch the Filr Configuration Wizard.

Filr Configuration Wizard

  1. Large Deployment is automatically selected.

    Click Next.

Figure 8-5 Each Filr Appliance Needs the Database Connection Information

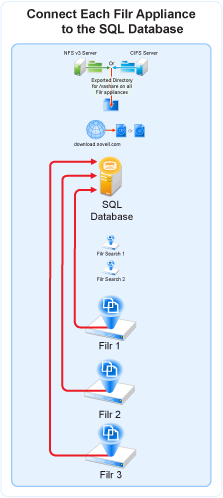
Table 8-5 Configuring each Filr to connect to the SQL Database

Page, Dialog, or Option

Do This

Database

  1. Specify the following configuration options for the database:

    Database Type: Select the type of database that you prepared in Setting Up the SQL Database.

    Host Name: The host name or IP address of the database server.

    Port: The wizard selects the standard port for the database type. If your server communicates using a non-standard port, adjust the number accordingly

    Database Name: The name of the database you want the wizard to create (first appliance) and then connect to (subsequent appliances).

    User Name: The administrative user name you identified in Setting Up the SQL Database.

    For the MySQL appliance, the default is filr.

    Password: The administrative user’s password.

  2. Click Next.

Figure 8-6 Initially, Each Filr Appliance Is Configured to Work with One Filr Search Appliance

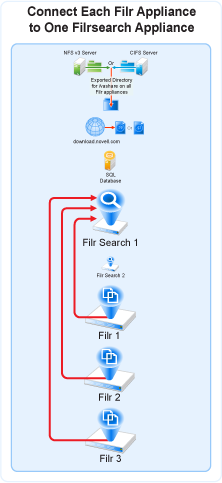
Table 8-6 Specify the First Search Appliance, Locale, and Admin user

Page, Dialog, or Option

Do This

Search Appliance

  1. Specify the first Filrsearch appliance’s DNS name and Lucene password, then click Finish.

    IMPORTANT:If you specify the IP address, it must be resolvable to the DNS hostname of the search appliance.

  2. Click Next.

Default Locale

  1. Select a Default Locale.

  2. If desired, specify a name other than admin for appliance administration on port 8443.

  3. Click Finish.

    IMPORTANT:Wait for the appliance to start before closing the tab or navigating away from the page.

  4. When the “Congratulations!” message displays, return to Table 8-4 and deploy the next Filr appliance.

  5. After all of the Filr appliances are deployed, continue with Completing the Expandable Filr Deployment.