Configuring the WebAccess Agent
During installation, the GroupWise® WebAccess Agent is set up with a default configuration. On Linux, this happens during the configuration step. However, you can use the information in the following sections to optimize the WebAccess Agent for your environment:
- Modifying WebAccess Settings
- Modifying WebPublisher Settings
- Controlling WebAccess Agent Logging
- Managing Access to Post Offices
- Changing the WebAccess Agent's Network Address or Port Numbers
Modifying WebAccess Settings
Using ConsoleOne®, you can configure the following GroupWise WebAccess settings for the WebAccess Agent:
- The maximum number of threads the agent will use to process WebAccess messages
- The key used to encrypt information sent between the agent and the WebAccess Application
To modify the configuration information:
-
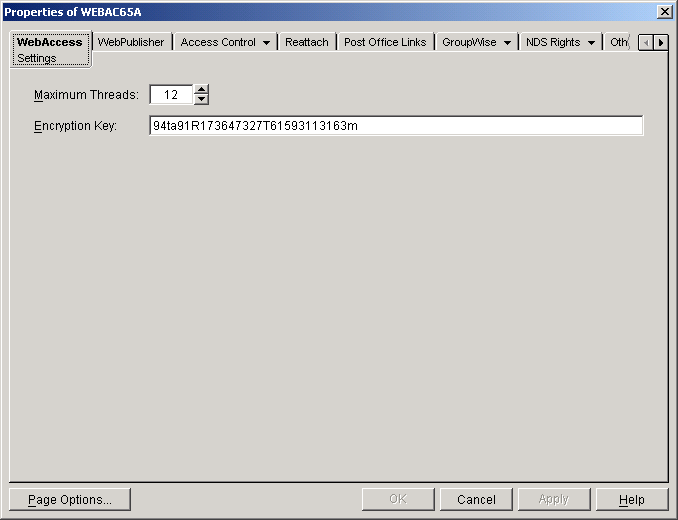
In ConsoleOne, right-click the WebAccess Agent object, then click Properties.
-
If necessary, click WebAccess > Settings to display the WebAccess Settings page.
-
Modify any of the following fields:
Maximum Threads: This is the maximum number of threads the agent will use at one time to process requests. The default (12) enables the agent to process 12 requests at one time, which is usually sufficient. If the agent regularly receives more requests than it has threads, you might want to increase the maximum number of threads. Increasing the threads increases the amount of server memory used by the agent.
To determine the maximum number of threads that have been in use at one time (for example, 8 of the 12 threads), you can view the server console screen for the NetWare® WebAccess Agent or view the status information displayed through the Web console. See Monitoring the WebAccess Agent.
Encryption Key: The encryption key is used to encrypt and decrypt the information sent between the WebAccess Agent and the WebAccess Application. If you do not want to use the default encryption key, you can type your own key. The encryption key must be identical to the encryption keys of any other WebAccess Agents that the WebAccess Application communicates with. For more information, see Configuring Redirection and Failover Support.
-
Click OK to save the changes.
Modifying WebPublisher Settings
Using ConsoleOne, you can configure the following WebPublisher settings for the WebAccess Agent:
- The GroupWise account used by the WebAccess Agent to retrieve documents for WebPublisher users
- The GroupWise libraries where the WebAccess Agent will look for documents that have been shared with GroupWise WebPublisher users
- The maximum amount of disk space to use when caching documents that have been converted to HTML for viewing by GroupWise WebPublisher users
- How often to synchronize the cached documents with the original documents in the GroupWise libraries
- The location where the files will be cached
To modify the configuration information:
-
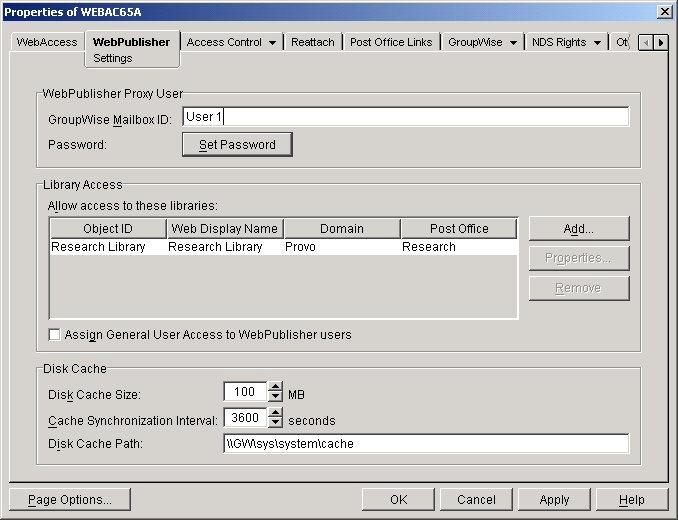
In ConsoleOne, right-click the WebAccess Agent object, then click Properties.
-
Click WebPublisher > Settings to display the WebPublisher Settings page.
-
Modify any of the following fields:
GroupWise Mailbox ID: The WebPublisher proxy user serves two purposes: 1) GroupWise users make documents available to GroupWise WebPublisher users by sharing the documents with the WebPublisher proxy user and 2) the WebAccess Agent logs in to GroupWise through the WebPublisher proxy user. This enables the WebAccess Agent to search for and retrieve documents that have been shared with the WebPublisher proxy user. Specify the ID for the GroupWise mailbox you want to use.
Password: Click Set Password to specify the mailbox password.
Allow Access to These Libraries: This list displays the libraries that the WebAccess Agent has access to. If a library is not in the list, WebPublisher users cannot see the library's documents. If a library is listed, WebPublisher users can view any of the library's documents that have been shared (by the document owner) with the WebPublisher proxy user.
To add a library to the list, click Add, then browse for and select the library.
To change the display name or description for the library, select the library, then click Properties. By default, the library's Novell® eDirectoryTM object name is used for the display name.
To remove a library from the list, select the library, then click Remove.
Assign General User Access to WebPublisher Users: When sharing documents with GroupWise users, a document's owner can assign individual access rights and general access rights (through the General User Access option). The General User Access rights determine the access for all GroupWise users who do not receive individual access rights. For example, if a document's owner sets the General User Access to View, all GroupWise users with access to that library can view the document.
This option lets you determine whether or not you, as the GroupWise system administrator, want to give General User Access rights to WebPublisher users. For example, with this option enabled, WebPublisher users can view any documents that have General User Access set to View.
Disk Cache Size: When a GroupWise WebPublisher user requests a document from a GroupWise library, the WebAccess Agent retrieves the document, renders it to HTML, displays it to the GroupWise WebPublisher user, and then saves it to a disk cache. If the document is requested again, the cached version is used.
The disk cache size determines the maximum amount of disk space to be used for the cache. The default is 100 MB. If there is not room in the cache for a newly rendered document, the least recently requested document is removed from the cache to make room for the new document.
If GroupWise users are publishing large numbers of documents, you might want to increase the cache size. The advantage of a large cache is that cached documents are displayed more quickly to GroupWise WebPublisher users because the WebAccess Agent does not have to first render them to HTML. The disadvantage of a large cache is the disk space used and the amount of time required by the WebAccess Agent to keep the cached documents synchronized with the original documents.
Cache Synchronization Interval: The cache synchronization interval determines how often the WebAccess Agent checks for differences between the cached documents and the original documents in the library. Based on the default interval, the WebAccess Agent checks for differences every one hour (3600 seconds). If differences exist, the WebAccess Agent replaces the cached document with a newly rendered version of the original document.
Disk Cache Path: The disk cache path indicates the directory where documents are stored. By default, this is a directory on the WebAccess Agent's server (c:\groupwise\cache for Windows or sys:\system\cache for NetWare® or /opt/novell/groupwise/webpublisher/cache for Linux). If necessary, you can change the path to specify a new location.
To increase speed and reduce network traffic, we recommend that you keep the cache directory on the WebAccess Agent's server.
-
Click OK to save the changes.
Controlling WebAccess Agent Logging
The WebAccess Agent provides logging options to help you monitor the operation of the agent.
The following sections explain the how to control logging:
Controlling the Agent's Logging
The WebAccess Agent logs information to the console and to a log file on disk (by default, disk logging is turned off). You can control the following logging features:
- The type of information to log.
- Whether disk logging is on or off.
- How long to retain log files.
- The maximum amount of disk space to use for log files.
- Where to store log files.
You can control logging through ConsoleOne, WebAccess Agent startup switches, and the WebAccess Agent console. The following table shows which logging options you can control from each location.
The log settings in ConsoleOne are used as the default settings. Startup switches override the ConsoleOne log settings, and agent console settings override startup switches and ConsoleOne settings for the current agent session. For information about modifying log settings through ConsoleOne, startup switches, or the WebAccess Agent console, see the following sections:
- Modifying Log Settings in ConsoleOne
- Modifying Log Settings through Startup Switches
- Modifying Log Settings through the NetWare Agent's Console
- Modifying Log Settings through the Windows Agent's Console
- Modifying Log Settings on Linux
Modifying Log Settings in ConsoleOne
Through ConsoleOne, you can select the following log settings:
- Log file location
- Logging level
- Maximum age for log files
- Maximum disk spaced used for log files
By default, the WebAccess Agent does not log information to a file on disk on NetWare and Windows. (However, on Linux, it does.) To turn disk logging on, you can use the /logdiskon startup switch. See Modifying Log Settings through Startup Switches. If you are using the NetWare WebAccess Agent, you can turn disk logging on through the agent's console. See Modifying Log Settings through the NetWare Agent's Console.
The WebAccess Agent creates a new log file each day and each time it is started. The log file is named mmddweb.nnn, where mm is the month, dd is the day, and nnn is a sequenced number (001 for the first log file of the day, 002 for the second, and so forth). On NetWare and Windows, the default location for the log files is the domain\wpgate\webac65a\000.prc directory. On Linux, the location is /var/log/novell/groupwise/domain_name.gateway_name/000.prc.
To modify log settings in ConsoleOne:
-
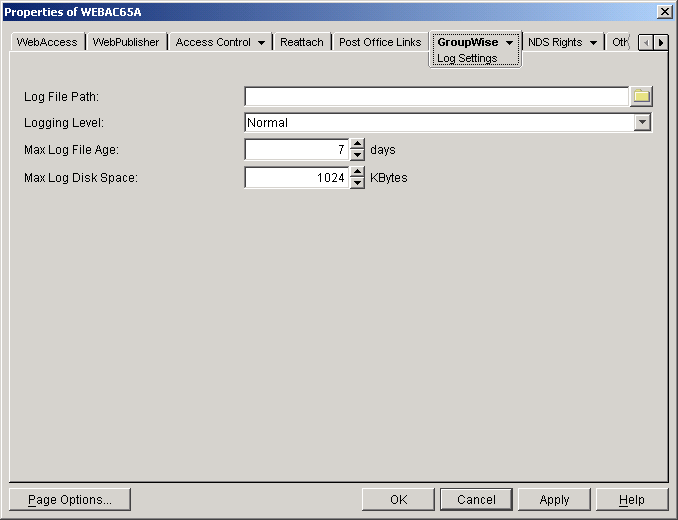
In ConsoleOne, right-click the WebAccess Agent object, then click Properties.
-
Click GroupWise > Log Settings to display the Log Settings page.
-
Modify any of the following properties:
Log File Path: By default, this field is empty. If you have turned on disk logging by using the /logdiskon startup switch (see Modifying Log Settings through Startup Switches), the log files will be saved to the default directory or to the directory specified by the /log startup switch. If you want to specify a different location, enter the directory path or browse to and select the directory.
If you have not used the /logdiskon startup switch to turn on logging, entering a log file path will activate disk logging (after you restart the WebAccess Agent).
Logging Level: There are four logging levels: Off, Normal, Verbose, and Diagnostic. Off turns logging off; Normal displays initial statistics, user logins, warnings, and errors; Verbose displays normal logging plus user requests; and Diagnostic displays Verbose logging plus thread information. The default is Normal logging. Use Diagnostic only if you are troubleshooting a problem with WebAccess.
The verbose and diagnostic logging levels do not degrade WebAccess Agent performance, but log files saved to disk consume more disk space when verbose or diagnostic logging is in use.
Max Log File Age: Specify the number of days you want the WebAccess Agent to retain old log files. The WebAccess Agent will retain the log file for the specified number of days unless the maximum disk space for the log files is exceeded. The default age is 7 days.
Max Log Disk Space: Specify the maximum amount of disk space you want to use for log files. If the disk space limit is exceeded, the WebAccess Agent will delete log files, beginning with the oldest file, until the limit is no longer exceeded. The default disk space is 1024 KB.
-
Click OK to save the log settings.
Modifying Log Settings through Startup Switches
Startup switches override any log settings you specified through ConsoleOne. See Modifying Log Settings in ConsoleOne.
To use a switch, you can:
- Add the switch to the command line. For example, load gwinter.nlm /ph-j:\domain\wpgate\webac65a.
- On NetWare, include the switch in the WebAccess NetWare configuration file (strtweb.ncf), typically located in sys:\system.
- On Linux, include the switch in the WebAccess startup script (gateway_name.waa) located in /opt/novell/groupwise/agents/bin.
- On Windows, include the switch in the WebAccess startup batch file (strtweb.bat), typically located in c:\webacc.
For information about startup switches that can be used to modify log settings, see Using WebAccess Agent Startup Switches.
Modifying Log Settings through the NetWare Agent's Console
You can use the NetWare WebAccess Agent's console to modify the following log settings:
- Logging level
- Disk logging on or off
- Maximum age for log files
- Maximum disk space used for log files
Changes you make to log settings at the console apply only to the current session. When you restart the WebAccess Agent, the log settings are reset to the settings specified in ConsoleOne or the startup switches. See Modifying Log Settings in ConsoleOne and Modifying Log Settings through Startup Switches.
To modify the log settings:
-
At the NetWare WebAccess Agent's console, press F10, select Logging Options, then modify any of the following settings:
Logging Level: Off turns logging off; Normal displays initial statistics, user logins, warnings, and errors; Verbose displays normal logging plus user requests; and Diagnostic displays Verbose logging plus thread information. The default is Normal logging. Use Diagnostic only if you are troubleshooting a problem with GroupWise WebAccess.
The verbose and diagnostic logging levels do not degrade WebAccess Agent performance, but log files saved to disk consume more disk space when verbose or diagnostic logging is in use.
File Logging: Turns disk logging on or off. When disk logging is turned on, the WebAccess Agent creates a new log file each day and each time it is restarted. The log file is named mmddweb.nnn, where mm is the month, dd is the day, and nnn is a sequenced number (001 for the first log file of the day, 002 for the second, and so forth). On NetWare and Windows, the default location for the log files is the domain\wpgate\webac65a\000.prc directory. On Linux, the default location is /var/log/novell/groupwise/domain.webac65a/000.prc.
Max Log File Age: Specifies the number of days you want the WebAccess Agent to retain old log files. The WebAccess Agent will retain the log file for the specified number of days unless the maximum disk space for the log files is exceeded. The default age is 7 days.
Max Log Disk Space: Specifies the maximum amount of disk space you want to use for log files. If the disk space limit is exceeded, the WebAccess Agent will delete log files, beginning with the oldest file, until the limit is no longer exceeded. The default disk space is 65536 KB.
-
Press Esc to save the information.
Modifying Log Settings through the Windows Agent's Console
You can use the Windows WebAccess Agent's console to modify the logging level. All other log settings must be modified through ConsoleOne or startup switches. See Modifying Log Settings in ConsoleOne and Modifying Log Settings through Startup Switches.
Changes you make to the log level at the console apply only to the current session. When you restart the WebAccess Agent, the log level is reset to the level specified in ConsoleOne or the startup switches.
To modify the logging level:
-
In the NetWare WebAccess Agent's console (the DOS window), press F2 to cycle the log level between Normal, Verbose, and Diagnostic. Each level is described below:
Normal: Normal displays initial statistics, user logins, warnings, and errors. This is the default level.
Verbose: Verbose displays Normal logging plus user requests.
Diagnostic: Diagnostic displays Verbose logging plus thread information. Use Diagnostic only if you are troubleshooting a problem with GroupWise WebAccess.
The verbose and diagnostic logging levels do not degrade WebAccess Agent performance, but log files saved to disk consume more disk space when verbose or diagnostic logging is in use.
Modifying Log Settings on Linux
On Linux, these settings must be modified through ConsoleOne. See Modifying Log Settings in ConsoleOne.
Assigning Operators to Receive Warning and Error Messages
You can select GroupWise users to receive warning and error messages issued by the WebAccess Agent. Whenever the agent issues a warning or error, these users, called operators, receive a message in their mailboxes. You can specify one or more operators.
To assign an operator:
-
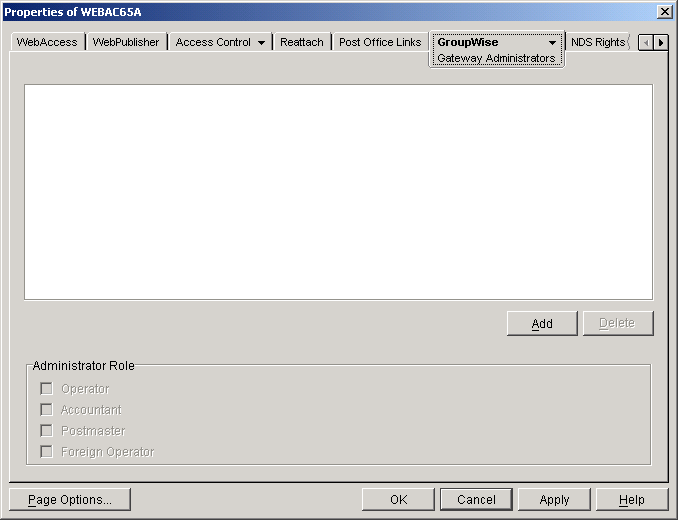
In ConsoleOne, right-click the WebAccess Agent object, then click Properties.
-
Click GroupWise > Gateway Administrators to display the Gateway Administrators page.
-
Click Add, select a user, then click OK to add the user to the Gateway Administrators list.
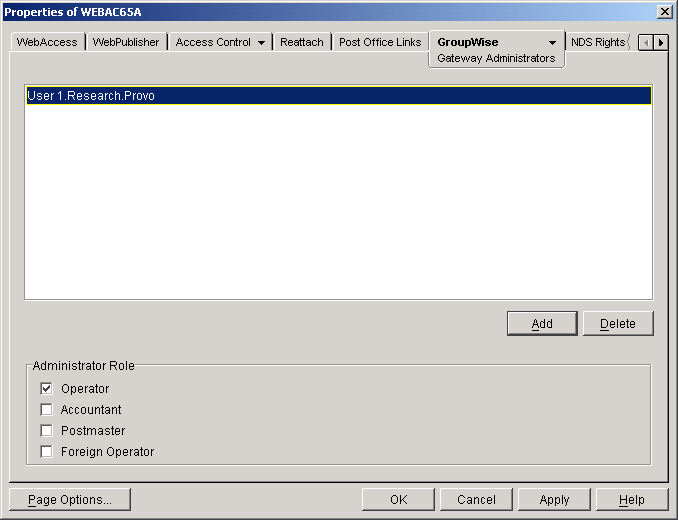
-
Make sure Operator is selected as the Administrator Role.
-
If desired, add additional operators.
-
Click OK.
Managing Access to Post Offices
The WebAccess Agent requires access to all post offices where WebAccess users' mailboxes or GroupWise libraries reside. The agent can access a post office using client/server mode, direct mode, or both. By default, it uses whichever mode is defined on the Post Office object's Post Office Settings page (located on the GroupWise tab).
- Modifying Links to Post Offices explains how to set the access mode to client/server, direct, or both.
- Automating Reattachment to NetWare Servers explains how to configure the agent to automatically reconnect to post offices on NetWare servers.
Modifying Links to Post Offices
-
In ConsoleOne, right-click the WebAccess Agent object, then click Properties.
-
Click Post Office Links > Settings.

-
In the Post Offices list, select the post office whose link information you want to change, then click Edit Link to display the Edit Post Office Link dialog box.
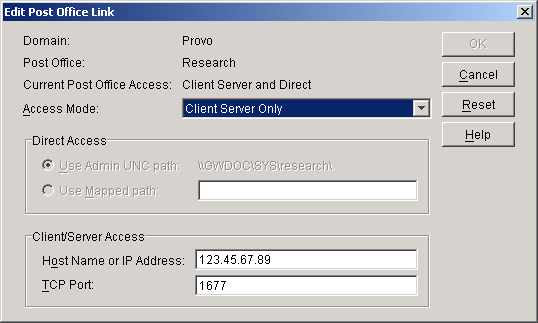
-
Define the following properties:
Access Mode: The access mode determines whether the WebAccess Agent will use client/server access, direct access, or both client/server and direct access to connect to the post office. With client/server and direct, the WebAccess Agent first tries client/server access; if client/server access fails, it then tries direct access. You can also choose to use the same access mode currently defined for the post office (on the Post Office object's Post Office Settings page). The current access mode is displayed in the Current Post Office Access field.
Direct Access: When connecting to the post office in direct mode, the WebAccess Agent can use the post office's UNC path (as defined on the Post Office object's Identification page) or a mapped path that you enter.
Client/Server Access: When connecting to the post office in client/server mode, the WebAccess Agent must know the hostname (or IP address) and port number of the Post Office Agent running against the post office.
-
Click OK.
-
Repeat Step 3 through Step 5 for each post office whose link you want to change.
Automating Reattachment to NetWare Servers
You can specify the reattach information for the Windows WebAccess Agent in ConsoleOne. Whenever the Windows WebAccess Agent loses its connection to a post office that is on a NetWare server, it will read the reattach information from the domain database and attempt to reattach to the NetWare server.
The NetWare WebAccess Agent does not use this information. To reattach to NetWare servers where users' post offices reside, the NetWare WebAccess Agent uses the user ID and password specified during installation. This user ID and password are entered in the strtweb.ncf file
To specify the reattachment information for the NetWare WebAccess Agent:
-
In ConsoleOne, right-click the WebAccess Agent object, then click Properties.
-
Click Reattach > Settings.
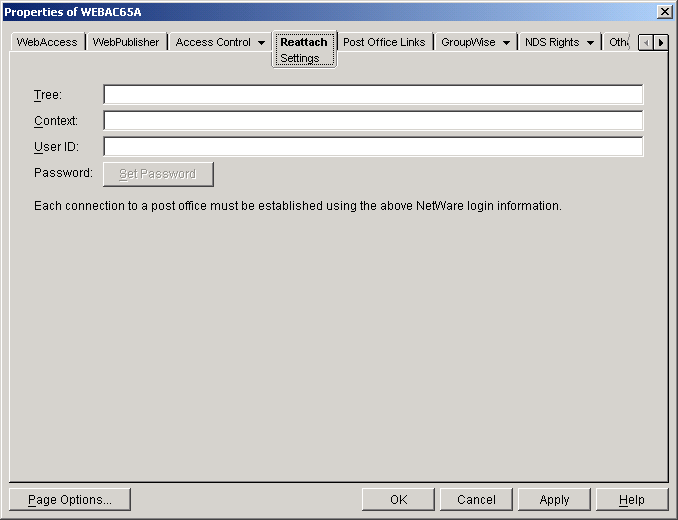
-
Define the following properties:
Tree: Enter the eDirectory tree that the WebAccess Agent logs in to. If the WebAccess Agent does not use an eDirectory user account, leave this field blank.
Context: Enter the eDirectory context of the WebAccess Agent's user account. If the WebAccess Agent does not use an eDirectory user account, leave this field blank.
-
Click OK.
Changing the WebAccess Agent's Network Address or Port Numbers
If you change the network address (IP address or DNS hostname) of the WebAccess Agent's server or move the WebAccess Agent to a new server, you will need to change the network address in ConsoleOne. You can also change the port numbers used by the WebAccess Agent.
-
In ConsoleOne, right-click the WebAccess Agent object, then click Properties.
-
Click GroupWise > Network Address to display the Network Address page.
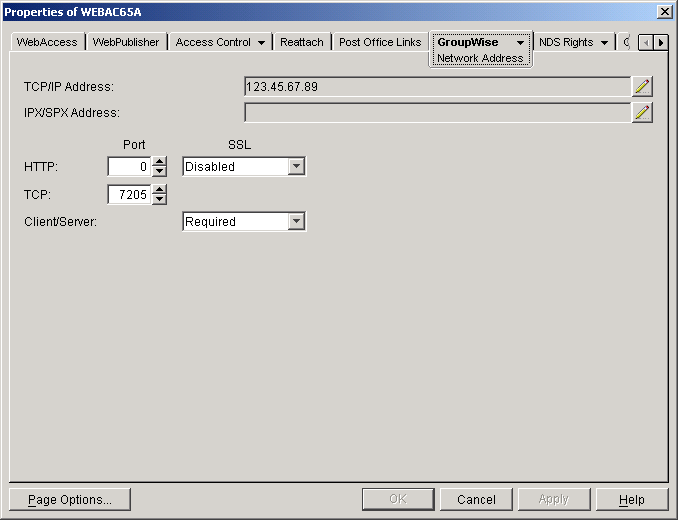
-
To change the WebAccess Agent's IP address, click the Edit button next to the TCP/IP Address field to display the Edit Network Address dialog box.
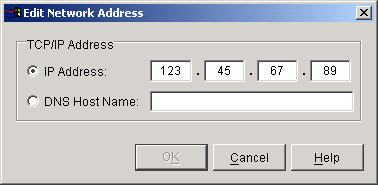
-
Change the IP address or DNS hostname as necessary, then click OK to return to the Network Address page.
-
To change the port numbers used by the WebAccess Agent, enter the new port number in the appropriate field.
HTTP Port: This is the port used to listen for requests from its Web console. The default port number is 7211.
TCP Port: This is the port used to listen for requests from the WebAccess Application and WebPublisher Application. The default port is 7205.
-
Click OK to save the changes.