Performing Basic MTA Configuration
MTA configuration information is stored as properties of its MTA object in eDirectory. The following topics help you modify the MTA object in ConsoleOne and change MTA configuration to meet changing system configurations:
- Creating an MTA Object in eDirectory
- Configuring the MTA in ConsoleOne
- Changing the Link Protocol between Domains
- Changing the Link Protocol between a Domain and Its Post Offices
- Moving the MTA to a Different Server
- Adjusting the MTA for a New Location of a Domain or Post Office
Creating an MTA Object in eDirectory
When you create a new domain, an MTA object is automatically created for it. If the original MTA object for a domain gets accidently deleted, you can create a new one for it. Do not attempt to create more than one MTA object for a domain.
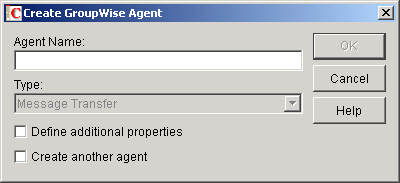
To create a new MTA object in Novell® eDirectoryTM:
-
In ConsoleOne®, browse to and right-click the Domain object for which you need to create an MTA object, then click New.
-
Double-click GroupWise Agent to display the Create GroupWise Agent dialog box.
-
Type a unique name for the new MTA. The name can include as many as 8 characters. Do not use any of the following invalid characters in the name:
ASCII characters 0-13
Comma ,
Asterisk *
Double quote "
At sign @
Extended characters
Braces { }
Parentheses ( )
Colon :
Period .
The Type field is automatically set to Message Transfer.
-
Select Define Additional Properties.
-
Click OK.
The MTA object is automatically placed within the Domain object.
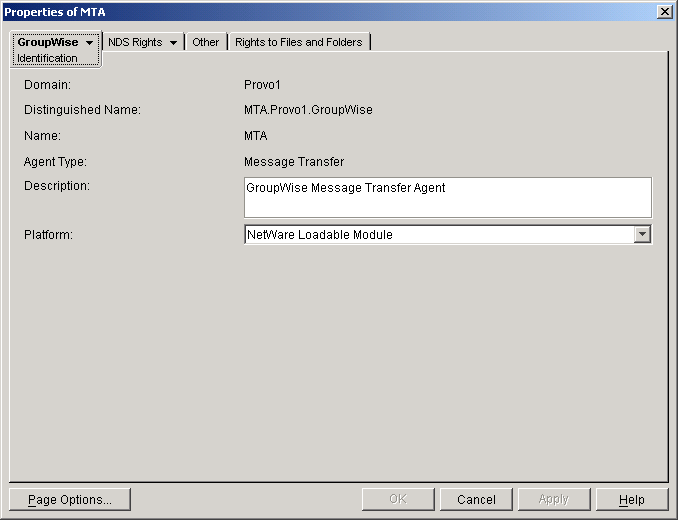
-
Review the information displayed for the first four fields on the Identification page to ensure that you are creating the correct type of Agent object in the correct location.
-
In the Description field, type one or more lines of text describing the MTA. This description will display on the MTA agent console as the MTA runs.
If multiple administrators work at the server where the MTA will run, the description could include a note about who to contact before stopping the MTA. When running multiple MTAs on the same server, the description should uniquely identify each one. See Monitoring the MTA.
-
In the Platform field, select the platform (NetWare Loadable Module or Windows) where the MTA will run.
-
Continue with Configuring the MTA in ConsoleOne.
Configuring the MTA in ConsoleOne
The advantage to configuring the MTA in ConsoleOne, as opposed to using startup switches in an MTA startup file, is that the MTA configuration settings are stored in eDirectory.
-
In ConsoleOne, expand the eDirectory container where the Domain object is located.
-
Expand the Domain object.
-
Right-click the MTA object, then click Properties.
The table below summarizes the MTA configuration settings in the MTA object properties pages and how they correspond to MTA startup switches (as described in Using MTA Startup Switches):
| ConsoleOne Properties Pages and Settings | Corresponding Tasks and Startup Switches |
|---|---|
|
|
Domain |
|
|
|
Scan Cycle |
See Adjusting MTA Polling of Input Queues in the Domain, Post Offices, and Gateways. |
Attach Retry |
|
Enable Automatic Database |
See /norecover. |
Use 2nd High Priority Scanner |
See Adjusting the Number of MTA Scanner Threads for the Domain and Post Offices. |
SNMP Community "Get" String |
|
HTTP User Name |
See Setting Up the MTA Web Console. |
|
|
TCP/IP Address |
See Using TCP/IP Links between Domains and Using TCP/IP Links between a Domain and its Post Offices. |
Message Transfer |
See Using TCP/IP Links between Domains. |
HTTP |
See Setting Up the MTA Web Console. |
|
|
Log File Path |
See Using MTA Log Files. |
|
|
Message Logging Level |
See Enabling MTA Message Logging. |
|
|
eDirectory User Synchronization |
See Using eDirectory User Synchronization. |
|
|
Default Routing Domain |
See Using Routing Domains. |
Allow MTA to Send Directly to |
See "Using Dynamic Internet Links" in "Connecting to GroupWise 5.x and 6.x Systems" in the GroupWise 6.5 Multi-System Administration Guide. |
|
|
Certificate File |
See Enhancing Domain Security with SSL Connections to the MTA. |
After you install the MTA software, you can further configure the MTA using a startup file. To survey the many ways the MTA can be configured, see Using MTA Startup Switches.
Changing the Link Protocol between Domains
How MTAs for different domains communicate with each other is determined by the link protocol in use between the domains. Typically, inbound and outbound links for a domain use the same link protocol, but this is not required. For a review of link protocols, see Link Protocols for Direct Links.
If you originally set up an MTA using one link protocol and need to change to a different one, some reconfiguration of the MTA is necessary.
- Using TCP/IP Links between Domains
- Using Mapped or UNC Links between Domains
- Using Gateway Links between Domains
NOTE: The Linux MTA does not support mapped or UNC links between domains. TCP/IP links are required.
Using TCP/IP Links between Domains
To set up TCP/IP links between domains, you must perform the following two tasks:
Configuring the MTA for TCP/IP
-
Make sure TCP/IP is properly set up on the server where the MTA is running.
-
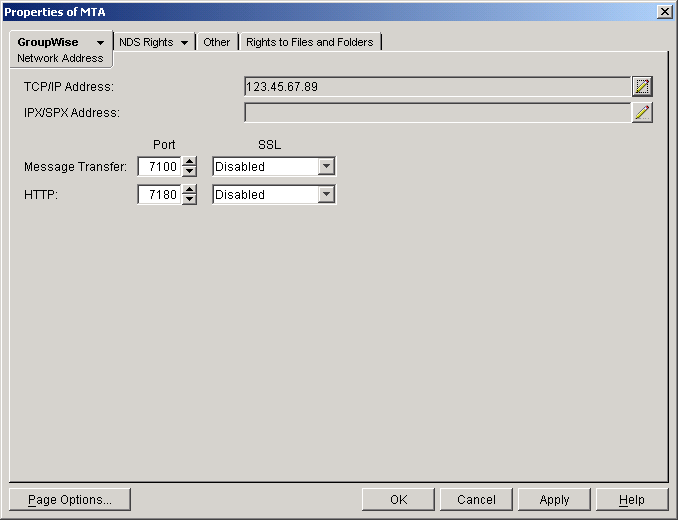
In ConsoleOne, browse to and right-click the MTA object, then click Properties.
-
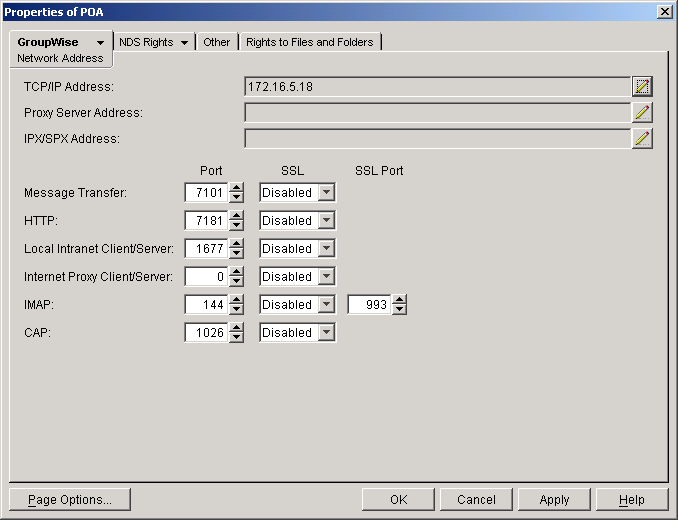
Click GroupWise > Network Address to display the Network Address page.
-
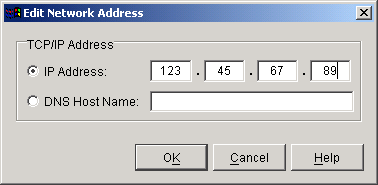
On the Network Address page, click the pencil icon for the TCP/IP Address field to display the Edit Network Address dialog box.

-
Select IP Address, then provide the IP address, in dotted decimal format, of the server where the MTA is running.
or
Select DNS Host Name, then provide the DNS hostname of the server where the MTA is running.
IMPORTANT: The MTA must run on a server that has a static IP address. DHCP cannot be used to dynamically assign an IP address for it.
Specifying the DNS hostname rather than the IP address makes it easier to move the MTA from one server to another, should the need arise at a later time. You can assign a new IP address to the hostname in DNS, without needing to change the MTA configuration information in ConsoleOne.
-
Click OK.
-
To use a TCP port number other than the default port of 7100, type the port number in the Message Transfer Port field.
If multiple MTAs will run on the same server, each MTA must have a unique TCP port number.
-
If needed, select Enabled in the SSL drop-down list for the message transfer port. For more information, see Enhancing Domain Security with SSL Connections to the MTA.
-
Click OK to save the network address and return to the main ConsoleOne window.
ConsoleOne then notifies the MTA to restart enabled for TCP/IP.
Corresponding Startup Switches
You could also use the /tcpport switch in the MTA startup file to provide the message transfer port number.
MTA Web Console
You can view the MTA TCP/IP information on the Configuration page under the TCP/IP Settings heading.
Changing the Link Protocol between Domains to TCP/IP
Make sure you have configured the MTA for TCP/IP at both ends of each link.
To change the link between the domains from mapped or UNC to TCP/IP:
-
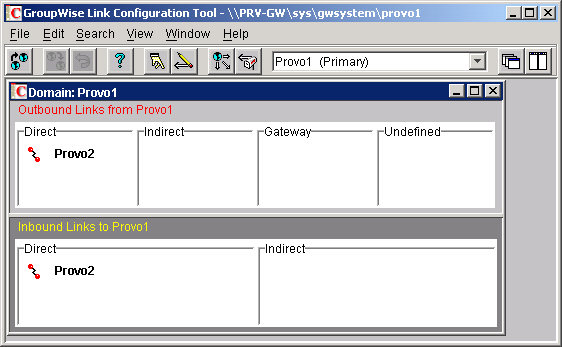
In ConsoleOne, click Tools > GroupWise Utilities > Link Configuration.
-
Click View > Domain Links to display domain links.
-
Select the MTA's local domain in the drop-down list.
Outbound and inbound links for the selected domain are listed.
-
Double-click a domain in the Outbound Links list.

-
Set Link Type to Direct.
-
Set Protocol to TCP/IP.
Make sure the information displayed in the IP Address and MT Port fields matches the information for the MTA for the domain to which you are linking.
-
Click OK.
-
Repeat Step 4 through Step 7 for each domain in the Outbound Links list where you want the MTA to use a TCP/IP link.
Selecting multiple domains is also allowed.
-
Double-click a domain in the Inbound Links list.
-
Set Link Type to Direct.
-
Set Protocol to TCP/IP.
Make sure the information displayed in the IP Address and MT Port fields matches the information you supplied in Configuring the MTA for TCP/IP.
-
Click OK.
-
Repeat Step 9 through Step 12 for each domain in the Inbound Links list where you want the MTA to use a TCP/IP link.
Selecting multiple domains is also allowed.
-
Click File > Exit > Yes to save the link changes.
ConsoleOne then notifies the MTA to restart with the new link configuration.
For a sample message flow for this configuration, see "TCP/IP Link Open: Transfer between Domains Successful" in "Message Delivery to a Different Domain" in GroupWise 6.5 Troubleshooting 3: Message Flow and Directory Structure.
Using Mapped or UNC Links between Domains
To change to a mapped or UNC link between domains:
-
In ConsoleOne, click Tools > GroupWise Utilities > Link Configuration.
-
Click View > Domain Links to display domain links.
-
Select the MTA's local domain in the drop-down list.
Outbound and inbound links for the selected domain are listed.
-
Double-click a domain in the Outbound Links list.
-
Set Link Type to Direct.
-
Set Protocol to Mapped or UNC.
-
Enter the full path, in the appropriate format, of the directory where the other domain is located.
-
Click OK.
-
Repeat Step 4 through Step 8 for each domain in the Outbound Links list where you want the MTA to use a mapped or UNC link.
Selecting multiple domains is also allowed.
-
Double-click a domain in the Inbound Links list.
-
Set Link Type to Direct.
-
Set Protocol to Mapped or UNC.
-
Enter the full path, in the appropriate format, of the directory where the local domain is located.
-
Click OK.
-
Repeat Step 10 through Step 14 for each domain in the Inbound Links list where you want the MTA to use a mapped link.
Selecting multiple domains is also allowed.
-
Click File > Exit > Yes to save the link changes.
ConsoleOne then notifies the MTA to restart with the new link configuration.
For a sample message flow for this configuration, see "Mapped/UNC Link Open: Transfer between Domains Successful" in "Message Delivery to a Different Domain" in GroupWise 6.5 Troubleshooting 3: Message Flow and Directory Structure.
Using Gateway Links between Domains
You can use GroupWise gateways to link domains within your GroupWise system.
Using the Async Gateway to Link Domains
You can use the Async Gateway to link a domain into your GroupWise system using a modem. For setup instructions, see the Async Gateway documentation at GroupWise 6.5 Documentation.
Using the Internet Agent to Link Domains
You can use the Internet Agent to link a domain into your GroupWise system across the Internet. When you use the Internet Agent as the transport mechanism between domains, it encapsulates GroupWise messages (both e-mail messages and administrative messages) within SMTP messages in order to transport them across the Internet. For setup instructions, see Linking Domains
NOTE: A simpler alternative to a gateway link for spanning the Internet is to use MTA to MTA links, as described for linking separate GroupWise systems in "Using Dynamic Internet Links" in the GroupWise 6.5 Multi-System Administration Guide. The same configuration that can link two separate GroupWise systems can be employed to link a domain within the same GroupWise system.
Changing the Link Protocol between a Domain and Its Post Offices
How messages are transferred between the MTA for the domain and the POA for each post office is determined by the link protocol in use between the domain and each post office. For a review of link protocols, see Link Protocols for Direct Links.
If you need to change from one link protocol to another, some reconfiguration of the MTA and its link to each post office is necessary.
- Using TCP/IP Links between a Domain and its Post Offices
- Using Mapped or UNC Links between a Domain and its Post Offices
NOTE: The Linux MTA requires TCP/IP links between a domain and its post offices.
Using TCP/IP Links between a Domain and its Post Offices
To change from mapped or UNC links to TCP/IP links between a domain and its post offices, you must perform the following two tasks:
- Configuring the Agents for TCP/IP
- Changing the Link Protocol between a Domain and its Post Offices to TCP/IP
Configuring the Agents for TCP/IP
-
If the MTA for the domain is not yet set up for TCP/IP communication, see Configuring the MTA for TCP/IP.
-
If any post offices do not yet have a POA set up for TCP/IP communication, see Using Client/Server Access to the Post Office to set up the initial TCP/IP information.
-
In ConsoleOne, expand the Post Office object to display the POA object(s) in the post office.
Only one POA per post office needs to communicate with the MTA. If the post office has multiple POAs, have a POA that performs message file processing communicate with the MTA for best performance. For information about message file processing, see Role of the Post Office Agent.
-
Right-click the POA object, then click Properties.
-
Click GroupWise > Network Address to display the Network Address page.
-
On the Network Address page, click the pencil icon for the TCP/IP Address field to display the Edit Network Address dialog box.
-
In the Message Transfer Port field, specify a unique TCP port on which the POA will listen for incoming messages from the MTA.
The default is 7101.
-
If needed, select Enabled in the SSL drop-down list for the message transfer port. For more information, see Enhancing Domain Security with SSL Connections to the MTA.
-
Click OK to save the TCP/IP information and return to the main ConsoleOne window.
ConsoleOne then notifies the POA to restart with message transfer processing enabled.
Changing the Link Protocol between a Domain and its Post Offices to TCP/IP
-
In ConsoleOne, click Tools > GroupWise Utilities > Link Configuration.
-
In the drop-down list, select the domain where you want TCP/IP links to post offices.
-
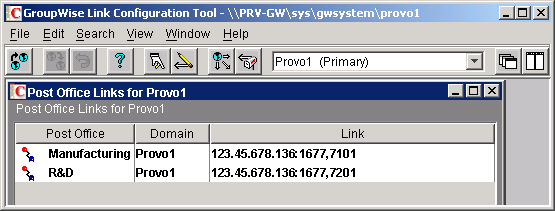
Click View > Post Office Links to display post office links.
-
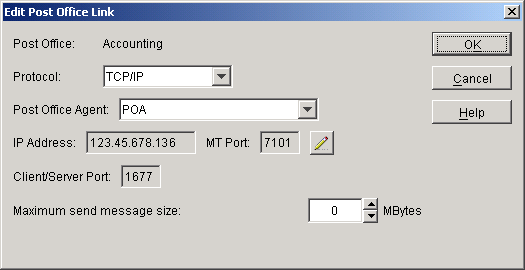
Double-click a Post Office object.
-
In the Protocol field, select TCP/IP.
-
Make sure the information displayed in the Edit Post Office Link dialog box matches the information provided in the Edit Network Address dialog box in Configuring the Agents for TCP/IP.
-
Click OK.
-
Repeat Step 4 through Step 7 for each post office in the domain where you want to use TCP/IP links.
-
To exit the Link Configuration tool and save your changes, click File > Exit > Yes.
ConsoleOne then notifies the MTA and POAs to restart using the new link protocol.
For a sample message flow for this configuration, see "TCP/IP Link Open: Transfer between Post Offices Successful" in "Message Delivery to a Different Post Office" in GroupWise 6.5 Troubleshooting 3: Message Flow and Directory Structure.
Using Mapped or UNC Links between a Domain and its Post Offices
To change from a TCP/IP link to a mapped or UNC link between a domain and its post offices:
-
In ConsoleOne, click Tools > GroupWise Utilities > Link Configuration.
-
In the drop-down list, select the domain where the post offices reside.
-
Click View Post Office Links to display post office links.
-
Double-click a Post Office object.
-
In the Protocol field, select Mapped or UNC.
-
Provide the location of the post office in the format appropriate to the selected protocol.
-
Click OK.
-
Repeat Step 4 through Step 7 for each post office in the domain.
-
To exit the Link Configuration tool and save your changes, click File > Exit > Yes.
ConsoleOne then notifies the POA and MTA to restart using the new link protocol.
For a sample message flow for this configuration, see "Mapped/UNC Link Open: Transfer between Post Offices Successful" in "Message Delivery to a Different Post Office" in GroupWise 6.5 Troubleshooting 3: Message Flow and Directory Structure.
Moving the MTA to a Different Server
As your GroupWise system grows and evolves, you might need to move an MTA from one server to another. For example, you might decide to run the MTA on a different platform, or perhaps you want to move it to a server that has more disk space for the mslocal directory.
-
Stop the existing MTA.
-
Copy the entire mslocal subdirectory structure to wherever you want it on the new server. It might contain messages that have not yet been delivered.
-
When moving the MTA, pay special attention to the following details:
- In the MTA startup file, set the /work switch to the location of the mslocal directory on the new server.
- If the original MTA was configured for TCP/IP links between domains, you must reconfigure the MTA object with the IP address and port number for the MTA on the new server. See Using TCP/IP Links between Domains.
- For the NetWare® MTA, if it was originally on the same server where its domain and post offices are located and you are moving it to a different server, you must add the /dn switch or the /user and /password switches to the MTA startup file to give the NetWare MTA access to the server where the domain and post offices are located.
-
Install the MTA on the new server. See "Installing GroupWise Agents" in the GroupWise 6.5 Installation Guide.
-
Start the new MTA. See Starting the MTA.
-
Observe the new MTA to see that it is running smoothly. See Monitoring the MTA.
-
If you are no longer using the old server for any GroupWise agents, you can remove them to reclaim the disk space. See Uninstalling the MTA Software.
Adjusting the MTA for a New Location of a Domain or Post Office
MTA configuration must be adjusted if you make the following changes to your GroupWise system configuration:
New Domain Location
If you move a domain from one server to another, you need to edit the MTA startup file to provide the new location of the domain directory.
-
Stop the MTA for the old domain location if it is still running.
-
Use an ASCII text editor to edit the MTA startup file.
- On NetWare and Windows, only the first 8 characters of the domain name are used in the filename. The startup file is typically located in the directory where the MTA software is installed.
- On Linux, the full domain name is used in the filename. However, all letters are lowercase and any spaces in the domain name are removed. The startup file is located in the /opt/novell/groupwise/agents/share directory.
-
Adjust the setting of the /home switch to point to the new location of the domain directory.
-
Save the MTA startup file.
-
Start the MTA for the new domain location. See Starting the MTA.
New Post Office Location
If you move a post office, you need to adjust the link information for that post office.
-
Click Tools > GroupWise Utilities > Link Configuration.
-
In the drop-down list, select the domain where a post office has moved.
-
Click View > Post Office Links to display post office links.
-
Double-click the post office that has been moved.
-
Provide its new location in the appropriate format.
-
Click OK.
-
Click File > Exit > Yes to save the link changes.
ConsoleOne then notifies the MTA to restart with the new link configuration.
Adjusting the MTA Logging Level and Other Log Settings
When installing or troubleshooting the MTA, a logging level of Verbose can be useful. However, when the MTA is running smoothly, you can set the logging level down to Normal to conserve disk space occupied by log files. See Using MTA Log Files.