65.2 Setting Client Options
Default settings can be established at the user level, the post office level, or the domain level. User settings override post office settings, and post office settings override domain settings. However, if you set a lock on an option at a higher level, the higher level then overrides the lower level setting.
To modify the default settings for the GroupWise client:
-
In ConsoleOne, click a Domain object if you want to modify the settings for all users in the domain.
or
Click a Post Office object if you want to modify the settings for all users in the post office.
or
Click a User object or GroupWise External Entity object if you want to modify settings for the individual user. To change the same settings for multiple users, select multiple objects.
-
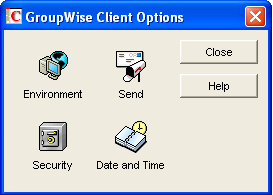
With the appropriate GroupWise object selected, click to display the GroupWise Client Options dialog box.
-
To set the Environment options, click > continue with Section 65.2.1, Modifying Environment Options.
or
To set the Send options, click > skip to Section 65.2.2, Modifying Send Options.
or
To set the Security options, click > skip to Section 65.2.3, Modifying Security Options.
or
To set the Date and Time options, click > skip to Section 65.2.4, Modifying Date and Time Options.
65.2.1 Modifying Environment Options
-
If the Environment Options dialog box is not displayed, follow the instructions in Section 65.0, Setting Defaults for the GroupWise Client Options to display the dialog box.
-
Click the tab that contains the options you want to change. Refer to the following sections for information about options:
- Environment Options: General
- Environment Options: Client Access
- Environment Options: Views
- Environment Options: File Locations
- Environment Options: Cleanup
- Environment Options: Appearance
- Environment Options: Retention
- Environment Options: Junk Mail
NOTE:The Environment options are not currently recognized by the Cross-Platform client.
-
If you want to prevent users from changing an option’s setting, click the lock button next to it.
After you click it, the lock button indicates whether the setting is locked at the domain level, the post office level, or the user level.
-
If you want to return all the options on a tab to their default settings, click .
-
When finished, click to save your changes.
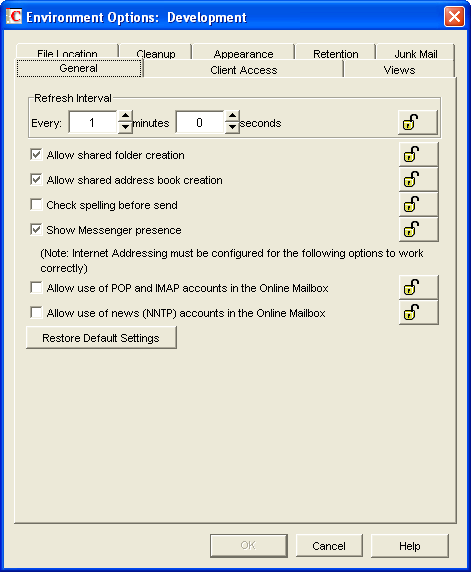
Environment Options: General
The options determine such settings as the refresh interval for new messages, whether users can create shared folders and address books, and which types of accounts can be used while in Online mode.
Figure 65-1 Environment Options Dialog Box with the General tab Open
Refresh Interval
Determine how often the GroupWise client lists will be updated to reflect new message status. The default is 1 minute.
Allow Shared Folder Creation
Enables users to share folders with other users. By default, this option is enabled.
Allow Shared Address Book Creation
Enables users to share address books with other users. By default, this option is enabled.
Check Spelling Before Send
Automatically spell checks the message text of each item before the item is sent. By default, this option is disabled.
Show Messenger Presence
Displays the Messenger presence information in the GroupWise Windows client. Messenger presence enables users to easily choose instant messaging as an alternative to e-mail. Messenger presence icons appear in the From field of a received message, in the Quick Info for users specified in the To, CC, and BC fields of a new message, and in the Quick Info for users in the Address Book. Messenger presence is enabled by default.
The Address Book must be properly configured to support Messenger presence. See Section 6.3, Supporting Messenger Presence Display in GroupWise.
Allow Use of POP and IMAP Accounts in the Online Mailbox
Select this option to enable users to access POP and IMAP accounts while using the GroupWise client in Online mode.
By default, this option is disabled. If you enable this option, an menu is added to the GroupWise client, allowing users to add POP and IMAP accounts to GroupWise, set account properties, and send and retrieve items from their POP and IMAP accounts. In addition, users are allowed to upload POP and IMAP items from the Remote mailbox to the Online mailbox.
Allow Use of News (NNTP) Accounts in the Online Mailbox:
Select this option to enable users to set up newsgroup (NNTP) accounts while using the GroupWise client in Online mode.
Environment Options: Client Access
The options allow you to apply a license type (full or limited) to users’ mailboxes and enable or disable the Remote and Caching modes in the GroupWise client for Windows.
Figure 65-2 Environment Options Dialog Box with the Client Access Tab Open
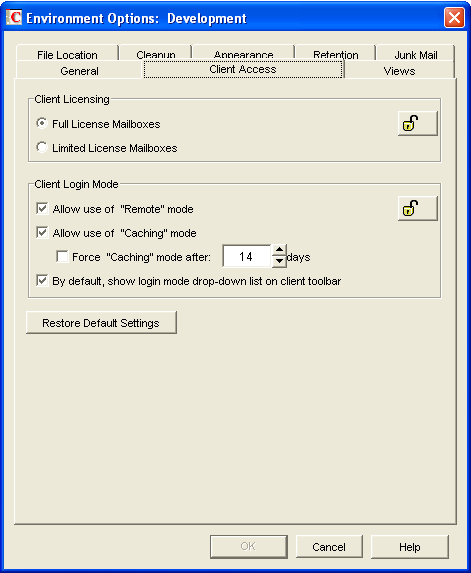
Client Licensing
GroupWise offers two types of mailbox licenses: full client mailbox licenses and limited client mailbox licenses.
A full client mailbox license has no mailbox access restrictions; the mailbox can be accessed by any GroupWise client (Windows or WebAccess) as well as any third-party plug-in or POP/IMAP client.
A limited client mailbox license restricts mailbox access to the following:
-
The GroupWise WebAccess client (including wireless devices)
-
A GroupWise client (Windows or WebAccess) via the Proxy feature
-
A GroupWise client (Windows or WebAccess) via the Busy Search feature
-
A POP or IMAP client
A limited client license mailbox does not allow access through the GroupWise client for Windows (other than via Proxy or Busy Search).
You can use this option to specify the type of client license that you want applied to users’ mailboxes. This enables you to support the type of GroupWise mailbox licenses you purchase. For example, if you only purchased limited client license mailboxes for users on a specific post office, you can mark all mailboxes on that post office as being limited client license mailboxes.
For information about generating an audit report that shows the type of license applied to each mailbox in a post office, see Section 12.4, Auditing Mailbox License Usage in the Post Office.
Client Login Mode
Choose from the following settings to determine which login modes are available to GroupWise users when using the GroupWise client for Windows. These settings apply only if you selected for the client licensing.
-
Allow Use of Remote Mode: Select this option to enable users to log in with GroupWise in Remote mode. With Remote mode, the GroupWise client uses a Remote mailbox on the user’s local drive. The user must initiate a connection (modem, direct, or TCP/IP) to send or retrieve items from the GroupWise system. For more information about Remote mode, see Section 64.1.3, Remote Mode. By default, this option is enabled.
NOTE:Remote Mode is not available in the Cross-Platform client.
-
Allow Use of Caching Mode: Select this option to enable users to log in with GroupWise in Caching mode. With Caching mode, the GroupWise client uses a Caching mailbox on the user’s local drive (this can be the same mailbox as the Remote mailbox). The GroupWise client periodically initiates a connection with the GroupWise system to send and receive items. For more information about Caching mode, see Section 64.1.2, Caching Mode. By default, this option is enabled.
Select the option (available only if the option is enabled) to force users to run in Caching mode. By default, this option is disabled. Specify the number of days before Caching mode is enforced. This allows the user to continue using Online mode until the grace period has passed. The grace period begins the first time the user connects to the POA. The setting applies per user per workstation.
The setting is not enforced on a workstation that does not have enough disk space for a Caching mailbox. The amount of disk space that is required is: the size of the mailbox + 20 MB + 25% of the mailbox size.
The setting is also not enforced when a user connects from a shared Windows workstation or terminal server if you configure these workstations to be excluded. You do this by setting a registry key on the Windows workstation. The registry key is in HKEY_LOCAL_MACHINE. Under Software\\Novell\\GroupWise\\Client, add a dword value named No Local Store with a value of 1. This prevents the user from creating a Caching or Remote mailbox by using the GroupWise Windows client menus. However, the user can still create a Caching or Remote mailbox by using the startup switches /pc, /pr, or /ps.
-
By Default, Show Login Mode Drop-Down List on Client Toolbar: Select this option to have the Login Mode drop-down list displayed on the client’s toolbar. This enables users to change the mode themselves and is necessary only if you allow multiple modes to be used. By default, this option is enabled.
Environment Options: Views
Figure 65-3 Environment Options Dialog Box with the Views Tab Open
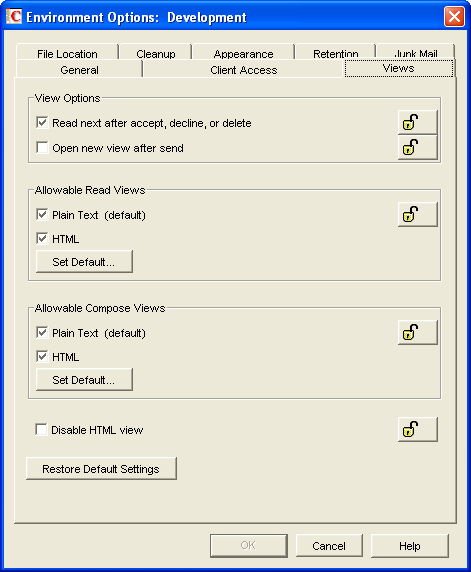
The Environment options determine when items open, and whether or not users can read and compose messages in HTML.
View Options
Choose from the following settings to determine what occurs when the user performs an action that closes the current view.
-
Read Next after Accept, Decline, or Delete: Select this option to have the next available received item automatically open after the user accepts, declines, or deletes an appointment, task, or note. By default, this option is enabled.
-
Open New View after Send: Select this option to have a new send view open after a user sends a message. By default, this option is disabled.
Allowable Read Views
Choose from the following settings to determine what read views you allow the clients to use.
-
Plain Text (Default): Select this option to allow users to read items in plain text.
-
HTML: Select this option to allow users to read items in HTML.
Click to select the default read views.
Allowable Compose Views
Choose from the following settings to determine what compose views you allow the clients to use.
-
Plain Text (Default): Select this option to allow users to compose items in plain text.
-
HTML: Select this option to allow users to compose items in HTML.
Click to select the default compose views.
Disable HTML View
Turns off the ability to view or compose messages in HTML View.
Environment Options: File Locations
The options determine the locations of users’ archive directories and the custom views directory.
Figure 65-4 Environment Options Dialog Box with the File Locations Tab Open
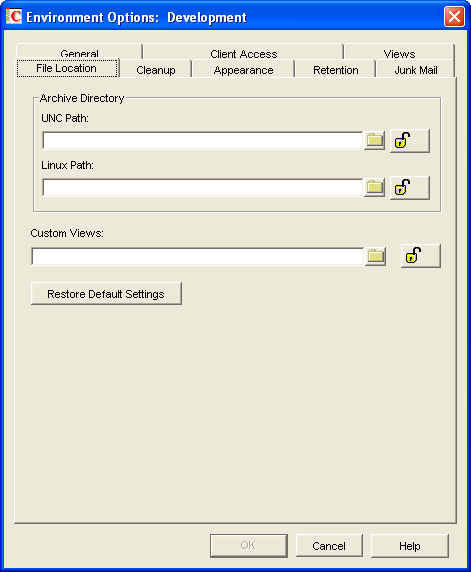
Archive Directory
Select the directory to be used for archiving items for both the Windows client and the Cross-Platform client. Each user must have his or her own archive directory, so this can be a local directory (for example, c:\novell\groupwise for the Windows client and \home\groupwise for the Cross-Platform client) or a personal user directory on a network server. If you select a local drive, make sure users have the directories created. If you select a network drive, make sure users have the necessary rights to access the directories.
IMPORTANT:If you want to use a network location, do not specify the same directory for users in more than one post office. The names of users’ individual archive directories are based on their FIDs. FIDs are unique within a post office, bur users in different post offices can have the same FID.
Custom Views
This option applies only if you are using custom views. Select the directory where the views are located. The GroupWise product does not include the capability to design custom views, but third-party products make use of this feature to support their specialized capabilities.
Environment Options: Cleanup
The options determine the delete and archive settings for GroupWise items (mail messages, phone messages, appointments, tasks, and notes).
Figure 65-5 Environment Options Dialog Box with the Cleanup Tab Open
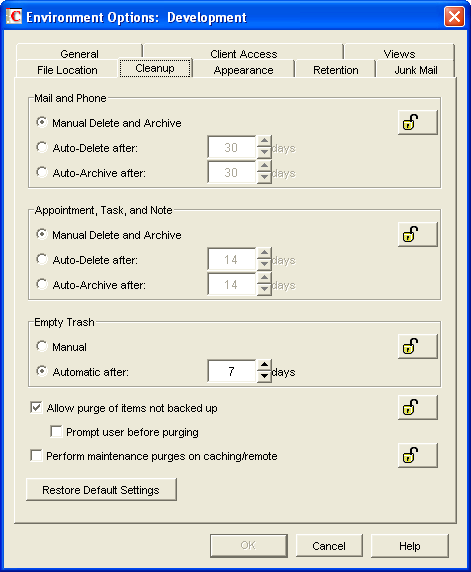
Mail and Phone
Choose from the following settings to determine how mail and phone messages are deleted and archived:
-
Manual Delete and Archive: Select this option to have mail and phone messages deleted or archived only when users manually do it. This is the default setting.
-
Auto-Delete After: Select this option to have GroupWise automatically delete mail and phone messages that are older than the specified number of days. If you use this option, you should notify users so they know they must archive items they want to save.
-
Auto-Archive After: Select this option to have GroupWise archive mail and phone messages that are older than the specified number of days. Users must have an archive directory specified in order for items to be archived. See Environment Options: File Locations for information about setting a default archive directory location.
Appointment, Task, and Note
Choose from the following settings to determine how appointments, tasks, and notes are deleted or archived:
-
Manual Delete and Archive: Select this option to have appointments, tasks, and notes deleted or archived only when users manually do it. This is the default setting.
-
Auto-Delete After: Select this option to have GroupWise automatically delete appointments, tasks, or notes that are older than the specified number of days. If you use this option, you should notify users so they know they must archive items they want to save.
-
Auto-Archive After: Select this option to have GroupWise automatically archive appointments, tasks, and notes older than the specified number of days. Users must have an archive directory specified in order for items to be archived. See Environment Options: File Locations for information about setting a default archive directory location.
Empty Trash
Deleted items are moved to the Trash folder. They can be retrieved from the Trash until it is emptied. Items in the Trash still take up disk space. Select from the following settings to determine how the Trash folder is emptied:
-
Manual: Select this option to require the user to manually empty the Trash. This is the default setting.
-
Automatic: Select this option to have GroupWise automatically empty items from the trash after they have been in it for the specified number of days.
Purges
-
Allow Purge of Items Not Backed Up: Select this option to enable items that have not been backed up to be removed from the Trash. This option is enabled by default.
Select the option (available only if is enabled) to prompt the user to confirm the purging of any files that have not been backed up.
-
Perform Maintenance Purges on Caching/Remote: On the Disk Space Management page () in ConsoleOne, you can limit the size of users’ Online mailboxes. You can now enforce the same mailbox size limits on users’ Caching and Remote mailboxes, wherever those mailboxes are located.
The size limit is applied to users’ Caching and Remote mailboxes regardless of the amount of available disk space on users’ hard drives. The size limit is applied the next time the GroupWise Windows client synchronizes with users’ Online mailboxes. Because users might lose items that they have been storing locally when the size limit is enforced, you should warn users that size limits are going to be placed on their local Caching and Remote mailboxes.
Environment Options: Appearance
The options determines the appearance of the GroupWise Windows client.
Figure 65-6 Environment Options Dialog Box with the Appearance Tab Open
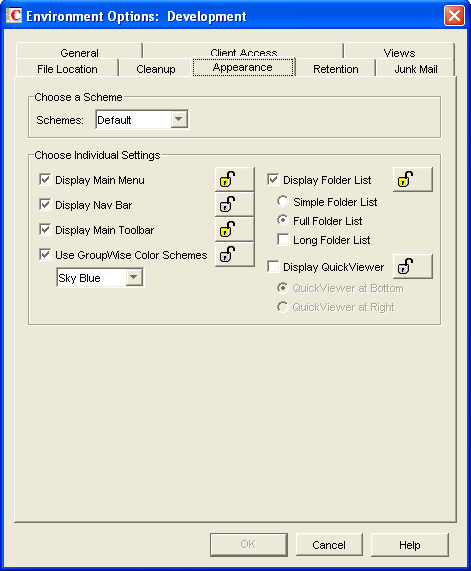
Schemes
There are three available schemes that determine how the GroupWise Windows Client appears.
-
Default: Displays the Main Menu, Toolbar, full Folder list, the Nav Bar, and the Sky Blue color scheme.
-
GroupWise 6.5: Looks just like the 6.5 client. It displays the Main Menu, Toolbar, and the full Folder list.
-
Simplified: Displays the Sky Blue color scheme, the Nav bar, and the simple Folder list.
Individual Settings
You can also control individual appearance settings for the GroupWise Windows client.
-
Display Main Menu: Displays at the top of the window in the GroupWise client.
-
Display Nav Bar: Displays at the top of the window in the GroupWise client.
-
Display Main Toolbar: Displays underneath the Navigation bar in the GroupWise client.
-
GroupWise Color Scheme: Overrides any operating system color schemes for the GroupWise client. You can select Blue, Olive Green, Silver, Sky Blue, Spring Green, or Sterling Silver.
-
Display Folder List: Displays the Folder list on the left side of the window in the GroupWise client. You can select from a Simple Folder List or a Full Folder List. If you are using the GroupWise 6.5 Look, you can also select to view the Long Folder List.
-
Display QuickViewer: Displays the QuickViewer in the GroupWise client. You can select to display the QuickViewer on the right side or at the bottom.
Environment Options: Retention
The tab is displayed only if the Provides Message Retention Service setting is turned on for a trusted application. For information, see Section 4.12, Trusted Applications.
Message retention is configurable by administrators only, not by GroupWise users. The Retention options do not display in the GroupWise client.
Figure 65-7 Environment Options Dialog Box with the Retention Tab Open
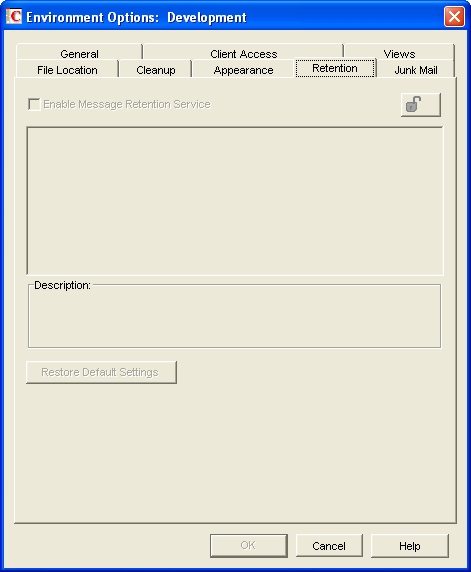
Enable Message Retention Service
Select this option to enable the Message Retention Service. If you are setting client options for a domain, all user mailboxes in the domain support message retention. Likewise, if you are setting options for a post office, all user mailboxes in the post office support message retention. After a user’s mailbox is enabled for message retention, the user cannot perform any action (purging, archiving, etc.) that removes messages from the mailbox until the messages have been copied to another storage location by a trusted application that has been designed to provide the Message Retention Service.
Environment Options: Junk Mail
The Junk Mail Handling Environment options determine the junk mail handling functionality of the GroupWise client.
Figure 65-8 Junk Mail Tab in the Environment Options Dialog Box
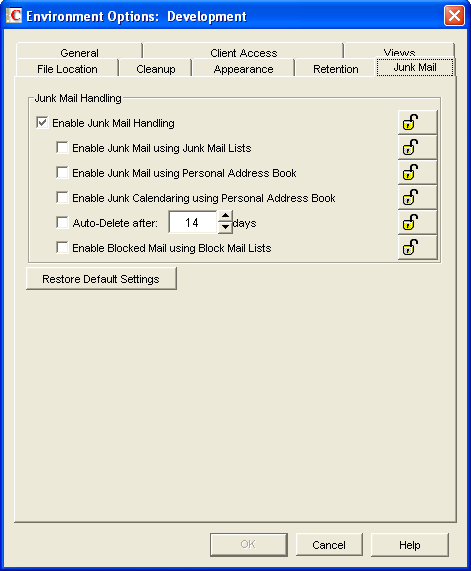
Junk Mail Handling
Select to enable junk mail handling. This setting determines whether or not the Junk Mail Handling feature is available for a user. This setting affects both the client and the POA. Junk Mail Handling allows users to block or “junk” unwanted Internet e-mail. When this setting is disabled, the client does not display any Junk Mail Handling menus or dialog boxes, and the POA does not perform any junk mail handling for the user. When this setting is enabled, the client displays Junk Mail Handling menus and dialog boxes, and the POA performs junk mail handling if the block and junk lists are also enabled.
Enable Junk Mail Using Junk Mail Lists
Select this option to cause junking based on e-mail addresses and domain names available to users. A user can junk e-mail from a specific Internet e-mail address or from an entire Internet domain, when the e-mail addresses and Internet domains are listed in the user’s Junk List. (Initially, there are no entries in a user’s junk list.) Junked items are delivered to the Junk Mail folder in the user’s Mailbox.
When this setting is enabled or disabled and not locked, the user’s initial setting to use the Junk List is enabled or disabled. Users can change the setting. When the setting is enabled and locked, a user's Enable Junk List setting is enabled and cannot be disabled. When the setting is disabled and locked, the Junk List is unavailable to the user. Client menu options and dialog boxes involving the Junk List are not displayed.
Enable Junk Mail Using Personal Address Book
Select this option to cause junking based on personal address book entries available to users. A user can junk e-mail from all users whose addresses are not in any personal address books (including Frequent Contacts) without building a Junk List.
When this setting is enabled or disabled and not locked, the user’s initial setting to use personal address books is enabled or disabled. Users can change the setting. When the setting is enabled and locked, a user's setting is enabled and cannot be disabled. When the setting is disabled and locked, this option is unavailable to the user.
Auto-Delete After
Select this option and specify the number of days after which you want junked items to be automatically deleted from users' mailboxes. The default is 14 days.
When this setting is enabled or disabled and not locked, the user's initial setting to delete junked items is enabled or disabled. Users can change the setting. When the setting is enabled and locked, a user’s setting is enabled and cannot be disabled. When the setting is disabled and locked, this option is unavailable to the user.
Enable Blocked Mail Using Block Mail Lists
Select this option to make blocking available to users. A user can block e-mail from an Internet e-mail address or Internet domain, when blocked e-mail addresses and Internet domains are listed in the user's Block List. (Initially, there are no entries in a user's Block List.) Blocked items are blocked when the POA processes delivery to the user's mailbox, and the items are never delivered to the user's mailbox. When the POA log uses verbose mode, the log displays information about blocked items.
When this setting is enabled or disabled and not locked, the user’s initial setting to use the Block List is enabled or disabled. Users can change the setting. When the setting is enabled and locked, a user's Block List setting is enabled and cannot be disabled. When the setting is disabled and locked, blocking is unavailable to the user. Client menu options and dialog boxes involving the Block List are not displayed.
65.2.2 Modifying Send Options
-
If the Send Options dialog box is not displayed, follow the instructions in Section 65.0, Setting Defaults for the GroupWise Client Options to display the dialog box.
-
Click the tab that contains the options you want to change. Refer to the following sections for information about options:
- Send Options: Send Options
- Send Options: Mail
- Send Options: Appointment
- Send Options: Task
- Send Options: Note
- Send Options: Security
- Send Options: Disk Space Management
- Send Options: Global Signature
NOTE:To see which Send options are recognized by the Cross-Platform client, refer to the client options table in Section 65.1, Client Options Summary.
-
If you want to prevent users from changing an option’s setting, click the lock button next to it.
After you click it, the lock button indicates whether the setting is locked at the domain level, the post office level, or the user level.
-
If you want to return all the options on a tab to their default settings, click .
-
When finished, click to save your changes.
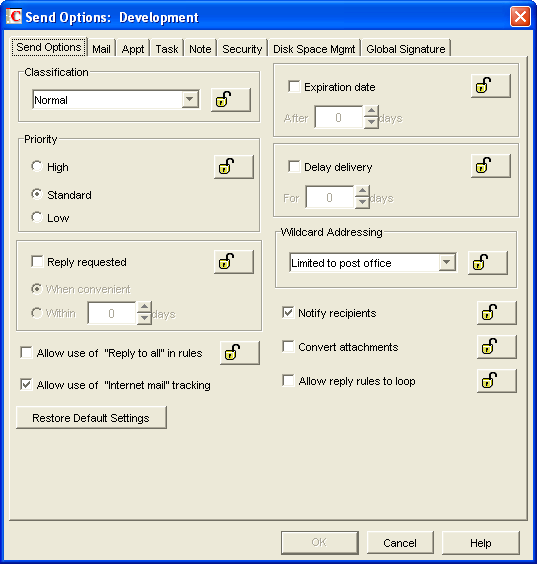
Send Options: Send Options
The determine general settings that apply to all GroupWise item types (mail messages, phone messages, appointments, tasks, and notes).
Figure 65-9 Send Options Dialog Box with the Send Options Tab Open
Classification
Select the default for the security classification label at the top of the message box. The classifications do not provide any encryption or additional security. They are meant to alert the recipient to the relative sensitivity of the item. The options are , , , , and The default is .
Priority
Select , , or as the default item priority. Priority determines which post office directory an item is placed in. This, in turn, determines how quickly items are delivered. High priority items are queued ahead of normal or low priority items.
Reply Requested
Select the option to have items always include a reply request. By default, this option is disabled. If you enable the option, select whether the recipient is asked to reply when it is convenient or within a specific number of days.
Allow Use of Reply to All in Rules
Select this option to enable users to use the l action when creating rules. By default, this option is disabled, which means that only the action is available.
Allow Use of Internet Mail Tracking
Select this option to allow users’ GroupWise clients to automatically embed information in Internet-bound items. The embedded information instructs the receiving system to send back a delivery notification message (if it is supported). By default, this option is enabled.
To make Internet Status Tracking work, users must also turn on the setting in the GroupWise client (). By default, the is turned off in the GroupWise client.
Expiration Date
Select this option to have unopened messages expire after the specified number of days. By default, this option is disabled.
Delay Delivery
Select this option to delay the delivery of messages for the specified number of days. For example, if you specify 3 days, a message is not delivered until 3 days after the day it is sent. Messages are delivered at 12:01 a.m. of the appropriate day. By default, this option is disabled.
Wildcard Addressing
Wildcard addressing enables a user to send an item to all users in a post office, domain, GroupWise system, or connected GroupWise system by inserting asterisks (*) as wildcards in e-mail addresses.
-
Not Allowed: Select this option to disable wildcard addressing.
-
Limited to Post Office (Default): Select this option to limit wildcard addressing to the user’s post office. This means that a user can send an item to all users on the same post office by entering * in the item’s address field.
-
Limited to Domain: Select this option to limit wildcard addressing to the user’s domain. This means that a user can send an item to all users in the domain by entering *.* in the item’s address field. A user can also send an item to all users on another post office in the domain by entering *.post_office_name in the item’s address field.
-
Limited to System: Select this option to limit wildcard addressing to the user’s GroupWise system. This means that a user can send an item to all users in the GroupWise system by entering *.*.* in the item’s address field. A user can also send an item to all users in another domain by entering *.domain_name or to all users in another post office by entering *.post_office_name.
-
Unlimited: Select this option to allow unlimited use of wildcard addressing. This means that a user can send an item to all users in another GroupWise system by entering *.post_office_name.domain_name or *.domain_name in the item’s address field.
Notify Recipients
Select this option to have recipients notified when they receive an item, if they are using GroupWise Notify. By default, this option is enabled.
Convert Attachments
Select this option to allow conversion of attachments in items sent to non-GroupWise e-mail systems through a GroupWise gateway.
Allow Reply Rules to Loop
By default, GroupWise does not allow a rule-generated reply to be replied to by another rule-generated reply. This situation, referred to as looping, can quickly increase message traffic. To allow reply rules to loop, select this option.
Send Options: Mail
The options apply to mail and phone messages only.
Figure 65-10 Send Options Dialog Box with the Mail Tab Open
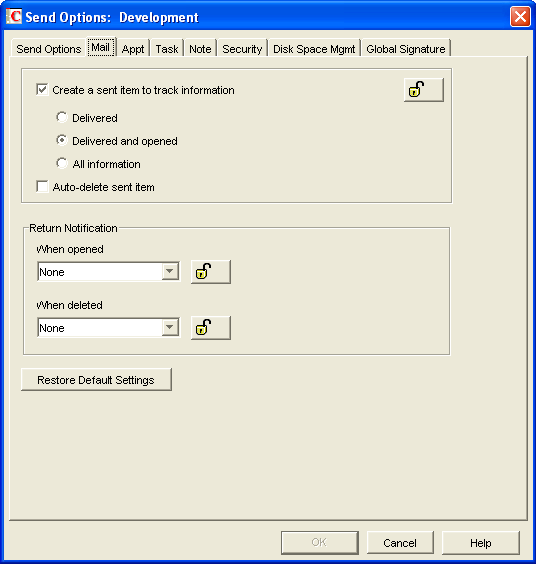
Create a Sent Item to Track Information
By default, items the user sends are inserted in the user’s Sent Items folder. Deselect this option if you do not want the items placed there. If items are not placed in the Sent Items folder, users cannot check the delivery status of the item. The following options are available only if this option is selected.
-
Delivered: Select this option to track delivered status only. The user can open the Properties window of the message to view the status.
-
Delivered and Opened (Default): Select this option to track delivered and opened status only. The user can open the Properties window of the sent message to view the status.
-
All Information: Select this option to track all status information (delivered, opened, deleted, emptied). The user can open the Properties window of the message to view the status.
-
Auto-Delete Sent Item: Select this option to automatically delete messages from the user’s Mailbox after all the recipients have deleted the messages and emptied them from the Trash.
Return Notification
In addition to status tracking information, the user can receive notification when a message is opened or deleted. Choose from the following notification options:
-
None (Default): The user does not receive notification.
-
Mail Receipt: The user receives a mail message stating that the recipient opened or deleted the message.
-
Notify: The user receives notification through GroupWise Notify when the recipient opens or deletes the message.
-
Notify and Mail: The user will receive notification through GroupWise Notify and a mail message.
Send Options: Appointment
The options apply to appointments only.
Figure 65-11 Send Options Dialog Box with the Appt Tab Open
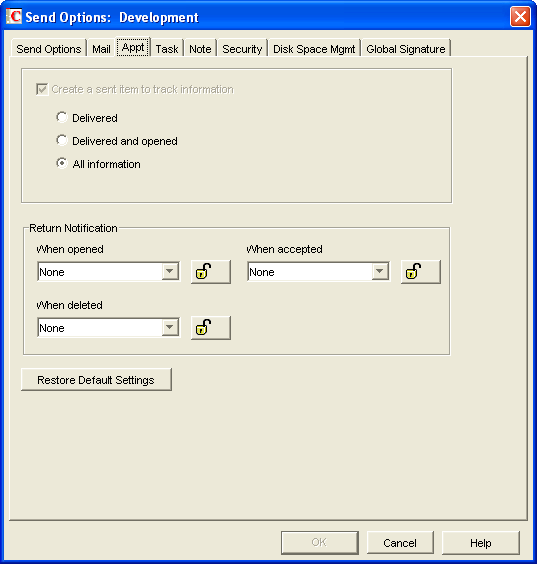
Create a Sent Item to Track Information
The setting for this option is inherited from the setting on the tab; it can only be enabled or disabled on the tab. If the option is enabled, you can choose from the following status tracking levels:
-
Delivered: Select this option to track delivered status only. The user can open the Properties window of the appointment to view the status.
-
Delivered and Opened: Select this option to track delivered and opened status only. The user can open the Properties window of the appointment to view the status.
-
All Information (Default): Select this option to track all status information (delivered, opened, deleted, emptied). The user can open the Properties window of the appointment to view the status.
Return Notification
In addition to status tracking information, the user can receive notification when an appointment is opened, accepted, or deleted. Choose from the following notification options:
-
None (Default): The user does not receive notification.
-
Mail Receipt: The user receives a mail message stating that the recipient opened, accepted, or deleted the appointment.
-
Notify: The user receives notification through GroupWise Notify when the recipient opens, accepts, or deletes the appointment.
-
Notify and Mail: The user receives notification through GroupWise Notify and a mail message.
Send Options: Task
The options apply to tasks only.
Figure 65-12 Send Options Dialog Box with the Task Tab Open
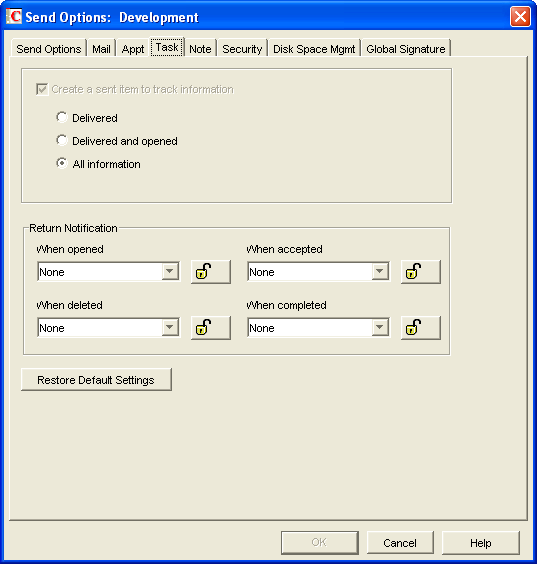
Create a Sent Item to Track Information
The setting for this option is inherited from the setting on the tab; it can only be enabled or disabled on the tab. If the option is enabled, you can choose from the following status tracking levels:
-
Delivered: Select this option to track delivered status only. The user can open the Properties window of the task to view the status.
-
Delivered and Opened: Select this option to track delivered and opened status only. The user can open the Properties window of the task to view the status.
-
All Information (Default): Select this option to track all status information (delivered, opened, deleted, emptied). The user can open the Properties window of the task to view the status.
Return Notification
In addition to status tracking information, the user can receive notification when a task is opened, accepted, completed, or deleted. Choose from the following notification options:
-
None (Default): The user does not receive notification.
-
Mail Receipt: The user receives a mail message stating that the recipient opened, accepted, completed, or deleted the task.
-
Notify: The user receives notification through GroupWise Notify when the recipient opens, accepts, completes, or deletes the task.
-
Notify and Mail: The user receives notification through GroupWise Notify and a mail message.
Send Options: Note
The options apply to notes only.
Figure 65-13 Send Options Dialog Box with the Notes Tab Open

Create a Sent Item to Track Information
The setting for this option is inherited from the setting on the tab; it can only be enabled or disabled on the tab. If the option is enabled, you can choose from the following status tracking levels:
-
Delivered: Select this option to track delivered status only. The user can open the Properties window of the note to view the status.
-
Delivered and Opened (Default): Select this option to track delivered and opened status only. The user can open the Properties window of the note to view the status.
-
All Information: Select this option to track all status information (delivered, opened, deleted, emptied). The user can open the Properties window of the note to view the status.
Return Notification
In addition to status tracking information, the user can receive notification when a note is opened or deleted. Choose from the following notification options:
-
None (Default): The user does not receive notification.
-
Mail Receipt: The user receives a mail message stating that the recipient opened or deleted the note.
-
Notify: The user receives notification through GroupWise Notify when the recipient opens or deletes the note.
-
Notify and Mail: The user receives notification through GroupWise Notify and a mail message.
Send Options: Security
The options apply to all GroupWise item types (mail messages, phone messages, appointments, tasks, and notes).
Figure 65-14 Send Options Dialog Box with the Security Tab Open
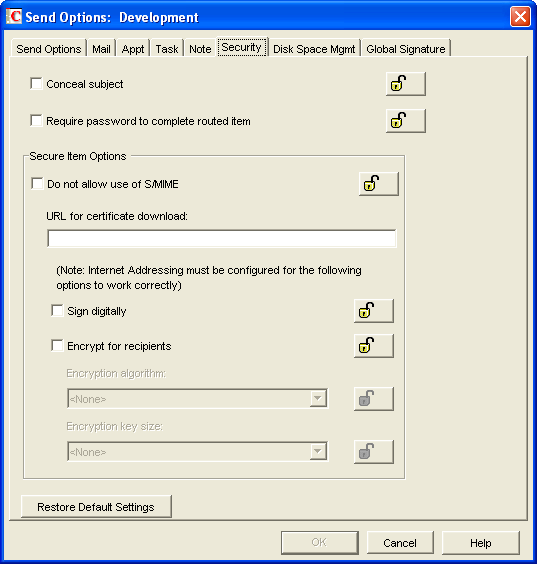
Conceal Subject
Select this option to conceal the item’s subject so the notification that appears on the recipient’s screen does not include the subject. The subject of the item is also concealed in the recipient’s mailbox and the sender’s Sent Items folder. It is visible only when the item is being read.
Require Password to Complete Routed Item
Select this option to require a user to enter a password before completing a routed item.
Secure Items Options
If users have installed security providers on their workstations, select the options you want them to use.
-
Do Not Allow Use of S/MIME: Select this option to disable S/MIME functionality. This disables the and buttons (and other related S/MIME functionality) in the GroupWise client. By default, this option is enabled. When it is enabled, you can modify the rest of the options in the dialog box.
-
URL for Certificate Download: Specify the Internet address of your preferred certification authority. If not otherwise changed in this field, the GroupWise client accesses http://www.novell.com/groupwise/certified.html, which lists several common certification authorities.
-
Sign Digitally: Select this option to enable users to add a digital signature to their outgoing messages. Recipients of a digitally-signed item who have S/MIME-enabled e-mail products are able to verify that the item is actually from the sender. This setting is not a useful security measure unless you lock it as the default.
-
Encrypt for Recipients: Select this option to enable users to encrypt an outgoing item so they can ensure that the intended recipients who have an S/MIME-enabled e-mail product are the only individuals who can read the item. This setting is not a useful security measure unless you lock it as the default.
If you enable the options, you can set the encryption algorithm and key size. The available algorithm methods (RC2, RC4, DES, 3DES) are trusted algorithms that encrypt or transform data to mask the original content. The key size sets the default size (in bits) of the encryption key that is used with the algorithm you select. These settings are not useful security measures unless you lock them.
Send Options: Disk Space Management
The options let you enforce disk space limitations for users on a post office.
Figure 65-15 Send Options Dialog Box with the Disk Space Management Tab Open
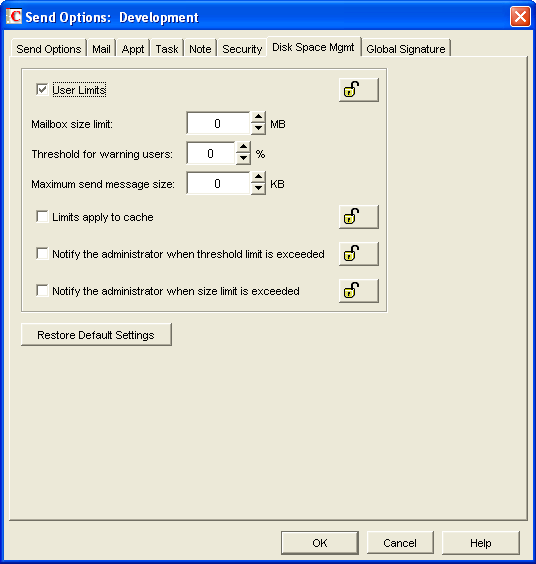
User Limits
Select this option if you want to impose limits on the size of users’ mailboxes or the size of messages they can send. By default, this option is disabled. If you enable it, you can modify the following options:
-
Mailbox Size Limit: Specify the maximum amount of post office disk space available to users for storing message and attachment files. The setting uses logical disk space because attachments are shared by all recipient users on the same post office. Messages in shared folders are counted as disk space only for the owner of the shared folder. If you do not want to limit the mailbox size, set the value to zero (0).
If users meet or exceed their mailbox size limits, they cannot send items until their mailboxes are under the size limit. Users can reduce the size of their mailboxes by deleting or archiving items.
-
Threshold for Warning Users: Select the mailbox capacity (as a percentage) that must be reached before the user is warned that his or her mailbox is reaching its limit. For example, if the mailbox size limit is 200 MB and the threshold is set at 75%, users receive warnings when their mailboxes reach 150 MB. Set the value to 0 or 100 if you do not want users to receive a warning.
-
Maximum Send Message Size: Specify the maximum size of a message (in kilobytes) that a user can send using the GroupWise client. If the user sends an item that exceeds this size, a message notifies the user that the item is too large to send.
You can also set message size limits at the post office level through POA configuration, at the domain level through MTA configuration, and at the GroupWise system level through Internet Agent configuration, as described in Section 12.3.4, Restricting the Size of Messages That Users Can Send.
-
Limits Apply to Cache: Use the same disk space limits for users’ Caching mailboxes on local workstations as you are using for their Online mailboxes in the post office. If you impose this limit on users who have existing Caching mailboxes, their Caching mailboxes might be reduced in size in order to meet the new disk space limit. Such users should be warned in advance so that they can back up their Caching mailboxes before the size reduction takes place. Otherwise, user could lose messages that they want to keep.
-
Notify the Administrator When Threshold Limit Is Exceeded: Select this option so that the administrator is notified along with the user when the user’s mailbox exceeds the size established in the field. The administrator who receives the notification must be defined on the Identification page of the Domain object.
-
Notify the Administrator When Size Limit Is Exceeded: Select this option so that the administrator is notified when the user’s mailbox exceeds the size established in the field. The administrator who receives the notification must be defined on the Identification page of the Domain object.
Send Options: Global Signature
The option lets you set the global signature. To set options at the domain level, select a domain. To set options at the post office level, select a post office. To set options for individual users, select one or more users.
Figure 65-16 Send Options Dialog Box with the Global Signature Tab Open
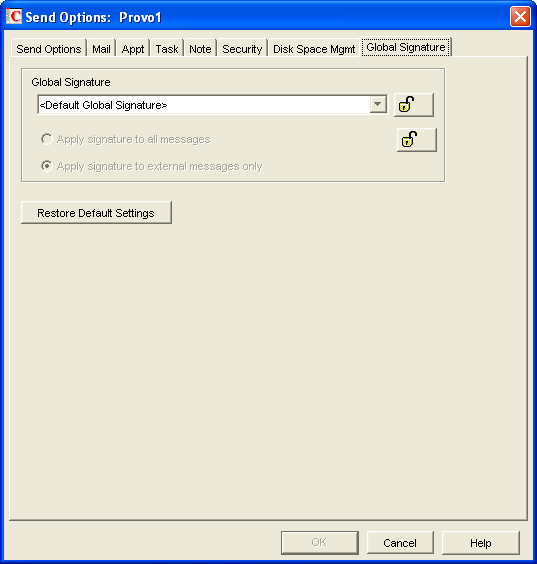
Global Signature
-
Select a global signature to append to users’ messages.
When enabled, global signatures are automatically appended to every message that is sent by the users. For more information, see Section 4.14, Global Signatures.
-
Select to add the signature to all internal or external messages.
or
Select to apply the signature to messages that are sent through the GroupWise Internet Agent.
If you select the default signature that is used by the GroupWise Internet Agent is applied. If you select , then no signature is applied.
NOTE:All options pertain only to the Windows client.
65.2.3 Modifying Security Options
-
If the Security Options dialog box is not displayed, follow the instructions in Section 65.0, Setting Defaults for the GroupWise Client Options to display the dialog box.
-
Click the tab that contains the options you want to change. Refer to the following sections for information about options:
NOTE:To see which Security options are recognized by the Cross-Platform client, refer to the client options table in Section 65.1, Client Options Summary.
-
If you want to prevent users from changing an option’s setting, click the lock button next to it.
After you click it, the lock button indicates whether the setting is locked at the domain level, the post office level, or the user level.
-
If you want to return all the options on a tab to their default settings, click .
-
When finished, click to save your changes.
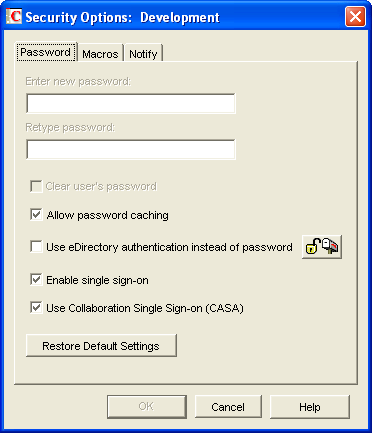
Security Options: Password
The options let you reset a user’s password and enable various methods by which a user can set up the GroupWise client so that he or she doesn’t have to enter a password at startup.
Figure 65-17 Security Options Dialog Box with the Password Tab Open
For background information about passwords, see Section 70.0, GroupWise Passwords.
Enter New Password
This option is available only when setting client options for an individual user. You can use this option to set or reset a user’s password. You should advise the user to change the password as soon as possible.
Retype Password
This option is available only when setting client options for an individual user. If you enter a new password, verify it by retyping it in this field.
Clear User Password
This option is available only when setting client options for an individual user. Select the option to clear an existing password without assigning a new password.
Allow Password Caching
Select this option to allow users to enable the option under options in the GroupWise client. The option stores the user’s password in the workstation’s Windows password list so that the user does not need to enter the password when starting GroupWise. This option is enabled by default.
The option applies to Windows 95/98/ME only. It is not displayed to users running the GroupWise client on Windows 2000/XP/2003. Because Windows 95/98/NT are not supported platforms for the latest client release, this option is for older versions of the client.
Allow eDirectory Authentication Instead of Password
Select this option to allow users to select the No Password Required with eDirectory option under Security options in the GroupWise client. When this option is selected in the client, the user can access his or her mailbox without requiring a password if he or she is already logged in to Novell eDirectory. Mailbox access is granted based on eDirectory authentication, not on password information.
NOTE:In versions of GroupWise prior to the GroupWise 5.5 Enhancement Pack, this option was called . The option name has been changed to avoid confusion with the Novell Single Sign-on product.
Enable Single Sign-On
Select this option to give users the option under in the GroupWise client. This option lets the user access his or her mailbox without reentering the password. After a user selects in the GroupWise client, the GroupWise password is stored in eDirectory for the currently logged-in user.
IMPORTANT:Novell Single Sign-on must be installed on the user’s workstation in order for this option to take effect.
Use Collaboration Single Sign-on (CASA)
Select this option to give users the option under in the GroupWise Windows client. This option lets the user access his or her mailbox without reentering the password if the software is installed. After a user selects in the GroupWise client and if the CASA client is installed, the GroupWise password is stored for the currently logged-in user.
Security Options: Macros
The option determines how GroupWise handles macros that are included in received messages.
Figure 65-18 Security Options Dialog Box with the Macros Tab Open
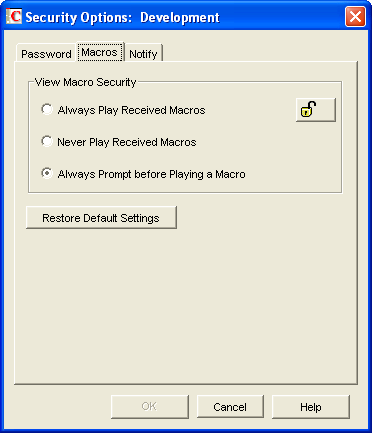
View Macro Security
Choose from the following settings to determine the level of macro security:
-
Always Play Received Macros: Select this option to play attached macros when the message is opened.
-
Never Play Received Macros: Select this option to ignore attached macros. Macros do not play.
-
Always Prompt Before Playing a Macro (Default): Select this option to have the user prompted to play the macro.
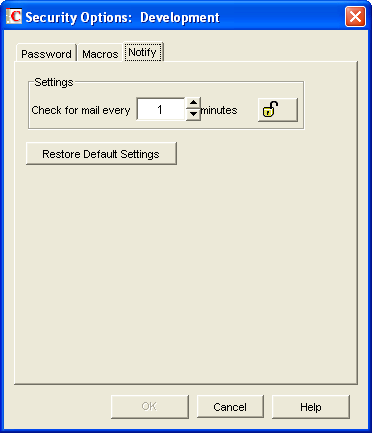
Security Options: Notify
The option determines how often GroupWise Notify checks a user’s mailbox for newly received items. If new items are detected, the user is notified. The default is every minute.
Figure 65-19 Security Options Dialog Box with the Notify Tab Open
65.2.4 Modifying Date and Time Options
-
If the Date and Time Options dialog box is not displayed, follow the instructions in Section 65.0, Setting Defaults for the GroupWise Client Options to display the dialog box.
-
Click the tab that contains the options you want to change. Refer to the following sections for information about options:
NOTE:The Date and Time options are not currently recognized by the Cross-Platform client.
-
If you want to prevent users from changing an option’s setting, click the lock button next to it.
After you click it, the lock button indicates whether the setting is locked at the domain level, the post office level, or the user level.
-
If you want to return all the options on a tab to their default settings, click .
-
When finished, click to save your changes.
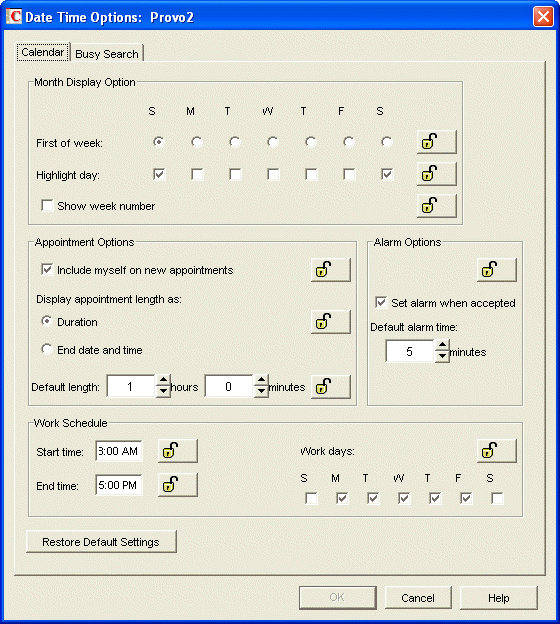
Date and Time Options: Calendar
The options determine basic settings for the GroupWise Calendar.
Figure 65-20 Date and Time Options Dialog Box with the Calendar Tab Open
Month Display Option
Select from the following options to determine how the month calendar is displayed:
-
First of Week: Select the day of the week that you want to display as the first day on the calendar.
-
Highlight Day: Select any days you want highlighted, such as weekends and holidays.
-
Show Week Number: Select this option to display the week number (1 through 52) at the beginning of the calendar week.
Appointment Options
Select from the following options to determine how appointments are handled:
-
Include Myself on New Appointments: Select this option to have the sender automatically included in the appointment’s To: list. This option is enabled by default.
-
Display Appointment Length As: When creating an appointment, the sender must specify the appointment’s length. You can use this option to determine whether the sender enters a duration for the appointment or an end time for the appointment. Select the setting to have appointments display a field that the sender must fill in (for example, 30 minutes, 1 hour, or 10 hours). Select the setting to have appointments display fields that the sender must fill in (for example, June 3, 2007 and 10:00 a.m.). The default setting is .
-
Default Length: Select the default length for appointments. Users can change the length. If the appointment’s length is displayed as a duration, the duration defaults to this length. If it is displayed as an end date and time, the end time defaults to the start time plus the default length (for example, if the start time is 9:00 a.m. and the default length is 1 hour, the end time defaults to 10:00 a.m).
Alarm Options
Users can set appointment alarms so that they are notified prior to an appointment time. Select from the following options to determine the default settings for an alarms:
-
Set Alarm When Accepted: Select this option to have an alarm automatically set when the user accepts an appointment. By default, this option is enabled.
-
Default Alarm Time: Select the number of minutes before an appointment to notify the user. The default is 5 minutes.
Work Schedule
The work schedule determines the user’s normal work days and hours. In the calendar and during busy searches, any days or hours outside of the work schedule are represented by gray squares (Out of Office). Users can still be scheduled for appointments during non-work hours.
-
Start Time: Select the daily start time. The default is 8:00 a.m.
-
End Time: Select the daily end time. The default is 5:00 p.m.
-
Work Days: Select the work days. The start time and end time are applied to each work day.
Date and Time Options: Busy Search
The options determine the amount of free time required for the appointment and the range of dates to search.
Figure 65-21 Date and Time Options Dialog Box with the Busy Search Tab Open
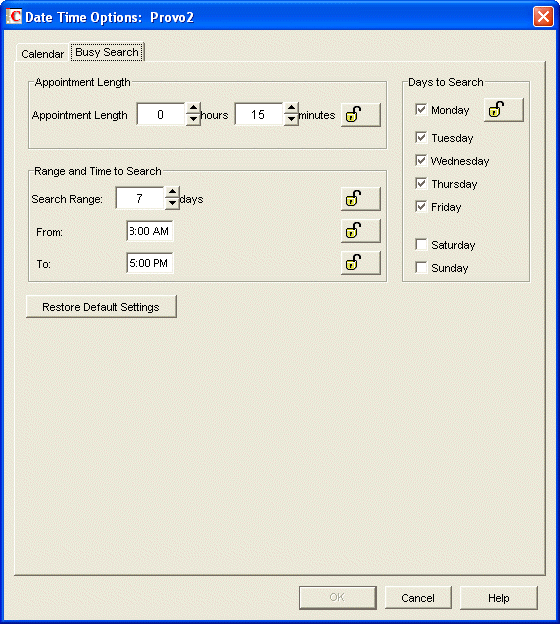
Appointment Length
Set the default appointment length to search. You can set the length in 15-minute increments. The default is 15 minutes. This setting is used only when the user does a busy search through the option on the menu. Otherwise, the default appointment length defined on the tab is used (see Date and Time Options: Calendar).
Range and Time to Search
Specify the number of days to include in the search, then set the daily start and end times for the search.
Days to Search
Select the days to search. By default, the typical work days (Monday through Friday) are selected.