36.3 Configuring Post Office Security
You can configure the POA in various ways to meet the security needs of the post office.
36.3.1 Securing Client/Server Access through a Proxy Server
If the server where the POA runs is behind your firewall, you can link it to a proxy server in order to provide client/server access to the post office for GroupWise client users who are outside the firewall. You could also use generic proxy, network address translation (NAT), and port address translation (PAT) to achieve the same results.
If the POA is configured with both an internal IP address and a proxy (external) IP address, the POA returns both IP addresses to the GroupWise client when it attempts to log in. The client tries the internal address first, and if that does not succeed, it tries the proxy address, then it records which address succeeded. If the user moves from inside the firewall to outside the firewall, the client might fail to log in on the first attempt, but succeeds on the second attempt.
-
In ConsoleOne, browse to and right-click the POA object, then click .
-
Click to display the POA Network Address page.

-
Make sure the POA is already configured for client/server processing as explained in Section 36.2.1, Using Client/Server Access to the Post Office.
-
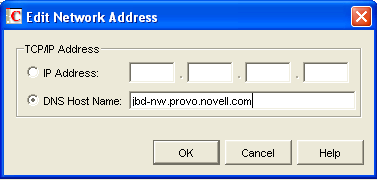
Click the pencil icon for the field to display the Edit Network Address dialog box.
-
Select , then specify the external IP address, in dotted decimal format, of the server that GroupWise client users access from outside your firewall.
Typically, this is the public IP address presented externally by your proxy server, generic proxy, NAT, or PAT.
or
Select , then provide the DNS hostname of that server.
-
Click .
-
If you want to use a different port number for the proxy server than you are using for client/server access to the POA itself, provide the port number in the Internet Proxy Client/Server field.
-
Click to save the proxy server network address and port and return to the main ConsoleOne window.
ConsoleOne then notifies the POA to restart and begin communicating with the proxy server.
POA Web Console You can list all POAs in your GroupWise system, along with their proxy server addresses. On the Configuration page, click IP Addresses Redirection Table under the General Settings heading.
36.3.2 Controlling Client Redirection Inside and Outside Your Firewall
When a user tries to access his or her mailbox without providing the IP address of the POA for his or her post office, any POA or a GroupWise name server POA can redirect the request to the POA for the user’s post office.
A POA that is configured with both an internal IP address and a proxy IP address automatically redirects internal users to internal IP addresses and external users to proxy IP addresses. However, if you want to control which users are redirected to which IP addresses based on other criteria than user location, you can configure a post office with one POA to always redirect users to internal IP addresses and a second POA to always redirect users to proxy IP addresses. Users are then redirected based on which POA IP address they provide in the GroupWise Startup dialog box when they start the GroupWise client to access their mailboxes.
-
Configure the initial POA for the post office with the IP address that you want for internal users. For instructions, see Section 36.2.1, Using Client/Server Access to the Post Office.
Do not fill in the field on the Network Address page of the POA object.
-
Create a second POA object in the post office and give it a unique name, such as POA_PRX. For instructions, see Section 36.1.1, Creating a POA Object in eDirectory.
-
Configure this second POA with a proxy IP address. For instructions, see Section 36.3.1, Securing Client/Server Access through a Proxy Server.
Do not fill in the field on the Network Address page of the POA object.
-
Create a startup file for the new instance of the POA.
-
Use the /name switch to specify the name of the POA object that you created in Step 2.
-
Use the /ip switch to specify the IP address of the server where this instance of the POA runs.
-
Use the /port switch to specify the client/server port that this instance of the POA listens on.
This information needs to be specified in the POA startup file because this information is not specified in ConsoleOne for this instance of the POA.
-
-
Start the new instance of the POA.
-
Give users that you want to be redirected to internal IP addresses the IP address you used in Step 1.
-
Give users that you want to be redirected to proxy IP addresses the IP address you used in Step 3.
36.3.3 Securing the Post Office with SSL Connections to the POA
Secure Sockets Layer (SSL) ensures secure communication between the POA and other programs by encrypting the complete communication flow between the programs. For background information about SSL and how to set it up on your system, see Section 71.0, Encryption and Certificates.
To configure the POA to use SSL:
-
In ConsoleOne, browse to and right-click the POA object, then click .
-
Click to display the Network Address page.
-
To use SSL connections between the POA and GroupWise clients located inside your firewall, select in the drop-down list to let the GroupWise client determine whether an SSL connection or non-SSL connection is used. (Non-SSL connections are still protected by native GroupWise encryption.)
or
For optimum security, select in the drop-down list if you want the POA to force SSL connections, so that non-SSL connections are denied.
IMPORTANT:Clients older than GroupWise 6.5 cannot connect to the POA if SSL is required.
-
To use SSL connections between the POA and GroupWise clients located outside your firewall (for example, across the Internet), select in the drop-down list to let the GroupWise client determine whether an SSL connection or non-SSL connection is used. (Non-SSL connections are still protected by native GroupWise encryption.)
or
For optimum security, select in the drop-down list if you want the POA to force SSL connections, so that non-SSL connections are denied.
IMPORTANT:Clients older than GroupWise 6.5 cannot connect to the POA if SSL is required.
-
To use SSL connections between the POA and IMAP clients, select in the drop-down list to let the IMAP client determine whether an SSL connection or non-SSL connection is used.
or
For optimum security, select in the drop-down list if you want the POA to force SSL connections, so that non-SSL connections from IMAP clients are denied.
-
To use SSL connections between the POA and SOAP clients, select in the S drop-down list to let the SOAP client determine whether an SSL connection or non-SSL connection is used.
-
To use SSL connections between the POA and its MTA, select in the drop-down list.
The POA must use a TCP/IP link with the MTA in order to enable SSL for the connection. See Using TCP/IP Links between the Post Office and the Domain.
The MTA must also have SSL enabled for the connection to be secure. See Section 41.2.3, Securing the Domain with SSL Connections to the MTA. If the MTA does not have SSL enabled, the POA falls back to native GroupWise encryption.
-
To use SSL connections between the POA and the POA Web console displayed in your Web browser, select in the drop-down list.
To set up the POA Web console, see Section 37.2.1, Setting Up the POA Web Console.
-
Click to save the settings on the Network Address page.
-
Click to display the SSL Settings page.

For background information about certificate files and SSL key files, see Section 71.0, Encryption and Certificates.
By default, the POA looks for the certificate file and SSL key file in the same directory where the POA executable is located, unless you provide a full pathname.
-
In the field, browse to and select the public certificate file provided to you by your CA.
-
In the field:
-
Browse to and select your private key file.
-
Click .
-
Provide the password that was used to encrypt the private key file when it was created.
-
Click .
-
-
Click to save the SSL settings.
ConsoleOne then notifies the POA to restart and access the certificate and key files.
Corresponding Startup Switches You can also use the /certfile, /keyfile, /keypassword, /httpssl, /mtpssl, /imapssl, and /imapsslport switches in the POA startup file to configure the POA to use SSL.
POA Web Console You can view SSL information for the POA on the Status and Configuration pages. In addition, when you list the client/server users that are accessing the post office, SSL information is displayed for each user.
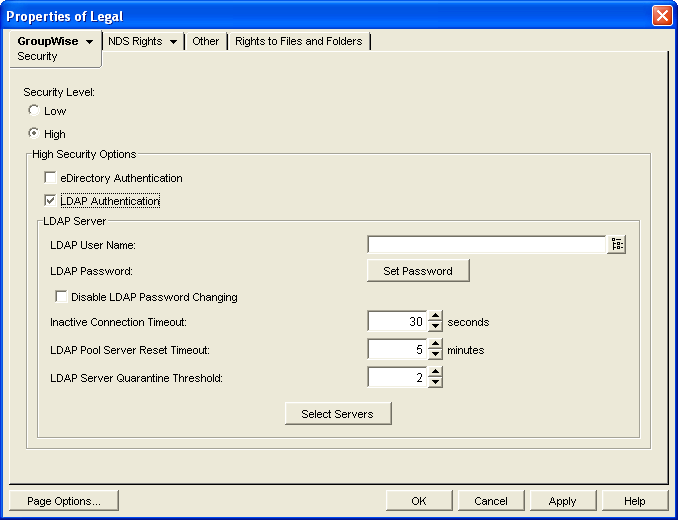
36.3.4 Providing LDAP Authentication for GroupWise Users
By default, GroupWise client users’ passwords are stored in GroupWise user databases, and the POA authenticates users to their GroupWise mailboxes by using those GroupWise passwords. For background information about passwords, see Section 70.0, GroupWise Passwords.
By enabling LDAP authentication for the POA, users’ password information can be retrieved from any network directory that supports LDAP, including eDirectory. For background information about LDAP, see Section 72.3, Authenticating to GroupWise with Passwords Stored in an LDAP Directory.
When you enable LDAP authentication, it is important to provide fast, reliable access to the LDAP directory because GroupWise client users cannot access their mailboxes until they have been authenticated. The following sections provide instructions for configuring the POA to make the most efficient use of the LDAP servers available on your system:
NOTE:If multiple eDirectory trees are involved, refer to TID 10067272 in the Novell Support Knowledgebase for additional instructions.
Providing LDAP Server Configuration Information
Information about your available LDAP servers must be provided in ConsoleOne before you can enable LDAP authentication for users.
-
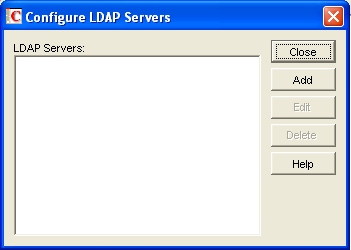
In ConsoleOne, click to display the Configure LDAP Servers dialog box.
-
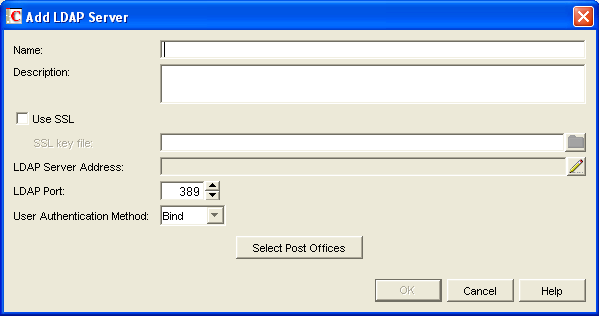
Click to add an LDAP server and provide configuration information about it.
-
In the field, type the name by which you want the LDAP server to be known in your GroupWise system.
-
In the field, provide additional information about the LDAP server as needed.
-
If the LDAP server requires an SSL connection, select , then browse to and select the trusted root certificate of the LDAP server.
If you do not specify a full path, the POA looks in the following locations for the trusted root certificate:
NetWare:
POA installation directory
Linux:
/opt/novell/groupwise/agents/lib/nldap
Windows:
POA installation directory
For more information about the trusted root certificate, see Section 71.3, Trusted Root Certificates and LDAP Authentication.
-
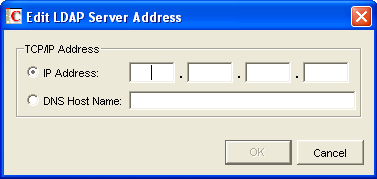
Click the pencil icon for the field.
-
Select , then specify the , in dotted decimal format, of the LDAP server.
or
Select , then provide the DNS hostname of the LDAP server.
The default LDAP port is 389 for non-SSL connections and 636 for SSL connections.
-
If the default port number is already in use, specify a unique LDAP port number.
-
Click to save the LDAP server address and port information.
-
In the field, select or .
For a comparison of these methods, see Section 72.3, Authenticating to GroupWise with Passwords Stored in an LDAP Directory.
-
Click to save the configuration information for the LDAP server.
-
Repeat Step 2 through Step 11 for each LDAP server that you want to make available to GroupWise for LDAP authentication.
Providing configuration information for multiple LDAP servers creates a pool of LDAP servers, which provides fault tolerance and load balancing to ensure fast, reliable mailbox access for GroupWise users.
-
Continue with Enabling LDAP Authentication for a Post Office
Corresponding Startup Switches You can also use the /ldapipaddr, /ldapport, /ldapuserauthmethod, /ldapssl, and /ldapsslkey startup switches in the POA startup file to provide the LDAP server information.
Enabling LDAP Authentication for a Post Office
To configure the POA to perform LDAP authentication for the users in a post office:
-
In ConsoleOne, browse to and right-click the Post Office object, then click .
-
Click to display the Security page.
-
For , select .
-
In the box, select .
-
If you want the POA to access the LDAP server with specific rights to the LDAP directory, specify a username that has those rights.
If you are using a Novell LDAP server, you can browse for an eDirectory User object. The information returned from eDirectory uses the following format:
cn=username,ou=orgunit,o=organization
If you are using another LDAP server, you must type the information in the format used by that LDAP server.
If the LDAP username for the POA requires a password, click type the password twice for verification, then click .
For more information about LDAP usernames, see Section 72.3, Authenticating to GroupWise with Passwords Stored in an LDAP Directory.
-
If you want to prevent GroupWise users from changing their LDAP passwords by using the Password dialog box in the GroupWise client, select .
This option is deselected by default, so that if users change their passwords in the GroupWise client through the Security Options dialog box (GroupWise Windows client > ) or on the Passwords page (GroupWise WebAccess client > ), their LDAP passwords are changed to match the new passwords provided in the GroupWise client.
-
If the LDAP server is configured for bind connections, as described in Providing LDAP Server Configuration Information, specify the number of seconds the POA should maintain an inactive connection to the LDAP server.
The default is 30 seconds.
-
If you have only one LDAP server, click to save the security settings for the post office. You have provided all the necessary information to provide LDAP authentication for users in the post office.
or
If you have multiple LDAP servers and want to configure them into an LDAP server pool, click , then continue with Configuring a Pool of LDAP Servers.
or
If you have multiple LDAP servers and want to configure them for failover, click to save the security settings for the post office, then continue with Specifying Failover LDAP Servers (Non-SSL Only).
Corresponding Startup Switches You can also use the /ldapuser, /ldappwd, /ldapdisablepwdchg, and /ldaptimeout startup switches in the POA startup file to configure POA access to the LDAP server. By default, the POA looks up users’ distinguished names in eDirectory. On NetWare, you can use the /noldapx startup switch to have the POA look up users by their e-mail addresses instead of by their distinguished names.
POA Web Console You can see if LDAP is enabled on the Configuration page. Under the General Settings heading, click LDAP Authentication to view LDAP settings and change some of them for the current POA session.
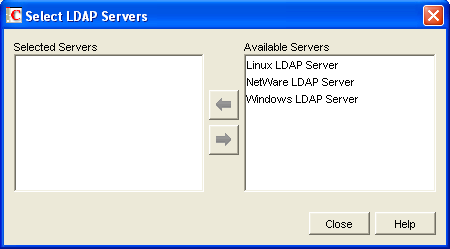
Configuring a Pool of LDAP Servers
You can configure the POA to contact a different LDAP server each time it needs to access the LDAP directory. This provides load balancing and fault tolerance because each LDAP server in the pool is contacted equally often by the POA. The LDAP server pool can include as many as five servers.
-
Make sure you have enabled LDAP Authentication as described in Enabling LDAP Authentication for a Post Office.
-
In the field, specify the number of minutes the POA should wait before trying to contact an LDAP server in the pool that failed to respond to the previous contact.
The default is 5 minutes.
-
Click to define the specific pool of LDAP servers that you want to be available to users in this post office for LDAP authentication.
-
Select one or more LDAP servers in the list, then click the arrow button to move them into the Selected Servers list.
-
Click to save the list of LDAP servers.
-
Click to save the security settings for the post office.
ConsoleOne then notifies the POA to restart so the new LDAP settings can be put into effect.
Corresponding Startup Switches You can also use the /ldapippooln and /ldappoolresettime startup switches in the POA startup file to configure the LDAP server pool and the timeout interval. If you choose to configure the LDAP server pool in the startup file rather than in ConsoleOne, additional switches must be provided to complete the configuration (/ldapportpooln, /ldapsslpooln, and /ldapsslkeypooln). Configuring the pool in ConsoleOne is the recommended approach.
If you previously set up LDAP authentication on the post office Security page in ConsoleOne and then you add the pooling startup switches to the POA startup file, the pooling switches override any LDAP information provided in ConsoleOne.
Specifying Failover LDAP Servers (Non-SSL Only)
If the POA does not need to use an SSL connection to your LDAP servers, you can use the /ldapipaddr switch to list multiple LDAP servers. Then, if the primary LDAP server fails to respond, the POA tries the next LDAP server in the list, and so on until it is able to access the LDAP directory. This provides failover LDAP servers for the primary LDAP server but does not provide load balancing, because the primary LDAP server is always contacted first.
-
Make sure you have provided the basic LDAP information on the post office Security page in ConsoleOne, as described in Enabling LDAP Authentication for a Post Office.
-
Edit the POA startup file (post_office.poa) with an ASCII text editor.
For more information about the POA startup file, see Section 39.0, Using POA Startup Switches.
-
Use the /ldapipaddr startup switch to list addresses for multiple LDAP servers. Use a space between addresses.
For example:
/ldapipaddr-172.16.5.18 172.16.15.19 172.16.5.20
IMPORTANT:Do not include any LDAP servers that require an SSL connection. There is currently no way to specify multiple SSL key files unless you are using pooled LDAP servers, as described in Configuring a Pool of LDAP Servers.
-
Save the POA startup file, then exit the text editor.
-
Stop the POA, then start the POA so that it reads the updated startup file.
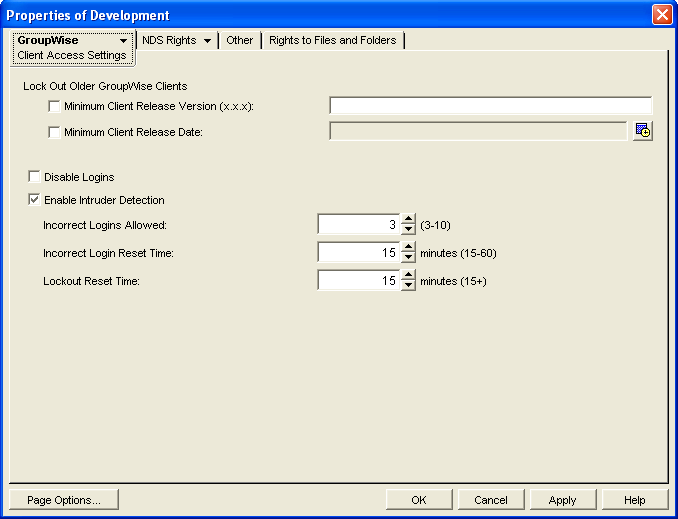
36.3.5 Enabling Intruder Detection
You can configure the POA to detect system break-in attempts in the form of repeated unsuccessful logins. This feature can be especially helpful when allowing Remote client users to establish client/server connections to MTAs in your system. See Section 41.2.2, Enabling Live Remote.
-
In ConsoleOne, browse to and right-click the Post Office object, then click .
-
Click to display the Client Access Settings page.
-
Select .
-
Specify how many unsuccessful login attempts are allowed before the user is locked out.
The default is 5: valid values range from 3 to 10.
-
Specify in minutes how long unsuccessful login attempts are counted.
The default is 15; valid values range from 15 to 60.
-
Specify in minutes how long the user login is disabled.
The default is 30; the minimum setting is 15.
-
Click to save the intruder detection settings.
ConsoleOne then notifies the POA to restart so the new settings can be put into effect.
If a user gets locked out by intruder detection, his or her GroupWise account is disabled. To restore access for the user in ConsoleOne, right-click the User object, click t, then deselect . At restore access for the user at the POA Web console, click , then clear the lockout.
Corresponding Startup Switches You can also use the /intruderlockout, /incorrectloginattempts, /attemptsresetinterval, and /lockoutresetinterval startup switches in the POA startup file to configure the POA for intruder detection.
POA Web Console You can view current intruder detection settings on the Configuration page and change them using the Intruder Detection link.
36.3.6 Configuring Trusted Application Support
For background information about setting up trusted applications in ConsoleOne, see Section 4.12, Trusted Applications.