4.2 Setting Up the Internet Agent in a Cluster
You should already have reviewed Section 4.1, Planning the Internet Agent in a Cluster and filled out the Section 4.4, Internet Agent Clustering Worksheet. You are now ready to complete the following tasks to set up the Internet Agent in a clustering environment:
4.2.1 Cluster-Enabling a Shared Volume for Use with the Internet Agent
To cluster-enable the Internet Agent shared volume:
-
Complete the cluster-enabling steps in the applicable section of the cluster documentation for your version of NetWare, as listed in Section 1.0, Introduction to GroupWise 7 and Novell Cluster Services on NetWare.
The Internet Agent Clustering Worksheet provides the volume to cluster-enable, the cluster-enabled volume IP address, and the failover path for the Internet Agent volume.
For a review of the new Novell® eDirectory™ objects that are created when you cluster-enable a shared volume, see Section 2.6, Deciding Whether to Cluster-Enable the Shared Volumes Used by GroupWise.
If you have installed the latest version of ConsoleOne® and the Novell Cluster Services snap-in, you can rename the cluster-related objects in case your DNS name server cannot resolve object names that include the underscore (_) character.
-
To ensure successful short name resolution, add entries for the Internet Agent virtual server to support your preferred methods of short name resolution, as described in Configuring Short Name Resolution.
-
To ensure that the Internet Agent has incoming and outgoing access to the Internet, make sure your firewall is properly configured, as described in Preparing Your Firewall for the Internet Agent.
-
Continue with Creating a Domain for the Internet Agent.
4.2.2 Creating a Domain for the Internet Agent
The Internet Agent domain will be a secondary domain. To create it, follow the instructions in Section 3.3, Creating a New Secondary Domain in a Cluster, taking your information from the Internet Agent Clustering Worksheet, rather than the System Clustering Worksheet, then return to this point.
Do not create any post offices in the Internet Agent domain.
Continue with Installing the MTA for the Internet Agent Domain.
4.2.3 Installing the MTA for the Internet Agent Domain
The MTA for the Internet Agent domain can be installed just like any other MTA in your clustered GroupWise system. Follow the instructions in Installing the Agent Software in a Cluster, then return to this point.
You do not need to edit the MTA startup file. You do not need to modify the Volume Resource properties until after you have installed the Internet Agent.
Continue with Installing and Configuring the Internet Agent in a Cluster.
4.2.4 Installing and Configuring the Internet Agent in a Cluster
After you have created a domain for the Internet Agent and installed the MTA for that domain, you are ready to install and configure the Internet Agent.
Installing the Internet Agent Software in a Cluster
-
Map a drive to the Internet Agent volume (Internet Agent Clustering Worksheet item 1).
The Internet Agent volume name will be cluster_volume. For assistance with mapping a drive to a cluster-enabled volume, see Configuring Short Name Resolution.
-
If you selected vol:\system on Internet Agent Volume as the Internet Agent installation location (Internet Agent Clustering Worksheet item 6), create the vol:\system directory on the Internet Agent volume accessed in Step 1.
or
If you selected sys:\system on Each Node, decide which node you will install the Internet Agent to first, then map a drive to sys:\system on that node.
-
Start the Internet Agent Installation program and install the NetWare® Internet Agent, following the steps provided in
NetWare and Windows: Installing the Internet Agent Software
inInstalling the GroupWise Internet Agent
in the GroupWise 7 Installation Guide. Keep in mind the following cluster-specific details:-
Use the notes you made during Planning the Internet Agent Installation to fill in the fields during the Internet Agent installation process.
-
In the Installation Path dialog box, be sure to browse through the drive you mapped to the location you chose in Step 2 above. Deselect and select .
-
In the GroupWise Domain dialog box, be sure to browse through the drive you mapped in Step 1 to the domain directory (Internet Agent Clustering Worksheet item 2).
-
The Internet Agent Installation program creates the gwia.ncf file, which includes the load command for the Internet Agent. You need this information later when you create the load script for the Volume Resource object.
-
-
If you need to install the Internet Agent to sys:\system to each node in the cluster:
-
Repeat Step 3, mapping new drives as needed.
-
If you marked Yes for Consolidate Multiple Configuration Files on Internet Agent Volume? (under Internet Agent Clustering Worksheet item 6), copy the gwia.cfg file to the planned location, then delete it from the sys:\system directories to avoid future confusion.
-
-
Make sure you have completed all the tasks described in
Installing the GroupWise Internet Agent
in the GroupWise 7 Installation Guide.The Internet Agent starts automatically immediately after Installation.
-
Stop each Internet Agent you have installed before configuring it for clustering.
-
Continue with Configuring the Internet Agent Volume Resource to Load and Unload the Internet Agent and Its MTA.
Configuring the Internet Agent Volume Resource to Load and Unload the Internet Agent and Its MTA
The properties of the Volume Resource object define how the Internet Agent volume functions within the cluster, how NLM™ programs are loaded and unloaded, and how failover and failback situations are handled. Complete the following tasks for the Internet Agent volume:
Modifying the Volume Resource Load Script for the Internet Agent
The volume resource load script executes whenever the Internet Agent volume comes online.
To set up the load script:
-
In ConsoleOne, browse to and select the Cluster object.
If necessary, click to display its contents.
-
Right-click the Volume Resource object (volume_SERVER), then click to display the default volume resource load script for the Internet Agent volume.
The next step assumes that this is the first time you have edited this load script. If other GroupWise agents are already running from this volume, some of the modifications have already been made.
-
Make the following changes to the default load script:
-
Remove the trustmig command. It is not necessary to migrate trustees for the Internet Agent volume. Removing this line helps the load script to execute faster.
-
On NetWare 5.1, if you are using SLP as a short name resolution method, as described in Configuring Short Name Resolution, add the cvsbind add command for the Internet Agent volume to the load script.
cvsbind add cluster_volume_SERVER IP_address
-
If you selected vol:\system on Internet Agent volume as the installation location (Internet Agent Clustering Worksheet items 4 and 6), add a search add command to add the new vol:\system directory to the server search path.
search add volume:\system -
If you selected sys:\system on each node as the installation location (Internet Agent Clustering Worksheet items 4 and 6) but you are storing the MTA startup file and the Internet Agent configuration file on the Internet Agent volume, add that location to the server search path.
-
If you marked No under Load Internet Agent and Its MTA in Protected Memory? (Internet Agent Clustering Worksheet item 8), add the following abend recovery options:
set auto restart after abend = 2
set auto restart after abend delay time = 0
set auto restart down timeout = 60
set developer option = off
These settings provide the best possible handling of GroupWise databases in the event that an abend should occur within the cluster.
-
Transfer the MTA load command from the grpwise.ncf file located in the vol:\system directory into the load script. Use Ctrl+C and Ctrl+V to copy and paste text into the load script page. Then delete or rename the grpwise.ncf file to avoid future confusion.
load volume:\system\gwmta.nlm @domain.mta
-
Add a delay so that the MTA is fully loaded before the Internet Agent starts to load:
load delay.nlm
delay 10
The length of the delay varies from system to system; ten seconds is a good starting place.
-
Transfer the Internet Agent load command from the gwia.ncf file located in the vol:\system directory into the load script. Use Ctrl+C and Ctrl+V to copy and paste text into the load script page. Then delete or rename the gwia.ncf file to avoid future confusion.
load volume:\system\gwia.nlm @gwia.cfg -
If you marked Yes under Load Internet Agent and Its MTA in Protected Memory? (Internet Agent Clustering Worksheet item 8), add the address space parameter to the load commands to specify the protected address space where the Internet Agent and its MTA will run. Add a protection restart command for the address space name.
load address space=addr_space_name
                          volume:\system\gwmta.nlm @domain.mta
load address space=addr_space_name
                          volume:\system\gwia.nlm @gwia.cfg
protection restart addr_space_name
The result would look similar to the following example:

NOTE:The set commands are needed in the load script only when the MTA and the Internet Agent are not running in protected memory. The address space parameters are needed in the load commands only when the MTA and the Internet Agent are running in protected memory.
-
-
Click to save the load script.
-
If necessary, click to confirm that you must offline and then online the volume resource in order for the changes to take effect.
-
Continue with Modifying the Volume Resource Unload Script for the Internet Agent.
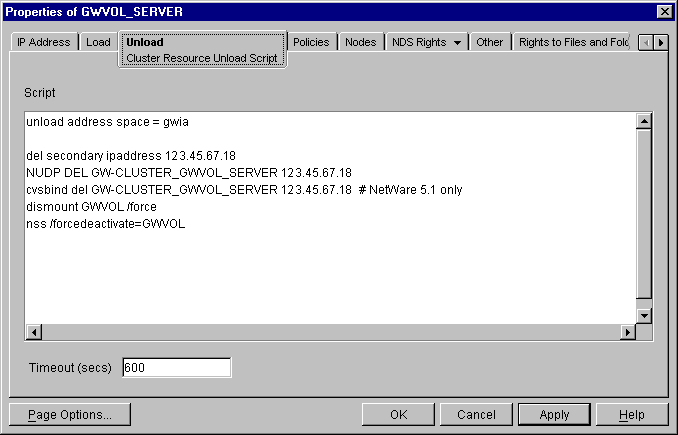
Modifying the Volume Resource Unload Script for the Internet Agent
The volume resource unload script executes whenever the Internet Agent volume goes offline. Programs should be unloaded in the reverse order of how they were loaded. This ensures that supporting programs are not unloaded before programs that rely on them in order to function properly.
To set up the unload script:
-
In ConsoleOne, in the properties pages for the Volume Resource object (volume_SERVER), click to display the default volume resource unload script.
The next step assumes that this is the first time you have edited this unload script. If other GroupWise agents are already running from this volume, some of the modifications have already been made.
-
Make the following changes to the default unload script:
-
If you marked Yes under Load Internet Agent and Its MTA in Protected Memory? (Internet Agent Clustering Worksheet item 8), add an unload address space command and an unload kill address space command to ensure that the address space is completely cleaned up.
unload address space=addr_space_name
unload kill address space=addr_space_name
If your system seems to be trying to kill the address space before the Internet Agent and its MTA have been completely unloaded, resulting in the agents hanging in the unloading state, set a delay of several seconds before issuing the unload kill address space command to allow the Internet Agent and its MTA adequate time to unload completely. The length of the delay varies from system to system; ten seconds is a good starting place.
unload address space=addr_space_name
delay 10
unload kill address space=addr_space_name
-
If you marked No under Load Internet Agent and Its MTA in Protected Memory? (Internet Agent Clustering Worksheet items 8), create an unload command parallel to each load command that you placed in the load script.
unload gwia.nlm
unload gwmta.nlm
-
On NetWare 5.1, if you are using SLP as a short name resolution method, add the cvsbind del command for the Internet Agent volume to the unload script.
cvsbind del cluster_volume_SERVER IP_address
-
Remove the trustmig command just like you did in the load script.
The result would look similar to the following example:
-
-
Click to save the unload script.
-
If necessary, click to confirm that you must offline and then online the volume resource in order for the changes to take effect.
-
Continue with Setting the Failover Path and Policies for the Internet Agent.
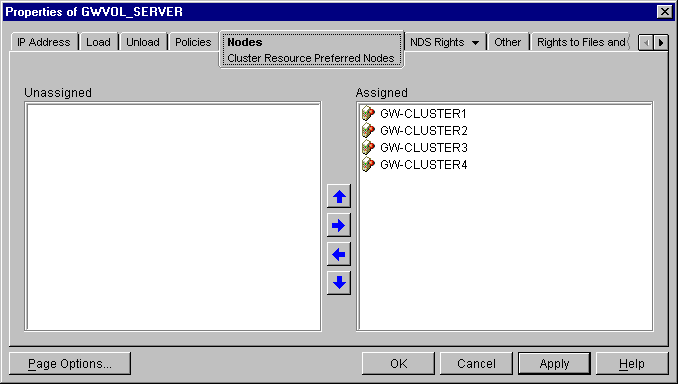
Setting the Failover Path and Policies for the Internet Agent
To modify the failover path and policies for the Internet Agent volume resource:
-
In ConsoleOne, in the properties pages for the Volume Resource object (volume_SERVER), click to display the default failover path for the Internet Agent volume resource.
-
Arrange the nodes in the cluster into the desired failover path for the Internet Agent volume (Internet Agent Clustering Worksheet item 3).
-
Click to save the failover path.
-
Click to display the default start, failover, and failback policies.
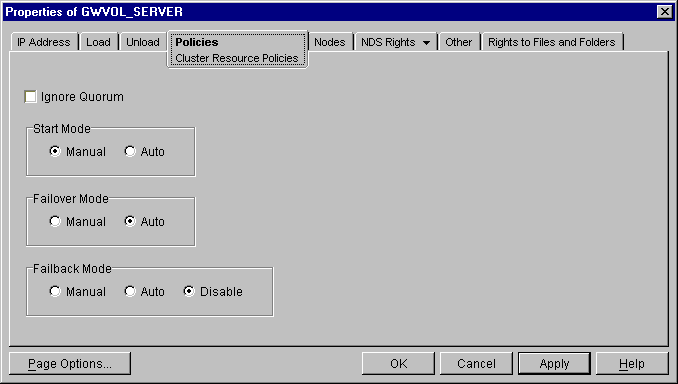
The default policy settings are often appropriate. By default, a volume resource:
-
Fails over automatically if the node it is running on fails
-
Starts automatically on the next node in its failover path
-
Continues running at its failover location, even after its most preferred node is again available
If you are considering changing these defaults, see the applicable section about failover and failback modes in the cluster documentation for your version of NetWare, as listed in Section 1.0, Introduction to GroupWise 7 and Novell Cluster Services on NetWare.
-
-
Click when you are finished editing the Internet Agent volume resource properties.
-
Continue with Enabling Internet Addressing for Your Clustered GroupWise System.
Enabling Internet Addressing for Your Clustered GroupWise System
Setting up Internet addressing for a clustered Internet Agent is no different from setting it up for an Internet Agent in a any other environment. Follow the instructions in Enabling Internet Addressing
in System
in the GroupWise 7 Administration Guide, then return to this point.
Verifying Internet Agent Object Properties
During installation of the Internet Agent, the Internet Agent object should have been configured correctly. However, it can be helpful to verify certain cluster-specific information in order to familiarize yourself with the configuration of a clustered Internet Agent.
Accessing Internet Agent Object Properties
-
In ConsoleOne, browse to and select the Internet Agent domain in order to display its contents.
-
Right-click the Internet Agent object, then click .
-
Continue with Verifying the Reference to the Volume Resource.
Verifying the Reference to the Volume Resource
In the Internet Agent object properties pages:
-
Click .
-
Verify the contents of the field.
It displays the hostname as currently configured in DNS. It should match the Volume Resource object name (volume_SERVER) of the Internet Agent volume, not the name of a physical server in the cluster.
-
Make changes if necessary.
-
Continue with Verifying the Reference to the Virtual Server.
Verifying the Reference to the Virtual Server
In the Internet Agent object properties pages:
-
Click .
-
Verify that the displayed directories match the virtual server name (cluster_volume_SERVER) associated with the Volume Resource object, not the name of a physical server in the cluster.
-
Make changes if necessary.
-
Continue with Verifying Post Office Links.
Verifying Post Office Links
In the Internet Agent object properties pages:
-
Click .
-
Verify that the Access Mode column displays C/S (for client/server mode) for all post offices serviced by the Internet Agent.
-
Verify that the Links column displays the secondary IP addresses of the GroupWise volumes where post offices reside, not the IP addresses of any physical servers in the cluster.
-
Make changes if necessary.
-
Continue with Forcing Use of the Internet Agent Secondary IP Address.
Forcing Use of the Internet Agent Secondary IP Address
If you want the Internet Agent to send outgoing messages on its secondary IP address, rather than using the default of its primary IP address:
-
Click .
-
In the field, provide the secondary IP address (under Internet Agent Clustering Worksheet item 1) for the Internet Agent to use for sending outgoing messages.
-
Click , then click .
-
Select .
-
Click .
-
Continue with Testing the Clustered Internet Agent.
4.2.5 Testing the Clustered Internet Agent
After you have configured the Internet Agent volume resource, you can test the load and unload scripts by bringing the Internet Agent volume online and taking it offline again.
-
In ConsoleOne, select the Cluster object, then click .
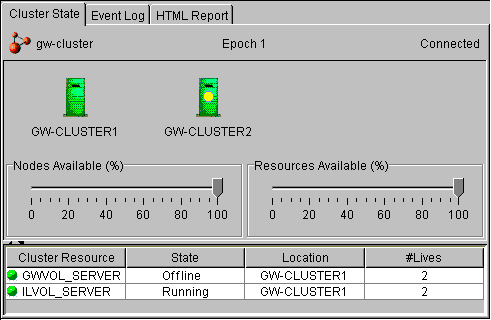
The new Internet Agent volume resource shows in the column.
-
Click the new Internet Agent volume resource, then click .

The column for the volume resource now displays .
-
Observe the server console where the Internet Agent and its MTA are loading to see that they start and run correctly.
If you are using protected memory, you can use the protection command at the server console prompt to list all the address spaces on the node and what NLM programs are running in each one.
-
Click the new Internet Agent volume resource, then click .
The column for the volume resource returns to .
-
Observe the server console where the Internet Agent and its MTA are unloading to see that they shut down correctly.
If you are using protected memory, you can use the protection command again to make sure that the address space used by the Internet Agent and its MTA is no longer present.
-
Repeat Step 2 whenever you are ready to bring the new Internet Agent volume resource online permanently.
On NetWare 6.x, these actions can also be performed from your Web browser. See Using Novell Remote Manager on NetWare 6.x.
-
Continue with Managing the Internet Agent in a Cluster.