1.4 Understanding Your Mailbox
All of your items, whether you send or receive them, are stored in your GroupWise Mailbox. You can quickly display only received items, sent items, posted items, or draft items by clicking a setting on the Display drop-down list. You can further restrict which items display in your Mailbox by using filters. See Section 6.0, Managing Your Mailbox for more information.
You can organize your messages by moving them into folders within your Cabinet, and you can create new folders as necessary. See Section 6.1, Using the Folder List for more information.
1.4.1 Bolded Items in Your Mailbox
All unopened items in your Mailbox are bolded to help you easily identify which items and documents you have not yet read. The icon appearing next to an item also indicates if it is unopened.
Sent items are also bolded to show when they are queued but not uploaded, status information has not been received about the item being delivered, or they have not yet been transferred to the Internet.
1.4.2 Icons Appearing Next to Items in Your Mailbox and Calendar
The icons that appear next to items in your Mailbox and Calendar show information about the items. The following table explains what each icon means.
Table 1-3 Icon Descriptions
|
Icon |
Description |
|---|---|
|
|
Next to an item you have sent in Caching mode, the
Next to the Sent Items folder, the
|
|
|
Appears next to an item you have sent. If the item has been opened by at least one person, this icon appears until all recipients have 1) opened the mail, phone message, or reminder note; 2) accepted the appointment; or 3) completed the task. |
|
|
Appears next to an item you have sent. The item couldn’t be delivered to the destination post office or it failed to transfer to the Internet. |
|
|
Appears next to an item you have sent. Next to an appointment or task, this icon indicates that at least one person has declined/deleted the item. Next to a mail message, phone message, or reminder note, this icon indicates that at least one person has deleted the item without opening it. |
|
|
One or more attachments are included with the item. |
|
|
One or more sound annotations are included with the item, or the item is a voice mail message. |
|
|
Draft item. |
|
|
Appears next to an item you have sent. |
|
|
Appears next to an item you have replied to. |
|
|
Appears next to an item you have forwarded. |
|
|
Appears next to an item you have delegated. |
|
|
Appears next to an item you have replied to and forwarded |
|
|
Appears next to an item you have replied to and delegated. |
|
|
Appears next to an item you have forwarded and delegated. |
|
|
Appears next to an item you have replied to, forwarded, and delegated |
|
|
Posted item. |
|
|
Specific version of a document. |
|
|
Official version of a document. |
|
|
Unopened mail message with a low, standard, or high priority. |
|
|
Opened mail message with a low, standard, or high priority. |
|
|
Unopened appointment with a low, standard, or high priority. |
|
|
Opened appointment with a low, standard, or high priority. |
|
|
Unopened task with a low, standard, or high priority. |
|
|
Opened task with a low, standard, or high priority. |
|
|
Unopened reminder note with a low, standard, or high priority. |
|
|
Opened reminder note with a low, standard, or high priority. |
|
|
Unopened phone message with a low, standard, or high priority. |
|
|
Opened phone message with a low, standard, or high priority. |
|
|
The sender has requested that you reply to this item. The item can be a low, standard, or high priority. |
|
|
Appears in a Busy Search. If it appears to the left of a username or resource, you can click a scheduled time across from the username or resource on the Individual Schedules tab to display more information about the appointment in the box below. However, the user or resource owner must give you appointment Read rights in the Access List before this icon appears. See Adding and Removing Proxy Names and Rights in Your Access List. |
|
|
Appears on your Calendar, indicates the item is a group appointment, reminder note, or task. |
|
|
Appears on your Calendar, indicates the item is marked private. |
|
|
Appears on your Calendar, indicates that you declined the item but didn’t delete it. |

 icon indicates that the item has been queued, but the queue has not been uploaded. After the item has been uploaded, this icon indicates that status information has not been received about the item being delivered to the destination post office or transferred to the Internet.


1.4.3 Viewing Options in Your Mailbox
You can view the items in your Mailbox five different ways, depending on how you want the information organized. Details, As Calendar, and As Checklist are all found on the View menu.
You can choose to have the display settings be temporary or permanent depending how you set them.
To permanently set your display setting:
-
Right-click the folder you want to change the display settings for, then click .
-
Click the tab.
-
Select the display setting from the drop-down list.
-
Click .
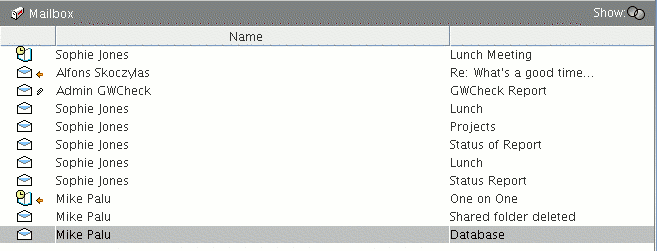
Details
Details displays a list of your items and information about them in columns, including Subject, Date, CC, Priority, Document Type, Due Date, Size, Version#, and many other categories. Details is the default Mailbox view if you have not changed your Mailbox properties. For information about adding or rearranging columns, see Section 6.16, Using the Columns in Your Mailbox.
Figure 1-2 Details View
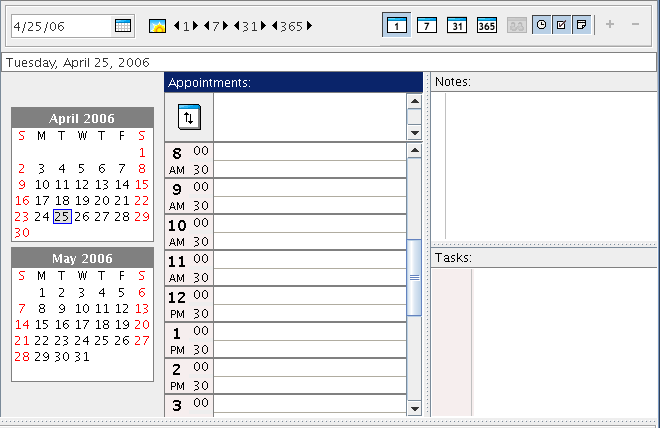
As Calendar
As Calendar displays all scheduled items saved in a particular folder. This is useful if you organize all your appointments and other items for a specific project in one folder.
Figure 1-3 Calendar View
As Checklist
As Checklist displays a checklist area at the top of your Item List where you can create a checklist using the items in your Item List. Each item that is dragged to the checklist area displays with a check box so that you can mark it completed. You can assign due dates, priorities, and more to checklist items. Any items you move to the checklist area also displays in the Checklist folder in the Folder List.
For more information about creating a checklist, see Creating a Checklist.
Figure 1-4 Checklist View
