6.3 Creating forms
This section describes how to create new forms and add controls to it. It includes these sections:
6.3.1 Creating New Forms
-
With provisioning request definition editor open, click the tab.
-
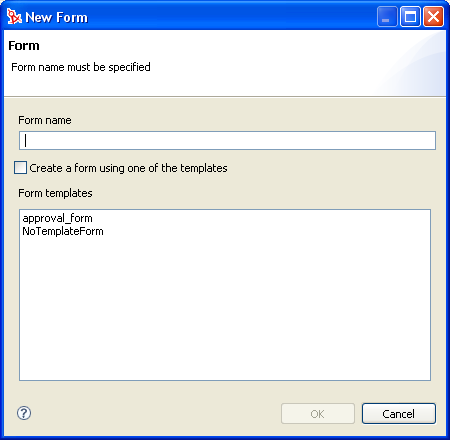
In the Form Selection section of the page, click to access the New Form wizard:
-
Fill in the fields as follows:
-
Click to save the form or to exit without saving.
6.3.2 Working with Form Controls
Use the section to define the content and layout of the form.
To add a control to a form:
-
Click . Designer adds a control named Field to the bottom line of the form.
If you add more than one control of the same name to the form, Designer adds a unique number to the end of the control name.
-
Define the following properties for the control:
NOTE:Form field controls do not have Data Item Mappings or E-mail notifications property sheets.
-
For each control, specify its properties in the tab (available via ). For more information, see Section 6.5, Form Control Reference.
-
Click the tab to define what the user can do with the form. For example, you can add actions that allow the user to submit a form or cancel it.
NOTE:A request form must have, at a minimum, a SubmitAction. Without a SubmitAction, the request will not process. It is also recommended that every form also have a CancelAction. Each approval form must have at least one action defined.
-
In the Actions page, click to add a new Action. Fill in the fields as follows:
Field
Description
Choose the location for the action buttons you add to the form.
. Places the action buttons on the bottom of the form. (Default.)
: Places the action buttons on the top of the form.
: Places the buttons at both the top and bottom of the form.
Choose an action for the button. For more information, see Section 6.4, Action Reference.
The data type associated with the action command. Valid choices are:
Button—Adds a button to the form.
Line Break—Allows you to define the layout of your action buttons. Adding a Line Break forces the buttons to the next line.
The visual representation of the action command and data type. Button is the only valid entry.
Controlling Form Layout
The Designer places form controls on the form top to bottom and left to right. Use the Line Break control type to force the controls to the next line of the form.