4.1 Installing the PeopleSoft Service Agent
The process for installing the PSA is different for different versions of PeopleSoft.
NOTE:Any references to specific paths in these sections represent the defaults indicated during the installation procedures. Apply the necessary changes if applicable.
4.1.1 Installing the PSA on PeopleSoft 7.5
If you are using PeopleSoft 7.5, you should complete the following tasks to install the PSA:
Extracting the PSA Files
The PSA project comes as a self-extracting project. To extract the project:
-
From the location you specified when you installed the components for PeopleSoft, run dirxml_driver_36.exe. The default location is Novell\nds\ps.
-
Click , select the destination directory, then click to begin extracting the PSA files.
-
Click to close the extraction process.
The PSA is now ready to be installed into your PeopleSoft environment.
Installing the PeopleSoft Service Agent
Before you can install and configure the PeopleSoft objects, you need access to a PeopleSoft user ID and password with Administrator or appropriate developer rights. You can create a unique user ID and password for implementing these objects.
To apply the delivered PSA set of objects, follow PeopleSoft's standard upgrade procedures. For information on PeopleSoft upgrade procedures, refer to PeopleSoft documentation.
Installing the PSA for PeopleSoft 7.5
Data Mover is an application tool used to import external PeopleSoft objects into an existing PeopleSoft 7.5 database. Using the standard PeopleSoft upgrade process, you use Data Mover to move the Identity Manager for PeopleSoft projects into an organization's PeopleSoft environment.
A Data Mover script (DMS) is provided with the driver. This script imports new and modified objects into the data dictionary tables. You should only run this script on a refreshed Application Update Database (AUD). Refreshing the database resolves any conflicts between the delivered objects and any objects that already exist in the AUD database.
WARNING:If the DMS is run against a database other than the AUD, it can fail or overwrite existing data. If you run the script directly against the PeopleSoft development database, it corrupts the database.
To ensure that the DMS files were copied during the component installation, check the C:\PSA directory. This is the default directory that the installation program uses. If you altered this setting during the installation, check the directory that you specified. The following are default steps to import the external PeopleSoft objects:
-
From the Start menu, click .
-
Log in to the AUD database.
-
Select .
-
Browse to the appropriate file for your installation, then select the DMS script with the appropriate release number. (For example, DIRXML_DRIVER_PSA_36IMP.DMS .)
The release number should be the same as the release number of the PeopleSoft database.
-
In the Data Mover syntax dialog box, verify that the input and log files are pointing to the directory containing the data (.dat) files on the local drive.
The following is an example of the delivered syntax:
SET OUTPUT c:\PSA\AU_CHECK.DAT;
SET INPUT c:\PSA\PSA-PS75\DIRXML_DRIVER_PSA_36IMP.DAT;
SET LOG c:\PSA\DIRXML_DRIVER_PSA_36IMP.LOG;
SET NO TRACE;
SET IGNORE_DUPS;
EXPORT AU_CHECK;
IMPORT *;
-
Select .
From the report in the bottom status panel, verify if the import was successful. If the import fails, make sure the input and output paths point the proper directories.
-
Click to close the Data Mover.
Copying the Novell Integration Project into a Target Database
Your target database contains the system catalog, data dictionary structures, and sample application data. When moving from an AUD database to the target database, objects from the data dictionary in the AUD are copied to the data dictionary of the target database.
After the copy is complete, you must build the database. The build creates the physical tables or views in the underlying database so that the objects are accessible. You should be logged in as an administration user when completing these procedures.
We recommend the following:
-
Use a clean copy of a target database for this procedure.
If you apply a copy to a database with production data, do a copy and compare before you apply the copy.
-
Complete an installation and test that installation against a target database.
Do this before you change the configuration and before you apply the database to a development or production environment.
To copy the project into a target database:
-
From the menu, click .
-
Log in to the AUD database.
-
Click .
-
Click , then click .
-
Click , , type , then click .
-
Click the project, then click .
-
Click .
-
Type the target database name (the project will be copied to this database), , and , then click .
Be sure to select all objects with the project, including the project itself.
-
Check the box to export the objects to the target database, then click .
All objects are copied from the AUD to the target DMO database.
-
Click to close the Application Designer window.
Building Project Record Definitions
After you have imported the project into the PeopleSoft database, you should build project record definitions and then build project views.
-
From the menu, click .
-
Log in to the target database using an administrator username that has administrative and development rights.
-
In the Application Designer, click , then click .
-
Select the project, then click .
-
Click .
-
From > , click .
-
Click to create sample project tables. After project tables are created, click to close the Build Progress window.
You must create project tables before creating the views. Views are created using information from table fields.
-
In the Application Designer, select .
-
In , click .
-
Click to create the sample project views. After the views are created, click to close the Build Progress window.
You should now establish roles and initiate workflow. Refer to Establishing Roles and Initiating Workflow.
Establishing Roles and Initiating Workflow
A role is a class of users who perform the same type of work. Business policies typically determine what role performs what activity. The eDirectory™ administrator has been designated as the role performing the ADD, UPD, and DIS events. This means that workflow must be activated and a role user must be assigned to the eDirectory administrator role. To activate a workflow, complete the following:
-
Click .
-
Click .
-
Select the box.
-
If you are using e-mail and other electronic forms, select the applicable boxes.
-
Ensure that a default role user, typically , is also assigned, then click . If workflow is not currently being used by other processes, change this role user to the role of eDirectory Administrator.
You should now assign security rights to the new objects. See Establishing Security for PSA Objects in PeopleSoft 7.5.
Establishing Security for PSA Objects in PeopleSoft 7.5
You can assign security rights to all new panels and pages that have been added to a project. Use an administrator-type account to establish security.
Applying Security for the New PSA Objects
-
Click .
-
Click . Select the , then click .
-
Click the icon from the left pane.
-
Click .
-
Double-click , click , then click .
-
Click , then click .
-
Click .
-
After you save, you can exit the Security Administrator interface.
Verifying Access to PSA Objects
After you have applied security to the new PSA objects, you should use the sample application to verify that you can access, change, and save data.
You can test to ensure that transactions are created by entering a new person using the sample application. This example uses Departments, so you need to create a sample department, and then add a person (assigning him or her to that department) to validate that the application works.
-
Connect to the PeopleSoft database as administrator in two tier mode.
-
In the Application Designer, click .
-
Select .
-
Click an empty field row to add a sample department and description.
-
Click to add the Department.
-
Select .
-
Specify an ID number for the new person, then click .
-
Provide data in the various fields for this ID, then click .
(The required fields include: First Name, Last Name, Birth Date, Status, Title, and Department ID.)
-
To validate that an ADD transaction was created, access the menu. Click . You can then search for the ID you just created.
-
Click the button.
-
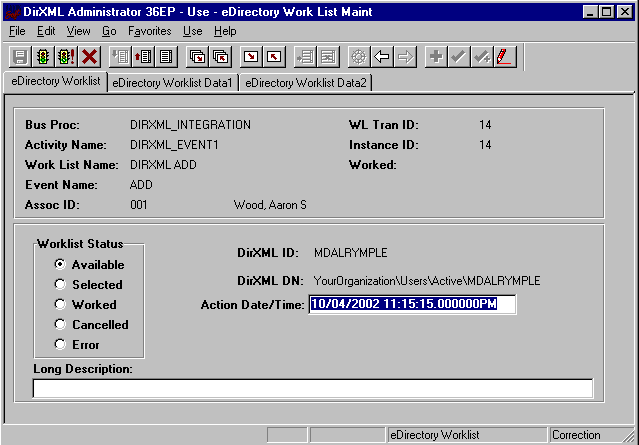
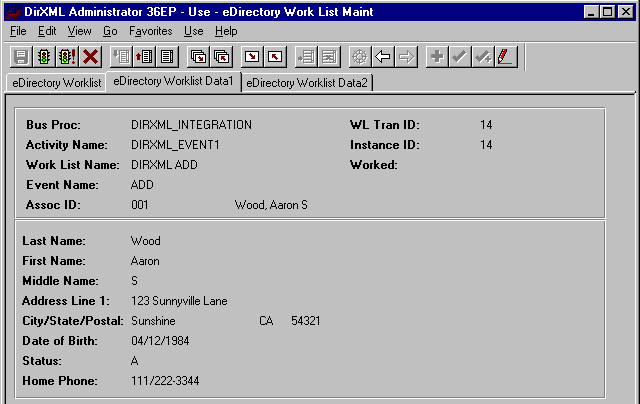
Double-click the event you created. Look at the panels and verify that the data you entered exists.
-
Click to close the PeopleSoft Client.
Now that you have completed the required tasks for installing and configuring the PSA, you should continue with Running the Message Agent Test Program.
4.1.2 Installing the PSA on PeopleSoft 8.1
Complete the following tasks to install the sample project for testing and configuration purposes:
NOTE:Any references to specific paths in these sections represent the defaults indicated during the installation procedures. Apply the necessary changes if applicable.
Extracting the PSA Files
The PSA project comes as a self-extracting project. To extract the project:
-
From the location you specified when you installed the components for PeopleSoft, run DIRXML_DRIVER_36.EXE. The default location is Novell\NDS\PS.
-
Click , select the destination directory, then click to begin extracting the PSA files.
-
Click to close the extraction process.
The PSA is now ready to be installed into your PeopleSoft environment.
Importing the PSA Project into the PeopleSoft Database
With PeopleSoft 8, projects are delivered in a cache directory structure, which is similar to the cache structure found within PeopleSoft. With previous versions of PeopleSoft you needed to use the Data Mover script and compare, but this process is no longer necessary.
To import the PSA into the PeopleSoft database:
-
Connect to the PeopleSoft database as administrator in two tier mode.
-
From the Application Designer, select .
-
Click and select the PSA project directory: C:\PSA\PSA-PSA8\.
-
Click .
-
With all object types selected, click to copy all project components into the PeopleSoft database.
Building Project Record Definitions
After you have imported the project into the PeopleSoft database, you should build project record definitions and then build project views.
-
Log into PeopleSoft using an administrator username that has administrative and development rights.
-
In the Application Designer, select .
-
In , click .
-
Click to create sample project tables. After project tables are created, click to close the Build Progress window.
You must create project tables before creating the views. Views are created using information from table fields.
-
In the Application Designer, select .
-
In , click .
-
Click to create the sample project views. After the views are created, click to close the Build Progress window.
Testing Sample PeopleSoft Applications
You can test to ensure that transactions are created by entering a new person using the sample application. This example uses Departments, so you need to create a sample department, and then add a person (assigning him or her to that department) to validate that the application works.
-
Connect to the PeopleSoft database as administrator in two tier mode.
-
From the Application Designer, select .
-
From the menu, select .
-
Click an empty field row to add a sample department and description.
-
Click to add the Department.
-
From the menu, click .
-
Specify an ID number, then click .
-
Provide data in the various fields for this ID, then click .
(The required fields include: First Name, Last Name, Birth Date, Status, Title, and Department ID.)
-
To validate that an ADD transaction was created, click .
-
Click the Search button to search for the user you added.
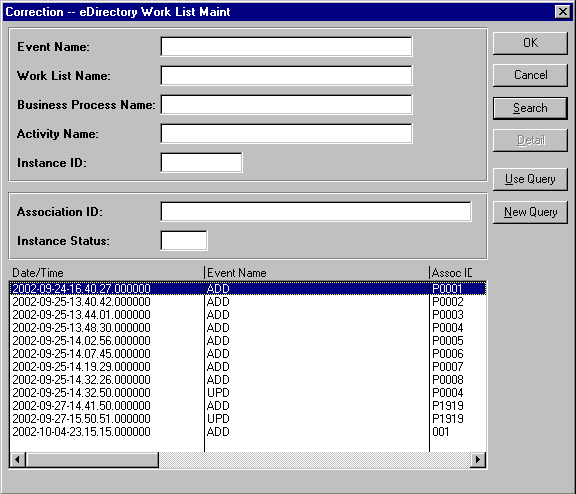
-
Double-click the event to view its details.
-
After you know that events are configured to process properly, you should ensure that you can make changes to the data and save it. Click .
-
Click and locate the sample person you created.
-
Specify a sample value (or modify an existing value) in the phone number field, then click .
-
Click .
-
Click Search and double-click your sample person.
-
Verify that the phone number you added or modified has changed.
-
You can now close the PeopleSoft client.
Now that you have completed the required steps for configuring the PSA, proceed to Running the Message Agent Test Program.