7.2 Upgrading Password Synchronization 1.0 to Password Synchronization Provided with Identity Manager
If you are currently using Password Synchronization 1.0, complete the instructions in this section to upgrade.
IMPORTANT:Do not install the Identity Manager driver shim until you have reviewed these instructions.
To upgrade from Password Synchronization 1.0 to Password Synchronization provided with Identity Manager:
-
Make sure your environment is ready to use Universal Password.
See
Preparing to Use Identity Manager Password Synchronization and Universal Password
in the Novell Identity Manager 3.0.1 Administration Guide.Enabling Universal Password doesn’t automatically cause password changes in both systems. Universal Password synchronization starts working only after users change their passwords.
Scenario: Universal Password. At DigitalAirlines, network administrator Sandy enables Universal Passwords. User Markus logs in and changes his password. The Universal Password for Markus is set on both systems. However, user Marie logs in but doesn’t change her password. She continues to log in by using her unchanged password. Universal Password functionality for Marie isn’t set until she changes her password.
-
Install the Identity Manager 3.0.1 driver shim to replace the DirXML® 1.1a driver shim, and immediately complete Step 3.
NOTE:If you are running Identity Manager 2.0, and are using Universal Password, you do not have upgrade Password Synchronization.
Use the installation program as described in the
Installing Identity Manager
chapter in the Identity Manager 3.0.1 Installation Guide, and select only the Identity Manager Driver for Active Directory. -
Create backward compatibility with Password Synchronization 1.0, by adding a new policy to the driver configuration as described in Creating Backward Compatibility with Password Synchronization 1.0 by Adding Policies.
A DirXML 1.1a driver shim updates the nadLoginName attribute, but the Identity Manager Identity Manager driver shim doesn’t. Therefore, you must add policies to the driver configuration to update nadLoginName. This allows Password Synchronization 1.0 to function as usual when you install the driver shim, so no password changes are missed while you finish deploying Identity Manager Password Synchronization.
IMPORTANT:If you don’t create backward compatibility, Password Synchronization 1.0 continues to update existing users, but any new or renamed users can’t be synchronized until you deploy Identity Manager Password Synchronization.
After you complete this step, you have the Identity Manager 3.0.1 driver shim and the policies for backward compatibility. Therefore, your driver is supporting Password Synchronization 1.0.
If you can’t complete the rest of this procedure right away, you can continue to use Password Synchronization 1.0 until you are ready to finish deploying Identity Manager Password Synchronization.
-
Add support for Identity Manager Password Synchronization to each driver you want to participate in password synchronization.
Either upgrade an existing configuration or replace an existing configuration.
Upgrade existing configuration: Upgrade your existing DirXML 1.1a driver configuration by converting it to Identity Manager format and adding the policies needed for Identity Manager Password Synchronization:
- Convert the driver to Identity Manager
format using a wizard. See
Upgrading Existing Driver Configurations to Support Password Synchronization
in the Novell Identity Manager 3.0.1 Administration Guide. - Add policies to support Identity Manager Password
Synchronization. You can use an “overlay” configuration
file to add the policies, driver manifest, and GCVs, all at once. You
must also add an attribute to the Filter. For instructions, see
Upgrading Existing Driver Configurations to Support Password Synchronization
in the Novell Identity Manager 3.0.1 Administration Guide.
Replace the existing configuration with Identity Manager configuration, and add backward compatibility again: The Identity Manager sample driver configuration contains the policies, driver manifest, GCVs, and filter settings to support Identity Manager Password Synchronization. See the instructions in Section 4.0, Configuring the Active Directory Driver of this driver guide for information on importing the new driver configuration.
- If you choose to replace your existing configuration, make sure you add backward compatibility again, as described in Creating Backward Compatibility with Password Synchronization 1.0 by Adding Policies. The Identity Manager sample driver configuration does not contain those policies.
- Make sure the nadLoginName attribute is set to Publish, as it was in your previous driver configuration.
- Convert the driver to Identity Manager
format using a wizard. See
-
Install new Password Synchronization filters, and configure them if you want the connected system to provide user passwords to Identity Manager.
See Section 7.5, Setting Up Password Synchronization Filters.
-
Set up SSL, if necessary.
For instructions, see Section 2.3, Addressing Security Issues.
The ability of the driver to set a password in Active Directory (Subscriber channel) requires a secure connection provided by one of the following conditions:
- The machine running the driver is the same machine as the domain controller.
- The machine running the driver is in the same domain as the domain controller.
- The machine not in the domain requires the Simple
method and SSL set up between it and the domain controller. Bidirectional
password synchronization is available only when using the Negotiate
authentication mechanism.
Refer to Microsoft documentation for instructions, such as Configuring Digital Certificates on Domain Controllers.
-
Turn on Universal Password for Identity Vault user accounts by creating Password Policies with Universal Password enabled.
See
Managing Password Synchronization
in the Novell Identity Manager 3.0.1 Administration Guide.To simplify administration, we recommend that you assign Password Policies as high up in the tree as possible.
-
Using the Password Policies and the Password Synchronization settings for the driver, set up the scenario that you want to use for Password Synchronization.
See
Implementing Password Synchronization
in the Novell Identity Manager 3.0.1 Administration Guide. -
Test password synchronization.
-
After Identity Manager Password Synchronization is working, remove Password Synchronization 1.0.
-
Using Add/Remove Programs, turn off Password Synchronization 1.0 by removing the agent.
-
In the filter for the driver, change the nadLoginName attribute to Ignore.
-
Remove the backward compatibility policies that are updating nadLoginName from the driver configuration.
-
If desired, you can also remove the nadLoginName attribute from users after Identity Manager Password Synchronization is working, because it is no longer needed.
-
7.2.1 Creating Backward Compatibility with Password Synchronization 1.0 by Adding Policies
Password Synchronization 1.0 relies on the driver shims updating an attribute named nadLoginName. This attribute indicates whether a user’s password should be synchronized. If a new user was added or the user’s name was changed, the nadLoginName attribute was added or updated to match.
The driver shims in the Identity Manager no longer update this attribute because it is not necessary for Identity Manager Password Synchronization. Therefore, after you install the new driver shim, the nadLoginName attribute is not being updated. This means that Password Synchronization 1.0 no longer receives notice of new or renamed users unless you add backward compatibility to your driver configuration.
For a smooth transition from Password Synchronization 1.0 to Identity Manager Password Synchronization, you need backward compatibility with Password Synchronization 1.0.
For backward compatibility with Password Synchronization 1.0, you must add policies that update the nadLoginName attribute.
These policies must be added regardless of whether you are updating your existing driver configurations, or replacing them with new configurations that ship with Identity Manager. The Identity Manager sample driver configurations for Active Directory do not include the policies by default.
Three policies are necessary, one each for the Subscriber Output Transformation, Publisher Input Transformation, and Publisher Command Transformation. These policies are provided with Identity Manager in a configuration file named Password Synchronization 1.0 Policies for Active Directory. The following procedure explains how to import the new policies and add them to a driver configuration.
-
In iManager, click > .
The Import Drivers Wizard opens.
-
Select the driver set where your existing Active Directory driver resides, then click .
-
In the list of driver configurations that appears, scroll to the Additional Policies section and select then click .
-
Complete the import prompts:
-
Select your existing Active Directory driver.
Selecting the existing driver allows you to add the three policies that are necessary. The import process creates three new policy objects, which you must then insert in the appropriate place in the driver configuration.
-
Specify whether the driver is an Active Directory driver.
The policies imported have minor differences depending on which system is chosen.
-
Browse for and select the nadDomain object associated with the driver you want to update.
It can normally be found under the Driver object.
-
(Active Directory only) Specify the name of the eDirectory™ attribute mapped to the Active Directory attribute sAMAccountName.
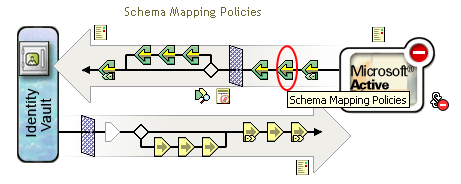
You can find this information in the Schema Mapping policy in the driver configuration.
NOTE:If the sAMAccountName is not mapped to any eDirectory attribute, map sAMAccountName to DirXML-ADAlias name.
-
-
Click .
Because you chose an existing driver, a page appears asking you to decide how you want the driver to be updated. In this case, you just want to update selected policies.
-
Select , and select the check boxes for all three policies listed.
-
Click , then click to complete the wizard.
At this point, the three new policies have been created as Policy objects under the Driver object, but they aren’t yet part of the driver configuration. To link them in, you must manually insert each of them at the right point in the driver configuration on the Subscriber and Publisher channels.
-
Insert each of the three new policies into the correct place on your existing driver configuration.
If any of these parts of the driver configuration has multiple policies, make sure these new policies are listed last.
Table 7-2 Policies
Repeat steps 8a through 8f for each policy.
-
Click > .
-
Select the driver set for the driver you are updating.
-
Click the driver you just updated.
A page opens showing a graphical representation of the driver configuration.
-
Click the icon for the place where you need to add one of the three new policies.
-
Click to add the new policy.
In the Insert page that appears, click , browse for the new policy object, then click .
-
If you have more than one policy in the list for any of the three new policies, use the arrow buttons

 to move the new
policy down so it is last in the list.
to move the new
policy down so it is last in the list.
-
-
Repeat steps 1 thought 9 for all your Active Directory drivers.


If the sAMAccountName needs to be mapped to the DirXML-ADAliasName in the Publisher channel Schema Mapping policy, then follow this procedure.
WARNING:If the sAMAccountName is mapped to another attribute, following this procedure invalidates your policies. The policies stop synchronizing passwords. Make sure you enter in the proper attribute in Step 4.d.
-
In iManager, select .
-
Browse to and select the Driver Set object that contains the Active Directory driver, then click .
-
Click the driver icon, then click the icon for the Publisher channel.
-
Click .
-
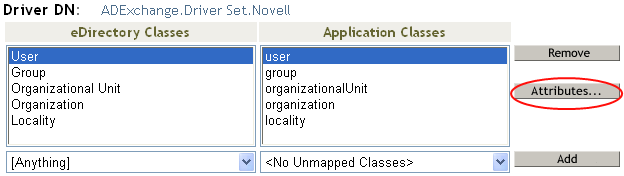
Select the User class, then click .
-
Click the drop-down list under eDirectory Attributes, then browse to and select DirXML-ADAliasName.
-
Click the drop-down list under Application Attributes, then browse to and select sAMAccountName.
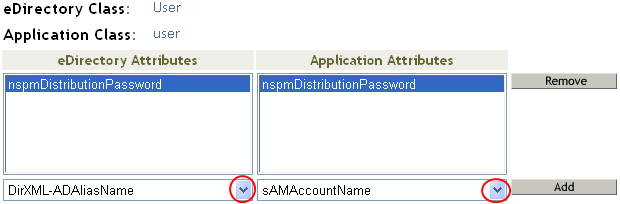
-
Click , then click .
-
Select the Group class, then click Attributes.
-
Repeat steps 6 through 8 for the Group class.
-
Click twice.
After you have completed this procedure, the driver configurations for your Active Directory drivers are backward compatible with Password Synchronization 1.0. This means that Password Synchronization continues to function as it did before, allowing you to upgrade to Identity Manager Password Synchronization at your convenience.