2.3 Digital Signature Configuration
This section provides instructions on configuring your environment to take advantage of the digital signature support provided with the Identity Manager User Application.
NOTE:If you want to use the Novell Certificate Server (Novell PKI infrastructure) for digital signing features, you need to use eDirectory 8.8 or later. The digital signature functionality requires PKI 3.1, which ships with eDirectory 8.8.
WARNING:You must use Novell Audit (or Sentinel) to preserve documents that you digitally sign. Digital signature documents are not stored with workflow data in the User Application database, but are stored in the logging database. You must enable logging to preserve these documents.
This section includes the following topics:
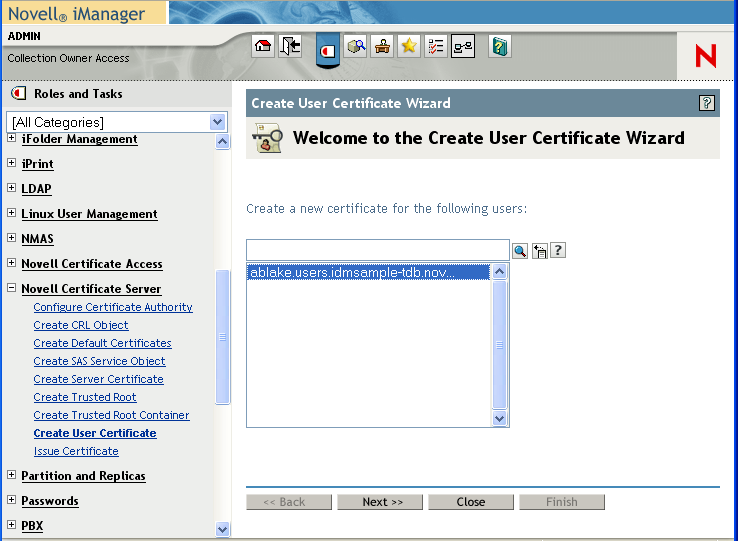
2.3.1 Setting Up the User Certificates
-
Create the user certificates using iManager.
-
Log in as an administrator.
-
Under , select .
-
Select the users for whom you want to create certificates and click .
You can use the Object Selector or Object History to pick the users.
-
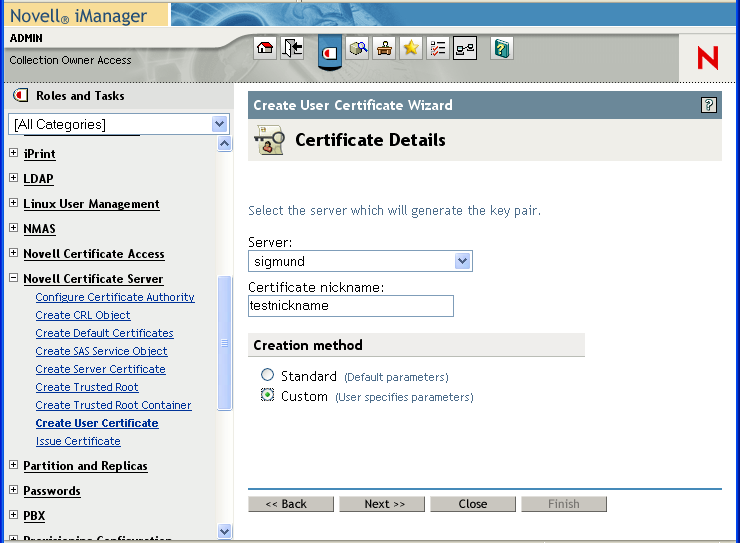
Select the server and specify the certificate nickname. Specify as the creation method and click .
-
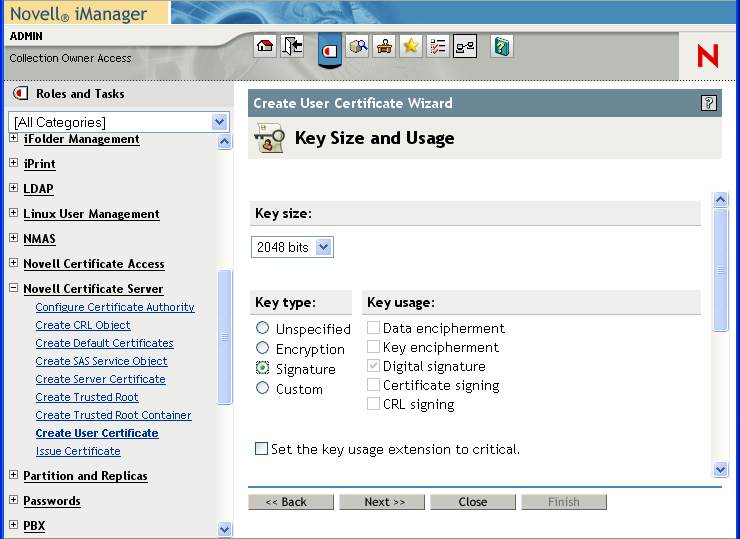
Specify a key size of 1024 or 2048 bits, depending on which size suits your requirements. Set the key type to . Leave other settings as is and click .
-
If you’re using the default configuration, leave the certificate parameters as is and click .
To enable certificate revocation list (CRL) support, select Custom and check the CRL signing check box.
For complete details on CRL configuration, see the Novell Certificate Server documentation.
-
Click .
-
Log out.
-
-
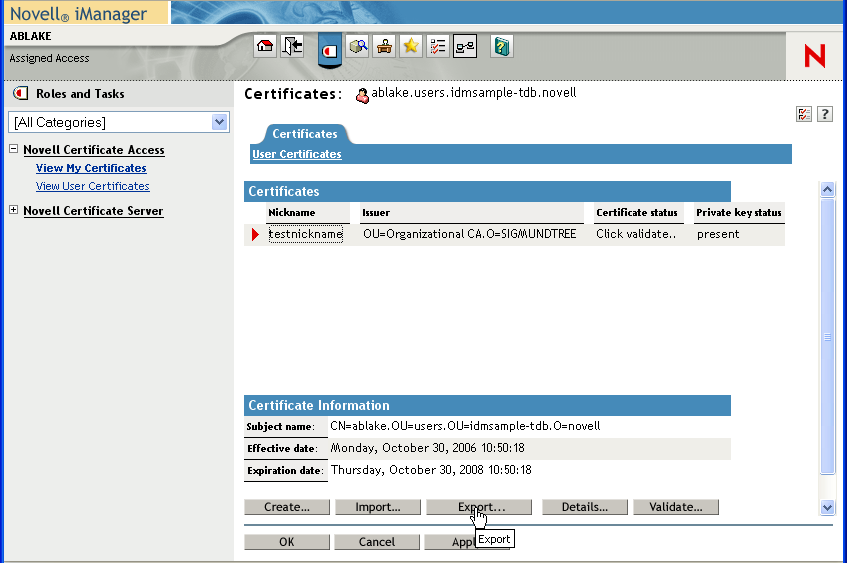
Export the user certificate as a PFX file that contains the private key.
-
Log in as the user for whom you want to export a certificate.
-
Under , select .
-
Select a certificate and click the button.
-
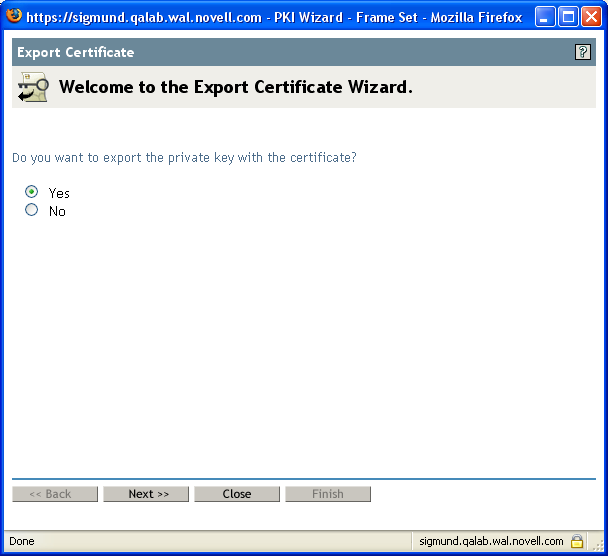
In the Export Certificate Wizard, click to indicate that you want to export the private key with the certificate. Then click .
-
Enter a password to protect the private key and click .
-
Select if you do not have a card reader. Otherwise, click on the link that says .
You can also import to the browser later. Therefore, you might want to click on to import to a different browser.
-
Click to save the file rather than opening it.
-
Click .
-
-
If you’re using a smart card, install the smart card reader driver.
-
Install the software needed to transfer certificate information to the smart card. For example, to get the smart card middleware software provided by cryptovision (cv act sc/interface), or download an evaluation copy of their product or documentation, go to: http://www.cryptovision.com/idmdigsig.html.
NOTE:You need to install version 3.3 or higher of the cryptovision middleware software. To transfer certificate information to the smart card, you need the administration software. The cryptovision software is not supported on Linux*.
-
Import the key pair (certificate) to the smart card:
If you are planning to use browser certificate support, rather than the smart card, you can skip steps 3 through 5 above. Certificates can be imported into a browser using iManager or the browser certificate management user interface. The cryptovision applet supports Internet Explorer and Firefox* running on Windows only.
2.3.2 Configuring the Application Server
To configure the application server, follow these steps:
-
Copy the following JARs to the JBOSS_HOME/server/IDM/lib directory if you are running JBoss, or to the /IBM/WebSphere/AppServer/lib/ext directory if you are using WebSphere:
-
dom.jar
-
xmldigsig.jar
-
xmlsec.jar
You can download dom.jar, xmldsig.jar, and xmlsec.jar from http://java.sun.com. These JARs are included with the Web Services Developer Pack.
For cryptovision, you also need SafXVerifier.jar. For details on downloading SafXVerifier.jar, see http://www.cryptovision.com/idmdigsig.html.
-
-
To deploy to JBoss, copy xmlsigner.war to the JBOSS_HOME/server/IDM/deploy directory.
To deploy to WebSphere, deploy xmlsigner.war using the WebSphere administration console.
For details on downloading xmlsigner.war, see http://www.cryptovision.com/idmdigsig.html.
-
Export the trusted root and all intermediate certificates (using iManager) and import them into the key store specified in your system’s local configuration using the keytool command.
For example, for JBoss:
keytool -import -trustcacerts -file certFileThe certFile is a fully qualified path to the certificate file.
For example, for WebSphere:
keytool -import -trustcacerts -file servercert.der -alias myserveralias -keystore trust.p12 -storetype PKCS12
If you’re using the Novell Certificate Server, you do not need to export the trusted root.
-
Start the User Application Configuration utility by running the configupdate script (configupdate.bat on Windows or configupdate.sh on Linux/Solaris).
-
Click .
-
Under , type the path to the certificate file in the . Also, type your password in the field. The default password is changeit.
The Trusted Key Store contains all trusted signers’ certificates used to validate digital signatures.
NOTE:For JBoss, if you’re using the Novell Certificate Server, you can simply paste the complete string (for example, C:\Program Files\Java\jdk1.5.0_08\jre\lib\security\cacerts) from the field under to the under . You can also paste the to the field.
For WebSphere, an example of a string is /opt/IBM/WebSphere/AppServer/profiles/AppSrv01/ config/cells/citgoNode01Cell/nodes/MyServerNode01/trust.p12.
-
If you are using OCSP, under , type the URI for OCSP in the field. This value is used to update the status of trusted certificates online. The URI points to the access point for the Online Certificate Status Protocol server.
For more information about JBoss application server setup, refer to manufacturer’s instructions, such as:
2.3.3 Configuring Logging
To enable logging of digital signatures, you need to configure the logging Platform Agent. The Platform Agent is required on any client that reports events to Novell Audit or Sentinel. You configure the platform agent through the logevent configuration file. This file provides the configuration information that the platform agent needs to communicate with the Novell Audit server.
IMPORTANT:If you are logging events that include digital signatures, it is critical that the value of the LogMaxBigData parameter be large enough to handle the data being logged.
For details on logging configuration, see Section 3.0, Setting Up Logging.
2.3.4 Configuring the User Application
To configure digital signature support for the User Application, you need to use the page on the tab within the User Application. For details, see Section 8.3, Configuring the Digital Signature Service.
2.3.5 Configuring the Provisioning Request Definitions
You can use Designer for Identity Manager or iManager to configure digital signature support for your provisioning request definitions. The basic requirements for digital signature support are the same whether you perform your configuration steps in Designer or iManager.
To configure a provisioning request definition to support digital signatures, you need to:
-
Indicate whether a digital signature is required to initiate the provisioning request.
-
Indicate whether a digital signature is required for each approval step within the workflow. Because each approval step might have more than one outgoing link, you need to specify whether a digital signature is required for each link.
After you have indicated whether a digital signature is required to initiate a request or perform an approval step, you need to also specify the following for each request or approval step where a digital signature is required:
Table 2-2 Digital Signature Settings
For details on configuring provisioning request definitions in Designer, see the Identity Manager User Application: Design Guide. For details on configuring provisioning request definitions in iManager, see Section 17.0, Configuring Provisioning Request Definitions.