8.2 Configuring Delegation, Proxy, and Task Settings
This section includes information about:
8.2.1 Configuring the Delegation and Proxy Service
To configure the Delegation and Proxy Service:
-
Select the tab.
-
Select from the left navigation menu.
The user interface displays the Delegation, Proxy and Tasks page. To configure the service, you need to make some changes in the Delegation and Proxy Service Settings box.
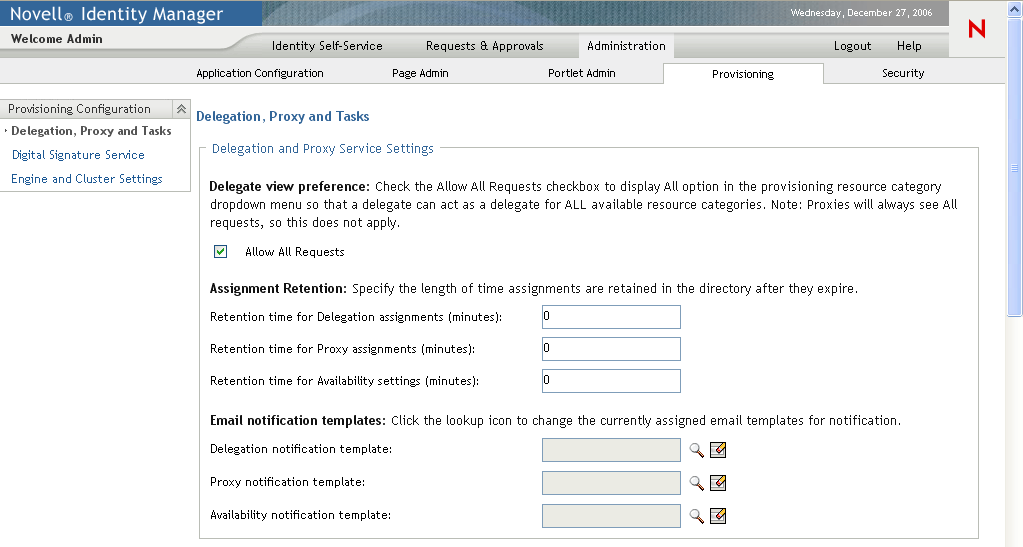
-
Check the option if you want to display the option in the Resource Search Criteria drop-down list for the Team Delegate Assignments action. When the option is available, a delegate assignment can be defined that applies to all resource categories.
-
Define the retention period for delegate, proxy, and availability assignments:
-
Select the e-mail templates you want to use for delegation, proxy, and availability notifications:
Field
Description
Specifies the language-independent name for the template to use for delegation e-mail notifications. After the template name has been specified, the notification engine can determine which language-specific template to use at runtime.
For details on creating and editing e-mail templates, see Section 18.4, Working with E-Mail Templates.
Specifies the language-independent name for the template to use for proxy e-mail notifications. After the template name has been specified, the notification engine can determine which language-specific template to use at runtime.
For details on creating and editing e-mail templates, see Section 18.4, Working with E-Mail Templates.
Specifies the language-independent name for the template to use for availability e-mail notifications. After the template name has been specified, the notification engine can determine which language-specific template to use at runtime.
For details on creating and editing e-mail templates, see Section 18.4, Working with E-Mail Templates.
8.2.2 Scheduling Synchronization and Cleanup
To configure the Synchronization and Cleanup Service:
-
Select the tab.
-
Select from the left navigation menu.
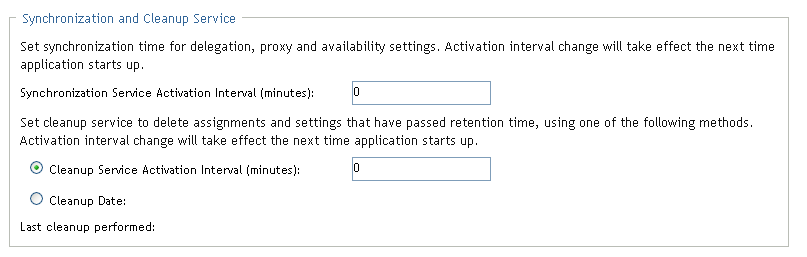
The user interface displays the Delegation, Proxy and Tasks page. To schedule synchronization and cleanup, you need to make some changes in the Synchronization and Cleanup Service box.
-
To specify how often you want to activate the synchronization service, type the activation interval (in minutes) in the field. The default value is 0, which means that the service is not activated.
When the synchronization service runs, any modifications (or deletions) made to delegate assignments are synchronized with the corresponding availability settings for the user.
-
To specify how often you want to activate the cleanup service, select , then type the activation interval (in minutes). Alternatively, select and use the calendar tool to specify the date when you want to activate the service. The default value is 0, which means that the service is not activated.
When the cleanup service runs, all obsolete proxy and delegate assignments are removed from the system.
If the cleanup service has been activated, the field indicates when the last cleanup was performed.
8.2.3 Configuring Provisioning Interface Display Settings
To configure the Provisioning Interface display settings:
-
Select the tab.
-
Select from the left navigation menu.
The user interface displays the Delegation, Proxy and Tasks page. To configure the display settings, you need to make some changes in the Provisioning Interface Display Settings box.

-
To change the default landing page, type the URL for another page in the field. The default page is shown below:
getAFTaskList.do?apwaLeftNavItem=JSP_MENU_TASKS&apwaActionType=user
The page you specify must be reference a servlet that is available from the tab. To change the landing page, you can click on the desired page in the left-hand navigation panel on the , and then cut and paste the last part of the URL after the application context (IDMProv) into the field. For example, to set the landing page to My Requests, you could paste the following string into the field:
getAFProcessList.do?apwaLeftNavItem=JSP_MENU_REQUESTS&apwaActionScope=user&apwaNewSearch=true
-
To set the number of rows returned from each query, type the row limit in the box. The default is 50.
NOTE:The setting only applies to pages on the Requests & Approvals tab.
-
To set the default number of rows to display, type the number of rows in the control. The default is 25.
This setting applies to the following pages on the Roles tab:
-
My Roles
-
View Request Status
-
Browse Role Catalog
-
Manage Role Relationships
-
-
To specify additional values that the user can select to override the default number of rows displayed on each page, type these values in the . Note that the number specified in the control is always included in the list of values for the user to select.
NOTE:This setting also applies to the Team Tasks page on the Requests & Approvals tab and to the Object Selector. The default number of rows displayed on the Team Tasks page and in the Object Selector, however, is not controlled by the setting. The default number of rows for team tasks is set at 5, and the default number of rows for the Object Selector is set at 10.
-
To set the maximum amount of memory (expressed in rows) to use in the client browser for sorting and filtering, type the maximum number of rows in the control.
This setting applies only if the size of the result set is less than or equal to the threshold value. If the size of the result set is larger than the threshold value specified, sorting and filtering operations are performed on the server.
-
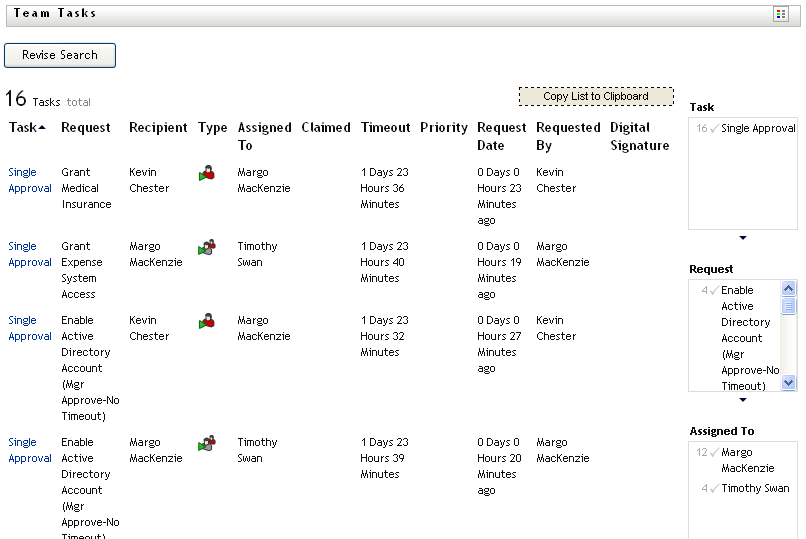
To set the view for the Team Tasks list, click either the or the radio button.
Review Table 8-1 to decide which view of tasks to select for your users. Figure 8-1 and Figure 8-2 show the displays.
Table 8-1 Comparison of Template View of Team Tasks and Exhibit View of Team Tasks
Figure 8-1 Example of Template Display
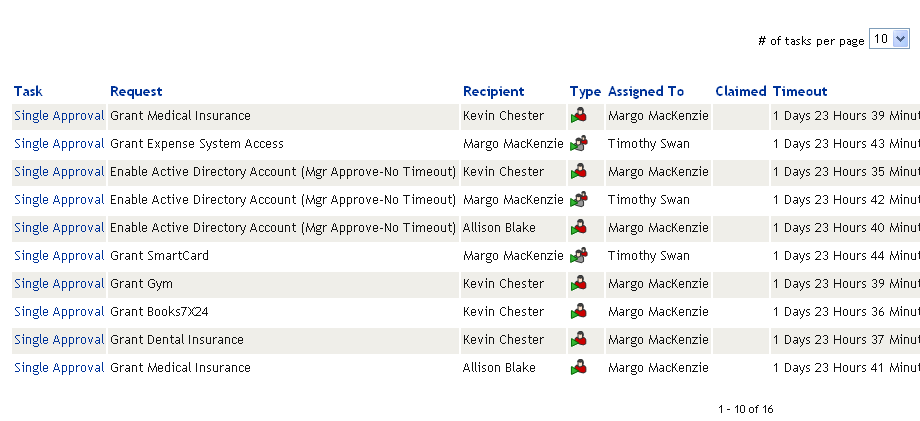
Figure 8-2 Example of Exhibit Display