2.9 Configuring the Roles Tab
This section provides details on configuring the underlying subsystem for the Roles tab. Topics include:
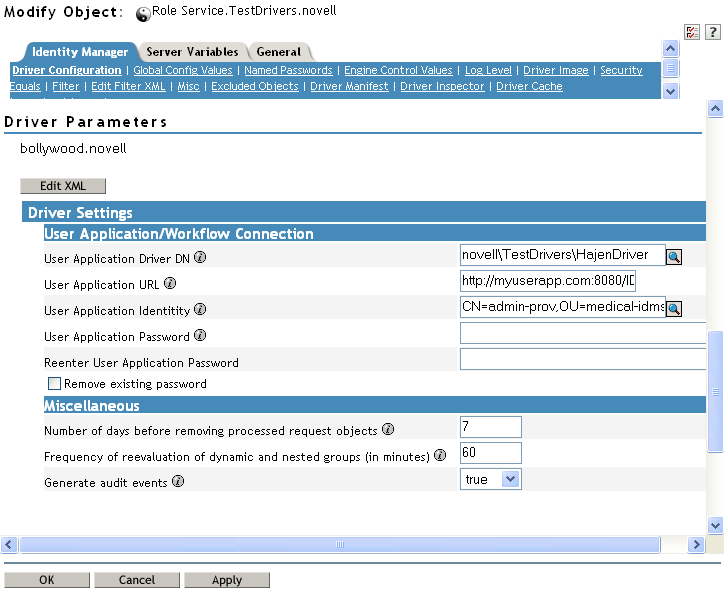
2.9.1 Role Service Driver Configuration
After creating the Role Service driver at installation time, you can optionally modify some of the driver configuration settings in iManager. To configure the Role Service driver:
-
In iManager, click .
-
Browse to the driver set where the driver exists, then click .
-
Click the upper-right corner of the Role Service driver icon, then click .
-
Click on the tab.
-
Scroll down to the section of the page.
-
Make any changes you would like to the settings, and click to commit your changes.
You can modify the following standard driver settings (listed under on the Driver Configuration page), which get their initial values at installation time:
Table 2-6 Standard Driver Settings
In addition, you can modify the following additional settings (listed under on the Driver Configuration page) to customize the behavior of the Role Service driver:
Table 2-7 Additional Settings for Customizing the Role Service Driver
|
Option |
Description |
|---|---|
|
|
Specifies the number of days the driver should wait before cleaning up request objects that have finished processing. This value determines how long you are able to track the status of requests that have been fulfilled. |
|
|
Specifies the number of minutes the driver should wait before reevaluating dynamic and nested groups. This value determines the timeliness of updates to dynamic and nested groups used by the User Application. In addition, this value can have an impact on performance. Therefore, before specifying a value for this option, you need to weigh the performance cost against the benefit of having up-to-date information in the User Application. |
|
|
Determines whether audit events are generated by the driver. For details on audit configuration, see Section 3.0, Setting Up Logging. |
Indexing for the Role Service Driver
The Role Service driver creates relevant indexes in eDirectory for roles definitions. If you upload a large number of roles, the indexing of these values may take some time. You can monitor these indexes under Index Management in iManager.
Here is the list of Index Names for the indexes created for the Role Service driver:
nrf(Object Class)
nrf(nrfMemberOf)
nrf(nrfStatus)
nrf(nrfStartDate)
nrf(nrfNextExpiration)
nrf(nrfParentRoles)
nrf(nrfChildRoles)
nrf(nrfCategory)
nrf(nrfRoleCategoryKey)
nrf(nrfLocalizedNames)
nrf(nrfLocalizedDescrs)
nrf(nrfRoles)
2.9.2 User Application Configuration
The action on the tab of the User Application allows you to specify administrative settings for the Role Subsystem. For details on using the action, see the section on configuring the role subsystem in the Identity Manager User Application: User Guide.
2.9.3 Security Roles
The Role Subsystem uses a set of system roles to secure access to functions within the tab. Each menu action in the tab is mapped to one or more of the system roles. If a user is not a member of one of the roles associated with an action, the corresponding menu item is not displayed on the tab.
The system roles are administrative roles automatically defined by the system at install time for the purpose of delegated administration. These include the following:
-
Roles Module Administrator
-
Roles Manager
-
Roles Auditor
-
Security Officer
To assign users to the system roles, you need to use the action on the tab. For details on assigning users to roles, see the section “Making Role Assignments” in the Identity Manager User Application: User Guide.
The initial assignment of the Role Module Administrator is specified at installation time and processed when the Role Subsystem is first initialized at startup time.
2.9.4 Trustee Rights
The Roles Module Administrator has unlimited authorization scope within the Role Subsystem, which means that the administrator does not need to have directory browse rights to perform any tasks on the Roles tab. This is not the case for the other security roles.
The Roles Manager, Roles Auditor, and Security Officer roles need to have directory browse rights for the objects they want to work with on the Roles tab. For example, the Roles Manager can modify roles to which the user logged in with role manager privileges has browse rights. In addition, the Roles Manager can request assignment of users, groups, and containers to roles to which the user has browse rights. Similarly, the Roles Auditor must have directory browse rights to a report to run this report, and a Security Officer must have directory browse rights to an SoD constraint to modify this constraint.
NOTE:You should not define trustee rights for the system roles themselves.
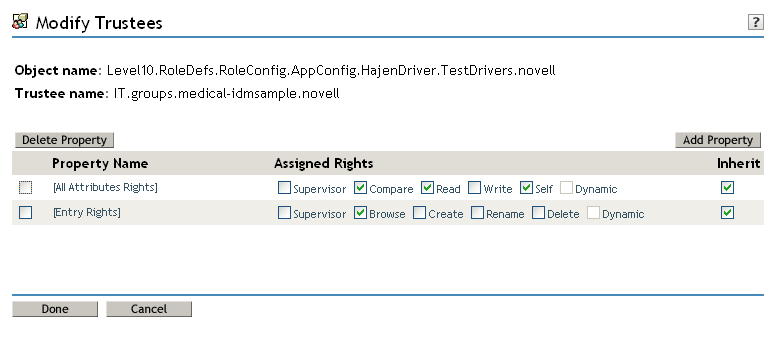
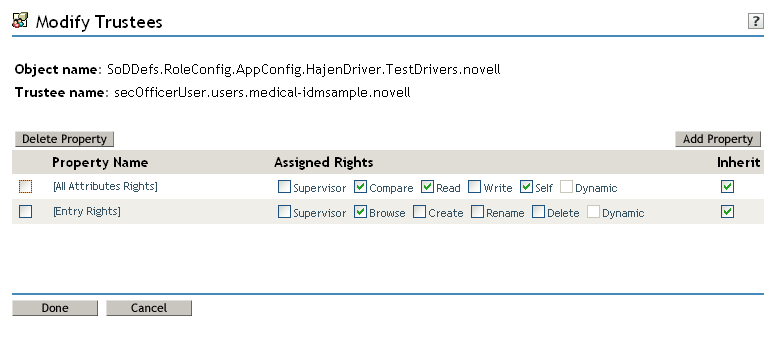
Directory browse rights for roles-related objects should be defined as follows:
Table 2-8 Directory Browse Rights Required for Trustees
|
Property Name |
Assigned Rights |
Inherit |
|---|---|---|
|
[All attribute rights] |
Read right checked. |
Checked |
|
[Entry rights] |
Browse right checked. |
Checked |
The Browse right setting for Entry rights is required for authorization to make role assignments. The Read right on attributes is required for attributes that are used in role searches.
Here is an example showing the trustee rights defined on the Level10 roles definition container for the IT group:
Figure 2-8 Trustee Rights for a Roles Container
Here is another example showing the trustee rights defined on the SoDDefs container for secOfficerUser, a sample user who has been assigned to the Security Officer role:
Figure 2-9 Trustee Rights for a Sample User
You can define rights for various types of trustees, including containers, subcontainers, groups, and users. One approach you might want to use is described below:
-
Assign users to a group and give rights to objects to the group.
-
Create a subcontainer for several objects (such as roles) and assign rights to the subcontainer.
Combining the two approaches might give you the greatest flexibility and effectiveness in assigning security rights.
NOTE:When a Role Manager creates a role, the Role Manager automatically receives trustee rights for the role definition. Similarly, when a Security Officer creates an SoD constraint, the Security Officer automatically receives trustee rights for the constraint definition.
2.9.5 View Request Status Search Limit
By default, the View Request Status action retrieves up to 10,000 request objects. If a user attempts to retrieve a larger result set, the user will see a message indicating that the limit has been reached. In this case, the user should narrow the search (by specifying a particular user or status, for example) to limit the number of objects returned in the result set. Note that when a user applies a filter to a role name, the filter limits what the user sees and its order, not the number of objects returned.
The administrator can change the maximum number of request objects retrieved by modifying the entity definition for the nrfRequest object in iManager. To do this, the administrator needs to modify the <search-max>10000</search-max> setting by editing the XmlData attribute of the sys-nrf-request object. The sys-nrf-request object can be found under EntityDefs.DirectoryModel.AppConfig within the User Application driver for the Roles Based Provisioning Module.
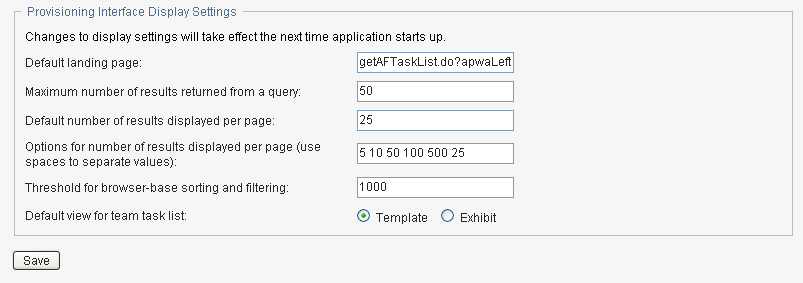
2.9.6 Result Set and Pagination Settings
The Administration tab in the User Application provides several settings you can use to control how result sets are processed and displayed on pages within the application. To configure the settings for result sets and pagination:
-
Open the tab in the User Application.
-
Select the tab.
-
Select from the left navigation menu.
-
Scroll down to the section of the page.
-
Modify any of the following settings, and click .
2.9.7 E-Mail Notification
The Role Subsystem uses two templates that are specific to roles-based provisioning:
-
(Role Request Notification)
-
(Role Request Approval Completed Notification)
You can edit the templates to change the content and format of e-mail messages. For more information on these templates, see Section 18.4, Working with E-Mail Templates.