6.2 Deploying iFolder Server
This section describes how to configure iFolder server in a Multi-server environment.
6.2.1 Configuring the iFolder Enterprise Server
After you install the iFolder enterprise server, you must configure the iFolder services, including the LDAP, iFolder system, and iFolder administration settings.
-
If you plan to use an NSS volume as the System Store Path for the users’ iFolder data, use iManager to create the NSS volume, then create a directory on the volume.
For information, refer to
Managing NSS Volumes
in the OES 2015: NSS File System Administration Guide for Linux. -
If you are using an NSS volume to store user data, you must set up NSS file system trustee rights for the Web server user object wwwrun before restarting your web server. At a terminal console prompt, log in as the root user or equivalent, then enter
rights -f /media/nss/NSSVOL/dirname -r rwfcem trustee wwwrun.ou.o.treename
If you ever get, “An Internal Error has occurred" error message within the iManager plug-in, this is an indication that you have not set up file system trustee rights within NSS properly.
-
Log in to the server as the root user, or open a terminal console, enter su, then enter the root password.
-
Start YaST, follow the YaST on-screen instruction to finish the installation. For more information see Step 1 through Step 7 in the section Section 6.1, Installing iFolder on an Existing OES Server.
-
Select and click to change the default configuration settings for iFolder.
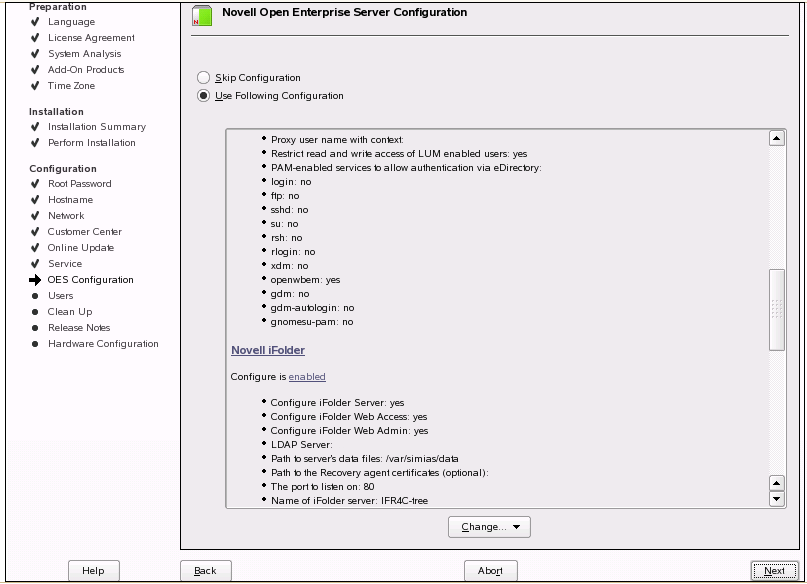
If you decide to use default settings, click to start iFolder 3 configuration.
IMPORTANT:For security reasons, it is recommended that you always change the default iFolder configuration settings.
-
Follow the YaST on-screen instructions to proceed through the iFolder 3 configuration. The following table summarizes the decisions you make.
HINT:If the iFolder configuration failed at any stage, refer to the /var/log/YaST2/y2log file to find the details on the failure that help you in analyzing and troubleshooting the issues.
Install Settings
Description
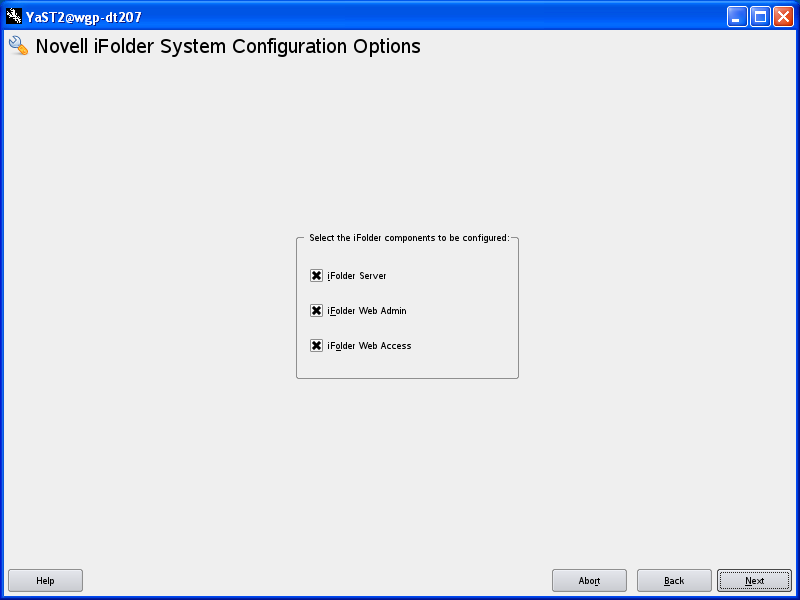
iFolder components
-
Select the iFolder components to be configured: Select the components you want to configure. You can choose any combination of iFolder components from the given options. The corresponding screens are displayed depending on your selection.
-
iFolder Server (optional): Select the check box adjacent to the iFolder Server to configure iFolder server.This option lets you configure the settings for the iFolder server. It is the central repository for storing user iFolders and synchronizing files for enterprise users.
-
iFolder Web Admin (optional): Select the check box adjacent to the iFolder Web Admin to configure iFolder Web Admin server. This option lets you create and configure settings for the Administrator user. The iFolder Admin user is the primary administrator of the iFolder Enterprise Server. The Web Admin server does not need to be configured on the iFolder Enterprise Server. Devoting a separate server to the Web Admin application improves the performance of the iFolder Enterprise Server by reducing the admin traffic.
-
iFolder Web Access (optional): Select the check box adjacent to the iFolder Web Access to configure iFolder Web Access server. This option lets you configure the Web Access server, which is an interface that lets users have remote access to iFolders on the enterprise server. The Web Access server lets users perform all the operations equivalent to those of the iFolder client through using a standard Web browser. The Web Access server does not need to be configured in the same iFolder Enterprise Server. Channeling the user tasks to a separate server and thereby reducing the HTTP requests helps to improve the performance of the iFolder Enterprise Server.
iFolder System Configuration
-
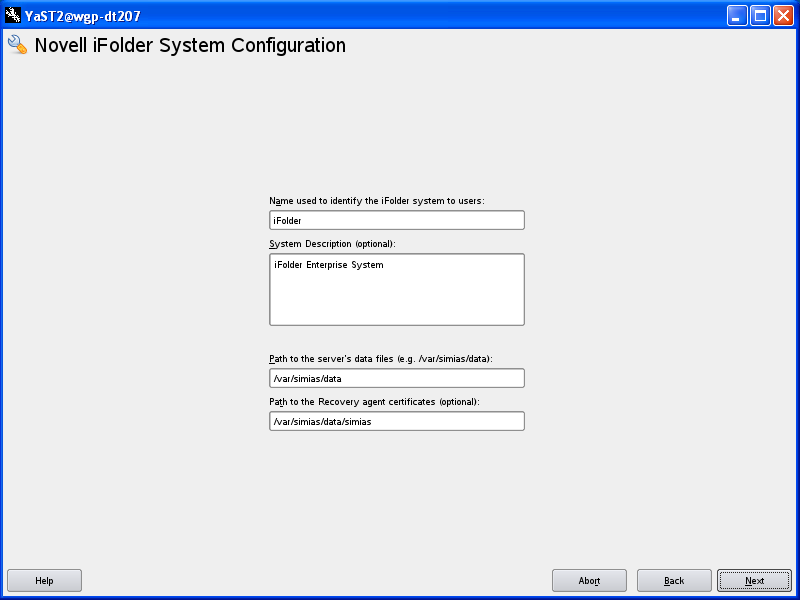
Name Used to Identify the iFolder System to Users: A unique name to identify your iFolder 3 server.
For example, iFolder Server.
-
System Description: A descriptive label for your iFolder 3 server. For example, iFolder3 Enterprise Server
-
Path to the Server Data File: Specify the case-sensitive address of the location where the iFolder enterprise server stores iFolder application files as well as the users' iFolders and files.
For example, /var/simias/data/simias. This location cannot be modified after install.
-
Path to the Recovery Agent Certificates (optional): Specify the path to the recovery agent certificates that are used for recovering the encryption key. After you configure the path to the Recovery Agent, you must load the Agent certificates to this location. For more information, see Section 6.7, Recovery Agent Certificates .
By default, eDirectory CA certificate is copied in this location with the name sscert. You can export the private key of this certificate using iManager. For information, see Section 6.7.6, Exporting eDirectory CA Certificate Using iManager
iFolder System Configuration
-
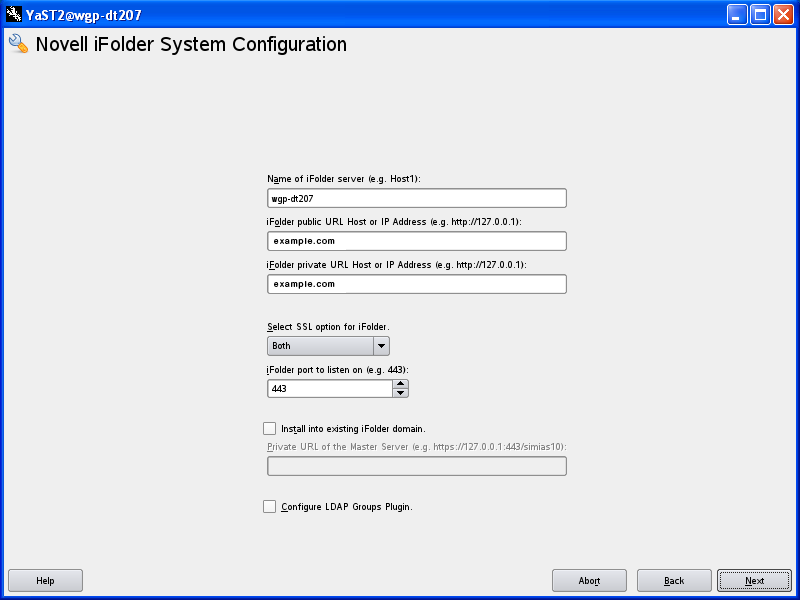
Name of iFolder Server: Specify a unique name to identify your iFolder server. For example, IF3EastS
-
iFolder public URL Host or IP Address: Specify the public URL to reach the iFolder server.
IMPORTANT:You must specify the DNS name of the server as to connect the client to the server using a DNS name. In this case, users need not remember all the IP addresses they are provisioned to. A single DNS name can map them to the respective server IP based on their location as in office or home.
-
iFolder private URLHost or IP Address: Specify the private URL corresponding to the iFolder server to allow communication between the servers within the iFolder domain. The Private URL and the Public URL can be the same.
NOTE:You can use a single URL for the iFolder server if it is accessed only inside the corporate firewall. If the server needs to be accessed outside the firewall, you must provide two different URLs: Private and Public. The private URL is used for server to server communication within the corporate firewall and this should not be exposed to outside of the firewall. The public URL is used for the iFolder clients that can communicate from outside the corporate firewall. The clients can be inside or outside of the firewall and based on this, you can use private or public URL, or use public URL all the time.
iFolder System Configuration
-
Configure SSL for iFolder: There are three options to select from.
-
SSL: Select to enable a secure connection between the iFolder server, iFolder Web Admin server, iFolder Web Access server, and the iFolder clients. iFolder uses the HTTPS channel for communication.
-
Non SSL: Select to enable unsecured communication between the iFolder server, Web Admin server, Web Access server and the clients. iFolder uses the HTTP channel for communication.
-
Both: This option is selected by default. Selecting enables you to select secure or non secure channel for communication between the iFolder server, Web Admin server, Web Access server and the clients. By default, these components use the HTTPS (secure) communication channel. However, all components can also be configured to use HTTP channel.
-
-
iFolder Port to Listen On: Specify the port for the iFolder to Listen On. Port 443 is the default for SSL.
-
Install into Existing iFolder Domain: If left unselected, this server becomes the Master iFolder server. Select this option when you want to use an existing iFolder domain and provide the Master server information.
IMPORTANT:You must ensure that the server you install and the current iFolder domain are in the same LDAP tree.
-
Private URL of the Master Server: Specify the private URL of the Master iFolder server that holds the master iFolder data for synchronization to the current iFolder Server. For example: https://127.0.1.1. For more information, see the Section 6.2.2, Configuring the iFolder Slave Server
-
-
Configure LDAP Groups plugin: Select this option to configure the LDAP Groups plug-in. If this option is left unselected, iFolder will not have the LDAP Groups support enabled.
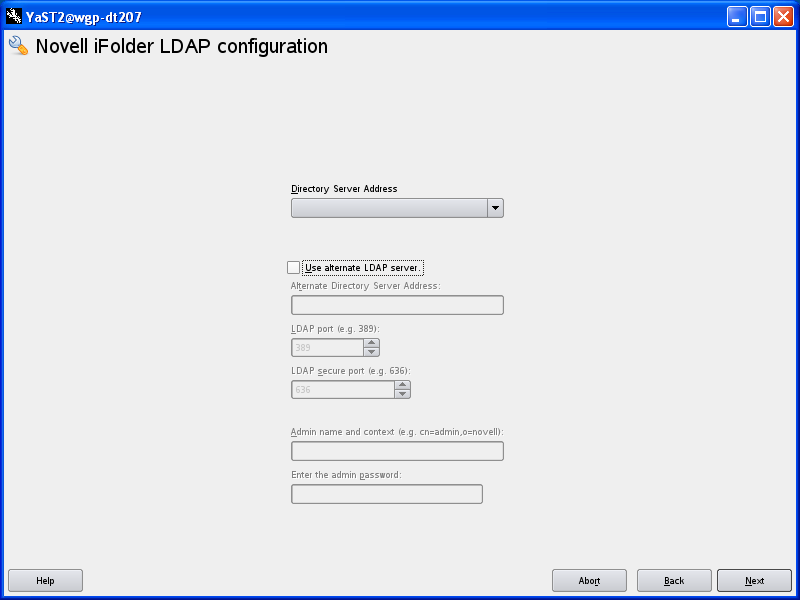
iFolder LDAP Configuration
-
Directory Server Address: The IP address shown is the default LDAP server for this service. If you do not want to use the default, select a different LDAP server in the list. If you are installing into an existing tree, ensure that the server you select has a master replica or read/write replica of eDirectory.
If you need to add an alternate LDAP server (including Active Directory) to the list, you must specify the following values:
-
Use alternate LDAP server: Select this check box to specify an alternate LDAP server. On selecting this check box, the subsequent fields get enabled.
-
Alternate Directory Server Address: Specify the host or IP address of the alternate LDAP server that iFolder must use.
-
LDAP port: Specify the LDAP port to use for the alternate server.
-
LDAP secure port: Specify the LDAP secure port to use for the alternate server.
-
Admin name and context: Specify the administrator’s full distinguished name for the alternate LDAP server. For example, cn=LdapAdmin,o=acme.
-
Enter the admin password: Enter the password for the alternate LDAP server.
In case your directory server is a DSFW server, follow the steps given below to configure iFolder with DSFW server:
-
Select the check box.
-
Specify the IP address of the DSFW server in the field.
-
Specify 1389 in the field and 1636 in the field.
-
Specify the eDirectory DN format and not DC context format in the field.
-
Enter the password in the field.
iFolder System Configuration
-
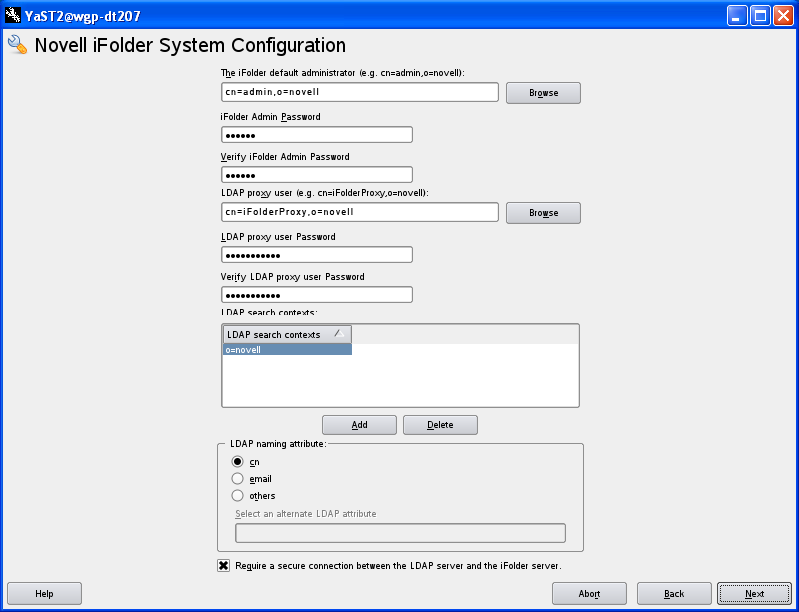
The iFolder Default Administrator: Specify the username for the default iFolder Admin user. Use the full distinguished name of the iFolder Admin user. For example:cn=admin,o=acme.
-
iFolder Admin Password: Specify a password for the iFolder Admin user.
-
Verify iFolder Admin Password: Type the password for the iFolder Admin user again.
-
LDAP Proxy User: Specify the full distinguished name of the LDAP Proxy user. For example:cn=iFolderproxy,o=acme. You must ensure that the proxy user's context is present in the LDAP server. This means that for a proxy user cn=iFolderproxy,o=acme, the container o=acme must be present in the LDAP server. This user must have the Read right to the LDAP service. The LDAP Proxy user is used for provisioning the users between the iFolder Enterprise Server and the LDAP server. If the Proxy user does not exist, it is created and granted the Read right to the LDAP Search context(s). If the Proxy user already exists, it is granted the Read right to the LDAP Search context(s). If the Proxy user already exists, but the given credentials do not match, then a new Proxy user is automatically created. The Proxy user's domain name (dn) and password are stored by the iFolder.
During eDirectory configuration, if you have selected the check box, then the proxy user and password fields are populated with common proxy user name and password. For more information on common proxy, refer to
Common Proxy User
in the OES 2015: Planning and Implementation Guide.NOTE:If you are using Active Directory or OpenLDAP as an LDAP source, you must not use common proxy.
iFolder System Configuration
-
LDAP Proxy User Password: Specify a password for the LDAP Proxy user. By default, it is YaST-generated password. This field is disabled, if you have selected the check box during eDirectory configuration.
IMPORTANT:You are recommended not to use this YaST-generated default password. You must specify the new proxy user password.
-
Verify LDAP Proxy User Password: Type the password for the LDAP Proxy User again.
-
LDAP Search Context Click , then specify an LDAP tree context to be searched for users and provisioning them in to iFolder. For example, o=acme, o=acme2,oro=acme3. You must ensure that the field does not remain empty. If the field is empty, the iFolder installation fails. You can modify the search context even after the configuration is complete by using the web admin console. For more information, see Accessing and Viewing the Server Details Page.
IMPORTANT:You must ensure the following:
-
The LDAP search context that you specify must be present in the LDAP server. If the LDAP search context is not present, the iFolder installation fails.
-
In a multi-server setup, all the search contexts of the slave servers must be present in the master server as well.
-
-
LDAP Naming Attribute: Select which LDAP attribute of the User account to apply when authenticating users. Each user enters a Username in this specified format at login time. Common Name (cn) is the default option.
For example, if a user named John Smith has a common name of jsmith and e-mail of john.smith@example.com, this field determines whether the user enters jsmith or john.smith@example.com as the Username when logging in to the iFolder server. This setting cannot be changed after the install using the Web Admin console.
If your directory server is configured with some other attribute as a unique login attribute for the users and you want to specify the same as login attribute for iFolder, then select the option and specify the attribute name in the field.
-
Require a secure connection between the LDAP server and the iFolder Server: Select this option to establish a secure connection between the LDAP server and the iFolder server. This option is selected by default. If the LDAP server co-exists on the same machine as the iFolder server, an administrator can disable SSL, which increases the performance of LDAP authentications.
iFolder Web Access Configuration
-
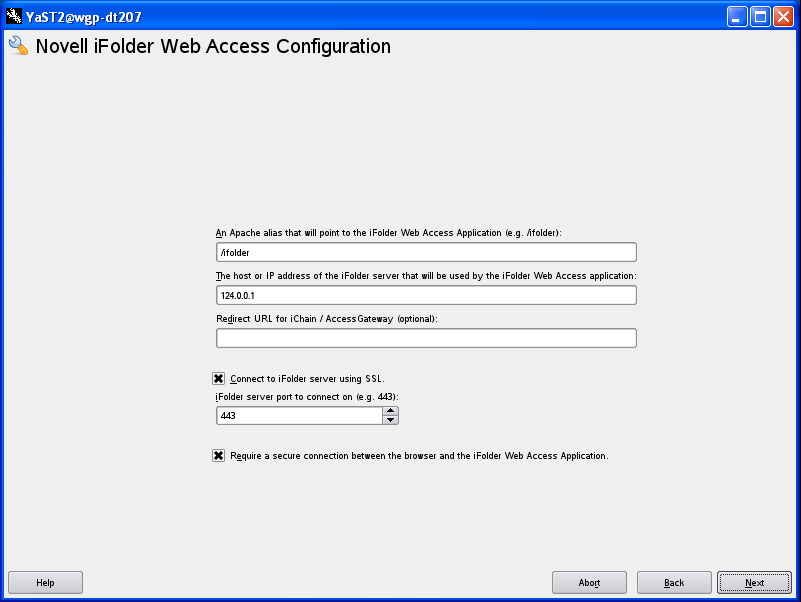
An Apache alias that will point to the iFolder Web Access Application: Specify an Apache alias to point to the iFolder Web Admin application. This is an admin-friendly pointer for the Apache service. For example, /access
-
The host or IP address of the iFolder server that will be used by the iFolder Web Access application: Specify the hostname or IP address of the iFolder Enterprise Server to be managed by the iFolder Web Admin application. The iFolder Web Admin application manages this host.
-
Connect to iFolder server using SSL: This option is selected by default to establish a secure connection between iFolder enterprise server and the iFolder Web Access application.
-
iFolder server port to connect on: Specify the port for the iFolder server to connect to the Web Access application. Port 443 is the default. Port 80 is the default value for non-SSL communication.
-
Require a secure connection between the browser and the iFolder Web Access application: Select the check box to establish a secure connection between the Web browser and the iFolder Web Access application. This enables a secure SSL channel between the two.
iFolder Web Admin Configuration
-
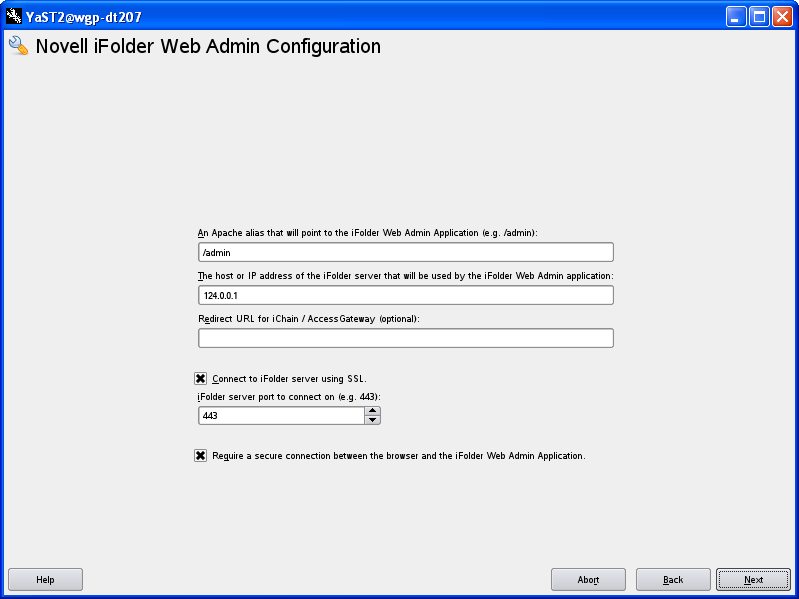
An Apache alias that will point to the iFolder Web Admin Application: Specify the Apache alias to point to the iFolder Web Access Application. This is a user-friendly pointer for the Apache service. For example, /admin
-
The host or IP address of the iFolder server that will be used by the iFolder Web Admin application: Specify the host or IP address of the iFolder Enterprise Server to be used by the iFolder Web Access application. This Web Access application performs all the user-specific iFolder operations on the host that runs the iFolder Enterprise Server.
-
Connect to iFolder server using SSL: This option is selected by default to establish a secure connection between iFolder enterprise server and the iFolder Web Admin application.
-
iFolder server port to connect on: Specify the port for the iFolder server to connect to the Web Admin application. Port 443 is the default. Port 80 is the default value for non-SSL communication.
-
Require a secure connection between the browser and the iFolder Web Admin application: Select the check box to establish a secure connection between the Web browser and the iFolder Web Admin application. This enables a secure SSL channel between the two.
-
-
When the system prompts you to restart the Apache server, accept the option by clicking , then restart the Apache server. This is necessary to use the new settings.
To manually restart the Apache Web server,
-
Open a terminal console, then log in as the root user.
-
Stop the Apache server by entering either of the following commands at the prompt:
/etc/init.d/apache2 stop
rcapache2 stop
-
Start Apache by entering either of the following commands at the prompt:
/etc/init.d/apache2 start
rcapache2 start
-
-
Go to Novell iManager to install the iFolder plug-in or to manage iFolder services.
6.2.2 Configuring the iFolder Slave Server
To deploy iFolder server in a Multi-server set up,
After you configure the iFolder enterprise master server, you must configure the iFolder slave servers.
-
Select and click in the window displayed.
-
Click and then to start configuring the slave server.
IMPORTANT:For security reasons, it is recommended that you always change the default iFolder configuration settings.
-
Follow the YaST on-screen instructions to proceed through the iFolder 3 configuration. The following table summarizes the decisions you make.
Install Settings
Description
iFolder components
-
Select the iFolder components to be configured: Select the components you want to configure. You can choose any combination of iFolder components from the given options. The corresponding screens are displayed depending on your selection.
-
iFolder Server (optional): Select the check box adjacent to the iFolder Server to configure iFolder server.This option lets you configure the settings for the iFolder server. It is the central repository for storing user iFolders and synchronizing files for enterprise users.
-
iFolder Web Admin (optional): Select the check box adjacent to the iFolder Web Admin to configure iFolder Web Admin server. This option lets you create and configure settings for the Administrator user. The iFolder Admin user is the primary administrator of the iFolder Enterprise Server. The Web Admin server does not need to be configured on the iFolder Enterprise Server. Devoting a separate server to the Web Admin application improves the performance of the iFolder Enterprise Server by reducing the admin traffic.
-
iFolder Web Access (optional): Select the check box adjacent to the iFolder Web Access to configure iFolder Web Access server. This option lets you configure the Web Access server, which is an interface that lets users have remote access to iFolders on the enterprise server. The Web Access server lets users perform all the operations equivalent to those of the iFolder client through using a standard Web browser. The Web Access server does not need to be configured in the same iFolder Enterprise Server. Channeling the user tasks to a separate server and thereby reducing the HTTP requests helps to improve the performance of the iFolder Enterprise Server.
iFolder System Configuration
-
Name Used to Identify the iFolder System to Users: A unique name to identify your iFolder 3 server.
For example, iFolder Server.
-
System Description: A descriptive label for your iFolder 3 server. For example, iFolder3 Enterprise Server
-
Path to the Server Data File: Specify the case-sensitive address of the location where the iFolder enterprise server stores iFolder application files as well as the users' iFolders and files.
For example, /var/simias/data/simias. This location cannot be modified after install.
-
Path to the Recovery Agent Certificates (optional): Specify the path to the recovery agent certificates that are used for recovering the encryption key. If the path to the Recovery Agent is configured, you need to copy the Agent certificates to this location. For more information, see Section 6.7, Recovery Agent Certificates.
iFolder System Configuration
-
Name of iFolder Server: Specify a unique name to identify your iFolder server. For example, IF3EastS
-
iFolder Public URL: Specify the public URL to reach the iFolder server.
-
iFolder Private URL: Specify the private URL corresponding to the iFolder server to allow communication between the servers within the iFolder domain. The Private URL and the Public URL can be the same.
-
Configure SSL for iFolder: There are three options to select from.
-
SSL: Select to enable a secure connection between the iFolder server, iFolder Web Admin server, iFolder Web Access server, and the iFolder clients. iFolder uses the HTTPS channel for communication.
-
Non SSL: Select to enable unsecured communication between the iFolder server, Web Admin server, Web Access server and the clients. iFolder uses the HTTP channel for communication.
-
Both: This option is selected by default. Selecting enables you to select secure or non secure channel for communication between the iFolder server, Web Admin server, Web Access server and the clients. By default, these components use the HTTPS (secure) communication channel. However, all components can also be configured to use HTTP channel.
-
-
iFolder Port to Listen On: Specify the port for the iFolder to Listen On. Port 80 is the default
-
Install into Existing iFolder Domain: If left unselected, this server becomes the Master iFolder server. For slave server configuration, select this option.
-
Private URL Host or IP address of the Master Server: Specify the private URL of the Master iFolder server that holds the master iFolder data for synchronization to the current iFolder Server. For example: https://127.0.0.1:443/simias10.
-
iFolder LDAP Configuration
IMPORTANT:iFolder Master server and slave servers must be in the same eDirectory tree.
-
Directory Server Address: The IP address shown is the default LDAP server for this service. If you do not want to use the default, select a different LDAP server in the list. If you are installing into an existing tree, ensure that the server you select has a master replica or read/write replica of eDirectory.
If you need to add an alternate LDAP server (including Active Directory) to the list, you must specify the following values:
-
Use alternate LDAP server: Select this check box to specify an alternate LDAP server. On selecting this check box, the subsequent fields get enabled.
-
Alternate Directory Server Address: Specify the host or IP address of the alternate LDAP server that iFolder must use.
-
LDAP port: Specify the LDAP port to use for the alternate server.
-
LDAP secure port: Specify the LDAP secure port to use for the alternate server.
-
Admin name and context: Specify the administrator’s full distinguished name for the alternate LDAP server. For example, cn=LdapAdmin,o=acme.
-
Enter the admin password: Enter the password for the alternate LDAP server.
In case your directory server is a DSFW server, follow the steps given below to configure iFolder with DSFW server:
-
Select the check box.
-
Specify the IP address of the DSFW server in the field.
-
Specify 1389 in the field and 1636 in the field.
-
Specify the eDirectory DN format and not DC context format in the field.
-
Enter the password in the field.
iFolder System Configuration
-
The iFolder Default Administrator: Specify the username for the default iFolder Admin user. Use the full distinguished name of the iFolder Admin user. For example:cn=admin,o=acme
-
iFolder Admin Password: Specify a password for the iFolder Admin user.
-
Verify iFolder Admin Password: Type the password for the iFolder Admin user again.
-
LDAP proxy User: Specify the full distinguished name of the LDAP Proxy user. For example:cn=iFolderproxy,o=acme. This user must have the Read right to the LDAP service. The LDAP Proxy user is used for provisioning the users between the iFolder Enterprise Server and the LDAP server. If the Proxy user does not exist, it is created and granted the Read right to the LDAP Search context(s). If the Proxy user already exists, it is granted the Read right to the LDAP Search context(s). If the Proxy user already exists, but the given credentials dont match, then a new Proxy user is automatically created. The Proxy user's domain name (dn) and password are stored by the iFolder.
During eDirectory configuration, if you have selected the check box, then the proxy user and password fields are populated with common proxy user name and password.
NOTE:If you are using Active Directory or OpenLDAP as an LDAP source, you must not use common proxy.
NOTE:and options are disabled for all iFolder upgrade scenarios. For more information on Upgrade, see the OES 2015: Migration Tool Administration Guide.
-
LDAP proxy user Password: Specify a password for the LDAP Proxy user. By default, it is YaST-generated password. This field is disabled, if you have selected the check box during eDirectory configuration
IMPORTANT:You are recommended not to use this YaST-generated default password. You must specify the new proxy user password.
-
LDAP Search Context Click , then specify an LDAP tree context to be searched for users and provisioning them in to iFolder. For example, o=acme, o=acme2,oro=acme3.You must ensure that the field does not remain empty. If the field is empty, the iFolder installation fails. You can modify the search context even after the configuration is complete by using the web admin console. For more information, see Accessing and Viewing the Server Details Page. The recommended settings must have a mutually exclusive LDAP search context list with other participating servers in the iFolder domain.
IMPORTANT:Ensure that the LDAP search context you have specified is present in the LDAP server. If the LDAP search context is not present, the iFolder installation fails.
iFolder System Configuration
-
LDAP Naming Attribute: Select which LDAP attribute of the User account to apply when authenticating users. Each user enters a Username in this specified format at login time. Common Name (cn) is the default and an e-mail address (e-mail) is the other option.
For example, if a user named John Smith has a common name of jsmith and e-mail of john.smith@example.com, this field determines whether the user enters jsmith or john.smith@example.com as the Username when logging in to the iFolder server. This setting cannot be changed after the install.
If your directory server is configured with some other attribute as a unique login attribute for the users and you want to specify the same as login attribute for iFolder, then select the option and specify the attribute name in the field.
-
Require a Secure Connection between the LDAP server and the iFolder Server: Select this option to require a secure connection between the LDAP server and the iFolder server. This option is selected by default. If the LDAP server co-exists on the same machine as the iFolder server, an administrator can disable SSL, which increases the performance of LDAP authentications.
iFolder Web Access Configuration
-
An Apache alias that will point to the iFolder Web Access Application: Specify an Apache alias to point to the iFolder Web Access application. This is an admin-friendly pointer for the Apache service. For example, /access
-
The host or IP address of the iFolder server that will be used by the iFolder Web Access application: Specify the hostname or IP address of the iFolder Enterprise Server to be managed by the iFolder Web Access application. The iFolder Web Access application manages this host.
-
Redirect URL for iChain/AccessGateway (optional): Specify the redirect URL for iChain/AccessGateway that will be used by the iFolder Web Access application. This URL is used for the proper logout of iChain/AccessGateway sessions along with the iFolder session.
-
Connect to iFolder server using SSL: Select the check box to establish a secure connection between the iFolder enterprise server and the iFolder Web Admin application.
-
iFolder server port to connect on: Specify the port for the iFolder server to connect to the Web Access application. Port 443 is the default for SSL. Port 80 is the default value for non-SSL communication.
-
Require a secure connection between the browser and the iFolder Web Access application: Select the check box to establish a secure connection between the Web browser and the iFolder Web Access application. This enables a secure SSL channel between the two.
iFolder Web Admin Configuration
-
An Apache alias that will point to the iFolder Web Admin Application: Specify the Apache alias to point to the iFolder Web Admin Application. This is a user-friendly pointer for the Apache service. For example, /admin
-
The host or IP address of the iFolder server that will be used by the iFolder Web Admin application: Specify the host or IP address of the iFolder Enterprise Server to be used by the iFolder Web Admin application. This Web Admin application performs all the user-specific iFolder operations on the host that runs the iFolder Enterprise Server.
-
Redirect URL for iChain/AccessGateway (optional): Specify the redirect URL for iChain/AccessGateway that will be used by the iFolder Web Access application. This URL is used for the proper logout of iChain/AccessGateway sessions along with the iFolder session.
-
Connect to iFolder server using SSL: Select the check box to establish a secure connection between the iFolder enterprise server and the iFolder Web Admin application.
-
iFolder server port to connect on: Specify the port for the Web Admin application to connect to the iFolder server. Port 443 is the default. Port 80 is the default value for non-SSL communication.
-
Require a secure connection between the browser and the iFolder Web Admin application: Select the check box to establish a secure connection between the Web browser and the iFolder Web Admin application. This enables a secure SSL channel between the two.
-
-
Click to complete the configuration.
-
When the system prompts you to restart the Apache server, accept the option by clicking , then restart the Apache server. This is necessary to use the new settings.
To manually restart the Apache Web server,
-
Open a terminal console, then log in as the root user.
-
Stop the Apache server by entering either of the following commands at the prompt:
/etc/init.d/apache2 stop
rcapache2 stop
-
Start Apache by entering either of the following commands at the prompt:
/etc/init.d/apache2 start
rcapache2 start
-
-
Go to Novell iManager to install the iFolder plug-in or to manage iFolder services.
-
If you are using an NSS volume to store user data, you must set up NSS file system trustee rights for the Web server user object wwwrun before restarting your web server. At a terminal console prompt, log in as the root user or equivalent, then enter
rights -f /media/nss/NSSVOL -r rwfcem trustee wwwrun.ou.o.treename
If you ever get An Internal Error has occurred error message within the iManager plug-in, this is a sure sign that you have not set up file system trustee rights within NSS properly.