5.4 Creating Printers

Before configuring the printer, you must create printers on iPrint Appliance. You can use any one of the following methods to add printers to iPrint Appliance.

5.4.1 Migrating Printers from an OES iPrint System

During process of migration iCM settings and ACLs are automatically migrated to the iPrint Appliance and depending on your selection printers, drivers, driver profile, and printer configuration details are migrated.

Prerequisites

  • All users are migrated from OES to iPrint Appliance by using LDAP Import. For information on how to import users from an LDAP source, see Section 8.1.7, LDAP Import.

  • Enable SSH service on the appliance. To enable SSH, see Section 7.6, System Services. By default, the ssh service is disabled.

Using iPrint Appliance you cannot launch the Migration GUI. You must connect from another computer to the iPrint Appliance, then launch the Migration GUI using SSH (Windows) or terminal (Linux or Mac).

Migrating Printers

  1. Launch the Migration Tool either from your Windows, Linux or Mac.

    1. To connect to the iPrint Appliance by using Windows (SSH):

      1. Launch SSH Client and connect to the iPrint Appliance. You must have X server running on your computer.

    2. To connect to the iPrint Appliance by using Linux or Mac:

      1. Launch the terminal, then run the command ssh -X <iPrintApplianceIPaddress>.

  2. Log in as the root user and at the command prompt, enter miggui.

  3. (Optional) Click Save Project. If you save a project, the next time you want to import printers, you can use the saved file to retrieve your preferences instantly.

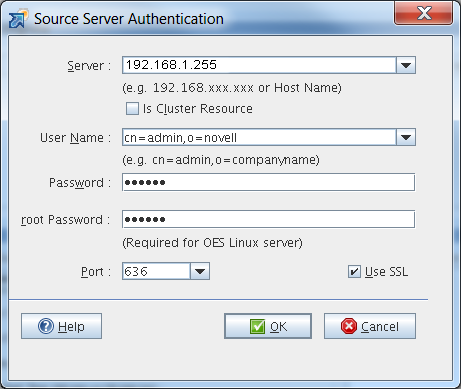
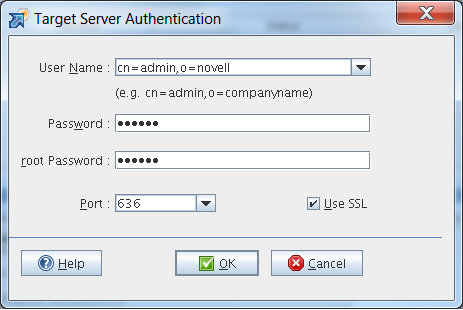
  4. Specify the credentials to authenticate to the source and iPrint Appliance server.

    If the source server is OES 2 SP3 or OES 11, specify the password for authentication in the root Password field.

  5. Click Add.

  6. Select Novell iPrint, then click OK.

  7. In the Configure Service dialog box, click Yes. The iPrint configuration windows is displayed.

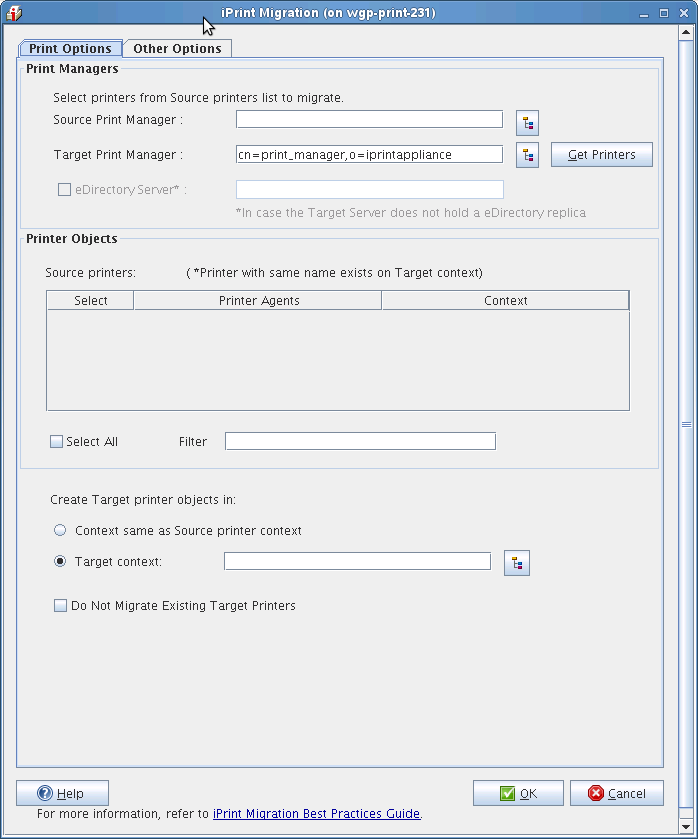
  8. Configure the following parameters to proceed with the migration process:

    Print Objects

    Parameter

    Description

    Print Managers

    Source Print Manager

    Specify the active Print Manager on the source server. The source Print Manager can be either an NDPS manager (for NetWare 6.5) or iPrint Manager (OES 2 SP3 or OES 11). To go directly to a context of your choice, specify the context in the search base and click Search. The objects in the specified context are displayed.


    Target Print Manager

    The Target Print Manager field is populated with the name of the active Print Manager running on the target server. This field is editable; you can also specify a different name for the active Print Manager. To go directly to a context of your choice, specify the context in the search base and click Search. The objects in the specified context are displayed.

    Click Get Printers to select printer objects from the source Print Manager.

    Printer Objects

    Source printers

    Displays all printers of the active Print Manager available on the source server. The printers that already exist on the target server are indicated by an asterisk (*).


    Select All

    Selects all the printers listed in the Printer Objects dialog box.

    NOTE:When you apply a new filter or modify an existing filter and click Select All, only printers that are displayed after applying the filter are selected. When you manually select all printers, the selected printers are migrated.


    Filter

    Specify the search pattern in the Filter field. This displays the printers in the Printer Agents list. This field is case sensitive.

    Create target printer objects in

    Context same as source printer context

    Select this option to use the same context as the source printers on the target server.


    Target context

    This option is selected by default. It allows you to create source printers under a different context on the target server. This option does not maintain the context hierarchy of the source printer.

    To go directly to a context of your choice, specify the context in the search base and click Search. The objects in the specified context are displayed.


    Do Not Migrate Existing Target Printers

    If the printer names on the source server match the printer names on the target server, the target printer properties and attributes are overwritten by the source printer properties and attributes.

    The printers that already exist on the target server are represented by an asterisk (*).
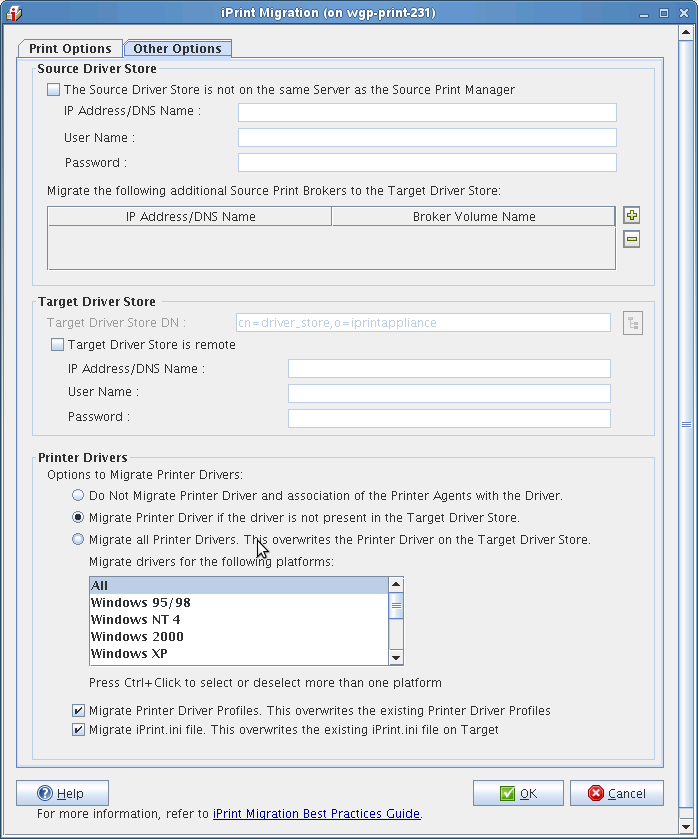
    Other Options

    Parameter

    Description

    Source Driver Store

    The Source Driver Store is not on the same server as the Source Print Manager

    If the source Driver Store is running on a server different from the source Print Manager's server, this check box is selected.Specify the IP address or the DNS Name and the root password of the server on which the source Driver Store is located.


    Migrate the following additional Source Print Brokers to the Target Driver Store

    This section lists the names and IP/DNS addresses of the source Print Broker volumes that must be migrated to the target Driver Store.

    Click the plus button (+) and specify the IP address or the DNS name of the Source Broker. Select the Source Broker volume from the drop-down list and click OK. The list is populated with the IP address or DNS name of the Source Broker and Broker volume name. You can add multiple Source Brokers to the list.

    To remove the Source Broker from the list, select the IP address or DNS name and click the minus button (-). You can remove one Broker at a time.

    Target Driver Store

    Target Driver Store is remote

    If the Driver Store is running on the remote server (other than the target server), the Target Driver Store is remote check box is enabled.

    Specify the IP address or the DNS name of the remote server and the root password of the remote server in the corresponding entry fields.

    Printer Drivers

    Do not Migrate Printer Drivers and the association of the Printer Agents with the Driver

    Selecting this option ensures that printer drivers and the association of Printer Agents with the drivers are not migrated.


    Migrate Printer Driver if the driver is not present in the target Driver Store

    Selecting this option migrates the printer drivers for the selected driver platforms from the Select Driver Platforms to Migrate list, if they are not present in the target Driver Store. This also migrates all the associations of the Printer Agents with the driver.

    NOTE:The default driver platform selection is All.


    Migrate all Printer Drivers. This overwrites the Printer Driver on the target Driver Store

    Selecting this option overwrites the target drivers for the driver platforms you have selected from the Select Driver Platforms to Migrate list, if the driver names in the target Driver Store are the same as the source Driver Store. This also migrates all the associations of the Printer Agents with the driver.

    NOTE:The default Driver Platform selection is All.

    Printer Driver Profile

    Migrate Printer Driver Profile

    If the profiles are the same on the target server as the source server, the target profiles are overwritten.

    iPrint.ini File

    Migrate iPrint.ini File

    If you migrate printer agents from two or more print managers, the iPrint.ini file on the target server is replaced by the iPrint.ini file of the last source server.

    NOTE:After migration, if the target server's iprint.ini file is overwritten by the source server's file, and if the target server's iprint.ini file had new parameters that were erased, you can restore them by copying the parameters manually from the iprint.bak file. The iprint.bak file is a backup of the target server's iprint.ini file. After migration, the iprint.bak file is saved in the /var/opt/novell/iprint/htdocs directory.

  9. Click OK to finish the configuration and go back to the migration screen.

  10. Click Migrate to begin the migration process.

    Using iManager, you can verify the details of the migrated printers.

5.4.2 Creating Printers Using iManager

  1. On the iPrint Appliance Management Console page, select the iPrint Printer Configuration (iManager) tool to connect to iManager.

  2. Log in to iManager using the eDirectory admin credentials of iPrint Appliance.

    Ignore the security certificate warning, and continue to the iPrint Appliance Management Console. If you add the certificate to the trusted certificates list, the security warning is not displayed.

  3. Click iPrint > Create Printer.

  4. Specify the Target printer details.

    Printer Name: Defines the label by which the new printer is identified. You can include uppercase and lowercase letters, numbers, spaces, and underscore in the label. Do not use any other characters.

    Container Name: The eDirectory container where the printer reference resides. By default, the value is “iPrintAppliance”. We do not recommend changing the default value.

    Print Manager name: The name of the Print Manager that handles the incoming print jobs.

    DNS name or IP address: The IP address of a printer uniquely identifies it on the network and allows other networked machines to communicate with it. A DNS name can also be applied to the printer, which can be translated into the printer's IP address.

    Specify the IP address (v4) or the DNS name of the target printer.

    Location: Indicates the printer's location. The value of this field is displayed when selecting a printer.

    Description: Describes the printer. The value of this field is displayed when selecting a printer.

    LPR Printer Name: Specify an LPR printer name. If the LPR protocol is selected, other optional parameters can also be specified. With most modern printers, the name can be set to PASSTHROUGH. With some older printers (1990's & prior), there might be a different printer name.

    RAW Port Number: If the RAW protocol is selected, a port number is required. Most printers are configured, by default, to use port 9100 for RAW protocol communications.

    iPrint Appliance supports printer communications using either the Line Printer Remote (LPR) or RAW protocols.

    The LPR protocol is the most common printing protocol and is generally more flexible than the RAW protocol. A printer that supports the LPR protocol is sometimes referred to as a TCP/IP printer. The LPR protocol has limited error reporting capabilities, which is often limited to “Printer Error” with no details.

    The RAW protocol is often the default protocol on non-Windows systems. Most printers that support the RAW protocol use port 9100. The LPR protocol can generally be substituted for the RAW protocol if the RAW protocol does not respond to a print job.

  5. Click Next.

  6. Specify the drivers for the printer.

    iPrint Appliance supports both driver and driverless printing. For mobile device printing, drivers are not required. The selectable drivers for each operating system are available in the Novell iPrint Appliance Driver Store.

  7. To re‐edit the printer‐specific options after the new printer has been created, click Modify. To create another printer, click Repeat Task. To continue, click OK.

    NOTE:In iManager, you might see a Partition and Replicas option. This feature is not required for iPrint Appliance, so it is not supported. We recommend that you do not use it on the iPrint Appliance eDirectory.

    IMPORTANT:In iManager, do not create or delete Print Manager objects. Always use the default Print Manager object.

IMPORTANT:By default, iPrint Appliance supports only PostScript printers. For non-PostScript printers like PCL, or for printers that do not work with the default PostScript driver, you must associate appropriate drivers to the printers.

5.4.3 Bulk Printer Import Using a CSV File

You can import printers into iPrint Appliance through a csv file. On successful import the printers resides in the container O=iPrintAppliance.

You must create a csv file, then import the csv file into iPrint Appliance. The csv file must contain the following fields in the same order:

PrinterName,PrinterIP,Location,Description,Win95_98_Driver,Winnt_Driver,Win2k_Driver,Winxp_Driver,Linux_Driver,Mac_Driver,Vista32_Driver,Vista64_Driver,Win732_Driver,Win764_Driver,Win832_Driver,Win864_Driver,Win1032_Driver,Win1064_Driver,Enable DirectPrinting,Secure Printing,Enable Auditing,LPR/RAW,Raw Port

NOTE:You cannot enable both direct printing and auditing. If enabled, both options are disabled when creating the printers.

Table 5-2 Parameter Description of CSV File

Parameter

Description

Value

(Mandatory/Optional)

PrinterName

Name of the printer that you want to import

Mandatory

PrinterIP

IP Address assigned to this printer

NOTE:Specify only the IP address. Printer creation fails if DNS name is specified.

Mandatory

Location

Location of the printer

Optional

Description

Details of the printers like make, model, and so forth.

Optional

Win95_98_Driver

Driver associated with this printer for Windows 95 and Windows 98 platform.

Optional

Winnt_Driver

Driver associated with this printer for Windows NT platform.

Optional

Win2k_Driver

Driver associated with this printer for Windows 2000 platform.

Optional

Winxp_Driver

Driver associated with this printer for Windows XP platform.

Optional

Linux_Driver

Driver associated with this printer for Linux platform.

Optional

Mac_Driver

Driver associated with this printer for Mac devices.

Optional

Vista32_Driver

Driver associated with this printer for Windows Vista 32-bit platform.

Optional

Vista64_Driver

Driver associated with this printer for Windows Vista 64-bit platform.

Optional

Win732_Driver

Driver associated with this printer for Windows 7 32-bit platform.

Optional

Win764_Driver

Driver associated with this printer for Windows 7 64-bit platform.

Optional

Win832_Driver

Driver associated with this printer for Windows 8.x (32-bit) platform.

Optional

Win864_Driver

Driver associated with this printer for Windows 8.x (64-bit) platform.

Optional

Win1032_Driver

Driver associated with this printer for Windows 10 32-bit platform. Windows 10 uses the same driver as Windows 8.x.

Optional

Win1064_Driver

Driver associated with this printer for Windows 10 64-bit platform. Windows 10 uses the same driver as Windows 8.x.

Optional

DirectPrinting

Enable direct printing for this printer. Value is yes or no. By default, this option is disabled. You cannot enable both direct printing and auditing.

Optional

Secure Printing

Enable secure printing for this printer. Value is yes or no. By default, this option is disabled.

Optional

Enable Auditing

Enable auditing of this printer. Value is yes or no. By default, this option is disabled.

Optional

LPR/RAW

Protocol to be used by this printer. Value is LPR or RAW. By default, the value is LPR.

Optional

Raw Port

If you have selected RAW protocol, specify the port number.

Optional

IMPORTANT:In the csv file, you must specify at least one driver for each printer. For all optional parameters, you must include a empty string.

Example of a CSV file

If you have to migrate 2 printers (printer1 and printer2) for a Windows 8 32-bit platform. The csv file includes:

printer1,10.0.0.1,1st_floor,HP LaserJet 4100,,,,,,,,,,,HP LaserJet 4100 PCL 5
,,,,no,yes,yes,LPR,
printer2,10.0.0.2,2st_floor,HP LaserJet 4100,,,,,,,,,,,HP LaserJet 4100 PCL 5
,,,,no,yes,yes,RAW,9100

After you create the csv file, upload the file to iPrint Appliance.

Uploading the CSV File

  1. On a Web browser, specify either the DNS name or the IP address. For example, https://10.0.0.1:9443 or https://iprint.example.com:9443.

  2. Specify the Username and Password, then click Log in.

  3. Click the iPrint Appliance Configuration icon.

  4. Click Printers.

  5. Click the Bulk Printer Upload button in the upper-right corner of the Available Printers window.

  6. Navigate to the csv file, select it, then click OK to begin the printer import process.

Printing is configured for desktops and laptops. To understand how to manage the iPrint client.

To enable printing from mobile devices, proceed to Section 5.5, Configuring Printing Through Mobile Devices.