8.7 Configuring Single Sign-On with Internet Information Services for Windows
Like Novell Access Manager, Windows Authentication provides Windows users with a single sign-on experience, enabling users to automatically authenticate to Teaming after they are logged in to their individual workstations. Internet Information Services (IIS) provides this capability.
Before you implement Windows Authentication, consider the following limitations:
-
Is best suited for an intranet environment. Because NTLM is a connection-based protocol, it does not work well with HTTP proxy servers.
-
Does not support Guest Access.
After you configure the Teaming server to support Windows Authentication, complete the planning process for additional Advanced installation features as needed, then perform the Advanced installation as described in Section 9.0, Performing an Advanced Teaming Installation.
-
Section 8.7.2, Planning Your IIS Installation and Configuration
-
Section 8.7.3, Configuring the Teaming Server to Support Windows Authentication
-
Section 8.7.5, Configuring Your Browser to Allow Access to the Teaming Site
-
Section 8.7.6, Bypassing Windows Authentication to Configure LDAP and Perform Other Tasks
-
Section 8.7.7, Logging In to the Teaming Site through Windows Authentication
-
Section 8.7.8, Editing Files through WebDAV with Windows Authentication
-
Section 8.7.9, Configuring IIS to Load Balance in a Clustered Environment
8.7.1 System Requirements
Windows Authentication with IIS can be enabled for Teaming only in the following environments:
Server
-
Windows 2008 Server
-
Windows 2008 R2 Server
IIS
-
IIS 7 with IIS Manager with CGI and ISAPI components
-
IIS 7.5 with IIS Manager with CGI and ISAPI components
Authentication Protocol
One of the following authentication protocols:
-
NTLM
-
Kerberos v5
-
Negotiate/SPNEGO (wrapper for NTLM and Kerberos v5)
Domain Controller
-
Active Directory Service
Teaming needs to be configured and synchronized with your Active Directory directory service. For more information about configuring LDAP synchronization within Teaming, see Section 3.10, Gathering Directory Services Information and
Synchronizing Users and Groups from an LDAP Directory
in the Novell Teaming 3 Administration Guide.If you are using Kerberos as your authentication protocol, then Key Distribution Services is also required.
For more information about installing and configuring Domain Controller and other domain services to support Windows Authentication, refer to the appropriate Microsoft documentation.
Client
One of the following clients:
-
Windows 7
-
Windows XP
Browser
One of the following browsers, configured to support Windows Authentication:
-
Internet Explorer
-
Firefox
For information on how to configure your browser to support Windows Authentication, see Section 8.7.5, Configuring Your Browser to Allow Access to the Teaming Site.
8.7.2 Planning Your IIS Installation and Configuration
Use the information in the following table as you consider your IIS installation.
|
Directory: The default installation directory for the IIS plugin is C:\Program Files\Novell. This is the recommended directory. If for some reason you choose to install the IIS plugin in a directory other than the C:\Program Files\Novell directory, then you need to modify the isapi_redirect.properties files, as described in Installing the Teaming IIS Plugin. |
|
External or Local Server: You can install the IIS plugin on the same server where you are running Teaming, or you can install it on an external server. Installing IIS on an external server can have several benefits, such as:
If you are running IIS from an external server, then you need to edit the C:\Program Files\Novell\Teaming IIS Plugin\conf\workers.properties file, as described in Installing the Teaming IIS Plugin. |
|
64-bit/32-bit: You can install the IIS plugin on a 64-bit or 32-bit operating system. However, because it is recommended that Teaming runs on a 64-bit operating system, if you install IIS on a 32-bit operating system, IIS should be on an external server. |
|
HTTP Ports: Regardless of whether IIS and Teaming are located on the same server or separate servers, the HTTP port and secure HTTP port for Teaming should always be 80 and 443, respectively. This ensures that when links are generated, they contain the correct host name and port number. These are the ports that Teaming uses to refer to the browser. In a very basic Teaming system (single-server without Windows Authentication), the HTTP ports can be the same as the listen ports. However, in a Teaming system with Windows Authentication enabled, the HTTP ports correspond with the ports that the IIS server is configured to use. |
|
Listen Ports: If you plan to run IIS on the same server as the Teaming server, you need to set the listen port and secure listen port for Teaming to something other than 80 and 443. By default, Teaming listens on ports 80 and 443. Because IIS also uses these ports to listen on, you must reconfigure the Teaming listen ports to ports that are not currently in use, such as 8080 for the listen port and 8443 for the secure listen port. You configure Teaming ports during the Teaming installation, as described in Section 9.0, Performing an Advanced Teaming Installation. |
|
ADVANCED TEAMING INSTALLATION SUMMARY SHEET |
|---|
|
Under , specify the HTTP ports and listen ports as discussed in Section 8.7.2, Planning Your IIS Installation and Configuration. |
8.7.3 Configuring the Teaming Server to Support Windows Authentication
To configure the Teaming server to support Windows Authentication, you must first configure IIS. You can set up IIS on the same server where Teaming is running, or on a separate server. See Section 8.7.2, Planning Your IIS Installation and Configuration for more information.
Complete the following sections to ensure that IIS is configured correctly to work with Teaming.
Installing the Teaming IIS Plugin
-
Locate the teaming-version-iis-plugin.zip file from the Teaming distribution, then unzip it into the C:\Program Files\Novell directory.
If you unzip this file into a directory other than C:\Program Files\Novell, then continue with Step 2.
If you unzip this file into the C:\Program Files\Novell directory, then continue with Step 3.
-
(Conditional) If in Step 1 you chose to unzip the teaming-version-iis-plugin.zip file into the C:\Program Files\Novell directory, continue with Step 3.
If in Step 1 you chose to unzip the teaming-version-iis-plugin.zip file into a location other than C:\Program Files\Novell, you must complete the following:
-
Locate the isapi_redirect.properties file in each of the following directories:
-
Teaming IIS Plugin\resources1\bin
-
Teaming IIS Plugin\resources2\bin
-
-
In each of the directories, open the isapi_redirect.properties file in a text editor.
-
Adjust the values of the log_file, worker_file, and worker_mount_file properties to reflect the directory where you chose to unzip the teaming-version-iis-plugin.zip file.
-
Save your changes and close both of the isapi_redirect.properties files.
-
-
(Conditional) If IIS and the Teaming server are located on the same server, continue with Step 4. If IIS and the Teaming server are located on separate servers, you must complete the following:
-
Locate the C:\Program Files\Novell\Teaming IIS Plugin\conf\workers.properties file.
-
Open the workers.properties file in a text editor.
-
Adjust the value of the worker.worker1.host property from localhost to the hostname or IP address of the Teaming server.
-
Save your changes and close the editor.
-
-
(Conditional) If you are running IIS on a 64-bit server, you must complete the following:
-
Locate the C:\Program Files\Novell\Teaming IIS Plugin\library\win64 directory.
-
Copy the appropriate version of the .dll library and paste it into each of the following directories:
-
C:\Program Files\Novell\Teaming IIS Plugin\resources1\bin
-
C:\Program Files\Novell\Teaming IIS Plugin\resources2\bin
Ensure that you copy the correct version of the .dll library. If you copy the incorrect version, then you receive a 500 error when trying to access the Teaming site.
-
-
Delete the existing isapi_redirect.dll files from the C:\Program Files\Novell\Teaming IIS Plugin\resources1\bin directory, as well as from the C:\Program Files\Novell\Teaming IIS Plugin\resources2\bin directory.
-
Rename the .dll library files that you copied in Step 4.b to isapi_redirect.dll.
For example, if running on an AMD64/EM64T platform, copy C:\Program Files\Novell\Teaming IIS Plugin\library\win64\amd64\isapi_redirect-version.dll into the C:\Program Files\Novell\Teaming IIS Plugin\resources1\bin and C:\Program Files\Novell\Teaming IIS Plugin\resources2\bin directories, then delete the original isapi_redirect.dll file and rename the isapi_redirect-version.dll to isapi_redirect.dll.
-
Installing IIS Manager
If Internet Information Services (IIS) Manager is not already installed on your server, you need to download and install it. You also need to install the CGI and ISAPI components.
-
Install the IIS 7 Administration Pack.
-
Navigate to Microsoft IIS Download Site.
-
Click the tab.
-
Under , click .
-
(Conditional) If you have not yet installed the Microsoft Web Platform, click to download the .exe file, install the Microsoft Web Platform, then click .
The Launch Application dialog box is displayed.
-
Select , then click .
The Web Platform Installer 2.0 dialog box is displayed.
-
Click to install the Administration Pack, then accept the terms of the license agreement.
-
-
Install the ISAPI and CGI components.
-
Launch the Web Platform Installer.
-
From the Web Platform Installer, select .
-
Under , click .
-
In the section, select , , and .
-
Click , then accept the terms of the license agreement.
-
Click after the components have been installed successfully.
-
Installing Windows Authentication Role Service
If the Windows Authentication Role Service is not already installed, you need to install it.
-
On the Windows 2008 server, click > > .
-
Expand , then right-click .
-
Click .
The Add Role Services window is displayed.
-
Scroll to the section, then select .
-
Click , then complete the installation.
Creating and Managing Teaming Resources with IIS Manager
-
Click > > .
-
In the pane on the left side of the window, expand your server, expand , then right-click .
-
Click .
The Add Virtual Directory dialog box is displayed.
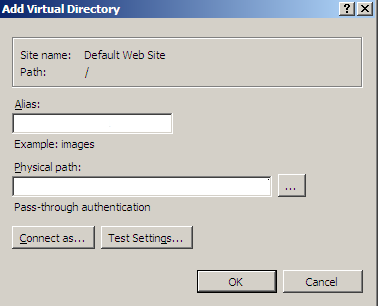
-
In the dialog box, specify the following information:
Alias: TeamingResources1
Physical path: C:\Program Files\Novell\Teaming IIS Plugin\resources1\bin
-
Click .
-
Repeat Step 3 through Step 5 to add another virtual directory.
This time, specify the following information in the Add Virtual Directory dialog box:
Alias: TeamingResources2
Physical path: C:\Program Files\Novell\Teaming IIS Plugin\resources2\bin
-
In the panel, select , then double click .
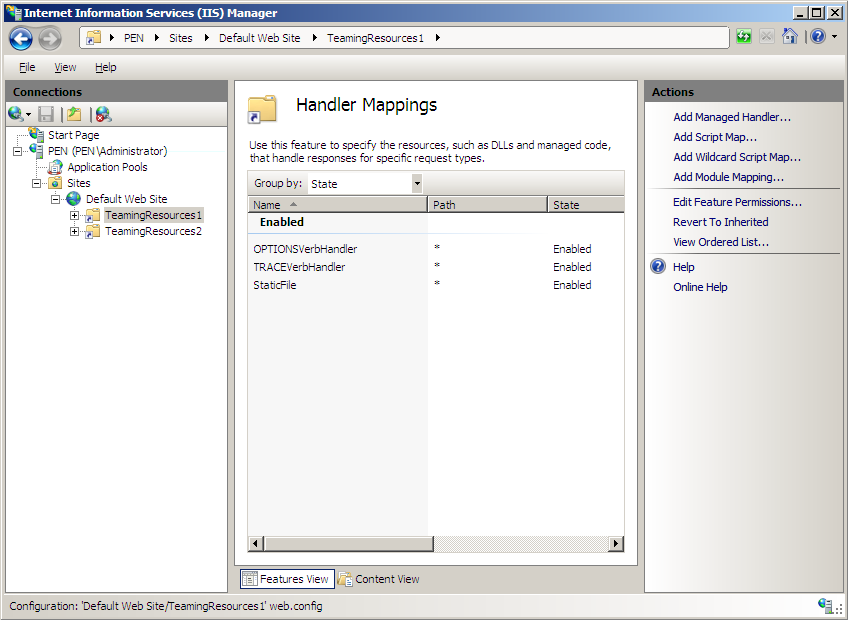
-
In the pane, click .
The Edit Feature Permissions dialog is displayed.
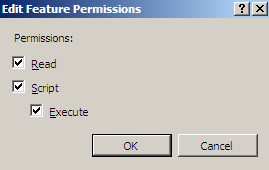
-
Select , then click .
-
Repeat Step 7 through Step 9 for the TeamingResources2 virtual directory.
-
In the pane, select , then double-click .
-
In the panel, click .
The Add ISAPI Filter dialog box is displayed.
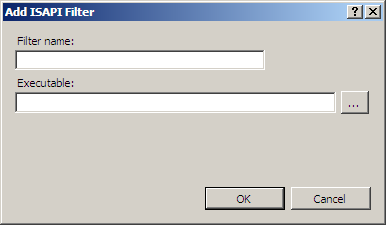
-
In the dialog box, specify the following information:
Filter name: TeamingResources1.
You must name the filter TeamingResources1 for Windows Authentication to work successfully.
Executable: C:\Program Files\Novell\Teaming IIS Plugin\resources1\bin\isapi_redirect.dll.
-
Click .
-
Repeat Step 12 through Step 14 to add another ISAPI Filter.
This time, specify the following information in the Add ISAPI Filter dialog box:
Filter name: TeamingResources2.
You must name the filter TeamingResources2 for Windows Authentication to work successfully.
Executable: C:\Program Files\Novell\Teaming IIS Plugin\resources2\bin\isapi_redirect.dll.
-
In the pane, select the server, then double-click .
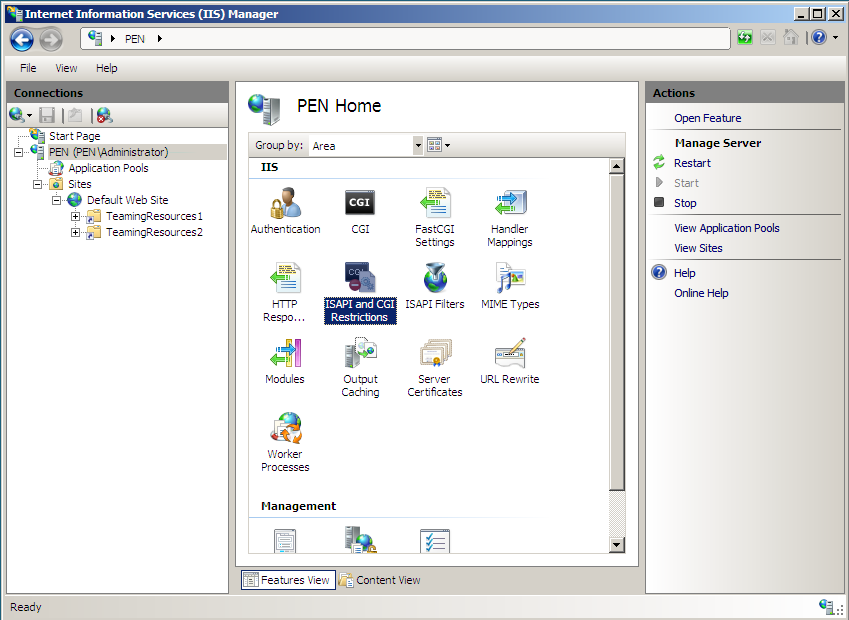
-
In the pane, click .
The Add ISAPI or CGI Restriction dialog box is displayed.
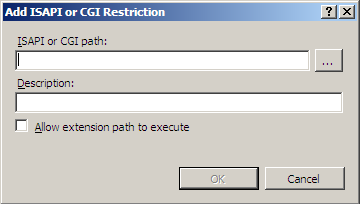
-
In the dialog box, specify the following information:
ISAPI or CGI path: Specify or browse to the following path: C:\Program Files\Novell\Teaming IIS Plugin\resources1\bin\isapi_redirect.dll
Description: TeamingResources1
Allow extension path to execute: Select this option to allow the path to execute.
-
In the pane, click .
The Add ISAPI or CGI Restriction dialog box is displayed.
-
In the dialog box, specify the following information:
ISAPI or CGI path: Specify or browse to the following path: C:\Program Files\Novell\Teaming IIS Plugin\resources2\bin\isapi_redirect.dll
Description: TeamingResources2
Allow extension path to execute: Select this option to allow the path to execute.
-
In the pane, select , then double-click .
-
Select , then click in the panel.
-
Select , then click in the panel.
-
Exit the Internet Information Services Manager.
-
Perform the Advanced installation as described in Section 9.0, Performing an Advanced Teaming Installation.
8.7.4 Running the Teaming Installation Program
See Choosing Windows Authentication for information about how to configure the Teaming installation program to support Windows Authentication, then follow the instructions for the advanced installation as described in Section 9.0, Performing an Advanced Teaming Installation. Return here to complete any additional configuration steps.
8.7.5 Configuring Your Browser to Allow Access to the Teaming Site
After Windows Authentication has been enabled on the server, you need to configure the client browser to allow access to the Teaming site.
Internet Explorer
-
In an Internet Explorer window, click > .
The Internet Options dialog box is displayed.
-
Click the tab, select , then click .
The Local intranet dialog box is displayed.
-
Click .
-
In the field, specify the Teaming Web site.
-
Click > .
Firefox
-
In a Firefox window, specify the following into the URL field: about:config
-
Specify ntlm in the window, then locate the entry.
The Enter string value dialog box is displayed.
-
Specify the DNS name of your Teaming site, then click .
For example, teaming.mycompany.com.
-
Repeat Step 2 through Step 3 for the following entries: , and .
8.7.6 Bypassing Windows Authentication to Configure LDAP and Perform Other Tasks
After Windows Authentication is working with your Teaming server, you can bypass the Windows Authentication functionality by including the Teaming listening port in the Teaming URL.
You need to do this in order to configure your LDAP directory.
-
In a Web browser, specify your Teaming URL with the Teaming listening port.
For example, http://teaming:8080.
The Teaming login page is displayed.
-
Log in to the Teaming site as the Teaming administrator.
-
Configure LDAP, as described in Section 5.3, Adding Teaming Users from Your LDAP Directory.
You might also want to bypass Windows Authentication to access Teaming for the following reasons:
-
To access a specific Teaming node in a clustered environment.
In order to access a specific Teaming node rather than just any Teaming node, you need to bypass Windows Authentication.
-
To troubleshoot the Teaming system.
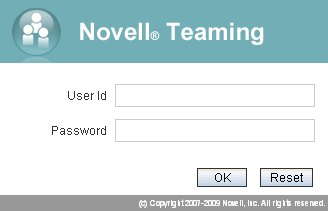
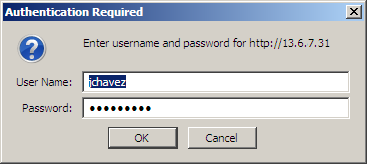
8.7.7 Logging In to the Teaming Site through Windows Authentication
After you have performed the configuration steps described in Section 8.7.3, Configuring the Teaming Server to Support Windows Authentication through Section 8.7.5, Configuring Your Browser to Allow Access to the Teaming Site, users can access the Teaming site through Windows Authentication. Users who have been configured through LDAP and are already logged in to their individual workstations enjoy a single sign-on experience when they log in to the Teaming site. Users who are not already logged in before they access Teaming see the following dialog box:
8.7.8 Editing Files through WebDAV with Windows Authentication
Achieving Single Sign-On When Editing Files through WebDAV
By default, when you edit a file in Teaming through WebDAV, you are prompted for your system login credentials before you can edit the file. However, when Windows Authentication is enabled on your Teaming server, you are no longer prompted for your system login credentials before you edit a file through WebDAV.
This functionality is supported only when using Microsoft Office as your default document editor. When using OpenOffice 3.1 or later as your default document editor, Teaming allows you to edit files through WebDAV, but it still requires you to enter your system login credentials. The single sign-on experience is only available when using Microsoft Office.
Enabling Basic Authentication for WebDAV
If you are using OpenOffice 3.0 or earlier, or any other document editor that requires basic authentication (does not support Windows Authentication), you need to configure your IIS server to support basic authentication. Supporting basic authentication enables Teaming users to edit files through WebDAV when using a document editor other than Microsoft office or OpenOffice 3.1 or later.
NOTE:If you enable basic authentication on your IIS server, all users who access the Teaming site using Firefox are prompted for their login credentials. Single sign-on to the Teaming server no longer functions. However, users who access the Teaming site using Internet Explorer retain the single sign-on experience.
To enable basic authentication on your IIS server, you need to install the Basic Authentication Role Service.
-
On the Windows 2008 server, click > > .
-
Expand , then right-click .
-
Click .
The Add Role Services window is displayed.
-
Scroll to the section, then select .
-
Click , then complete the installation.
-
Click > > .
-
In the pane on the left side of the window, expand your server, expand , then expand .
-
Select , then double-click .
-
Select , then click in the panel.
-
Close the Internet Information Services (IIS) Manager.
8.7.9 Configuring IIS to Load Balance in a Clustered Environment
If you have Teaming installed in a clustered environment where there are multiple Teaming nodes, you can configure IIS to balance the load of user requests from the multiple Teaming nodes, while still supporting Windows Authentication.
-
On the IIS server, locate the C:\Program Files\Novell\Teaming IIS Plugin\conf\workers.properties.clustered.template file, then open the file in a text editor.
-
Copy the contents of the file.
-
Locate the C:\Program Files\Novell\Teaming IIS Plugin\conf\workers.properties file, then open the file in a text editor.
-
Paste the contents of the C:\Program Files\Novell\Teaming IIS Plugin\conf\workers.properties.clustered.template that you copied in Step 2 and paste them into the C:\Program Files\Novell\Teaming IIS Plugin\conf\workers.properties file, overwriting the content that was previously there.
-
Replace the value of from to the hostname or IP address of your first Teaming node.
-
Repeat Step 5 for each additional Teaming node that is running in your environment. If you have more than two Teaming nodes, you can add an additional section to the workers.properties file for each additional node.
-
For each Teaming node that you specified in Step 5 and Step 6, locate the corresponding Teaming directory and open the tomcat\conf\server.xml file in a text editor.
-
Locate the element and modify the value of the jvmRoute attribute to the value of the worker that you used in the workers.properties file.
For example, the modified <Engine...> XML element for the Teaming node that corresponds to worker1 should look like this:
<Engine name=“Catalina” defaultHost=“localhost” jvmRoute=“worker1”>
Repeat this step for each Teaming node.
-
Locate the C:\Program Files\Novell\Teaming IIS Plugin\resources1\conf\uriworkermap.properties file, then open the file in a text editor.
-
Replace all instances of worker1 with balancer.
-
Locate the C:\Program Files\Novell\Teaming IIS Plugin\resources2\conf\uriworkermap.properties file, then open the file in a text editor.
-
Replace all instances of worker1 with balancer.
-
Restart each Teaming node.
-
Restart the IIS server.
-
Click > > .
-
Select your server in the panel, then click in the panel.
-