2.4 Configuring Authentication
You can enable NDS or eDirectory authentication to an HTTP proxy or Telnet proxy, and mandate the users to authenticate before they access the proxy server through the Internet.
Proxy authentication consists of a username and a password. This could be the NDS or eDirectory authentication username and password.
If you have enabled proxy authentication and selected both single sign-on and SSL as your authentication scheme, then proxy server first attempts to authenticate the user through single sign-on. If single sign-on fails, the proxy tries to authenticate using SSL.
Single sign-on succeeds when the client machine runs Novell Client 32 and is logged in to NDS or eDirectory. The client machine must also be running clntrust.exe. These files are located in the sys:public directory on the server.
IMPORTANT:Proxy server users can use security devices such as hardware tokens to authenticate, in addition to the NDS or eDirectory password. Login policies defining the authentication rules and access methods required for remote users to authenticate are stored in the NDS or eDirectory Login Policy object.
The following section provides information about configuring authentication:
2.4.1 Configuring Proxy Authentication
To configure proxy authentication:
-
Log in to iManager.
-
Select
-
Browse to and select the BorderManager server or container that you want to configure, then click .
-
Select from the section.
-
Select the tab, then select .
-
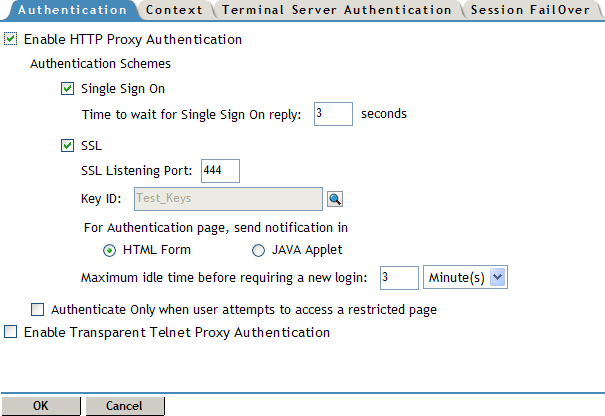
To specify Single Sign on as the authentication scheme, do the following:
-
Select .
-
Specify the time in seconds in the field.
-
-
To specify SSL as the authentication scheme, do the following:
-
Select the check box.
-
Specify the following information:
SSL Listening Port: Specify the port used for authentication. You might need to change the port number to prevent reverse proxy traffic from running into SSL traffic. Both reverse proxy and SSL traffic default to port 444.
Key ID: Browse to and select the key ID exchanged between the client and server for authentication.
For Authentication Page, Send Notification In: Specify whether to send authentication notification in HTML form or as a Java applet.
Maximum Idle Time Before Requiring a New Login: Specify the length of time a connection can remain idle before a new login is required.
-
-
Select if required.
-
Select to enable authentication for transparent proxy
-
Click the tab.
-
Click in the section, then specify the user’s default NDS or eDirectory context and tree name.
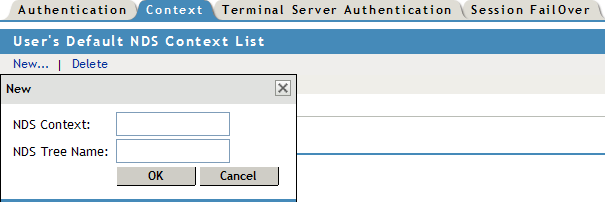
Specify a fully distinguished NDS or eDirectory container name (sales.my_org, for example). The NDS or eDirectory container name can have up to 256 characters. This entry is optional and makes logging in easier for users. Users in the specified container can log in by typing only their login names without the complete context string.
-
Click .
-
Click to save changes.
2.4.2 Configuring Terminal Server Authentication
Terminal server authentication provides the capability to differentiate users from client with the same address, such as clients using a Terminal Server or the clients behind NAT; and also from different addresses. Users coming from clients with the same address are provided with a different authentication scheme.
-
Log in to iManager.
-
Select
-
Browse to and select the BorderManager server or container that you want to configure, then click .
-
Complete Step 4 to Step 12 in Section 2.4.1, Configuring Proxy Authentication, to configure proxy authentication.
-
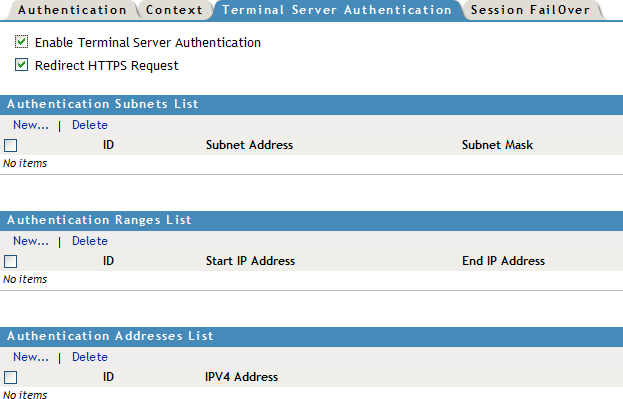
Select the tab.
-
Select .
-
Select to enable HTTPS request redirection using the JavaScript*.
-
Specify an authentication subnet in the to authenticate all clients identified from the specified subnet range. To add a new subnet to the list, click , then specify the ID, subnet address, subnet mask, then click .
-
Specify a range of IP addresses to authenticate all clients identified from the specified address range, in the .
-
Specify an IP address to authenticate all clients identified from that addresses.
-
Click .
-
Click to save changes.
NOTE:For the new configuration to take effect, enter the following command to at the console to restart proxy:
-
stopbrd
-
startbrd
-