

| |
There is an NIS Server object in NDS called NISSERV_Servername. This object is created during installation. Migration utility adds the domain details to this object when a domain is migrated. NIS Server will service the list of domains present in this object.
Also, for every user moved, it updates the user's Group Membership attribute and gives rights equivalent to that of the Group.
For information about NIS, see Network Information Service .
The configuration parameters required for NIS Services is available in the file NIS.CFG. The following table lists the parameters in NIS.CFG.
Table 2. NIS Parameters
Copy the NIS related text files required for the domain from the
UNIX machine (which are available in /ETC in UNIX) into SYS:\ETC\NIS.
(Conditional) If you want to set up other NIS server as slave to this NIS server, do the following:
Create a text file called YPSERV in SYS:\ETC\NIS. For every slave server enter the hostname of the slave server in this file in the following format:
slaveserverhostname1 slaveserverhostname1
slaveserverhostname2 slaveserverhostname2
NOTE: The first field should not be IP Address.
Enter the YPSERVERS map entry in SYS:\ETC\NIS\NISMAKE with its path in the following format:
YPSERVERS SYS:\ETC\NIS\YPSERV
Migrate the domain. For migration information, see File-Based Migration.
Load NISSERV.NLM. Now the NetWare NIS Server is setup as Master NIS Server.
(Conditional) If the map data in NIS master is modified anytime, and the changes done needs to be updated in the slave servers immediately then execute the following command:
yppush -d domainname [-v] mapname
NOTE: The changes done on the NIS master are automatically updated on the slave servers periodically.
While setting up the UNIX machine as the master, add the NetWare server name to the slave server list.
In the NetWare server, make sure that the parameter NIS_CLIENT_ACCESS=1 in the file SYS:\ETC\NFS.CFG.
Set the domain to the one that is being served by the UNIX NIS server, using the following command:
ypset domainname hostname
To login or to set the password for a user from a UNIX NIS client, set the default domain in the NetWare server using ypset.
Make sure NISSERV.NLM is loaded.
Run MKSLAVE, to setup the NetWare machine as slave, with the following parameters:
mkslave -d domainname -m master [-x contextname]
Run NFSSTOP.
In the NetWare server, make sure that the parameter NIS_CLIENT_ACCESS=1 in the file SYS:\ETC\NFS.CFG.
Run NFSSTART.
Set the default domain by entering
ypset domainname hostname/IP_address
To configure the parameters required for nis services, right-click The Nisserv_servername > Click Properties. A panel similar to the following appears:
Figure 14
Nis Server-general Parameters Panel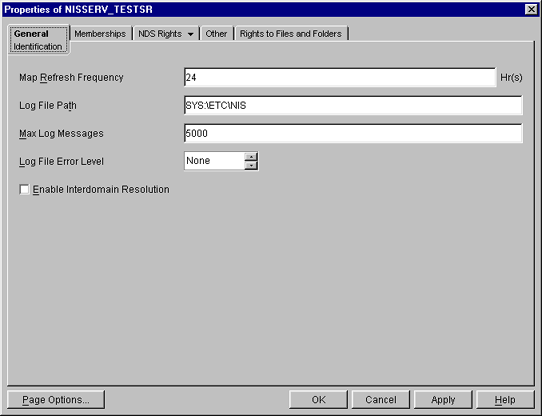
Map Refresh Frequency--- The frequency at which all the records of the map should be refreshed. range = 1 to 2400 hours (100 days).
Log File Path---The path in the netware server where you want to write the NIS log files.
Maximum Log Messages---The maximum number of log messages that can be logged. the information is specific to each log file. by default the last 5000 messages are displayed. If the number of log messages is set to n, the last n messages are retained.
Log File Error Level---The level of error messages written to the AUDIT.LOG file. Select an error level from the drop-down list.
Enable Interdomain Resolution---Check this box to allow interdomain resolution. DNS is then contacted for hostname resolution for nis client calls on host maps only.
To View The Domains Served By The Nis Server Right-click Nisserv_servername > Click Properties > Memberships Tab. A Panel Similar To The Following Appears.
Figure 15
NIS Server: Membership Panel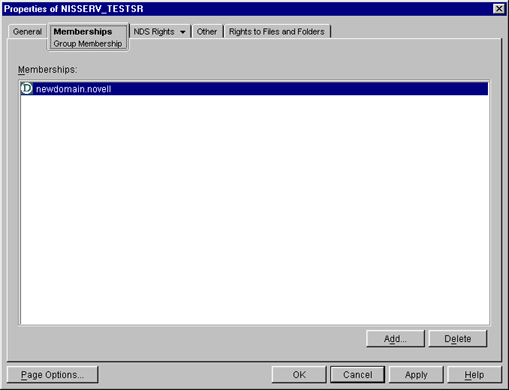
You can add or delete domains from this panel. for more details, see the Online Help.
Copy the NIS related text files required for the domain from the
UNIX machine (which are available in /ETC in UNIX) into SYS:\ETC\NIS.
(Conditional) If you want to set up other NIS server as slave to this NIS server, do the following:
Create a text file called YPSERV in SYS:\ETC\NIS. For every slave server enter the hostname of the slave server in this file in the following format:
slaveserverhostname1 slaveserverhostname1
slaveserverhostname2 slaveserverhostname2
NOTE: The first field should not be IP Address.
Enter the YPSERVERS map entry in SYS:\ETC\NIS\NISMAKE with its path in the following format:
YPSERVERS SYS:\ETC\NIS\YPSERV
Migrate the domain. For migration information, see ConsoleOne-Based Migration.
Start NISSERV.
(Conditional)You can use the YPPUSH utility to update the Slave NIS Server.
The YPPUSH utility copies a new version of the named NIS map from the master NIS server to the slave NIS servers. The YPPUSH utility is normally run only on the master NIS server after the master databases are changed and the changes need to be updated in the NIS slave servers immediately. The YPPUSH utility first constructs a list of NIS slave server hosts by reading the NIS map Ypservers within the same domain. Then a transfer map request is sent to the NIS server on each host.
Right-click NISSERV_Servername > click Update Slave Server . A panel similar to the following appears:
Figure 16
YPPUSH Dialog Box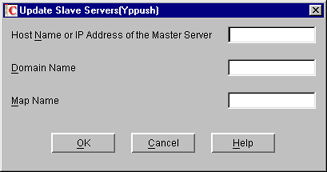
Enter the required details such as HostName or IP Address of the Master Server, Domain Name, and Map Name. For more details, see the online help.
NOTE: The changes done on the NIS master are automatically updated on the slave servers periodically.
While setting up the UNIX machine as the master, add the NetWare server name to the slave server list.
In the left panel of ConsoleOne, click The Network.
Select the server tree where you want to manage the domains and maps.
Click the M icon on the toolbar to display the Migration panel.
To migrate a domain, enter the NetWare Host Name/IP Address, slave Domain Name, and context where the domain object is to be created.
To set the NIS Server as slave for this specified domain, uncheck Set the Specified Host As Master Server.
Enter the Master Server's Name /IP Address in the Slave server information.
To migrate the domain, click Migrate.
NIS Server recognises NDS users/groups as NIS users/group only if they have a UNIX profile attached to them. To configure existing NDS user/group objects to be served by NIS Server, complete the following steps.
Choose the NDS User/Group object > right-click Properties > UNIX Profile. Enter the required fields in this page and move to the Other tab.
In the Other tab, choose Add > nisUserGroupDomain attribute.
Browse and select the NIS Domain Object to which you want to attach these Users and Groups.
This is a multi-valued attribute and you can attach as many NIS Domains to this as you want. These Users and Groups now belong to these NIS Domains and will be listed under all these domains.
Verify if the NDS Context under which these User and Groups exist is listed in the NIS Domain object. Right-click Domain Object > Properties > Memberships tab.
You can also create new NIS maps and NIS map records under NIS domain object as you create normal NDS objects.
NOTE: No objects will be there under the passwd and group map objects in the domain. When managing NIS through ConsoleOne, NDS objects of type ipService and nisObject cannot be created.
After migration the NIS maps and records will be available as objects under the migrated NIS domain object.
Figure 17
Maps under the Migrated Domain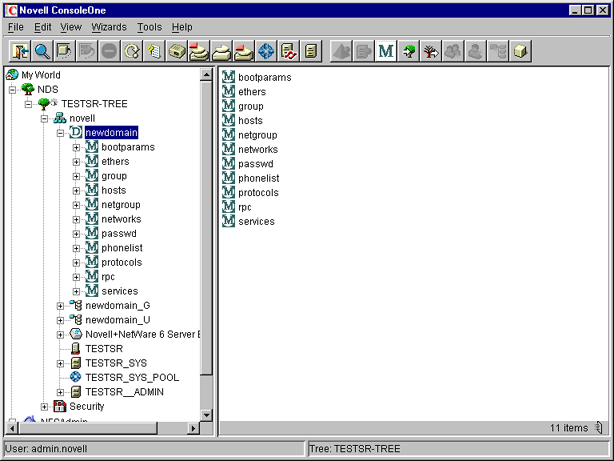
When a client call is made to this domain, the NIS Server will list the data present under the corresponding domain object. However, for user/group details, it will look for users and groups belonging to the domain under the contexts specified by an attribute of the domain object.
To view the list of contexts where the users and groups will be located, right-click Domain object > click Properties > Membership Tab. A panel similar to the following appears.
Figure 18
Domain Properties Panel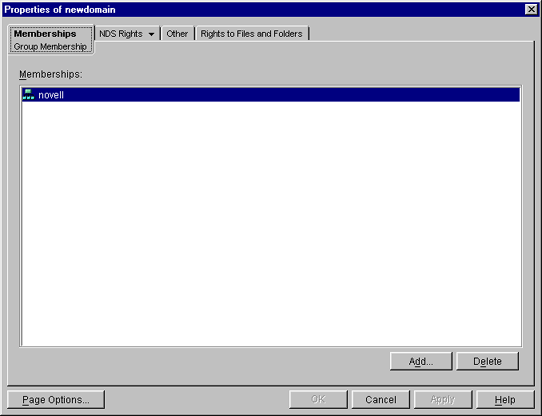
In case the NetWare NIS Server is a slave for a domain and the master NIS server for that domain is changed to some other server; to get the updates from the new master, you need to change the NIS master server name for the domain object present in the NetWare NIS slave server.
Right-click Domain object > click Change Master. A panel similar to the following appears:
Figure 19
Change Master Dialog Box
Enter the IP address of the new NIS master server. The NIS slave server will now contact the new master server for updates on all the maps under this domain.
You can view the properties for each map. Right-click Map object > click Properties. A panel similar to the following appears:
Figure 20
General Map Properties Panel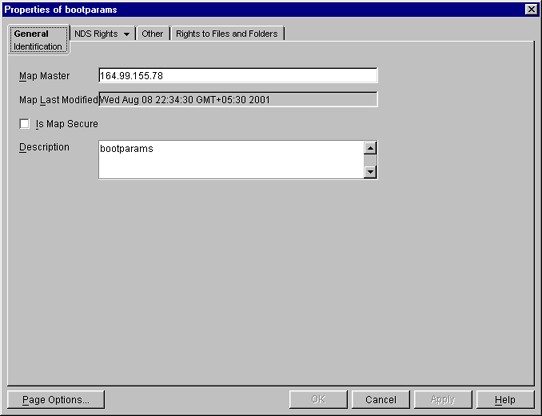
Map Master---The name of the master server serving this map.
Map Last Modified---The last time the map was modified by adding or removing records.
Is Map Secure---Sets the secure flag of the map when checked.
Description---Any general comments that you want to record.
Click each map to perform operations on it and to see the records present under the map.
To add an object to a map, right-click the map in the left panel, click New, select the object and then specify the details of the object in the dialog box.
While the panels for records on the same map are the same, they differ from map to map.
The following figures show the main map panels and are followed by procedures for using each panel's basic fields. Using these panels, you can view or modify the map record's properties. The standard fields remain the same.
Figure 21
Ethers Map Records Properties Panel
This panel shows the Ethernet address of the host.
The standard address form is x:x:x:x:x:x, where x is a hexadecimal number.
Click the icon to enter the Ethernet address of the host, and then click Apply > OK.
Figure 22
Boot Map Records Properties Panel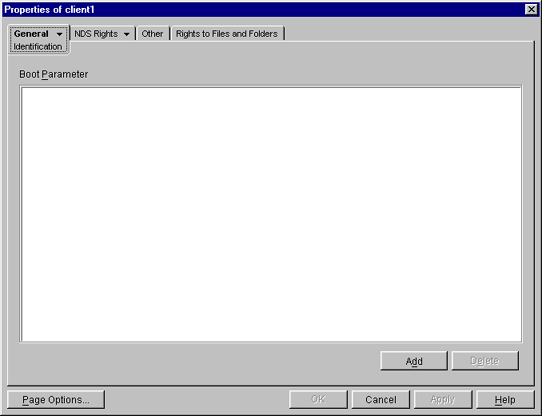
To add the device's boot parameter, click Add, enter the boot parameter of the device in the Boot Parameter field, and then click Apply > OK.
To delete the device's boot parameter, select the boot parameter of the device in the Boot Parameter field, and then click Delete > Apply > OK.
Figure 23
Host Map Records Properties Panel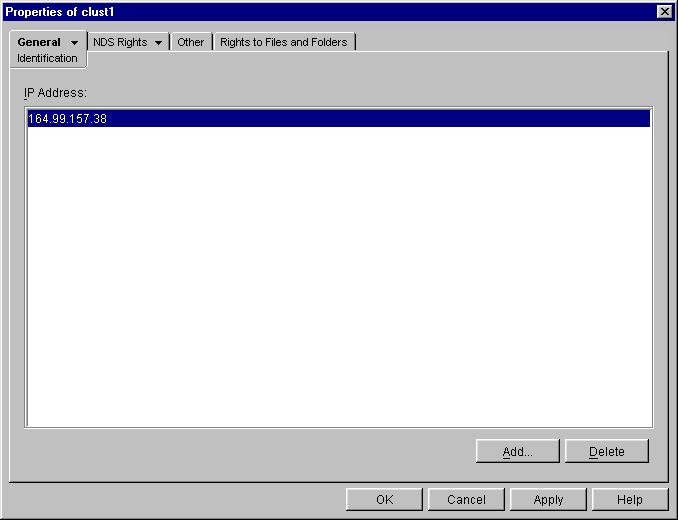
To add the host address, click Add, enter the IP address of the host, and then click Apply > OK.
The network addresses are written in the conventional decimal dot notation.
To delete the host address, select the host's IP address from the IP Address field, and then click Delete > Apply > OK.
Figure 24
Netgroup Map Records Properties Panel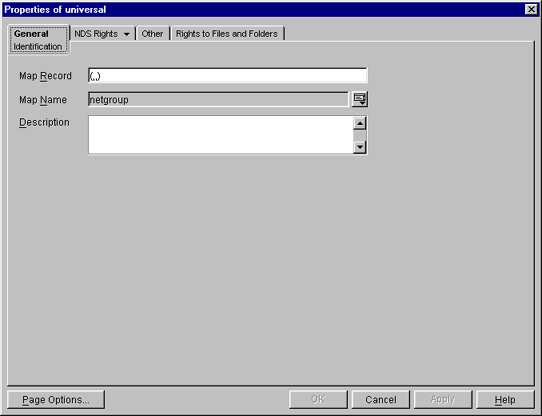
To add a netgroup address, enter the name of the Map Record, browse the icon for the Map Name, enter the description of the map, and then click Apply > OK.
Figure 25
Network Map Records Properties Panel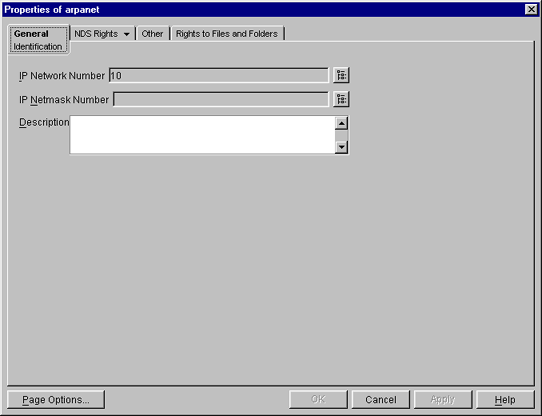
To enter the IP network number, click Browse, enter the network number, and click OK.
To enter the IP netmask number, click Browse, enter the netmask number, click OK, enter the description of the record, and then click Apply > OK.
Figure 26
Protocols Map Records Properties Panel 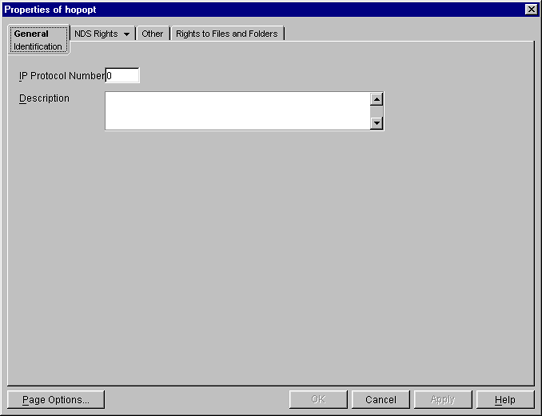
Enter the protocol number and a brief description of the record.
Click Apply > OK.
Figure 27
RPC Map Records Properties Panel 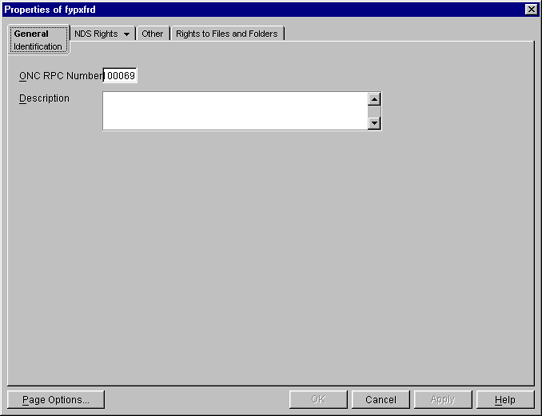
In the ONC RPC Number field, enter the RPC number of the program.
Enter a brief description of the record.
Click Apply > OK.
Figure 28
Services Map Records Properties Panel
In the IP Service Port field, enter the port number that this service is available on.
In the IP Service Protocol field, enter the protocol used to access the specified service.
Enter a brief description of the record.
Click Apply > OK.
Figure 29
General Map Records Properties 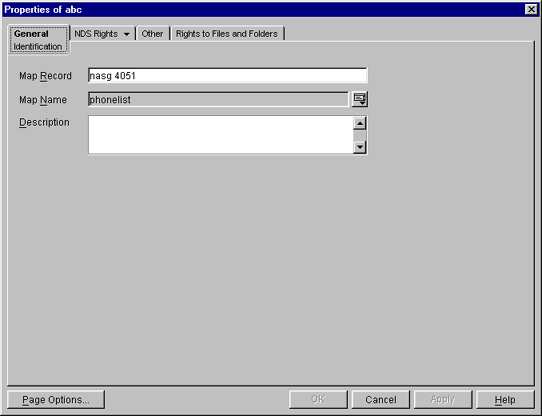
In the Map Record field, specify the map record using the following format:
key record
Enter the map name that the record belongs to.
Enter a brief description of the record.
Click Apply > OK.
Right-click NISSERV_Servername object > click Start/Stop Services.
NOTE: You can also start and stop the NIS Services by using the NIS Server menu. Make sure you refresh ConsoleOne after you change the status of NIS using the menu.
| |