

| |
The NFS Server uses the following files:
For more information on NFS Server, see NFS Server.
The following table lists the parameters that can be set in NFSSERV.CFG:
IMPORTANT: When trying to administer NFS Server through ConsoleOne while NFS configuration files are still open, inconsistent entries might be displayed in the configuration files or on ConsoleOne.
The Export Path information file, NFSEXPRT, contains the list of the paths that are exported from the system. It also gives the specified properties for the exported path.
This file contains one exported path per line. The format of each line is as follows:
ExportedPath isReadonly anonymousAccess mode webccess
Exported Path---The directory path to be exported. For example /nfsvol.
isReadOnly---Specifies whether to export the path in read-only mode or not. Values = 1 (read-only), 0.
anonymousAccess---Specifies whether anonymous access to the exported path is allowed or not. Values = 1, 0.
mode---Specifies the rights and permission mapping modes for the directory. Novell Native File Access for UNIX supports independent mode (value 512).
Web---Specifies if Web access is allowed for this exported path. At any point in time, only one path can be enabled for Web access.
Example of an exported path:
/nfsvol 0 1 512 0
The NFSTHOST file contains the list of all the trusted hosts that can access the exported directory. This is specified in conjunction with the NFSEXPRT file.
The format of every line is as follows:
Exported Path Host Name Access-Type Host/Hostgroup
Exported Path---Gives the directory path to be exported. For example, /nfsvol.
Host Name---Gives access to the client host named by the user. To give access to all hosts, select (*).
Access Type (1, 2, 3)---Specifies the type of access to be granted to a specific host. The values it can take are as follows:
Host/Hostgroup (1, 0)---This field shows whether the Host Name specified is a Host or a Hostgroup. This field should always be set to 1 (Host).
Example of an exported directory:
/nfsvol nfs-sun2 3 1
/nfsvol nfs-sun2 2 1
/nfsvol nfs-sun2 1 1
/nfsvol * 3 1
/nfsvol * 2 1
/nfsvol * 1 1
To remove an exported path, delete the corresponding directory entries from the files NFSTHOST and NFSEXPRT.
For file system sharing by NFS server, the UNIX user and group information is obtained from NDS by default. This can be modified so that UNIX information is obtained from a remote NIS server. To set this, do the following:
Run NFSSTOP.
In the NFS.CFG file, set the parameters as follows:
Run NFSSTART.
Load NFSSERV.
To start NFS Server enter at the system console, enter:
load nfsserv
To stop NFS Server enter at the system console, enter:
unload nfsserv
This section describes how to manage the NFS Server from ConsoleOne.
After logging in, click the server you want to administer from the list of servers under NFSAdmin in the ConsoleOne left panel.
The NFS Server toolbar icon and the NFS Server on the menu bar are displayed.
To administer NFS Server, click NFS Server on the menu bar and then click Options.
The following panel, which shows the NFS Server basic parameters and their default values, appears.
Figure 10
General Parameters in NFS Server Options Panel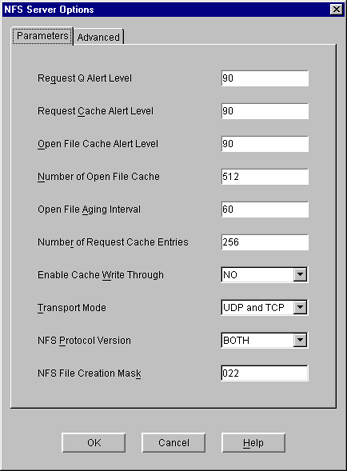
Modify the following parameters as necessary:
Request Q Alert Level---After what percentage of request queue utilization an SNMP alert is sent. Default = 90. Range = 20 - 99.
Request Cache Alert Level---After what percentage of request cache utilization an SNMP alert is sent. Default = 90. Range = 20 - 99.
Open File Cache Alert Level---After what percentage of open file cache utilization an SNMP alert is sent. Default = 90. Range = 20 - 99.
Number of Open File Cache---Number of files the NFS server can have open simultaneously. Default = 512. Range = 32 - 1024.
Open File Aging Interval---How many seconds the NFS server keeps a file's information in cache memory. When a file is held in cache, NetWare users cannot access it. Larger values produce better performance, but they also make NetWare users wait longer to access files that are being manipulated by NFS. Default = 60. Range = 0 - 2000. Open File Caching is disabled at 0.
Number of Request Cache Entries---Number of requests that can be held in cache memory. Default = 256. Range = 64 - 512.
Enable Cache Write Through---Whether cached data should be written to disk immediately or not. By default, the data is not written immediately.
Transport Mode---Which transport mode NFS Server should support. The modes could be UDP, TCP, or Both. Default = Both.
NFS Protocol Version---Version of the NFS protocol to be loaded. The values are 0/2/3.
NFS File Creation Mask---File mode creation mask in Independent Mode for default UNIX permissions of files and directories created from the NetWare side.
To specify the advanced parameters, click Advanced on the NFS Server Options panel.
The following panel, which shows the NFS Server advanced parameters and their default values, appears.
Figure 11
Advanced Parameters in the NFS Server Options Panel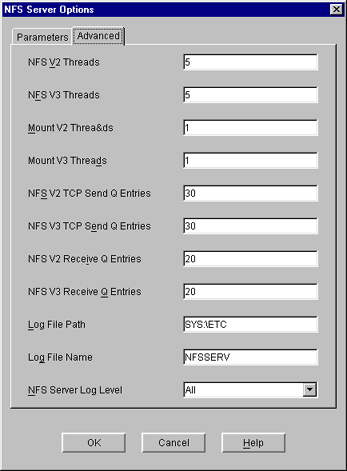
Modify the following parameters as necessary:
NFS V2 Threads---Number of NFS Server threads servicing the NFS 2 protocol. Default = 5. Range = 1 - 150.
NFS V3 Threads---Number of NFS Server threads servicing the NFS 3 protocol. Default = 5. Range = 1 - 150.
Mount V2 Threads---Number of NFS Server threads servicing the Mount V2 Requests. Default = 1. Range = 1 - 150.
Mount V3 Threads---Number of NFS Server threads servicing the Mount V3 Requests. Default = 1. Range = 1 - 150.
NFS V2 TCP Send Q Entries---Size of the TCP send queue for the NFS 2 protocol. Default = 30. Range - 1 - 150.
NFS V3 TCP Send Q Entries---Size of the TCP send queue for the NFS 3 protocol. Default = 30. Range = 1 - 150.
NFS V2 Q Entries---Size of the receive queue for the NFS 2 protocol. Default = 20. Range = 1 - 150.
NFS V3 Receive Q Entries---Size of the receive queue for the NFS 3 protocol. Default = 20. Range = 1 - 150.
Log File Path---Directory that NFS Server creates the log file in. Default directory is SYS:\ETC.
Log File Name---Name of the NFS Server Log File. Default name is NFSSERV. A .LOG extension is automatically added.
NFS Server Log Level---Indicates the types of messages to be logged.
Click OK.
Exporting a directory enables NFS client users to view NetWare volumes and directories as part of the client file system.
You can export a NetWare path and manage it.
Make sure you have added the NFS name space, and then select Export New Path from the NFS Server drop-down list.
The Export New Path panel appears.
Figure 12
NFS Server Export New Path Panel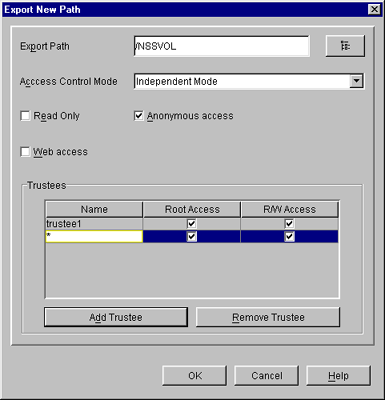
To export a new directory, click the Browse icon in the upper-right corner of the panel.
The Export Path panel appears.
Figure 13
Browse Panel for exporting NetWare Volumes and Directories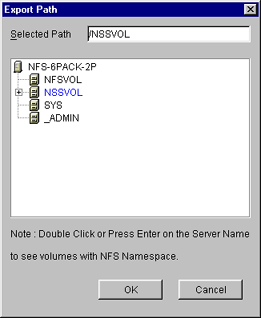
Double-click the server name to see the volumes with NFS name space.
Select the volume or directory you want to export and click OK.
On the Export New Path panel, modify the following fields as necessary:
Export Path---Path of the directory to be exported.
Access Control Mode---The access control mode that applies to this directory: independent mode.
Read-Only---Indicates whether user access is limited to read-only. Selecting No (the default) provides all users with read/write access. Selecting Yes limits users to read-only access. If Yes is specified, even users on hosts identified as trusted are limited to read-only access. The same also applies to root users. To override this option, enter the name of that host in the Hosts with Read-Write Access field.
Anonymous Access---Indicates whether the users Nobody and Nogroup can access the exported path. Selecting Yes (the default) provides these users with access. Selecting No denies access.
Web Access---Enables WebNFS access for the selected directory when checked. At any point in time only one of the exported paths can be enabled for Web Access.
Click Add Trustee. Enter the hostname that you want to give exported directory/volume access to.
An asterisk (*) will give access to all the hosts.
You can also specify the type of access you want to give to the host.
Click the Trustee name on the Export New Path panel to set their access rights.
Hosts with Root Access---The host whose users with root privileges have Admin rights to the exported directory. Select this field to display a list of these hosts. If a host with access is not specified as having root access, root users on that host have the rights of the NFS user Nobody.
Hosts with Read-Write Access---The hosts with access whose users have read/write access to the exported path. Select this field to display a list of these hosts.
To remove a host from the Trustee list, select the trustee and click Remove Trustee.
In the left panel of the ConsoleOne main menu, click the server that you want to administer.
The Export icon appears in the right panel.
Double-click Exports to see the currently exported path.
Right-click the exported path you want to modify and then click Properties.
You can now see the properties of the exported path and modify them.
Make the changes as required and then click OK.
In the left panel of the ConsoleOne main menu, click the server that you want to administer.
The Export icon appears in the right panel.
Double-click Exports to see the currently exported path.
Right-click the exported path you want to delete and then click Remove.
For file system sharing by NFS server, the UNIX user and group information is obtained from NDS by default. This can be modified so that UNIX information is obtained from a remote NIS server. To set this, do the following:
Run NFSSTOP.
Set the parameters in the NFS.CFG file as follows by following Steps 1 to 5 in Configuring the Server General Parameters.
Run NFSSTART.
Load NFSSERV.
Click NFSAdmin and log in to the server that you want to administer.
Click the S icon on the toolbar to start/stop the NFS Server. The background color of the S icon indicates the status of the NFS Server Software.
If the NFSEXPRT file is modified outside ConsoleOne, then to view the current contents of the file, do the following:
In the left panel of the ConsoleOne main menu, click the server that you want to administer.
The Export icon appears in the right panel.
Right-click Exports and then click Refresh to view the currently exported paths.
When NFS Server service is running it logs messages into a log file named NFSSERV.LOG created by default in SYS:\ETC. This file records messages that provide following information:
| |