7.3 Installing and Configuring High Availability Branch Servers
This section outlines the steps required to set up a highly available Branch Server pair.
NOTE:For ease of reference, the following procedure refers to the active node as BS1 and the passive (standby) node as BS2.
7.3.1 Installing the Novell Linux Point of Service Software
To install the Novell Linux Point of Service software on each Branch Server:
-
Start the YaST utility by inserting Novell Linux Point of Service 9 CD 1 into the drive and rebooting the computer.
-
At the SuSE boot screen, select .
-
Go through the rest of the initial installation screens as outlined in Section 2.5.1, Starting the YaST Utility.
-
When you get to the Installation Settings menu, make your settings as outlined in Section 2.5.2, The Installation Settings Screen.
For the option, you must set up drbd partitions on BS1 and BS2.
-
Select and then click .
-
Make sure the primary and SWAP partitions are defined on the drive.
-
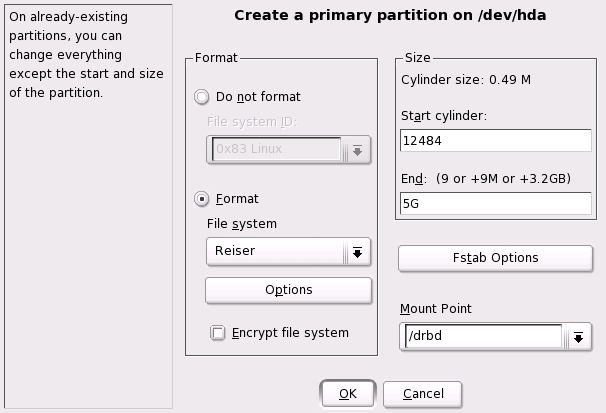
Click to define the drbd partition. Figure 7-2 shows the partition creation screen.
Figure 7-2 drbd partition creation screen.
-
Specify the size of the partition.
The size depends on your needs. The partition accommodates all your images plus several configuration files. A size of 5 GB should be sufficient for most installations.
IMPORTANT:The drbd partitions must be the same size on both Branch Servers.
-
Set the Mount Point as /drbd.
-
Click to apply your changes.
The drbd partition is now listed in the partition table.
-
-
For the option, choose the NLPOS Admin/Branch Server software selection and add the High Availability packages (heartbeat and drbd) via .
This selection installs all the necessary Branch Server and High Availability packages to the server. For more information, see Software Selection Screen.
-
When you have finished making your installation settings, click .
-
When prompted, answer Yes to start the installation.
YaST partitions the drive, applies the installation settings, and copies the necessary files from NLPOS CD 1 to disk.
-
As prompted, insert each requested CD and click .
-
When it finishes with the basic installation, the system reboots and YaST starts again.
-
In the Root Password screen, enter the password for the root user twice, then click .
-
In the Network Configuration screen, set up the network cards for drbd, heartbeat, and the Administration Server and Branch Server networks. Make sure they can communicate. The recommended four-card configuration is illustrated in Figure 7-1. For more information on entering the network interface card configuration in YaST, see Network Interfaces.
-
Continue through the screens as outlined in Section 2.5.3, The YaST Configuration Phase.
After you have completed the options in the Hardware Configuration screen, click .
-
Remove any CDs from the drive, and then click to complete the installation.
The system reboots.
-
Login in as root on each Branch Server.
-
Unmount the drbd partition on both BS1 and BS2.
umount /drbd
-
On BS1 and BS2, edit the /etc/fstab file and remove the line that mounts the drbd partition.
-
Verify that the LDAP database on the Administration Server is accessible using a GUI-based LDAP browser or an ldapsearch command.
For example:
ldapsearch -x -h administration_server_name -b base_context -s base -D dn_of_admin_user -w password
-
Temporarily configure the heartbeat software on BS1 and BS2.
-
Copy the ha.cf file from /etc/opt/SLES/POS/ha/ to the /etc/ha.d/ directory and make the following changes:
- Configure either the bcast or ucast line. If you activate bcast, the interface should be the heartbeat interface (eth3). If you activate ucast, the IP address is the heartbeat interface IP address on BS2 (for example, eth3 192.168.3.2).
- Make sure the node lines have the correct server names for BS1 and BS2.
-
Copy the authkeys file from /etc/opt/SLES/POS/ha/ to the /etc/ha.d/ directory and change the permissions as follows:
chmod 600 authkeys
-
Copy the haresources file from /etc/opt/SLES/POS/ha/ to the /etc/ha.d/ directory. Set the last line to the virtual IP address as follows:
bs1 192.168.1.3 #drbddisk::r0 Filesystem::/dev/drbd0::/drbd::ext3 # named dhcpd atftpd
NOTE:The rest of the line is commented out because drbd is not yet configured.
-
-
Use the following command to start heartbeat on BS1:
rcheartbeat start
-
Execute ifconfig on BS1 to verify that the virtual IP interface (eth1:0) is active.
NOTE:This can take some time.
For more information on the ha.cf, authkeys, and haresrouces files, see Section 7.6, Heartbeat Configuration Files.
7.3.2 Configuring the Branch Servers
This section describes the Branch Server configuration with the posInitBranchServer.sh script. Follow these steps for both nodes in the high availability Branch Server pair.
IMPORTANT:You must have created the scBranchServer object and its supporting organizational structure before you can run posInitBranchserver.sh and configure the Branch Server. For more information, see Section 6.2, Creating Branch Server Objects in LDAP.
-
Before starting the configuration script, ensure that the Branch Server can find its objects in the LDAP directory.
IMPORTANT:The Branch Server’s hostname must resolve to the IP address defined in the --ipHostNumber attribute of the scNetworkcard object; for example, 192.168.2.1. Otherwise, the Branch Server cannot find the scBranchServer object in the LDAP directory.
To ensure this resolution, make sure that, on each node, the /etc/hosts file includes the other node. For example:
192.168.1.1  bs1.east.boston.mycorp.us  bs1
192.168.1.2  bs2.east.boston.mycorp.us  bs2
-
Execute posInitBranchserver.sh at the BS1 server console only.
-
Specify your company name without spaces or special characters.
-
Specify your country abbreviation.
Use us for United States, uk for United Kingdom, de for Germany, and so forth.
-
Specify the IP address of the Administration Server.
Set the value according to the IP address you assigned when you configured the Administration Server.
-
The script attempts to connect to the Administration Server. If it fails, you are prompted again for the company name, country name, and password.
Otherwise, the script tries to determine the IP address, hostname, and domain name as it is defined in the LDAP database. If it fails, you are prompted for the Branch Server’s IP address.
If the Branch Server configuration is successful, the script displays the Branch Server’s name, IP address, and domain name, along with a success message.
-
Verify that the LDAP objects have been created for the Branch Servers using a GUI-based LDAP browser or an ldapsearch command. For example:
ldapsearch -x -h administration_server_name -b base_context -s base -D dn_of_admin_user -w password
7.3.3 Configuring drbd
Continue with these steps to configure the drbd service.
-
Configure drbd on BS1 and BS2.
-
Copy the drbd.conf file from /etc/opt/SLES/POS/ha/ to the /etc/ directory.
-
Make sure you have the right drbd partitions in the BS1 and BS2 sections of the drbd.conf file.
-
Make sure the IP addresses designated in the drbd.conf file are the drbd interface IP addresses.
In this example, the IP addresses are 192.168.2.1 and 192.168.2.2.
-
Execute the following command to make sure drbd is started automatically:
chkconfig dbrd on
For more information, see Section 7.7, drbd Configuration File.
-
-
Execute the following commands on BS1 to start drbd and define BS1 as the primary server:
rcdrbd start
abort the wait
drbdsetup /dev/drbd0 primary
mke2fs -j /dev/drbd0
-
Start drbd on BS2 and control the synchronization of the network block device /dev/drbd0:
rcdrbd start
Wait for the sync to finish. This can take a while, and you might have to check the /var/log/messages file or run rcdrbd status and monitor progress.
-
Mount the drbd partition on BS1:
mount /dev/drbd0 /drbd
-
(optional) Verify that drbd is working.
-
Write to a file on the /drbd partition on BS1.
-
Unmount the drbd partition on BS1.
-
Define BS1 as the secondary server:
drbdsetup /dev/drbd0 secondary
-
Define BS2 as the primary server:
drbdsetup /dev/drbd0 primary
-
Mount the drbd partition on BS2.
mount /dev/drbd0 /drbd
-
Verify that the file with the correct data is there.
-
Unmount the drbd partition on BS2.
-
Define BS2 as the secondary server:
drbdsetup /dev/drbd0 secondary
-
Define BS1 as the primary server:
drbdsetup /dev/drbd0 primary
-
Mount the drbd partition on BS1.
mount /dev/drbd0 /drbd
-
-
Execute the following commands to stop all Branch Server services on BS1 and BS2:
rcdhcpd stop
rcnamed stop
rcatftpd stop
-
Change permissions for the bsha_config.sh file on BS1 and BS2.
chmod to a+rx bsha_config.sh
-
Run the /bsha_config.sh script on BS1 and BS2.
This script performs the following functions:
- It creates the following directories
on the Branch Server:
- drbd/etc/
- drbd/tftpboot/
- drbd/var/
- It moves all the data required for the Branch Server services to the drbd directories on the Branch Server.
- It creates the following links on the Branch Server:
- /etc/opt/SLES/POS is linked to /drbd/etc/opt/SLES/POS.
- /var/lib/named is linked to /drbd/var/lib/named.
- /var/lib/dhcp is linked to /drbd/var/lib/dhcp.
- It creates the following directories
on the Branch Server:
-
Modify the last line of the /etc/ha.d/haresources file on BS1 and BS2 as follows:
bs1 192.168.1.3 drbddisk::r0 Filesystem::/dev/drbd0::/drbd::ext3 # named dhcpd atftpd
NOTE:The drbd portion no longer needs to be commented out because drbd is now configured. However, leave the services commented out until after you test data replication.
-
Start heartbeat on BS1:
umount /dev/drbd0
rcheartbeat start
-
Start heartbeat on BS2:
rcheartbeat start
-
Execute ifconfig on BS1 to verify that the virtual IP interface (eth1:0) is active.
NOTE:This can take several seconds.
-
Verify that the drbd partition is mounted on BS1.
-
(optional) Verify that heartbeat is failing over and failing back correctly:
-
Stop heartbeat on BS1:
rcheartbeat stop
-
After a few seconds, verify that the virtual IP interface and drbd partition are unmounted on BS1 and activated on BS2.
-
Start heartbeat on BS1:
rcheartbeat start
-
After a few seconds, verify that the virtual IP interface and drbd partition migrated back to BS1.
-
-
Modify the last line of the /etc/ha.d/haresources file on BS1 and BS2 as follows:
bs1 192.168.1.3 drbddisk::r0 Filesystem::/dev/drbd0::/drbd::ext3 named dhcpd atftpd
NOTE:The entire line can now be uncommented because drbd is configured and data replication has been tested.
-
Execute the following commands on BS1 and BS2 to turn off automatic startup of the services during boot. Heartbeat takes care of starting these services.
chkconfig dhcpd off
chkconfig named off
chkconfig atftpd off
chkconfig heartbeat on
For information about testing a newly installed Novell Linux Point of Service system, refer to Section 12.0, Testing Your Novell Linux Point of Service Environment.