A.5 Preparing Files for the Hands-on Exercises
After installing and configuring the OES-11 server and its required services, you need to create files and folders on the server in order to use in the exercises in this guide. See the following sections:
A.5.1 Creating Files and Folders
Refer to Figure A-3 and Table A-2 as you create the folders and files that will be used for the exercises.
Figure A-3 Files and Folders on the Hands-on OES 11 Server
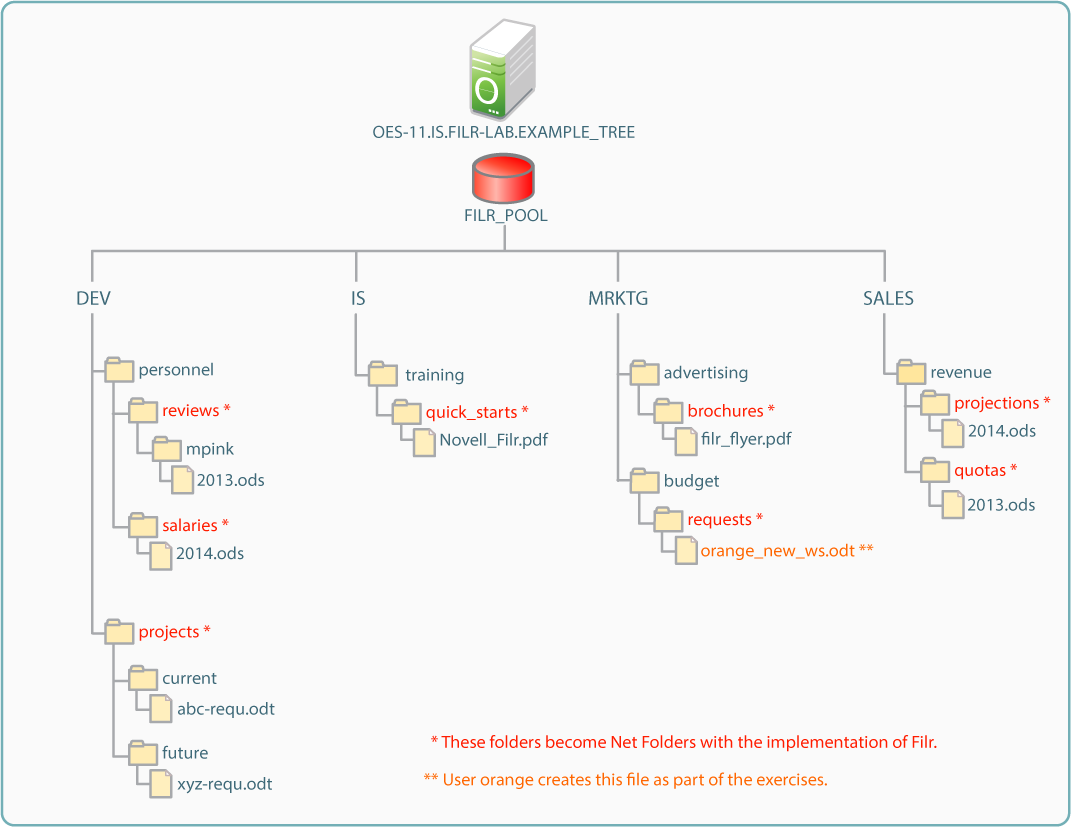
Table A-2 Folder Structure to Create on the OES Server
|
Volume Name |
Subfolder Structure |
|---|---|
|
DEV |
personnel |
|
personnel\reviews |
|
personnel\reviews\mpink |
|
personnel\salaries |
|
projects |
|
projects\current |
|
projects\future |
|
IS |
training |
|
training\quick_starts |
|
MRKTG |
advertising |
|
advertising\brochures |
|
|
budget |
|
budget\requests |
|
SALES |
revenue |
|
revenue\projections |
|
revenue\quotas |
-
In iManager, click > >
-
Click the icon
 next to the field.
-
In the pane, navigate to > > .
-
In , click the link.
IMPORTANT:As you follow these steps, remember that the targets you are selecting are all found in the Organizational Unit object container and within their respective volume containers, such as .
Unless you keep the structure of EXAMPLE_TREE in mind, it’s easy to get confused and try to find the DEV volume object in the DEV container.
-
In the field, type personnel, then click .
-
Click .
-
Click the icon
next to the field, then browse to and click the link to the personnel folder that you just created.
-
In the field, type reviews, then click .
-
Repeat the applicable steps until you have created the folders shown in Figure A-3 and Table A-2.
-
When you have created all of the folders, click .
-
Continue with Uploading the Files to the OES 11 Server.
A.5.2 Uploading the Files to the OES 11 Server
-
Download the user exercise files from the Filr Documentation Site and unzip the archive, which contains the files shown below.
Table A-3 Files and Locations
File Name
Path to File
mpink_2013.odt
DEV:personnel\reviews\mpink
2014.ods
DEV:personnel\salaries
abc_reqr.odt
DEV:projects\current
xyz_reqr.odt
DEV:projects\future
Novell-Filr.pdf
IS:training\quick_starts
abc_flyer.pdf
MRKTG:advertising\brochures
fy_2014.ods
SALES:revenue\projections
fy_2013.ods
SALES:revenue\quotas
-
In iManager, click , then click >
-
Click the icon
next to the field, then navigate to the first path shown in Table A-3.
-
Browse to and click the link to the mpink folder.
-
Click and navigate to the mpink_2013.odt file that you downloaded in Step 1, then click .
-
Click , then repeat from Step 3 and navigate to the second path, and so on, until all of the files that you created are uploaded to their proper folders.
-
Continue with Assigning File and Folder Trustee Rights.
A.5.3 Assigning File and Folder Trustee Rights
Filr access to files and folders is ultimately controlled by the rights on the file system. Therefore, you now need to assign the eDirectory users as trustees to the files and folders on the OES-11 server volumes.
-
Assign the managing users Supervisor rights to their respective volumes:
-
In iManager, click , then click >
-
Click the icon
next to the field.
-
In the pane, navigate to > > .
-
Click the link.
-
Click .
-
Click the tab.
-
Click the icon
next to the field.
-
Browse to > > , then click the link for user .
-
Click .
-
In the panel, select the (Supervisor) option. If desired, you can deselect (Write) and (File Scan) because includes those rights.
-
Click > .
-
Repeat from Step 1.a and assign the following rights:
-
User as Supervisor on volume .
-
User as Supervisor on volume .
-
User as Supervisor on volume .
-
User as Supervisor on , , , , and .
-
-
-
Continue with Proxy User Rights to Volume Objects.
A.5.4 Proxy User Rights to Volume Objects
The needs Read rights to each volume object. Because is in the FILR-LAB container above the volume objects, and therefore has Read rights to the objects, no additional action is required.
Continue with Installing and Configuring the Filr Appliance.