A.4 Setting Up Novell CIFS
Novell CIFS lets Windows users access NSS volumes on Novell Open Enterprise Server 11 SP1 servers exactly as they would access a Windows file server. For some organizations, CIFS (Common Internet File System) is preferred over NCP (NetWare Core Protocol) because it doesn’t require the installation of Novell Client software.
Filr enables mobile device access to files through both the CIFS and the NCP file protocols.
See following:
A.4.1 Overview of Novell CIFS
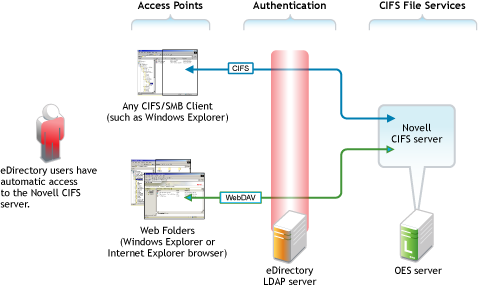
Figure A-2 illustrates the file services available through Novell CIFS in OES.
For more information on Novell CIFS file services in OES 11 SP1, see Novell CIFS Implementation and Maintenance in the OES 11 SP1: Planning and Implementation Guide.
Figure A-2 Novell CIFS
A.4.2 Setting the Search Context
By default, the search context for CIFS users is set to the container where the OES 11 SP1 server is installed (IS in this case). The assigned proxy user searches in this context for users seeking access to the CIFS file service. You must set a context that points to the other containers where your User objects are located.
-
In iManager, click , then click > .
-
Click the icon next to the field, then browse to and select the oes-11 lab server (in the IS container).
-
Click the tab.
-
Click .
-
Browse to and select the container in , then click .
-
Repeat from Step 4 to add the USERS containers in , , and containers.
-
Continue with the next section.
A.4.3 Making Novell CIFS Shares Available to CIFS Users
By default, all NSS volumes hosted on an OES server have shares associated with them. These shares point to the root of the volume.
If a volume is created while the Novell CIFS service is running, the service must be restarted to discover the volume.
-
Click the tab.
-
If the five shares are listed (one for each volume), skip to Novell CIFS Users’ Access Rights.
If not, continue with Step 3.
-
Click the tab, then click . The service status changes to .
-
Click the sub-tab. The service status changes to .
-
Click the tab.
The five shares are listed.
-
Continue with Novell CIFS Users’ Access Rights.
A.4.4 Novell CIFS Users’ Access Rights
As illustrated in Figure A-2, all eDirectory users have automatic access to the Novell CIFS file service, assuming that the service is configured correctly.
However, access to the CIFS file service does not equate to access to the NSS file system and the folders and files that it contains. It is the Novell File and Directory Trustee Rights model that provides this access. It also ensures that users can see only those files and folders to which they have access rights, including when they use Filr for access.
Continue with Preparing Files for the Hands-on Exercises.