A.3 Creating Users, Pools, and Volumes
eDirectory is the central, key component of Novell Open Enterprise Server (OES). It provides the following:
-
Centralized identity management
-
The underlying infrastructure for managing your network servers and the services they provide
-
Secure access to network services, from within the firewall and from the Web
At this point you have created a new eDirectory tree named EXAMPLE_TREE that you will use to learn about Filr. Now you need to create users and configure Novell Storage Services (NSS) for the exercises in this guide.
See the following:
A.3.1 Your Hands-on eDirectory Tree
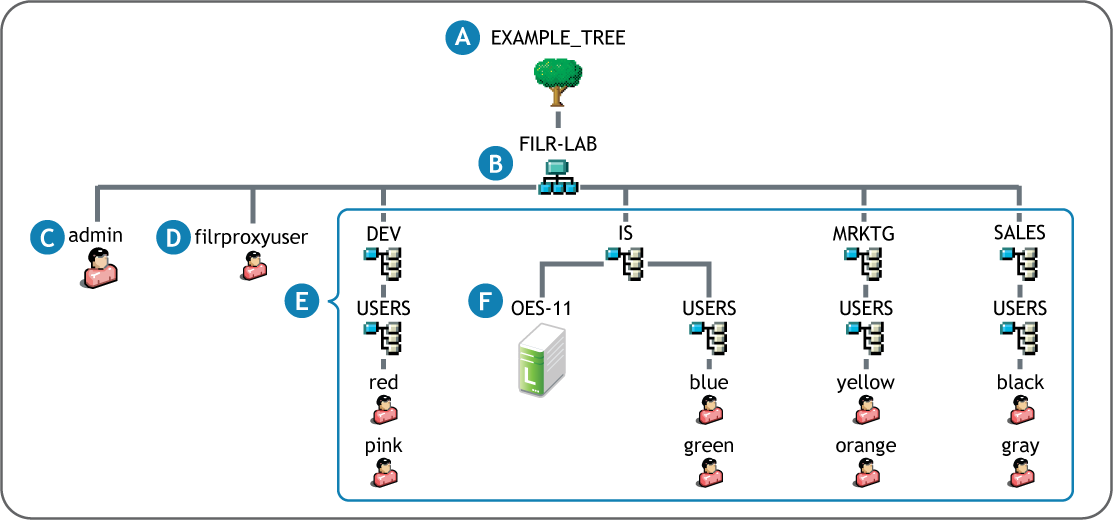
Figure A-1 illustrates the basic eDirectory tree that you will now create on your hands-on OES 11 server.
Figure A-1 Your Hands-on eDirectory Tree
|
Reference Letter |
Explanation |
|---|---|

|
The Tree object is the top container object in the tree. |

|
The Organization object (FILR-LAB) normally represents your company or organization. However, in this case its only purpose is to contain the eDirectory objects and configuration information required for the exercises and explanations in this guide. |

|
Every tree requires an Admin User object. You can log in as Admin to manage objects in the tree. |

|
filrproxyuser is a system user that reads, writes, creates, and deletes files on file servers in behalf of users who have rights via a Share in Filr, rather than native rights on the file systems. |

|
FILR-LAB contains four Organizational Unit (OU) container objects (DEV, IS, MRKTG, and SALES), each representing a department within the organization. Each of these in turn has a USERS OU container. |

|
Unlike its sibling departments, the IS OU also contains the OES-11 object that represents the OES 11 SP1 server that all departments use. |
A.3.2 Creating Contexts for Your Users
Figure A-1 illustrates that the users in this hands-on-setup belong to four different organizations that are represented by OUs in your eDirectory tree: DEV, IS, MRKTG, and SALES. These OUs are the parent containers for the users, and define their contexts within the tree.
To create the Organizational Unit container objects shown in Figure A-1:
-
In iManager, click the icon
 .
.
-
In the left pane, click the tab.
-
Click the Organization object
 .
.
The objects contained in are listed in the right pane. Notice that the OU object already exists. This was created when you specified the context of the OES server during the installation.
-
Click , then select from the drop-down list.
-
From the list, select , then click .
-
In the field, type DEV.
-
Click .
-
Click , then repeat from Step 6 to create objects for the MRKTG and SALES organizations.
-
Click the Organization object
.
-
Click , then select from the drop-down list.
-
From the list, select , then click .
-
In the field, type USERS.
-
Click , then repeat from Step 9 to create Organization Unit objects in the , , and OUs.
With each iteration, in the field replace with one of the other three OUs in turn (IS, MRKTG, and SALES) until each contains a USERS OU object.
-
Click .
-
Do not close iManager. Continue with the next section, Assigning a Password Policy to Your Users.
A.3.3 Assigning a Password Policy to Your Users
In Configuring eDirectory and OES Services, you create a common proxy user and a universal password policy named Common Proxy Policy.
For the users to use some of the OES services you have installed, you must associate the Common Proxy Policy with those users. The simplest method for doing this is to associate the policy with the containers you created in Section A.3.2, Creating Contexts for Your Users.
NOTE:The Common Proxy Policy is associated with the server’s parent container (IS) by default. If all of your users were in the same container as the server or in a subcontainer of it, then the following steps would not be needed. However, the DEV, MRKTG, and SALES containers are siblings to the IS container in the tree created in this guide, and must be associated with the policy manually.
-
In iManager, click the icon
 .
.
-
Click > .
-
Click the link.
-
Click the tab.
-
Click the icon
 next to the field.
-
In the pane, click the down-arrow
 next to .
-
Navigate to and select the USERS objects in the , , and Organizational Unit objects, then click .
-
Click > .
-
Do not close iManager. Continue with the next section, Creating an NSS Pool.
A.3.4 NSS Pools and Volumes
OES supports NSS volumes. NSS is a fast-mounting, journaled file system for OES and NetWare. It is the only file system in the industry that is integrated with identity management. NSS volumes support the Novell File and Directory Trustee Rights model and also NSS file attributes. For more information, see The Traditional Novell Access Control Model, in the OES 11 SP1: Planning and Implementation Guide.
If you create NCP and NSS volumes before creating users, you can then create home directories at the same time as you create the user objects. For that reason, it makes sense to set up the volumes prior to user object creation.
A.3.5 Creating an NSS Pool
NSS volumes are created inside NSS Pools.
-
From your hands-on lab workstation, access iManager, then click the icon
.
-
Click > .
-
Click the icon
next to the field.
-
Browse to and select your hands-on oes-11 object (in > ).
-
Click .
-
Name the pool filr_pool, then click .
-
Click the box next to the system disk in your server (sda).
-
By default, all free space on the disk (~7.8 GB) should automatically be entered in the field, and the amount should match the displayed to the right of the system disk. If the field is blank, type the free space amount.
-
Click .
FILR_POOL is listed as an available pool. Notice that the NSS pool name is uppercase, even though you typed lowercase. All NSS pools and volumes are created and displayed in uppercase to give a visual distinction from the Linux POSIX lowercase norm, to prevent visual confusion of letters and numbers (vol1 vs. VOL1), and because names are case-insensitive on NSS.
Creating NSS Volumes
-
After the pool appears in the list, continue in the task by clicking in the left frame. Then use the information below to create five NSS volumes on your server.
Volume Name
Volume Quota in GB
HOME
3
DEV
1
IS
1
MRKTG
1
SALES
1
-
Click .
-
In the field, type the first volume name listed in Step 1, then click .
-
Click the box next to , then deselect .
-
Type the volume quota in the field, then click > .
The volume is listed.
-
Repeat from Step 2 until all volumes have been created.
-
Do not close iManager. Continue with the next section, Summary of Hands-on Volumes and Purposes.
Summary of Hands-on Volumes and Purposes
Your hands-on OES 11 server now has five volumes.
-
HOME: This volume is the personal workspace for all users in the FILR-LAB organization. When you provision users in Filr, some of their My Files workspaces point to directories on this volume.
-
DEV, IS, MRKTG, and SALES: These volumes contain their respective department’s folders and files. Access is generally limited to members of the department. Access to certain folders and files is limited according to roles within the department. When you set up Filr, you create Net Folders in Filr that point to directories that they contain.
A.3.6 Creating Users
For the hands-on exercises, you need to create the users shown in Table A-1.
Table A-1 Users to Create
|
User Name |
First Name |
Last Name |
eDirectory Context within FILR-LAB |
Password |
Home Directory |
|---|---|---|---|---|---|
|
red |
M |
Red |
DEV/USERS |
filrrocks |
Yes |
|
pink |
M |
Pink |
DEV/USERS |
filrrocks |
No |
|
blue |
M |
Blue |
IS/USERS |
filrrocks |
Yes |
|
green |
M |
Green |
IS/USERS |
filrrocks |
No |
|
yellow |
M |
Yellow |
MRKTG/USERS |
filrrocks |
Yes |
|
orange |
M |
Orange |
MRKTG/USERS |
filrrocks |
No |
|
black |
M |
Black |
SALES/USERS |
filrrocks |
Yes |
|
gray |
M |
Gray |
SALES/USERS |
filrrocks |
No |
|
filrproxyuser |
Filr |
Proxyuser |
(directly in FILR-LAB with the eDir Admin user) |
novellfilr IMPORTANT: the password for this user is novellfilr, not filrrocks. |
No |
To create the users:
-
In iManager, in the left pane, click > .
-
In the field, type a user name from Table A-1.
For the first user, this is red.
-
Type the first name and last name for the user, as shown in Table A-1.
-
Click the icon
next to the field.
-
Browse to the context indicated for the user, then click the OU object.
-
Type the password listed in both the field and the field.
None of the exercises require unique passwords, so for simplicity, we use the same password for each user except filrproxyuser, as indicated in the table.
-
If the Home Directory column is marked No, skip to Step 8. Otherwise, select the option and browse
 to the oes-11_HOME volume (in the IS OU).
For the third and other odd-numbered users, you can use the icon
to select the context rather than browsing.
-
Click .
-
Click to repeat the process until the other users listed in Table A-1 are created.
-
Do not close iManager. Continue with Setting Up Novell CIFS.