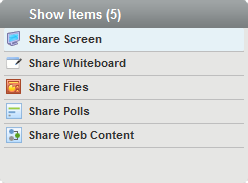
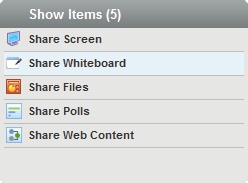
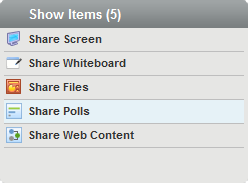
2.10 Sharing and Managing Items
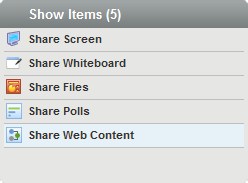
As a Novell Conferencing presenter, you can share your desktop and allow other users to observe and interact with items you display there, such as documents, a whiteboard, and Web pages.
For example, you can use the whiteboard to draw a chart, and then have meeting attendees add their own annotations. Or, you can display a document so that you and the meeting attendees can use the whiteboard annotation tools to highlight the important information. You can also share a Web page and let users navigate the links, or you can lock the Web page to disable the links.
The action you take to stop sharing one item and share another depends on whether you are sharing a screen or sharing some other item:
-
If you are sharing a screen: You stop the screen share and then switch by selecting what you want to share.
-
If you are not sharing a screen: Simply select the item you want to share.
2.10.1 Sharing Your Screen
If the Conferencing plug-in is installed on the computer that the presenter is using, the presenter can share his or her desktop screen with other attendees. If the Conferencing plug-in is not installed, presenters are prompted to install it when they click .
NOTE:The Show Computer Screen option is not supported on the Linux operating system because the Web meeting plug-in is not supported on Linux.
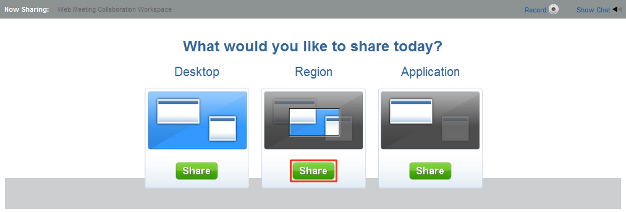
To share the screen:
-
In the meeting console, click .
-
Choose whether you want to share your whole screen, a region of your screen, or a running application.
-
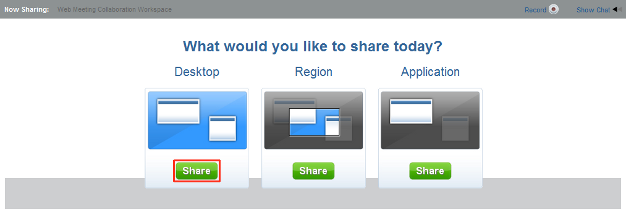
Click below the desired type of sharing and your screen share begins.
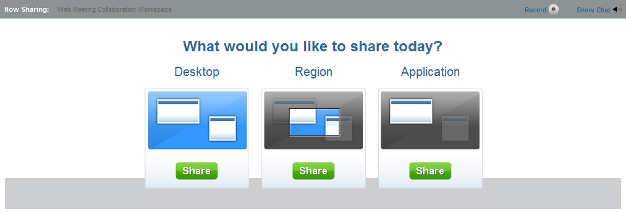
Desktop
This option allows you to share your entire screen.
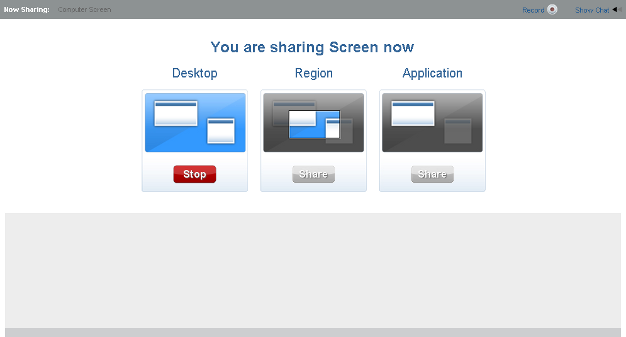
-
Click in the meeting console.
-
In the collaboration area, click underneath the option.
-
When you have finished sharing, click underneath the Desktop option in the collaboration area.
Region
This option allows you to share only the area of your desktop that you want attendees to see.
-
Click in the meeting console.
-
In the collaboration area, click underneath the option.
-
A black sharing box pops up, which can be moved or resized to share the area of the screen that you desire. The box defaults to the minimum size that can be shared.
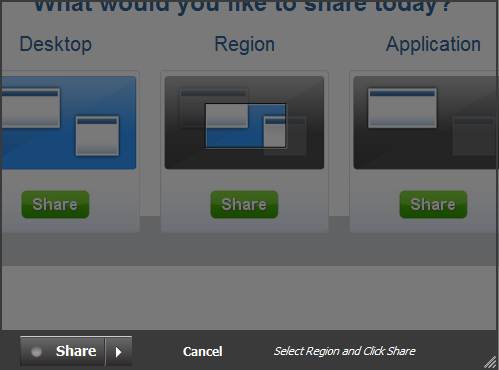
-
When you have selected the area you want to share, click at the bottom left of the black sharing box.
The box can be resized and movedat any time while you are sharing your screen.
-
When you have finished sharing, click the button at the bottom left of the black sharing box.

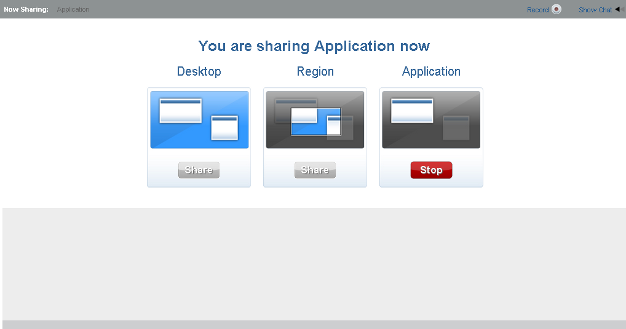
Application
Application sharing lets you share any application that is currently running on your computer. Only the application is shown. All other areas of your screen or open applications are shown as black areas to the attendees. If you move an open application in front of the shared application or the shared application is minimized, the area overlapping the shared application is black or the entire collaboration area is black on the attendees’ screens.
-
Click in the meeting console.
-
In the collaboration area, click underneath the option. A list of running applications appears.
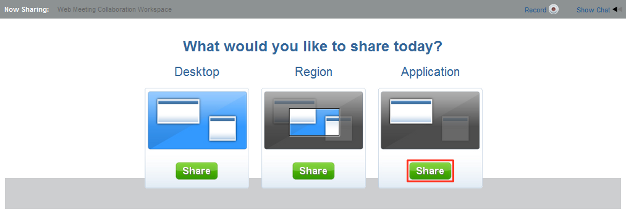
-
Select the desired application and click . The application is immediately brought to the front of the screen.

-
When you have finished sharing, click underneath the option in the collaboration area.
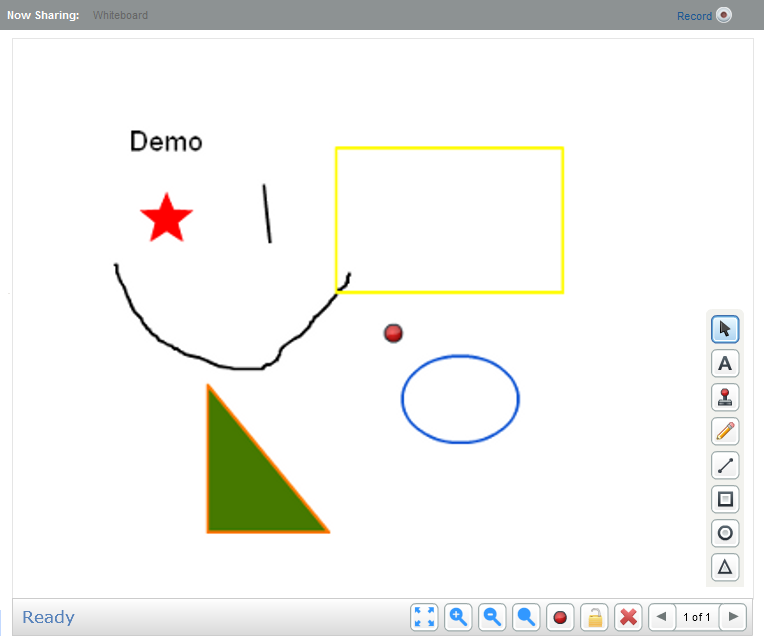
2.10.2 Sharing the Whiteboard
The whiteboard is an area where the presenter and the attendees in a meeting can interactively create content.
During a meeting, presenters can create up to 99 whiteboard screens. A whiteboard is saved if the host switches presenters, but a whiteboard cannot be saved to be used in another meeting.
Unless the presenter locks the screen, both presenters and attendees can use the annotation toolbar for drawing and managing the content in the whiteboard, including the select/move/edit, text, stamp, freehand, line, shapes, delete, pointer, and lock and zoom buttons.
Displaying the Whiteboard
If you are the presenter, you can create a whiteboard screen where you and other meeting attendees can interactively create content.
-
Start the meeting by logging in to Novell Conferencing. For information on how to log in, see Section 1.3, Logging In.
or
If you are already logged in, click .
-
Click in the meeting console.
The whiteboard appears in the collaboration space.
-
Use the annotation tools as described in the following sections to draw or write on the whiteboard.
Using the Select Tool
Use the Select tool to select a shape to use for copying, cutting, pasting, moving, etc.
-
Click the Select tool in the annotation toolbar of the whiteboard.
-
Select the annotation you want to edit.
Using the Text Tool
Use the Text tool to type text from the keyboard and add it to the whiteboard. You can also control the text color and size.
-
Select the Text tool in the annotation toolbar.
-
In the whiteboard, click where you want to add the text.
The text box appears for you to type in.
-
Type the text.
-
To change the color of the text, select the text box or text and click the color palette to select the color.
-
To change the size of the text, select the text box or text and click the or to increase or decrease the font size.
-
Using the Stamp Tool
Use stamps to annotate the whiteboard with artwork that is always the same size and pointed in the same direction. Choose from a variety of stamps in the stamp gallery.
-
Select the Stamp tool in the annotation toolbar of the whiteboard.
-
In the stamp gallery, select the stamp.
-
In the slide, click where you want the stamp to appear.
To change a stamp, select the stamp you want to change, then select the new stamp from the stamp gallery.
Using the Drawing Tools
The drawing tools let you draw annotations on the slide. The following drawing tools are available:
-
Freehand
-
Line
-
Rectangle
-
Circle
-
Triangle
-
Select the drawing tool (Freehand, Line, Rectangle, Circle, Triangle) in the annotation toolbar of the whiteboard.
-
Drag the mouse pointer to apply the annotations.
Locking the Whiteboard
The presenter can prevent attendees from making annotations on the whiteboard.
-
To lock the whiteboard, simply click the button in the annotation toolbar of the whiteboard.
The whiteboard is locked and attendees can no longer make changes.
Clearing Annotations
The presenter can delete all of the annotations from the whiteboard at once, or delete one annotation at a time.
To delete all of the annotations from the whiteboard:
-
Select the Delete tool in the annotation toolbar of the whiteboard.
-
In the Whiteboard Delete dialog box, select or select .
To delete a single annotation:
-
Select the annotation you want to delete, then press the Delete key on your keyboard.
Using the Pointer
The presenter can use the Pointer to point to information on the slide. The pointer is displayed by default.
-
To display or hide the pointer, click the Pointer tool in the annotation toolbar of the whiteboard.
Zooming
Use the Zoom In tool to magnify an area of a slide or use the Zoom Out tool to decrease magnification.
Adding a New Whiteboard Screen
The presenter can create up to 99 new whiteboard screens as necessary during a meeting, and can use the arrows at the bottom right of the annotation tools to move among the screens that have already been created and annotated.
A whiteboard is saved if you switch presenters, but a whiteboard cannot be saved to use in another meeting.
To add a new whiteboard screen, you must be on the most recently created whiteboard screen.
-
To add a new whiteboard screen, click
 .
.
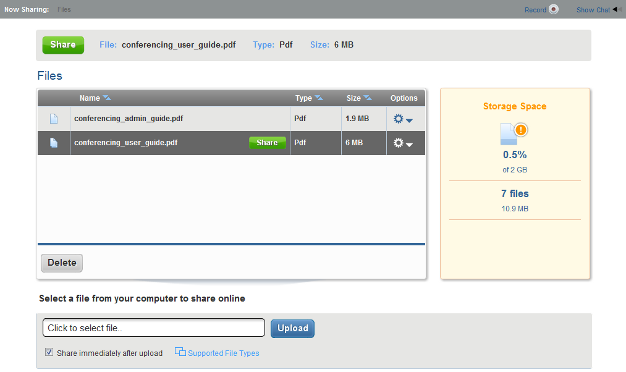
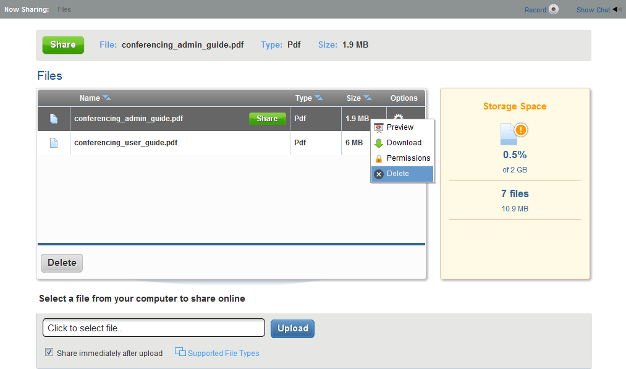
2.10.3 Sharing and Managing Files
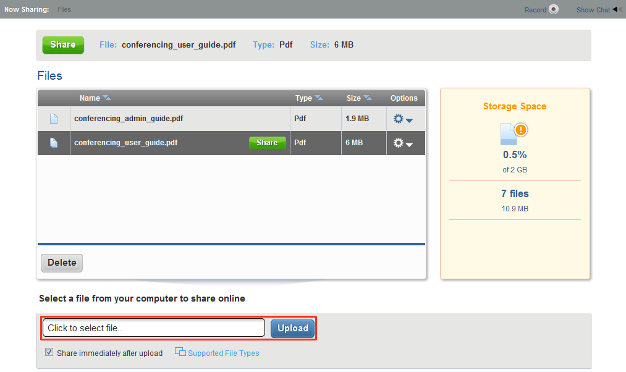
Novell Conferencing allows you to upload documents before or during the meeting. The files are then stored in Conferencing so that you can use them in any meeting. You are allowed to store up to 2 GB of information, including files, polls, and Web content. To see how to upload documents before a meeting see Section 1.4.9, Managing Files. You can share and store PowerPoint presentations, Adobe PDF files, Microsoft Word documents, and Microsoft Excel spreadsheets.
Sharing a File
Files can be uploaded before the meeting and then shared, or they can be uploaded during the meeting. To see how to upload files before the meeting, see Section 1.4.9, Managing Files.
Sharing a Previously Uploaded File.
-
In the meeting console, click .
The resource manager opens in the collaboration area.
-
Select the file and click the button.
Sharing a New File.
-
In the meeting console, click .
The resource manager opens in the collaboration area.
-
Click the button.
-
In the window that opens, select the file.
-
Click .
If you have selected, the file is shared after it has been uploaded and converted. Depending on the size of the file, it might take a few minutes to convert the file so it can be shown. When it has been converted and displayed, attendees can make notations on the document in the same way they annotate the whiteboard. For more information on the annotation tools, see Section 2.10.2, Sharing the Whiteboard.
Previewing an Uploaded File
When you have files stored in Conferencing, you can preview them before sharing them during the meeting.
-
In the meeting console, click
The resource manager opens in the collaboration area.
-
Click the
 button under the column of the file you want to preview.
-
In the drop-down list that appears, select .
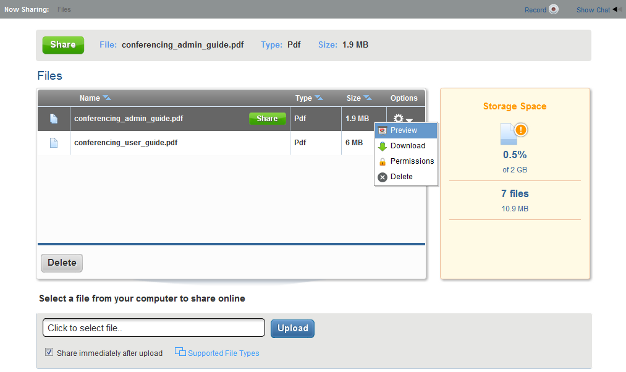
The file opens in the preview window. Use the arrows in the bottom right of the window to move through the different pages/slides.
-
When you have finished previewing the file, click in the top right corner to close the preview window.
Downloading an Uploaded File
If you have files stored in Conferencing, you can download them to the computer that you are currently using.
-
In the meeting console, click
The resource manager opens in the collaboration area.
-
Click the
button under the column of the file you want to download.
-
In the drop-down list that appears, select .
-
View the file using the software on your computer, or save the file to your computer.
Setting Permissions
Permissions allow you to select who can download a file. The files can either be public or you can select and enter a passcode that people must use to download the file.
-
In the meeting console, click
The resource manager opens in the collaboration area.
-
Click the
button under the column of the file for which you want to change the permissions.
-
In the drop-down list that appears, select .

-
(Optional) Select , then in the field that appears specify a passcode for people to use to download the file.
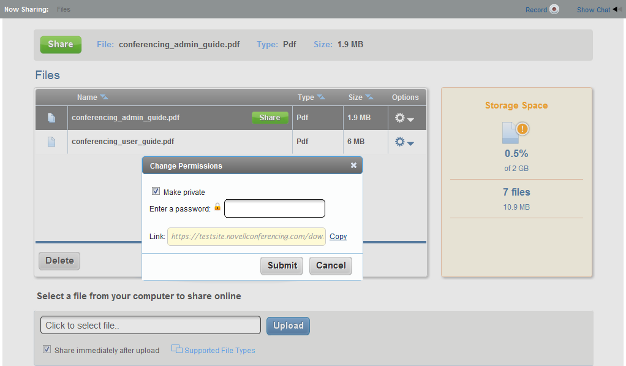
The link displayed in the dialog box is where other people can go to download the file. Click to copy the URL to your clipboard. You can then share the URL via e-mail, chat, or any other way you desire.
-
When you are finished setting up the permissions or copying the URL, click if you made any changes or click if you didn’t.
Deleting an Uploaded File
You can delete stored files when you are done sharing them so they don’t take up your storage space.
-
In the meeting console, click
The resource manager opens in the collaboration area.
-
Click the
button under the column of the file you want to delete.
-
In the drop-down list that appears, select .
-
In the dialog box that appears, select .
Your file is deleted from the Conferencing storage.
2.10.4 Sharing and Managing Polls
Polls allow you to create questions that you can use to interactively survey your attendees during a meeting. Polls can be used during several meetings and the results from multiple meetings can be shown, or you can display the results from the most recent meeting. Conferencing allows you to store up to 2 GB of files, polls, Web content, and recordings.
Creating a New Poll
Polls can be created before a meeting or during a meeting. To see how to create polls before the meeting, see Section 1.4.10, Managing Polls.
To create a poll during a meeting:
-
In the meeting console, click .
The poll manager opens in the collaboration area.
-
If you do not have any polls saved, fill in the title (question) and the multiple-choice answers in the area on the right.
If you have saved polls in Conferencing, click and fill in the information.

-
Click .
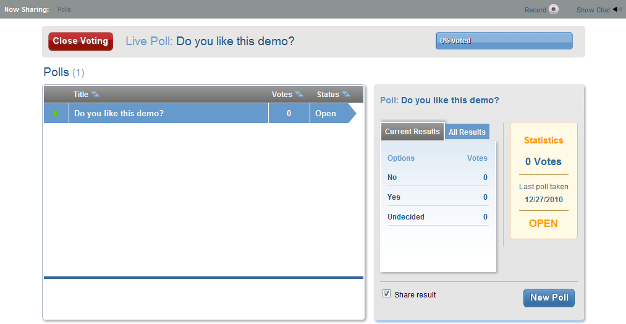
Sharing a Poll
Polls can be created and shared in multiple meetings. You can see and when you select the poll before sharing it.
-
In the meeting console, click .
The poll manager opens in the collaboration area.
-
Select the poll you want to share and click .
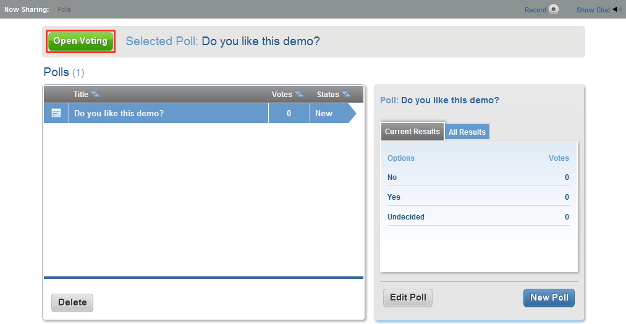
All attendees can now vote on the question.
-
When all attendees have finished casting their votes, click .
Editing a Poll
After a poll has been created, you can edit the question or any of the answers. You cannot add any additional answers. This can invalidate the results of the poll, so only use this when necessary.
-
In the meeting console, click .
The poll manager opens in the collaboration area.
-
Select the poll you want to edit and click .
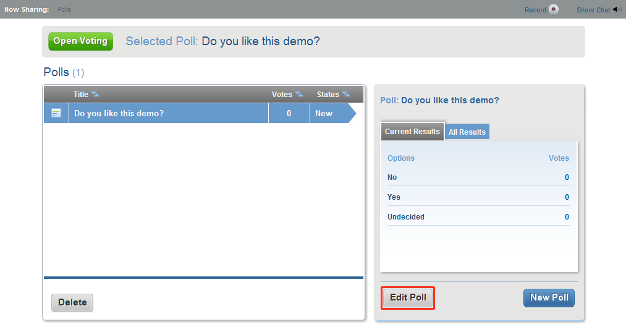
You can edit the question or any of the answers you desire. You cannot add any additional answers.
Deleting a Poll
You can delete polls that are stored in Conferencing so they don’t take up your storage space.
-
In the meeting console, click .
The poll manager opens in the collaboration area.
-
Select the poll you want to delete and click .
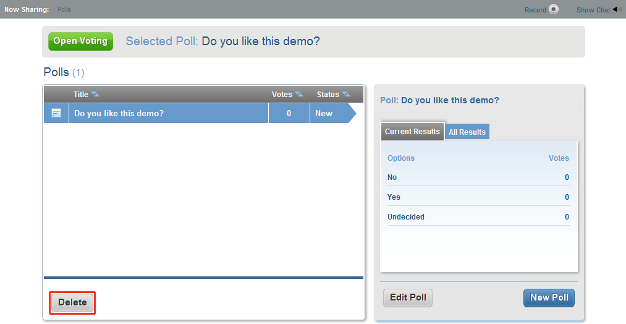
-
In the dialog box that appears, select .
Your poll is deleted from the Conferencing storage.
2.10.5 Sharing and Managing Web Content
Novell Conferencing allows you to share Web content during your meeting. Web content can be YouTube videos, Picasa videos, or any other video as long as you have the embed code or URL. The Web content can be stored in Conferencing before or during the meeting. To see how to store the Web content before a meeting, see Section 1.4.11, Managing Web Content.
Uploading Web Content
New Web content can be uploaded before the meeting or during the meeting. To see how to upload Web content before the meeting, see Section 1.4.11, Managing Web Content.
To upload content during the meeting:
-
In the meeting console, click .
The Web content manager opens in the collaboration area.
-
Paste the embed code from a video or the URL from YouTube or Picasa in the box.
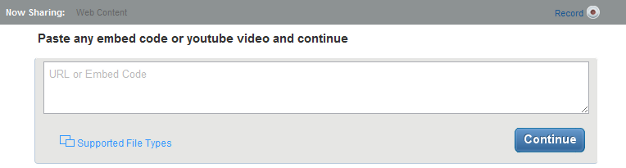
-
Click .
A preview window appears where you can change the name of the video or embed code.

-
Click .
The Web content is now shared with all attendees.
Sharing Web Content
You can share Web content that has been uploaded into Conferencing.
-
In the meeting console, click .
The Web content manager opens in the collaboration area.
-
Select the Web content that you want to share.
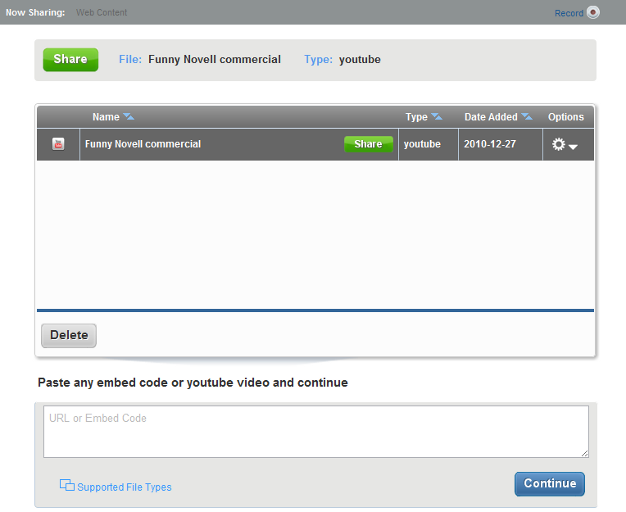
-
Click .
Previewing Uploaded Web Content
You can preview Web content that has been stored in Conferencing before you share it.
-
In the meeting console, click .
The Web content manager opens in the collaboration area.
-
Select the Web content you want to preview.
-
Click the
button and select in the menu that appears.
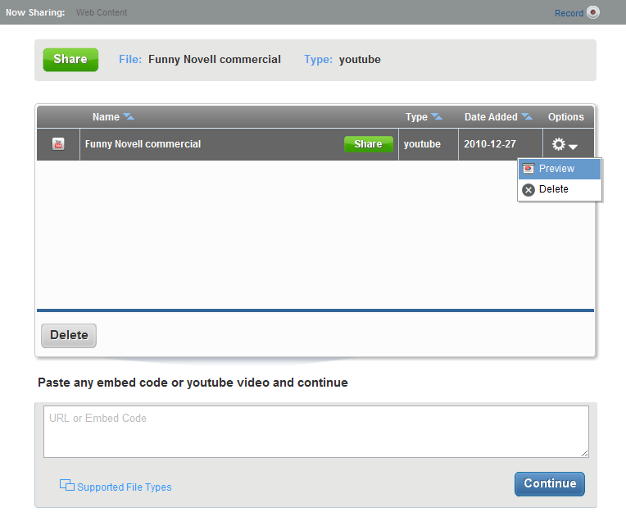
A preview window appears where you can view the Web content and change the name of the video or embed code.
-
Click if you changed the name of the embed code or click if you did not.
Deleting Web Content
You can delete Web content that has been stored in Conferencing when you are finished sharing it. This frees up storage space in Conferencing.
-
In the meeting console, click .
The Web content manager opens in the collaboration area.
-
Select the Web content you want to delete.
-
Click the
button and select in the menu that appears.
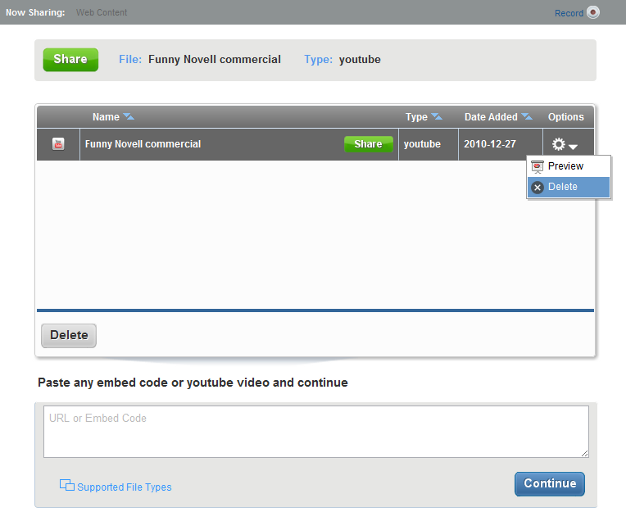
-
In the dialog box that appears, select .
Your Web content is deleted from the Conferencing storage.