30.3 Implementing Form Fill Policies
Section 30.2, Creating a Form Fill Policy for the Sample Form section describes how to create a simple Form Fill policy for a few input fields. This section describes all available options and explains how to use them to create a Form Fill policy and a Login Failure policy.
30.3.1 Designing a Form Fill Policy
Besides analyzing the form and determining the data items that need to be filled (see Section 30.1, Understanding an HTML Form), you need to consider the following when designing the Form Fill policy:
Verifying the Content or Page Type of the Form
If possible, the URL of the protected resource should include the filename of the page that contains the form. Sometimes this is not possible. If the URL references a directory, the Access Gateway has to sort through the files in the directory and determine which one contains the form. The Linux Access Gateway and the NetWare Access Gateway use different methods to sort through the files.
Linux Access Gateway
The Web server must sent the content type of the form. The Linux Access Gateway processes pages with the following content types:
text/html
text/xml
text/css
text/javascript
application/javascript
application/x-javascript
If the page with the form has no content type or has a type other than one in the above list, the Linux Access Gateway skips the page.
NetWare Access Gateway
The NetWare Access Gateway looks for the following extensions and excludes these files:
gif, jpg, jpeg, pdf, png, zip, jar, bmp, iso, ico, doc, mov, mp3, mpeg, ppt, rpm, tar, wav, sxi, xls, wmf, wpd, sxw, gz, css, odt
If the file has an extension other than one in the above list, the NetWare Access Gateway processes the page.
Creating a Form Matching Rule
To create a successful Form Fill policy, you need to create a matching rule that matches the policy to the HTML page that contains the form, and then matches the form on the page. The Access Gateway uses the following rules, in the order listed, when determining whether a page contains the required form:
-
Matches the protected resource path in the URL with the page. If they don’t match, the page is rejected. If they match, continues. For more information, see Using the URL of the Protected Resource.
-
Checks for CGI criteria. If they don’t match, the page is rejected. If they match or no criteria is specified, continues. For more information, see Using CGI Matching Criteria.
-
Checks for page matching criteria. If they don’t match, the page is rejected. If they match or no page matching criteria is specified, continues. For more information, see Using Page Matching Criteria.
-
Checks the form name criteria (which can be the <FORM> name attribute, the <FORM> ID attribute, or a number). If it doesn’t match, the page is rejected. If it matches, the form is processed. For more information, see Using Form Name Criteria.
When the Access Gateway uses URL or CGI criteria, it can make a match early in the filling process. This allows the Access Gateway to fill the data from the Web server and send it, almost simultaneously, to the browser. However, if the Access Gateway is configured to use page matching criteria, the Access Gateway must retrieve the entire page from the Web server, process it, and then determine whether the page needs to fill a form. All this processing must be completed before the Access Gateway can send any data to the browser. Unless the page is quite small, users will clearly perceive the delay.
The form name matching criteria are not used for page matching. They are used to determine which form on the page is selected.
Using the URL of the Protected Resource
When assigning a Form Fill policy to a protected resource, we recommend that the URL specified in the contain the filename of the page. Usually, such a URL is enough to match the HTML page for the form. However, when pages are dynamically generated, sometimes the same filename is used to display different pages. Sometimes you can’t specify the filename in the URL. When this is the case, you need to use either the or the to create an accurate page matching rule.
Using CGI Matching Criteria
If the page for the URL changes with the CGI portion of the URL (the portion that follows the question mark (?) and also called the query string), you can enter the CGI value. For example, consider the following URL:
http://webaccess.novell.com/servlet/webacc?Action=User.logout
If this is your URL, you can enter Action=User.logout as the value in the text box for the option. If the page generated from this URL always contains the page you want to match, you do not need to add any additional page matching criteria.
Using Page Matching Criteria
If your URL of your protected resource has the following characteristics, you need to use page matching criteria:
-
The URL does not contain any CGI data.
-
The URL displays generated pages which vary in content. For example, if your form fill login page and the login failure page share the same URL, you need to use page matching criteria.
Page matching criteria are the most processing-intense form of matching and should be avoided if possible, but sometimes they are the only method available to identify the page with the correct form. For example, suppose you have a login failure page and login page that use the same URL, with no CGI data. You can use page matching criteria to ensure that the Access Gateway matches the Form Fill policies for login and for login failure to the correct pages. You need to examine the source code for each page, and identify a string at the top of the page that uniquely identifies the page.
For example, the login page might contain a <TITLE> element that names the application the user is logging in to. If the login failure page does not contain the same <TITLE> element, you can use the <TITLE> element to identity the login page. Suppose the this is true and the login page contains the following string:
<TITLE>Novell WebAccess</TITLE>
You would add this string as the value in the text box for the option. Remember that white space is significant when white space is entered to the left of the value in the text box. To have the Access Gateway ignore white space, left-justify the value in the text box, or copy and paste the HTML text directly from the source code of the Web page.
Now you need to uniquely identify the login failure page. If this page does not have a <TITLE> element, look at the strings near the top of the page. Suppose the page contains the following string:
"Please log in again. You might have typed your name or password incorrectly."
Because the login page does not contain this string, you can use this string to identify the login failure page. You would add the following string as the value in the text box for the option for the login failure Form Fill policy.
Please log in again.
To have the Access Gateway ignore white space, left-justify the value in the text box, or copy and paste the HTML text directly from the source code of the Web page.
Using Form Name Criteria
After identifying the page, the Access Gateway needs to identify the form on the page. If there is only one form on the HTML page, the Access Gateway can easily identify the form. If the form has a name or an ID attribute, you can use the value of the attribute to identify the form. If the form doesn’t have either of these attributes, you can use the option with a value of 1. The first form the Access Gateway finds on the page matches.
When multiple forms exist on the same HTML page, the easiest and fastest matching method is to give each form a unique name or unique ID on the HTML page. If the forms have the same name or ID, you need to use the Number option, and the order in which they appear on the page determines their number.
The value 0 for the option has special meaning. You use this value when you want the Form Fill policy to fill in values for all forms on the page. Sometimes a page has multiple forms, but all forms on the page must be filled in before the page can be submitted. For example, one form might contains user information and another form contain user preferences. If both of these forms need to be filled in before the user can log in, then you can use the Number option set to 0, and the Fill Options section of the policy can contain fields for both forms, in the order in which they appear on the page.
Including JavaScript in a Form Fill Policy
Figure 30-2 illustrates a simple form.
Figure 30-2 Form Login Page
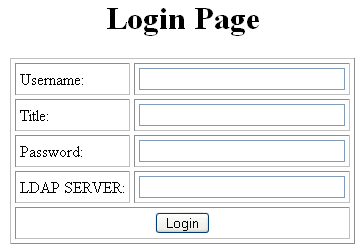
The source code for this simple form reveals that it includes JavaScript functions:
<html><head><title>Login Page</title></head><body>
<h1 align="center">Login Page</h1>
<script language="JavaScript">
  function setCookie(){
    document.cookie="myCookieName=myCookieValue";
  }
  function validate(){
  if(document.mylogin.title.ldap.length == 0){
    alert("You must provide the title for the user!");
    return false;
  }
  return true;
}
</script>
<form name="jscript" action="viewInfo.php" method="post" onload="setCookie()">
<center>
<table border="1" cellpadding="4" cellspacing="4">
  <tbody><tr>
  <td>Username:</td>
  <td><input name="username" size="30" type="text"></td>
  </tr>

  <tr>
  <td>Title:</td>
   <td><input name="title" size="30" type="text"></td>
  </tr>
  <tr>
   <td>Password:</td>
  <td><input name="password" size="30" type="text"></td>
  </tr>

  <tr>
    <td>LDAP SERVER:</td>
  <td><input name="ldap" size="30" type="text"></td>
  </tr>
  <tr>
  <td colspan="2" align="center">
  <input value="Login" onclick="return validate();" type="submit">
  </td>

  </tr>
</tbody></table>
</center>
</form>

<script language="JavaScript">
function doCookie(){
document.cookie="myCookieName=myCookieValue";
}
return true;
}
</script>

</body></html>
The significant code snippets for determining whether to include JavaScript commands in the Form Fill policy are displayed in bold. The <script> elements are in bold because you need to be aware of all the JavaScript on the HTML page. Whether all the functions in the JavaScript need to be included in the policy is usually determined by trial and error. There are some clues you can use to determine the requirements:
-
If a function is called within the form, you should include it in the Form Fill policy. The above form calls two JavaScript functions, setCookie() and validate().
-
If a function is not called by the form, you probably do not need to include it. The above form has one JavaScript function that falls within this category, doCookie. You can probably leave out these types of functions, but only trial and error can determine whether that is true.
For this form, you could select the option. This would include all three functions (setCookie(), validate(), and doCookie()) in the Form Fill policy. If you wanted to test whether the doCookie() function was needed, you would select the option and then specify the following in the text box:
function setCookie()
function validate()
Each function needs to be placed on a separate line. This feature does a string compare, so the string after the function key word must match exactly a string in the JavaScript.
Form Fill Character Sets (UTF-8)
Access Manager supports only UTF-8 encoding (UCS Transformation Format 8) and ISO 8859-1. Otherwise, Form Fill translations to the secret data store cannot be guaranteed.
30.3.2 Creating a Form Fill Policy
-
Examine the source code for the HTML form and determine what data the form requires and where that data is stored (LDAP attributes, Liberty User Profile attributes, shared secrets, credential profiles, etc.)
Ideally, the form should be its own HTML page, and page should be as small as possible. Form Fill must parse the entire file and assemble the body in contiguous memory before the first byte of the form is displayed to the user. On a large file, this can take enough time that your users might think the system has a problem.
If it isn’t possible to have the form on its own HTML page, make sure the form is easily identifiable on the page. For example, give the form a name or use CGI data (the text that the follows the question mark in the URL) to identify the page and form.
-
In the Administration Console, click > > .
-
Specify a name for the policy, select as its , then click .
-
In the section, click and select .

If you are converting an iChain® Form Fill policy written in XML to an Access Gateway policy, see
URLs Requiring Form Fill
in the Novell Access Manager 3.0 SP4 Installation Guide. -
In the section, specify how the Access Gateway can identify the form on the page. Select one or more of the following methods. To be as specific as possible, use as few of these methods as possible. For information on how to use these options effectively, see Creating a Form Matching Rule.
Form Name: Identities the form on the HTML page. Select one of the following:
-
Form Name: If the <form> element on your HTML page specifies a name attribute, select and specify the value of the name attribute in the text box. For example, suppose your form contains the following:
<form name="mylogin" action="validatepassword.php" method="post" id="form1">For this form, you would specify mylogin in the text box.
-
Form Number: The Access Gateway numbers forms sequentially from the top of the HTML page. If your page has multiple forms, you can use option and specify the form’s sequential location in the text box.
-
Form ID: If the <form> element on your HTML page specifies an id attribute, select and specify the value of the id attribute in the text box. For example, suppose your form contains the following
<form name="mylogin" action="validatepassword.php" method="post" id="form1">For this form, you would specify in the text box.
CGI Matching Criteria: Allows the Access Gateway to evaluate the query string in the URL (the portion after the question mark) to differentiate pages that have the same URL. Consider the following URL:
http://webaccess.novell.com/servlet/webacc?Action=User.login
For this URL, enter the following string in the text box for :
Action=User.login
If possible, copy the text from the form and paste it into the text box.
Page Matching Criteria: Causes the Access Gateway to search the HTML page for the specified text. If the specified text is found on the page, the page is a match for the policy. If it isn’t found, the page is not a match for the policy and the policy is not applied. For example, suppose your HTML page has the following string within the <FORM> element:
<title>Form Fill Test Page</title>
If you enter this string in the box, the Access Gateway searches the form for this string. If it finds the string, it knows it has a match.
White space is significant. If the text in the text box is left-justified, the text can be found anywhere on the HTML page. If the text contains leading white space, such as ten spaces, the text must be found with ten leading spaces. If possible, copy the text as it appears on the form and paste it into text box.
The more specific your information is, the faster Access Gateway can match the form. Parsing page matching criteria is a very intensive process. If possible, use the URL path specified for the protected resource or to identity the form.
-
-
In the section, create an entry for all the input fields and select options in the form. For each input field or select option, you need to specify the following information:
Input Field Name: Specifies the name of the field or option. This is the name attribute of the element on the form.
Input Field Type: Specifies the type attribute for the input field or select option in the form. Select one of the following data types for the field:
-
Text: Indicates that the field is a text field on the form.
-
Password: Indicates that the field is a password field on the form.
-
Checkbox: Indicates that the field is a check box on the form.
-
Radio Button: Indicates that the field is a radio button on the form.
-
Select: Indicates that the field is a select option on the form.
-
Hidden: Indicates that the field is an input field, but that this field is hidden from the user.
-
Not Specified: Indicates that the field is an input field, but the data type is not specified in the form.
Input Field Value: Specify the value for the field. You must specify the data type, then enter the value. Select one of the following data types:
-
Credential Profile: Specifies that the value should be retrieved from the credentials the user specified during authentication. If you have created a custom contract that uses a credential other than the ones listed below, do not use the Credential Profile as an input value.
-
LDAP Credentials: If you prompt the user for a username and password, select this option, then either (the cn of the user) or (the fully distinguished name of the user). Your Web server requirements determine which one you use.
The default contracts assign the cn attribute to the Credential Profile. If your user store is an Active Directory server, the SAMAccountName attribute is used for the username and stored in the cn field of the LDAP Credential Profile.
-
X509 Credentials: If you prompt the user for a certificate, select this option, then select one of the following. Your Web server requirements determine which one you use.
X509 Public Certificate Subject: Specifies that the subject field from the certificate should be the value, which can match the DN of the user, depending upon who issued the certificate.
X509 Public Certificate Issuer: Specifies that the issuer field from the certificate should be the value, which is the name of the certificate authority (CA) that issued the certificate.
X509 Public Certificate: Specifies that the entire certificate should be the value.
X509 Serial Number: Specifies that the certificate serial number should be the value.
-
SAML Credential: Injects the SAML assertion as the value of the field when SAML is used for authentication. This value is usually used for the user’s password.
-
-
LDAP Attribute: Indicates that the value should be retrieved from the specified LDAP attribute. If the attribute you require does not appear in the list, click to add the attribute.
-
Liberty User Profile: Indicates that the input field contains a Liberty User Profile attribute. In the value field, select the attribute. The attribute you select must be mapped to an LDAP attribute, and the Access Gateway retrieves its value from the LDAP directory.
-
Shared Secret: Indicates that the input field contains a user-entered value that is to be stored in the specified shared secret store.
You can create your own value. Click , specify a display name for the store, and the Access Manager creates the store. Select the store, click , specify a name for the attribute, then click . The store can contain one name/value pair or a collection of name/value pairs. For more information, see Section 30.4, Creating and Managing Shared Secrets.
-
String Constant: Indicates that the input field contains a static value. In the text box, enter the value for the string constant.
Data Conversion: Specify whether the case of the value entered by the user should be converted. Select one of the following options:
-
None: Indicates that no conversion should be performed on the value.
-
To Upper Case: Indicates that the value should be converted to uppercase.
-
To Lower Case: Indicates that the value should be converted to lowercase.
-
LDAP DN to NDAP Partial Dot Notation: Converts the LDAP DN (which uses typed, comma notation) to eDirectory™ typeless, dot notation: For example:
cn=jsmith,ou=Sales,o=novell to jsmith.sales.novell
-
LDAP DN to NDAP Leading Partial Dot Notation: Converts the LDAP DN to eDirectory typeless, leading-dot notation.
cn=jsmith,ou=Sales,o=novell to .jsmith.sales.novell
-
LDAP DN to NDAP Fully Qualified Partial Dot Notation: Converts the LDAP DN to eDirectory typed, dot-notation. For example:
cn=jsmith,ou=Sales,o=novell to cn=jsmith.ou=Sales.o=novell
-
-
In the section, specify how you want the information in the form submitted to the Web server. (The HTML form page determines whether the post method or the get method is used for the submission) Select one or more of the following options:
Auto Submit: Indicates that you want the form submitted to the Web server without having the user confirm the submission by clicking a button. If this option is not selected, Form Fill can fill in the data, but the user must click the button before the data is sent to the Web server. If you select , you can select one or more of the following options:
-
Debug Mode: Allows you to verify that the information in the filled-in form is valid before it is posted to the Web server. You can right-click and view the source that is being submitted to the Web server. If it is correct, click to send it to the Web server.
This is a troubleshooting option. We recommend that you use it when creating a new Form Fill policy, and that you remove it when you have determined that the policy is behaving as expected.
-
Mask Data: Replaces text input field values (username, password, etc.) with nov-ss-ff-masked instead of the value specified by the value parameter when the form is sent to the browser. The Access Gateway replaces these masked values with the real values when the Access Gateway submits the form to the Web server. The user’s browser never sees the actual values for these fields.
Insert Text in Header: If this option is selected, you can use the option to specify text to add to the header. Use this option to insert static values into the form.
Enable JavaScript Handling: Retains JavaScript from the original page. Use the following fields to specify how you want the JavaScript handled:
-
Functions to Keep: Specifies the functions you want executed from the JavaScript on the original page. In the text box, use the following format:
function setCookie()
where function is a key word, followed by a space, and then the name of the function. Each function should be entered on a separate line, but you need only one function per script block. Everything must match exactly (name, capitalization, white space.) If you include the parentheses after the function name (setCookie()), they must exactly match the white space in the JavaScript. If possible, copy the function name from the HTML page.
-
Statements to Execute on Submit: Specifies the functions you want executed just before the form is posted. Copy the JavaScript from the HTML page into this text box or add a Java function that you want called that is not on the HTML page. This allows you to modify the behavior of the form when you can’t modify the form.
If the text box is empty, the JavaScript function specified in the submit field of the HTML page executes before the form is posted.
For more information, see Including JavaScript in a Form Fill Policy.
-
-
In the section, specify how you want errors handled.
Redirect to URL: When an LDAP or NSS error occurs, the user is redirected to the URL you specify in the text box. This is optional and allows you to customize the error handling process. If you do not customize it, a standard error page is displayed.
-
Click , then click .
-
Continue with Section 13.4.5, Assigning a Form Fill Policy to a Protected Resource or Section 30.3.3, Creating a Login Failure Policy.
30.3.3 Creating a Login Failure Policy
The Login Failure policy can be part of the same policy as the Form Fill policy, if both share the same URL. In this case, the Form Login Failure policy should be the first action in the policy, and the Form Fill policy should be the second action in the policy. This causes a login failure to execute the policy that clears the stored data and the Form Fill policy to prompt the user for new data.
If the user is redirected to a different page when login fails, it is best to create a separate policy for that page, create a protected resource that includes just that page, and assign your Form Login Failure policy to that resource.
To create a Login Failure policy:
-
In the Administration Console, click > > .
-
Specify a name for the policy, select as its , then click .
-
In the section, click , then select .
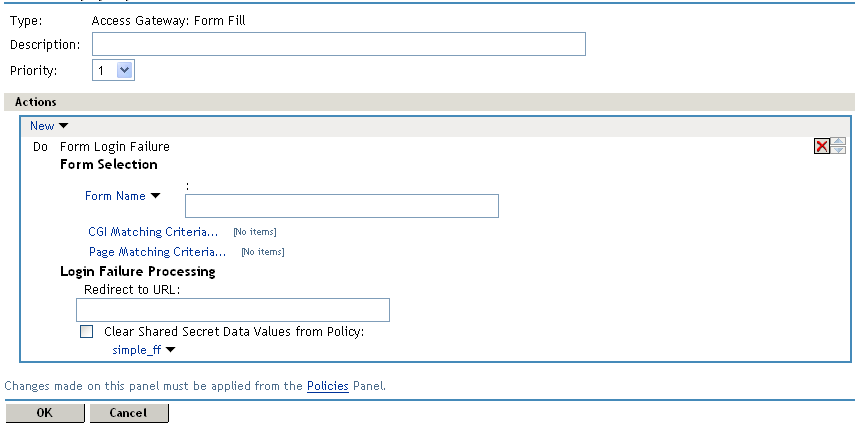
-
In the section, identify the form. This section uses the same criteria for identifying a form as the Form Fill policy. For more information, see Step 5 and Creating a Form Matching Rule.
-
In the section, define the actions you want executed when a user fails to log in. Fill in the following fields:
Redirect to URL: When a user’s login attempt fails, use this option with its text box to specify the URL you want the user redirected to. This is optional and allows you to customize what happens on login failures.
Clear Shared Secret Data Values From Policy: Select this field to delete the user’s stored data for a Form Fill policy. If the user has the ability (and perhaps the requirement) to periodically change his or her password or any other information on the form, you need to select this field. Otherwise, the wrong data can be stored for the user, and the Access Gateway has no way of updating the information.
From the list of Form Fill policies, select the policy whose stored values should be cleared with this Login Failure policy.
-
Click , then click .
-
Continue with Section 13.4.5, Assigning a Form Fill Policy to a Protected Resource.
30.3.4 Troubleshooting a Form Fill Policy
When a new Form Fill policy is not behaving as expected, use the following tips to discover the cause:
-
Select the option. This option prepares the form for submission, but doesn’t submit the form until you click the button. This allows you to view the source, and determine if the policy is generating the required data.
-
Check to ensure that all input fields have valid names, that the fields are being filled in the correct order, and that any JavaScript commands have been entered correctly.
-
Enable Form Fill logging. Form Fill is a function of both the proxy service and the embedded service provider. The embedded service provider logs the evaluation of the policy, and the proxy logs the process of gathering the data. To enable the embedded service provider tracing, see Section 39.1, Turning on Logging for Policy Evaluation. To enable Access Gateway log entries for Form Fill policies, see Enabling Form Fill Logging.
Check for the following problems with the source content of the Form Fill page:
Valid HTML Structure
The Form Fill process aborts if the page does not contain valid HTML structure. The page must contain the <html></html> tags, and the form must contain the <form></form> tags. If these tags are missing, you should correct the source page on the Web server. If this is not possible, you can create a rewriter policy to add the tags.
-
To add the <html> tag, have the rewriter policy search for the <body> tag, and replace it with <html><body>.
-
To add the </html> tag, have the rewriter policy search for the </body> tag, and replace it with </body></html>.
-
Use similar entries to add the <form></form> tags. You’ll need to discover which tag or phrase starts and stops the form.
Configure your rewriter policy so that it runs before the default rewriter policy.
The Option Element Does Not Contain a Value Attribute
If an <option> element does not contain a value attribute, Form Fill cannot fill the value. For example:
<form action="select.htm">
   <select name="top2">
      <option>Bob</option>
      <option>Alice</option>
   </select>
</form>
If your form contains <option> elements similar to these, they need to rewritten to contain a value attribute. For example:
<form action="select.htm">
   <select name="top2">
      <option value="name1">Bob</option>
      <option value="name2">Alice</option>
   </select>
</form>
If possible, change the source page on the Web server to add the value attribute to the <option> elements. If this is not possible, you can use a rewriter policy to add the value attribute.
-
For the Bob option, have the rewriter policy search for <option>Bob and replace it with <option value="name1">Bob.
-
For the Alice option, have the rewriter policy search for <option>Alice and replace it with <option value="name1">Alice.
Configure your rewriter policy so that it runs before the default rewriter policy.
The Form Element Does Not Contain a Method Attribute
If the <form> element does not contain a method attribute, Form Fill does not run an Auto Post. For example, the following form cannot use an Auto Post.
<form name="loginForm">
To enable Form Fill so that it can run an Auto Post, you need to add a method attribute to the <form> element. For example:
<form method="get" action="index.htm" name="loginForm">
If possible, change the source page on the Web server to add the method attribute to the <form> element. If this is not possible, you can use a rewriter policy to add the method attribute.
-
Search for <form
-
Replace this string with <form method="get" action="index.htm"
Configure your rewriter policy so that it runs before the default rewriter policy.