40.2 Troubleshooting the Linux Access Gateway
This section provides various troubleshooting scenarios and frequently asked questions that you might encounter while using the Linux Access Gateway, and suggests appropriate actions.
-
Section 40.2.1, Useful Tools and Files for Troubleshooting the Linux Access Gateway
-
Section 40.2.2, Troubleshooting a Failed Linux Access Gateway Configuration
-
Section 40.2.3, Troubleshooting a Linux Access Gateway Crash
-
Section 40.2.12, Authorization and Identity Injection Issues
-
Section 40.2.14, 302 Errors When Using Internet Explorer 7 Browser
For information about installation and import issues, see Troubleshooting Linux Access Gateway Installation
and Troubleshooting the Access Gateway Import
in the Novell Access Manager 3.0 SP4 Installation Guide.
For information on how to install security patches on your Linux Access Gateway, see Installing the Latest Linux Patches
in the Novell Access Manager 3.0 SP4 Installation Guide.
40.2.1 Useful Tools and Files for Troubleshooting the Linux Access Gateway
Useful Tools
Table 40-1 describes some of the tools available in the Linux operating system or installed by the Linux Access Gateway that can help you determine the cause of a problem.
Table 40-1 Useful Tools
|
Tool |
Description |
|---|---|
|
icon |
In the Administration Console, click on the icon to view details about the health of the Access Gateway. For more information, see Section 34.3, Monitoring the Health of an Access Gateway. |
|
curl |
Use it to view identity provider metadata from the Linux Access Gateway. See Section 38.2.7, Test Whether the Provider Can Access the Metadata. |
|
tail -f |
Use it to view real time activity in key log files. For information on useful files to tail, see Useful Troubleshooting Files. |
|
proc |
Use it to check resources available on the system. |
|
netstat /ss |
Use it to view statistics about the listeners on the Linux Access Gateway. |
|
netcat |
Use it to access the Linux Access Gateway console, which displays statistics and information about various processes. For more information, see The Linux Access Gateway Console. |
|
tcpdump |
Use it to capture data on standard and loopback interfaces and to view SSL data with imported keys. |
|
nash |
Use it to manually configure log level verbosity and replace IP addresses. For log level information, see Linux Access Gateway Logs. |
|
/etc/init.d/novell-vmc |
Use the novell-vmc command line options to restart the proxy and view status. For more information, see Table 40-2. |
|
The /chroot/lag/opt/novell/bin directory contains the following scripts: |
|
|
getlaglogs.sh |
Generates a /var/log/laglogs.tar.gz file of the install and system log files. For more information, see Linux Access Gateway Logs. |
|
lagupgrade.sh |
Use it to apply patches. For more information, see |
|
lagconfigure.sh |
Use it to resolve auto-import issues. For more information, see |
You can use the following commands to stop and start the Linux Access Gateway and to view its status.
Table 40-2 novell-vcm Commands
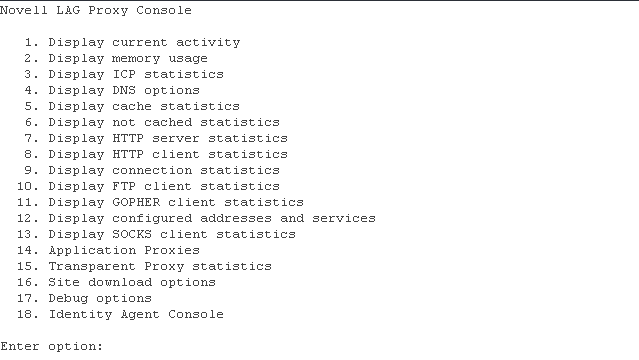
The Linux Access Gateway Console
-
To access the console, run the following command:
netcat localhost 2300
-
Press Enter at the Please enter terminal type prompt.
This displays the Linux Access Gateway console screens.
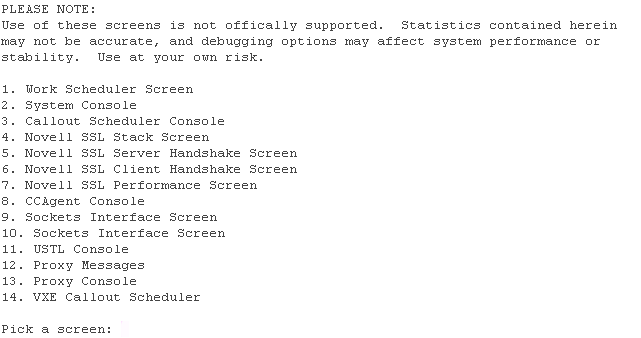
Most of the time, the Proxy Console screen is the one you should pick. The other screens are used mainly by the developers of the Linux Access Gateway. If you are having SSL connection problems, the SSL screens can help in diagnosing the problem.
-
To access the Proxy Console screen, enter 13.
-
To access a specific screen, enter the number.
Screen
Description
1. Display current activity
Displays information about connections (server and client), cached objects, and HTTP requests.
2. Display memory usage
Displays information about memory pools and memory used and the types of objects stored in memory.
3. Display ICP statistics
Displays statistics for the Internet Cache Protocol.
4. Display DNS options
Displays statistics and information about the entries in the DNS table.
5. Display cache statistics
Displays information about cached objects and the COS partition.
For more information, see Checking if the COS Partition Is Mounted.
6. Display not cached statistics
Displays statistics about requests for objects that cannot be cached.
7. Display HTTP server statistics
Displays statistics about the server handling of HTTP requests.
8. Display HTTP client statistics
Displays statistics about the client handling of HTTP requests.
9. Display connection statistics
Displays general information about connections.
Displays statistics about FTP client requests.
10. Display FTP client statistics
11. Display GOPHER client statistics
Displays statistics about GOPHER requests.
12. Display configured addresses and services
Displays information about the IP addresses that the Access Gateway is using.
13. Display SOCKS client statistics
Displays statistics about SOCKS client requests.
14. Application Proxies
Displays proxy service statistics.
15. Transparent Proxy statistics
Displays transparent proxy statistics.
16. Site download options
Displays information about the last download and prompts for information to schedule a new download.
17. Debug options
Allows you to control cache purging.
18. Identity Agent Console
Displays user information.
For more information about the user screen, see User Details.
-
To return to the opening page of the console from other console page, press Esc+Enter.
This key stroke works only on some pages.
-
To exit the console, press Ctrl+C.
Useful Troubleshooting Files
Viewing Log Files
Table 40-3 describes the Linux Access Gateway files that contain troubleshooting information.
Table 40-3 Log Files with Troubleshooting Information
|
Log File |
Description |
|---|---|
|
catalina.out |
Located in the /var/opt/novell/tomcat4/logs directory and available from the General Logging page in the Administration Console. The embedded service provide, which communicates with the Identity Server, writes to this log file. The log level is controlled by the Identity Server Configuration. For configuration information, see Section 39.1, Turning on Logging for Policy Evaluation. For information on how to use the entries for policy troubleshooting, see Section 39.0, Troubleshooting Access Manager Policies. |
|
ics_dyn.log |
Located in the /var/log directory and available from the General Logging page in the Administration Console. The proxy service writes to this log file. For information on enabling logging to this file, see Linux Access Gateway Logs. For maximum verbosity, the proxy service must be started in debug mode. See Table 40-2, novell-vcm Commands. |
|
lagsoapmessages |
Located in the /var/log directory and available from the General Logging page in the Administration Console. When enabled, this file contains a log of the SOAP messages between the Linux Access Gateway and the embedded service provider for authentication (roles, contracts, and timeouts) and policy interaction (Authorization, Form Fill, and Identity Injection). For information on enabling logging to this file, see Configuring Logging of SOAP Messages and HTTP Headers. |
|
laghttpheaders |
Located in the /var/log directory and available from the General Logging page in the Administration Console. When enabled, this file contains a log of the HTTP headers to and from the Linux Access Gateway. For information on enabling logging to this file, see Configuring Logging of SOAP Messages and HTTP Headers. |
Using Touch Files
Table 40-4 describes the touch files that control the Linux Access Gateway.
Table 40-4 Touch Files
|
Filename |
Description |
|---|---|
|
.~newInstall |
Located in the /var/novell directory. Purges cache during restart. The Linux Access Gateway creates this file during every start. If you want the Linux Access Gateway to come up without the contents cached in the previous run, remove this file before you restart the Linux Access Gateway. |
|
.~fastAutoRestart |
Located in the /var/novell directory. Restarts the Linux Access Gateway in the daemon mode without the VMController. This automatically removes the /var/novell/.~newInstall file during the Linux Access Gateway restart. This ensures that the contents cached in the previous run are not read and the time taken to restart the Linux Access Gateway is reduced. |
|
.modVia |
Located in the /var/novell directory. Adds the device ID in the Via header that is sent by the Linux Access Gateway to the Web server. To add a device ID in the Via header, enter the following command: /var/novell/.modVia Then restart the Linux Access Gateway. The Linux Access Gateway sends the Via header in the following format: Via: 1.0 www.mylag.com (Access Gateway 3.0.1-72-D06FBFA8CF21AF45) |
|
.ForceHTTPSSchemeInESPRedirection |
Located in the /var/novell directory. Forces the Linux Access Gateway to always return the URL in the HTTPS schema. |
|
.EnableSecureCookie |
Located in the var/novell/ directory. It sets the HTTPS services authentication cookie with the keyword secure. For more information, see Section 14.7.2, Securing the Proxy Session Cookie |
|
.ForceSecureCookie |
Located in the /var/novell/ directory. When this touch file is present, even the HTTP services have the authentication cookie set with the keyword secure. For more information, see Section 14.7.2, Securing the Proxy Session Cookie |
|
.EnableHttpOnlyCookie |
Located in the /var/novell directory. Configures the Linux Access Gateway to set its authentication cookie with the HttpOnly keyword, to prevent scripts from accessing the cookie. For more information, see Section 14.7.2, Securing the Proxy Session Cookie. |
|
.alwaysUseJSFor302 |
Located in the /var/novell directory. Always uses JavaScript for redirection for all issues from all the browsers. For more information, see Section 40.2.14, 302 Errors When Using Internet Explorer 7 Browser. |
|
.useJSFor302withIE7 |
Located in the /var/novell directory. Always uses JavaScript for redirection from IE7 browser for any issues. For more information, see Section 40.2.14, 302 Errors When Using Internet Explorer 7 Browser. |
|
.useRelativeUrlInJS |
Located in the /var/novell directory. Uses the relative URL in JavaScript whenever required. For more information, see Section 40.2.14, 302 Errors When Using Internet Explorer 7 Browser. |
|
.ignoreDnsServerHealth |
Located in the /var/novell directory. When an internal DNS server is used, the health check fails. When the .ignoreDnsServerHealth is used, the health reports green. |
|
.doNotUseTLS |
Located in the /var/novell directory. The Linux Access Gateway uses the TLS protocol by default. However, some Web servers that do not support the TLS protocol abort the SSL handshake because they do not fall back to SSLV3. When this touch file is set, the Linux Access Gateway tries the SSLV3 protocol by default, instead of the TLS protocol. |
|
.overwrite_AuthHeader_With_IIData |
Located in the /var/novell directory. Overwrites the browser authorization header with the Identity Injection data. |
|
.incCOSSize |
Located in the /var/novell directory. Enables Linux Access Gateway to rewrite more URLs per page. |
40.2.2 Troubleshooting a Failed Linux Access Gateway Configuration
If the IP address and other network configurations are not reflected in the installed Linux Access Gateway, log in as a root user and run the following commands:
rm /opt/novell/legacy/etc/proxy/.novell_lag_lock
/etc/init.d/novell-vmc stop
/etc/init.d/novell-vmc start
40.2.3 Troubleshooting a Linux Access Gateway Crash
The Linux Access Gateway might have crashed because of the following reasons:
-
SIGSEGV
-
ASSERT (for a debug build only)
The following sections explain how to gather the files that need to be sent to Novell for a resolution of the problem.
Linux Access Gateway Logs
-
Enter the following command from the bash shell to collect the debug log files that are generated:
/chroot/lag/opt/novell/bin/getlaglogs.sh -
The laglogs.tgz tar file is located in the /var/log directory.
-
Send this tar file to Novell Support.
Event Log
By default the event log size is 15 MB. The size of event log can be controlled by configuring the required event log size in the eventlogsize.cfg file, located at the /chroot/lag/etc/opt/novell directory. For example, if you specify 350 in the file, you can configure an event log of size 350 MB. This file should contain only the file size information. This file should not contain any other characters or new lines.
The procedure for obtaining the event log depends upon the build type:
Event Log for a Production Build
To get the event log for the production build:
-
Log in as the root user.
-
To disconnect all instances of Linux Access Gateway, enter the following command:
/etc/init.d/novell-vmc stop
-
Enter the following command to change the root environment:
chroot /chroot/lag
-
To start the process, enter the following command:
gdb /opt/novell/bin/ics_dyn 2>/var/log/ics_dyn.log
-
At the GDB prompt, run the following command:
run -m <memory>
Where <memory> is the percentage of total memory to be used for ics_dyn process. It is recommended to set this value in the range of 20-30 percent.
-
Repeat the scenarios to reproduce the issue.
-
If you are trying to reproduce the proxy crash, you see the GDB prompt as soon as the crash is reproduced.
-
If you are trying to reproduce a functionality issue, press Crtl+C to enter the GDB prompt as soon as the issue is reproduced.
For a list of commands that can be entered in the debugger, see Useful Debugger Commands.
-
-
To save event logs to a file, enter the following command:
d ,save 1This stores all the events in the /chroot/lag/opt/novell/debug/<pid>all_events.0.txt file.
-
Tar or Zip this file and send it to Novell Support.
Event Log for a Debug Build
To get the event log:
-
Log in as the root user.
-
To stop all instances of Linux Access Gateway, enter the following command:
/etc/init.d/novell-vmc stop
-
To start the Novell Linux Access Gateway in debugging mode, enter the following command:
/etc/init.d/novell-vmc gdb
-
To run the Linux Access Gateway process, enter the following command at the GDB prompt:
run -m <memory> 2>/var/log/ics_dyn.log
Where <memory> is the percentage of total memory to be used for ics_dyn process. It is recommended to set this value in the range of 20-30 per cent.
-
Repeat the scenarios to reproduce the issue.
-
If you are trying to reproduce the proxy crash, you will enter the GDB prompt as soon as the crash is reproduced.
-
If you are trying to reproduce a functionality issue, enter the following command to enter the GDB prompt as soon as the issue is reproduced:
Crtl+C
NOTE:For a list of commands that can be entered in the debugger, see Useful Debugger Commands.
-
-
To save all event logs to a file, enter the following command:
d ,save 1This stores all the events in the /chroot/lag-debug/opt/novell/debug/<pid>all_events.0.txt file.
-
Tar or Zip this file and send it to Novell Support.
Core Dump
Before you begin, make sure there is free space in root to hold the core file and that the space is at least equal to the RAM size
To collect a core dump:
-
Log in as the root user.
-
To disconnect all instances of the Linux Access Gateway, enter the following command:
/etc/init.d/novell-vmc stop
-
At the bash prompt, specify the following command:
touch /tmp/.dumpcore
-
Enter the following command to start the Linux Access Gateway:
/etc/init.d/novell-vmc start
-
Repeat the scenarios to reproduce the issue.
The core is dumped to the /chroot/lag core.<pid> file.
<pid> is the process ID of ics_dyn process.
After the core is dumped, the Linux Access Gateway restarts.
-
Tar or Zip the core dump send it to Novell Support.
Proxy Hang Core
To analyze the proxy hang and create a core file:
-
Enter the following command to change the root environment:
chroot /chroot/lag
-
Enter the following command to attach the ics_dyn process to the debugger:
gdb /opt/novell/bin/ics_dyn <pid>
Where <pid> refers to the Process ID of the ics_dyn process.
-
At the GDB prompt, enter the following command:
set logging on <filename>
Where <filename> specifies the name of the file that will store the output of the executed debugger commands.
-
Enter the following command to collect a stack trace of all threads:
thread apply all bt
-
Enter the following command to turn off logging:
set logging off
-
Enter the following command to save the core dump in the /chroot/lag directory.
gcore
The core dump is saved as core.<pid>
-
Tar or Zip this file and send it to Novell Support.
Packet Capture
The tcpdump utility allows you to capture network trace packets.
-
Log in as the root user.
-
Enter the following command:
tcpdump -s0 -n -t -p -i ‘any’ -w filename.cap
-
Tar or Zip this file and send it to Novell Support.
40.2.4 HTTP Requests Are Dropped
If you have HTTP requests that are being dropped, create the following touch file:
/var/novell/.AllowUnknownHTTPMethods
This file allows the Access Gateway to forward unknown HTTP methods.
Restart the Access Gateway.
If this solves your problem, discover the name of the unknown HTTP method and inform Novell so that it can be added to the list of supported methods. To allow any unknown method to be forwarded, opens a security vulnerability.
40.2.5 Linux Access Gateway Not Responding
If the Linux Access Gateway is not responding, do the following:
-
Enter the following command to change the root environment:
chroot /chroot/lag
-
Enter the following command to attach the ics_dyn process to the debugger:
gdb /opt/novell/bin/ics_dyn <pid>
Where <pid> refers to the Process ID of the ics_dyn process. You can get the process ID by entering the following command:
pgrep ics_dyn
-
At the GDB prompt, enter the following command:
set logging file <filename>
Where <filename> specifies the name of the file that will store the output of the executed debugger commands.
-
Enter the following command to start logging:
set logging on
-
Enter the following command to collect a stack trace of all threads:
thread apply all bt full
-
Enter the following command to turn off logging:
set logging off
-
Enter the following command to save the core dump in the /chroot/lag directory.
gcore
The core dump is saved as core.<pid>
-
Tar or Zip this file and send it to Novell Support.
40.2.6 Connection Details
To obtain connection information:
40.2.7 Network Socket Issues
This section lists various issues related to network sockets and provides information on how to verify bind and connection issues:
Socket Listener Bind
To verify whether the socket listener is bound to the required port:
-
Log in as the root user.
-
At the bash prompt, enter the following command:
netstat -anp | grep LISTEN
All ports are displayed.
-
Search for the desired port.
If the required port is not visible in the list, a bind failure has occurred.
Issues with Outgoing Connections
To verify that the Access Gateway is able to make outbound connections:
-
Log in as the root user.
-
At the bash prompt, view the following log file:
/var/log/ics_dyn.log
-
Search for a connection message. If the service is unavailable, the file contains messages similar to the following:
ERROR Connection FAILED with peer
40.2.8 Authentication Issues
This section provides information related to authentication:
User Details
To check the details about the users logged in to the Linux Access Gateway:
-
To access the console, enter the following command:
netcat localhost 2300
-
Press Enter at the Please enter terminal type prompt.
This displays the Linux Access Gateway console screens.

-
Enter the option number at the prompt.
The Linux Access Gateway Console screen is displayed.
-
To select the option, enter the option number at .

The Identity Agent Console screen is displayed.

The user information contains the following items:
-
X: An authenticated user.
-
O: An unauthenticated user.
-
R: A retired user; the user session has timed out. The default time-out is 3 minutes. In this state, the user session is deleted. If the user makes another request from the browser session, the Linux Access Gateway requires the user to authenticate.
-
L: The user has logged out of the session.
-
W: The user session is functional.
-
U: The use count is more than zero.
-
Username: The full distinguished name of the user. The username can contain a maximum of 20 characters.
-
TTL: The time remaining before the user session goes to the retired state if the user session remains idle.
-
Timeout: The session timeout is displayed in d:hh:mm:ss format.
The screen displays 20 users at a time. The screen also displays the browser IP address. The following options are available at the bottom of the screen:
-
Previous Page: Lets you go to the previous page.
-
Next Page: Lets you go to the next page (to view the next set of users).
-
Refresh: Refreshes the page to reflect the latest user status.
-
Exit: Exits the console.
-
Error Codes
The following error codes indicate authentication problems:
500 Internal Server Error
Possible Cause: Authentication failed because of a system error.
Action: Contact Novell Support.
504 Gateway Timed Out
Possible Cause: The authentication back-end channel is not working.
Action: Check to see if the embedded service provider is listening on the loopback address 127.0.0.1 at port 8080: Use the following command:
netstat -na | grep 8080
If the embedded service provider is down, restart the service provider from the Administration Console.
If the issue persists, contact Novell Support.
40.2.9 Rewriter Issues
The following sections explain how to troubleshoot problems with the rewriter:
Reading Configuration Files
If the rewriter is successful in reading the configuration files, and you have enabled the log level to LOG_INFO, the following message is displayed in the /var/log/ics_dyn.log file:
Reading Config File
Aug 16 04:16:51 proxy140 LINUX_AG:REWRITER:0:Configuration information read successfully
For more information on configuring log levels, see Configuring Log Levels.
If the rewriter fails to read the configuration files, the following message is displayed:
Aug 16 04:16:51 proxy140 LINUX_AG:REWRITER:0:Reading configuration failed for ssTypeName=www.mynovell.com
If this happens, re-create the corresponding proxy service and restart the Linux Access Gateway service.
Rewriting a URL
Set the log level to LOG_DEBUG to view rewriter log messages in the /var/log/ics_dyn.log file. (See Configuring Log Levels.)
For example, if the Rewriter successfully rewrites the URL, the following messages are displayed:
Aug 16 04:16:51 proxy140 LINUX_AG:REWRITER:0:URL:'http://www.mynovell.com:9090/common/inc/nav/main.js' Content type match, Will Rewrite
Aug 16 04:16:51 proxy140 LINUX_AG:REWRITER:0:URL:'http://www.mynovell.com:9090/common/inc/nav/main.js' Unknown Content-Type - automatic match - Will Rewrite
Aug 16 04:16:51 proxy140 LINUX_AG:REWRITER:0::'http://www.mynovell.com:9090/common/inc/nav/main.js' NULL Content-Type - automatic match - Will Rewrite
Aug 16 04:16:51 proxy140 LINUX_AG:REWRITER:0:In RewriterOption::shouldRewriteUrl, returning TRUE.
Aug 16 04:16:51 proxy140 LINUX_AG:REWRITER:0:URL:'http://www.mynovell.com:9090/common/inc/nav/main.js' Unknown extension - automatic match - Will Rewrite
Aug 16 04:16:51 proxy140 LINUX_AG:REWRITER:0:URL:'http://www.mynovell.com:9090/common/inc/nav/main.js' NULL extension - automatic match - Will Rewrite
Aug 16 04:16:51 proxy140 LINUX_AG:REWRITER:0:URL:'http://www.mynovell.com:9090/common/inc/nav/main.js' Extension type match - Will Rewrite
If the conditions for rewriting a URL fail, the following messages are displayed:
Aug 16 04:16:51 proxy140 LINUX_AG:REWRITER:0:URL:'http://www.mynovell.com:9090/favicon.ico' - Did not match INCLUDE list, Content-Type and Extension type
Aug 16 04:16:51 proxy140 LINUX_AG:REWRITER:0:In RewriterOption::shouldRewriteUrl, returning FALSE.
Check the rewriter configuration. Ensure that your content type, extension type, and include URL list are valid.
40.2.10 COS Related Issues
The following sections explain how to troubleshoot COS (cache object store) partition issues:
Viewing COS Partition Details
You can view COS partition details either through YaST or through the nash prompt.
Using YaST
-
Log in as the root user.
-
At command prompt, enter the following command:
fdisk -l
The partition details are displayed. Check for COS partition details. Make sure that a partition is created with a partition ID of 68 and that the file system is created as type unknown.
Using nash
-
At the command prompt, enter the following command:
nash
-
At the nash shell prompt, enter the following command:
configure .current
-
Enter the following command:
vm scan
If the COS partition is already created, the details are displayed.
Checking if the COS Partition Is Mounted
-
Access the Linux Access Gateway main screen.
For more information on how to access the Linux Access Gateway main screen, see The Linux Access Gateway Console.
-
Enter the option number at the prompt.
The Linux Access Gateway Console screen is displayed.
-
Enter the option number at the prompt.

-
Enter the option number at the prompt.

The following details are displayed if the COS partition is mounted:

40.2.11 Memory Issues
The following sections explain how to troubleshoot memory issues:
Checking Memory Details and Related Information
Most of the information, including the memory details, can be accessed by entering the following command at the bash prompt:
top
Ensure that the Linux Access Gateway does not occupy more than the percentage of the memory requirements you set. ics_dyn occupies approximately 20 to 25 percent of the total memory by default.
Checking Available Memory
As the root user, enter the following command at the bash prompt:
cat /proc/meminfo | grep MemTotal
40.2.12 Authorization and Identity Injection Issues
Authorization and Identity Injection Error Messages
If you have already configured the Identity Injection policies, you might receive the following errors while trying to send a browser request:
-
Service provider is in halted state. Please contact your administrator to restart Service Provider from Administrator Console.
-
Policy engine is sending invalid response. Please contact your administrator to restart Service Provider from Administrator Console.
-
Unable to process your request.
-
Unable to process your request due to parseXML failure.
These errors indicate that the embedded service provider is down. Every Identity Injection policy has a policy ID, which is sent to the Access Gateway by the embedded service provider. If the embedded service provider is down, the Access Gateway does not get the policy ID, and an error is thrown. Restart the embedded service provider from the Administration Console as follows:
-
In the Administration Console, click > .
-
Select the server, then click .
-
Click > .
-
Click .
Identity Injection Failures
Identity injection might fail while trying to inject authentication headers because of improper policy configuration or because the Identity Server is not sending values to the Access Gateway.
Check the /var/log/ics_dyn.log file for the following error messages:
-
Customer Header Injection Failed.
-
Query String Injection Failed.
-
Authentication Header Injection Failed.
To receive help resolving identity injection failures, send the following information to Novell Support:
-
Linux Access Gateway logs. For more information on how to get Linux Access Gateway log files, see Linux Access Gateway Logs.
-
Packet Capture. For more information on how to get packet captures, see Packet Capture.
40.2.13 Form Fill Issues
Form Fill error messages are logged only if you set the log level to LOG_DEBUG. The entries are logged in the ics_dyn.log file. Search for entries with a correlation tag of AM#504507. For more information, see Section 39.2.6, Form Fill Traces.
This section contains the following information about form fill issues:
Form Fill Error Messages
You might get the following errors when sending a browser request:
-
DataStore Error
-
The service provider is not running at the moment. Please retry after a few seconds.
These errors indicate that the Access Gateway cannot retrieve the information that is essential to process the browser request, or is unable to save the information provided by the user because the embedded service provider is down. Retry the action after a few seconds. If the error persists, restart the embedded service provider from the Administration Console.
Form Fill Failure Because of Incorrect Policy Configuration
Form fill fails if the policy is not configured correctly. For configuration information, see Section 30.0, Creating Form Fill Policies.
Browser Spinning Issues
Browser spinning can occur if inappropriate data is filled in the form because of one of the following reasons:
-
Shared secrets are configured, the user provided incorrect data to the Linux Access Gateway, and there are no appropriate actions configured to handle login failure.
-
A Credential Profile with LDAP attributes has been configured, and there is a mismatch between the user name used to authenticate to the Linux Access Gateway and the user name used to authenticate to the accelerated Web server.
When a Form Fill policy succeeds and the authentication to the Web server fails, the Web server redirects the browser to its authentication page again and again, if auto-submit is enabled. In such a situation, if there is no appropriate login-failure action configured in the policy, the browser “spins” endlessly.
If this happens, do the following:
-
Kill the browser session. If you are unable to do this, run the following commands to restart the Linux Access Gateway:
/etc/init.d/novell-vmc stop /etc/init.d/novell-vmc start
-
If the issue is with a Credential Profile with LDAP attributes, verify which LDAP attributes are required by the Web server, and create the appropriate entries in the Form Fill policy.
-
If the issue is with shared secrets, delete the corresponding values from the Secret Store. If it is not possible to delete the value, modify the corresponding policy to use a different or a new custom attribute or shared secret attribute. For more information on modifying the policy, see Section 30.3, Implementing Form Fill Policies.
40.2.14 302 Errors When Using Internet Explorer 7 Browser
When you use Internet Explorer 7 browser, you might get a Page can not be displayed error after receiving a HTTP 302 redirection message. This is because a memory leak in the Internet Explorer prevents redirection of browser to the authentication page and the authentication process stops. To avoid this situation, use the following touch files:
-
.alwaysUseJSFor302 : When this touch file is used, Linux Access Gateway uses JavaScript for redirection for all issues from all the browsers.
-
.useJSFor302withIE7: When this touch file is used, Linux Access Gateway uses JavaScript for redirection for any issues from the Internet Explore 7 browser.
-
.useRelativeUrlInJS : When this touch file is used, Linux Access Gateway uses the relative URL in JavaScript whenever required.