1.3 Creating a Basic Identity Server Configuration
After you log in to the Administration Console, click > . The system displays the installed server, as shown in the following example:

At this point the Identity Server is in an unconfigured state and is halted. It remains in this state and cannot function until you create an Identity Server configuration, which defines how an Identity Server or Identity Server cluster operates.
NOTE:Before the Identity Server is configured, might not display under the Command Status until Tomcat is restarted.
When creating the Identity Server configuration, you specify the following information:
-
The DNS name for the Identity Server.
-
The IP address of an LDAP directory (user store). The LDAP directory is used to authenticate users. The trusted root certificate of the user store is imported to provide secure communication between the Identity Server and the user store.
-
The distinguished name and password of the administrator of the LDAP user store.
NOTE:This task is a basic setup to help you become familiar with Access Manager. It discusses only the required fields for creating a configuration. For information about all of the fields in the interface, see Creating a Cluster Configuration
in the Novell Access Manager 3.0 SP4 Administration Guide.
To create an Identity Server configuration:
-
On a client workstation, enable browser pop-ups, then log in to the Administration Console.
For login information, see
Logging In to the Administration Console
in the Novell Access Manager 3.0 SP4 Installation Guide. -
In the Administration Console, click > > .
-
Select the check box by the Identity Server, then click .
Selecting the server is one way to assign it to the cluster configuration.
-
In the dialog box, specify a name for the cluster configuration.
If you did not select the server in the previous step, you can now select the server or servers that you want to assign to this configuration. For more information about assigning servers to a configuration, see
Assigning an Identity Server to a Cluster Configuration
in the Novell Access Manager 3.0 SP4 Administration Guide. -
Click .
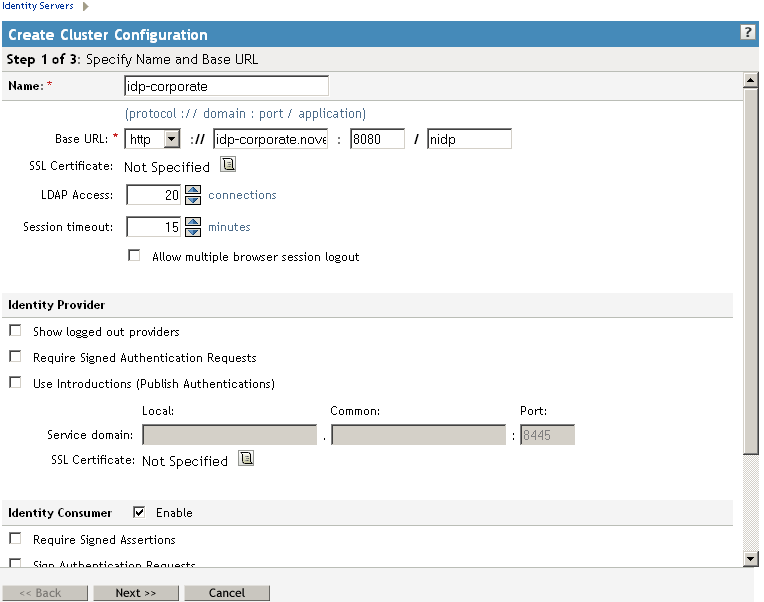
The following example shows a new server configuration called :
-
Fill in the following fields to specify the properties for your Identity Server configuration:
Name: The name by which you want to refer to the Identity Server configuration. This field is populated with the name you provided in the dialog box. You can change this here, if necessary.
Base URL: The application path for the Identity Server. The Identity Server protocols (Liberty 1.2, SAML 1.1, and SAML 2.0) rely on this base URL to generate URL endpoints for each protocol.
-
Protocol: The communication protocol. Select HTTP for a basic setup.
-
Domain: The domain name used to access the Identity Server. For a basic setup, this is the DNS name of the machine on which you installed the Identity Server. Using an IP address is not recommended.
-
Port: The port values for the protocol. For HTTP, this is 8080.
-
Application: The Identity Server application path. Leave the default value as .
-
-
Click .
The system displays the Organization page.
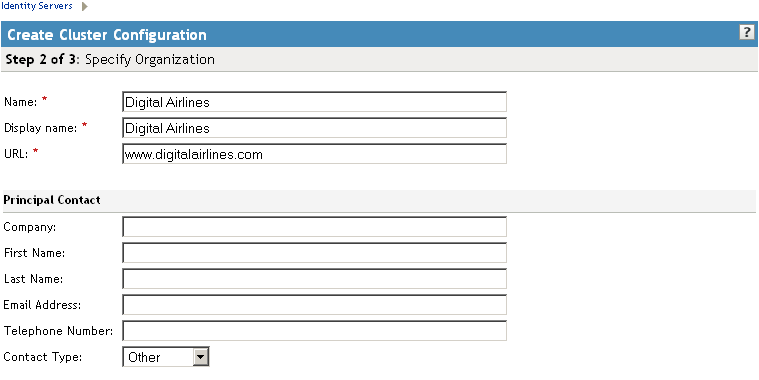
Use this page to specify organization information for the Identity Server configuration. The information you specify on this page is published in the metadata of the Liberty 1.2 and SAML protocols. The metadata is traded with federation partners and supplies various information regarding contact and organization information located at the Identity Server.
The following fields require information:
-
Name: The name of the organization.
-
Display Name: The display name for the organization. This can be the same as the name of the organization.
-
URL: The organization’s URL for contact purposes.
Optional fields include , , , , , and .
-
-
Click .
The system displays the User Store page.
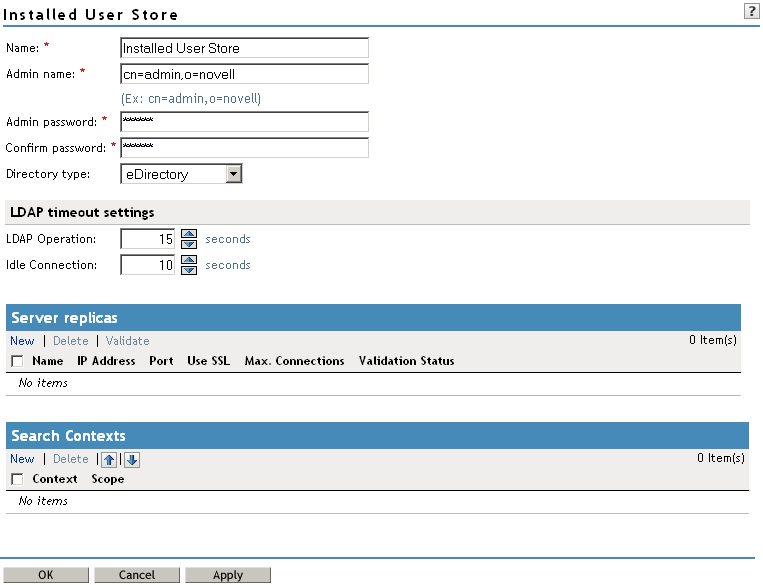
Use this page to configure the user store that references users in your organization. User stores are LDAP directory servers to which end users authenticate. You can configure a user store to use more than one replica of the directory server, to provide load balancing and failover capability. You must reference an existing user store.
For more information about the options on this page and configuring the user store for load balancing and failover, see
Configuring the User Store
in the Novell Access Manager 3.0 SP4 Administration Guide.Name: A display name for the LDAP directory.
Admin Name: The distinguished name of the admin user of the LDAP directory. Administrator-level rights are required for setting up a user store.
Admin Password and Confirm Password: The password for the admin user and the confirmation for the password.
Directory Type: The type of LDAP directory. You can specify eDirectory, Active Directory, or Sun ONE.
If eDirectory has been configured to use Domain Services for Windows, eDirectory behaves like Active Directory. When you configure such a directory to be a user store, its Directory Type must be set to Active Directory for proper operation.
-
Under , click to specify the user store replica information. It is recommended that you specify an LDAP server that contains a read/write replica.
Name: The display name for the LDAP directory server.
IP Address: The IP address of the LDAP directory server. The port is set automatically to the standard LDAP ports.
-
Click . You must enable SSL between the identity user store and the Identity Server. The port changes to 636, the secure LDAP port.
-
Click .
-
Click to confirm the import.
-
Select one of the certificates in the list.
You are prompted to choose either a server certificate or a root CA certificate. To trust one certificate, choose . Choose to trust any certificate signed by that certificate authority.
-
Specify an alias, then click .
An alias is a name you use to identify the certificate used by Access Manager.
-
Click , then click .
-
Under , verify the .
The system displays a green check mark if the connection is valid. If it is red, you have a configuration error:
-
Check the distinguished name of the admin user, the password, and the IP address of the replica.
-
Check for network communication problems between the Identity Server and the LDAP server.
-
-
Add a search context. Click , specify the DN of the context, select a scope, then click .
The search context is used to locate users in the directory. If a user exists outside of the specified search context and its scope (object, subtree, one level), the Identity Server cannot find the user, and the user cannot log in.
If the search context you specify finds more that one user with the same username, the Identity Server cannot authenticate these users. A username must be unique within a search context.
This is required for Active Directory or Sun ONE; it is optional for eDirectory, but recommended. If a search context is not specified for eDirectory, the entire tree is searched from the root.
-
Click to save the server configuration.
-
Restart Tomcat as prompted.

The Health status icons for the configuration and the Identity Server should turn green. It might take several seconds for the Identity Server to start and for the system to display a green light. If the health does not turn green, see
Monitoring the Health of an Identity Server
in the Novell Access Manager 3.0 SP4 Administration Guide. -
(Optional) Verify the configuration by entering the Base URL of the Identity Server as the URL in a browser. Log in using the credentials of a user in the LDAP server.
If the URL returns an error rather than displaying a login page, verify the following:
-
The browser machine can resolve the DNS name of the Identity Server.
-
The browser machine can access the port.
-
-
If you have already installed an Access Gateway, continue with one of the following:
-
To use your own Web server pages, continue with Section 1.4, Configuring the Access Gateway.
-
To use the Digital Airlines sample Web pages, continue with Section 7.0, Digital Airlines Example.
To install an Access Gateway, see
Installing the Linux Access Gateway
orInstalling the NetWare Access Gateway
in the Novell Access Manager 3.0 SP4 Installation Guide. -