3.2 Using Access Manager Certificates
By default, all Access Manager components (Identity Server, Access Gateway, SSL VPN, and J2EE Agents) trust the local CA. However, the browsers are not set up to trust the Access Manager CA. You need to import the public key of the trusted root certificate (configCA) into the browsers to establish the trust.
This section discusses the following procedures:
3.2.1 Configuring Secure Communication on the Identity Server
The Identity Server comes with a the test-connector certificate. This procedure shows you how to replace this certificate by completing the following tasks:
-
Enable SSL on the Identity Server (changing from HTTP to HTTPS)
-
Create a certificate
-
Replace the test-connector certificate with the newly created certificate
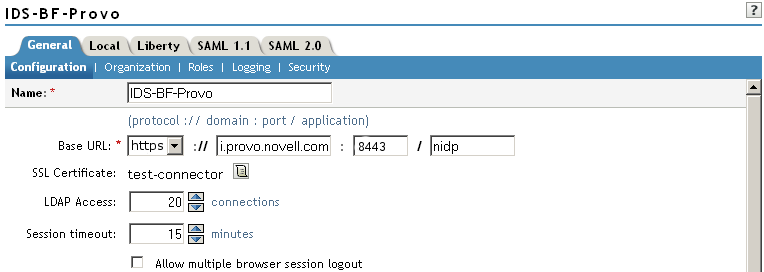
To configure SSL on the Identity Server:
-
In the Administration Console, click > > .
-
Change to HTTPS (the system changes the port to 8443).
-
Copy the domain name of your Identity Server configuration to the Clipboard, or take note of the name. It must match the common name of the new certificate.
-
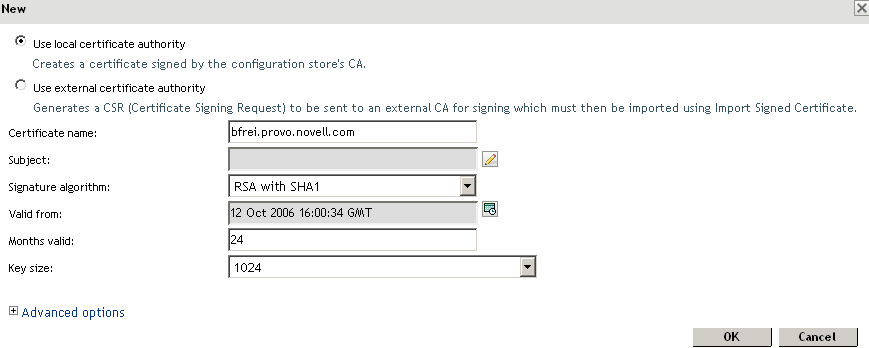
Click, then click .

-
In the dialog box, click the icon next to the field.
-
On the Select Certificate page, click .
-
Click .
This option creates a certificate signed by the local CA (or Organizational CA), and creates the private key.
-
Fill in the following fields:
Certificate name: The name that you can associate with this certificate. For easy reference, you might want to paste the domain name of the Identity Server configuration in this field.
For information on how to modify the default values before clicking , see
Creating Certificates
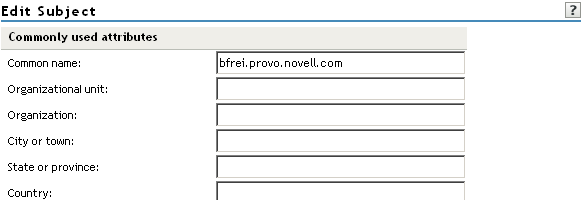
in the Novell Access Manager 3.0 SP4 Administration Guide.Subject: Click the icon. In the field, paste the domain name of the base URL of the Identity Server configuration. This value cannot be an IP address or begin with a number, in order to ensure that trust does not fail between providers.
-
Click .
-
To accept the default values in the other fields, click twice.
The new certificate is displayed on the Select Certificate page.
-
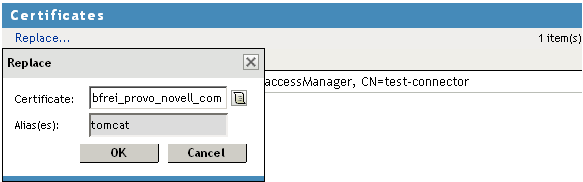
Verify that the new certificate is selected, then click .
-
Click on the dialog box.
-
Click to restart Tomcat, as prompted.
-
Click on the page.
You should wait about thirty seconds for the restart. If your Identity Server and Administration Console are on the same machine, you need to log in to the Administration Console again.
-
To update the Identity Server, click > > .
-
To update the embedded service provider of the Access Gateway to use the new URL, click > .
This re-establishes the trust between the Access Gateway and the new base URL for the Identity Server.
-
Verify that the trusted relationship between the Identity Server and the Access Gateway has been reestablished.
-
Enter the URL to a protected resource on the Access Gateway.
-
Complete one of the following:
-
If you are prompted for login credentials, enter them. The trusted relationship has been reestablished. Continue with Section 3.2.2, Configuring the Access Gateway for SSL.
-
If you receive a 100101043 or 100101044 error, the trusted relationship has not been established. For information on solving this problem, see
Troubleshooting 100101043 and 100101044 Liberty Metadata Load Errors
in the Novell Access Manager 3.0 SP4 Administration Guide.
-
-
3.2.2 Configuring the Access Gateway for SSL
This section describes how to set up SSL for the Access Gateway communication channels:
Configuring SSL Communication with the Browsers and the Identity Server
-
In the Administration Console, click > > > .
-
To configure the reverse proxy for SSL, fill in the following fields:
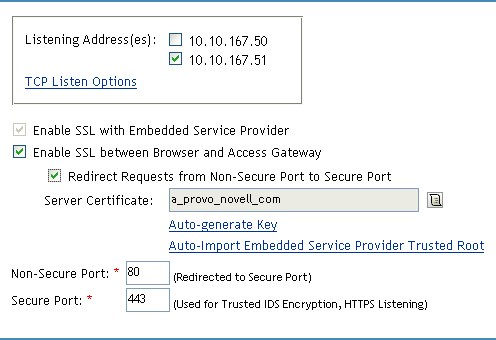
Enable SSL with Embedded Service Provider: Select this option to encrypt the data exchanged for authentication (the communication channel between the Identity Server and the Access Gateway). This option is only available for the reverse proxy that has been assigned to perform authentication.
If you enable SSL between the browsers and the Access Gateway, this option is automatically selected for you. You can enable SSL with the embedded service provider without enabling SSL between the Access Gateway and the browsers. This allows the authentication and identity information that the Access Gateway and the Identity Server exchange to use a secure channel, but allows the Access Gateways to use non-secure channels with the browsers and the Web servers. This saves processing overhead if the data on the Web servers is not sensitive.
Enable SSL between Browser and Access Gateway: Select this option to require SSL connections between your clients and the Access Gateway. SSL must be configured between the browsers and the Access Gateway before you can configure SSL between the Access Gateway and the Web servers. For this process, see Enabling SSL between the Reverse Proxy and Its Web Servers.
Redirect Requests from Non-Secure Port to Secure Port: Determines whether browsers are redirected to the secure port and allowed to establish an SSL connection. If this option is not selected, browsers that connect to the non-secure port are denied service.
-
To generate a certificate key by using the Access Manager CA:
-
Click , then click twice.
-
On the Select Certificate page, make sure the certificate is selected, then click .
The generated certificate appears in the text box.
-
-
Configure the ports for SSL:
Non-Secure Port: Specifies the port on which to listen for HTTP requests. The default port for HTTP is 80. If you have selected the option, requests sent to this port are redirected to the secure port. If the browser can establish an SSL connection, the session continues on the secure port. If the browser cannot establish an SSL connection, the session is terminated.
Secure Port: Specifies the port on which to listen for HTTPS requests (which is usually 443). This port needs to match the configuration for SSL. If SSL is enabled, this port is used for all communication with the browsers. The listening address and port combination must not match any combination you have configured for another reverse proxy or tunnel.
-
In the , click > .
-
In the , change the Contract assignments from HTTP contracts to HTTPS contracts.
For example, if a protected resource is using the Name/Password - Basic contract, click the name and change it to the Secure Name/Password - Basic or the Secure Name/Password - Form contract. Then click .
To enable single sign-on, select the same contract for all the protected resources.
-
Click , then in the confirmation box, click .
-
On the Server Configuration page, click .
-
On the Access Gateways page, click > .
-
Update the Identity Server so that it uses the new SSL configuration. Click > .
-
Verify that the trusted relationship between the Identity Server and the Access Gateway has been reestablished:
-
Enter the URL to a protected resource on the Access Gateway. For example, enter
https://www.mytest.com
-
Complete one of the following:
-
If you are prompted for login credentials, enter them. The trusted relationship has been reestablished.
-
If you receive a 100101043 or 100101044 error, the trusted relationship has not been established. For information on solving this problem, see
Troubleshooting 100101043 and 100101044 Liberty Metadata Load Errors
in the Novell Access Manager 3.0 SP4 Administration Guide.
-
-
Enabling SSL between the Reverse Proxy and Its Web Servers
To enable SSL between the reverse proxy and the Web servers, you must have already performed the following tasks:
-
Enabled SSL between the Access Gateway and the browsers. See Section 1.4.1, Configuring a Reverse Proxy and select the field.
-
Enabled SSL on the Web server. See your Web server documentation.
If you have completed these tasks:
-
In the Administration Console, click > > > > > .
-
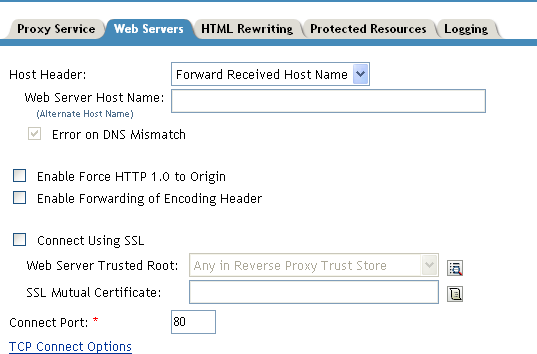
To configure SSL, select .
This option is not available if you have not set up SSL between the browsers and the Access Gateway. See Section 1.4.1, Configuring a Reverse Proxy and select the field.
-
In the field, specify the port that your Web server uses for SSL communication.
-
Configure how you want the certificate verified. The Access Gateway platforms support different options:
-
(Conditional) If you are configuring a Linux Access Gateway, select one of the following options:
-
(Conditional) If you are configuring a NetWare® Access Gateway, all the certificates in the certificate chain of the Web server must be in its trust store. To add these certificates to the trust store, click . Continue with Step 4.c.
-
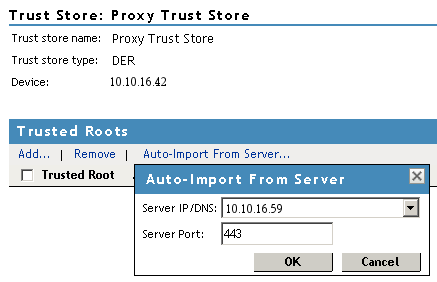
The auto import screen appears.
-
-
Ensure that the IP address of the Web server and the port match your Web server configuration.
If these values are wrong, you have entered them incorrectly on the Web server page. Click and reconfigure them before continuing.
-
Click .
Wait while the Access Gateway retrieves the server certificate, the root CA certificate, and any CA certificates from a chain from the Web server.
-
Specify an alias, then click .
All the displayed certificates are added to the trust store.
-
Click .
-
(Optional) For mutual authentication, the Access Gateway platforms support different options:
-
(Conditional) If you are configuring a Linux Access Gateway, you need to select the certificate. Click the icon, select the certificate you created for the reverse proxy, then click .
This is only part of the process. You need to import the trusted root certificate of the CA that signed the proxy service’s certificate to the Web servers assigned to this proxy service.
-
(Conditional) If you are configuring a NetWare Access Gateway, the text box displays the certificate that is sent to the Web server if the Web server requires it. If the Web server is not set up for mutual SSL, the certificate is not sent.
To set up the Web server for mutual SSL, you need to import the trusted root certificate of the CA that signed the certificate displayed in the text box.
-
-
Click , then click .
-
On the page, click .
-
On the page, click .
-
(Optional). To test this configuration from a client browser:
-
Enter the published DNS name as the URL in the browser.
-
Click the links that require authentication for access.
-