3.2 Creating Access Gateway Authorization Policies
An Authorization policy specifies conditions that a user must meet in order to access a resource. The Access Gateway enforces these conditions. The policy specifies the criteria a user must meet to either allow access or deny access. This section describes the following:
3.2.1 The Process
To create an Authorization policy:
-
In the Administration Console, click > .
-
Select the policy container, then click .
-
Specify a name for the policy, then select for the type of policy.
-
Fill in the following fields:
Description: (Optional) Describe the purpose of this rule.
Priority: Specify the order in which a rule is applied in the policy, when the policy has multiple rules. The highest priority is 1 and 10 is the lowest. If two rules have the same priority, a Deny rule is applied before a Permit rule.
-
In the section, click , then select one of the following:
-
Authentication Contract: Allows you to control access based on the contract the user used for login. For configuration information, see Section 3.5.1, Authentication Contract Condition.
-
Client IP: Allows you to control access based on the IP address of the client making the request. For configuration information, see Section 3.5.2, Client IP Condition.
-
Credential Profile: Allows you to control access based on the credentials the user specified during authentication. For configuration information, see Section 3.5.3, Credential Profile Condition.
-
Current Date: Allows you to control access based on the date of the request. For more information, see Section 3.5.4, Current Date Condition.
-
Day of Week: Allows you to control access based on the day the request is made. For configuration information, see Day of Week Condition.
-
Current Day of Month: Allows you to control access based on the month the request is made. For configuration information, see Section 3.5.6, Current Day of Month Condition.
-
Current Time of Day: Allows you to control access based on the time the request was made. For configuration information, see Section 3.5.7, Current Time of Day Condition.
-
HTTP Request Method: Allows you to control access based on the request method. For configuration information, see Section 3.5.8, HTTP Request Method Condition.
-
LDAP Attribute: Allows you to control access based on the value of an LDAP attribute. For configuration information, see Section 3.5.9, LDAP Attribute Condition.
-
LDAP OU: Allows you to control access based on the value of an LDAP organizational unit. For configuration information, see Section 3.5.10, LDAP OU Condition.
-
Liberty User Profile: Allows you to control access based on the value of a profile attribute. For configuration information, see Section 3.5.11, Liberty User Profile Condition.
-
Roles: Allows you to control access based on the roles a user has been assigned. For configuration information, see Section 3.5.12, Roles Condition.
-
URL: Allows you to control access based on the URL in the request. For configuration information, see Section 3.5.13, URL Condition.
-
URL Scheme: Allows you to control access based on the scheme in the URL of the request (for example, http or https). For configuration information, see Section 3.5.14, URL Scheme Condition.
-
URL Host: Allows you to control access based on the hostname in the URL of the request. For configuration information, see Section 3.5.15, URL Host Condition.
-
URL Path: Allows you to control access based on the path in the URL of the request. For configuration information, see Section 3.5.16, URL Path Condition.
-
URL File Name: Allows you to control access based on the filename in the URL of the request. For configuration information, see Section 3.5.17, URL File Name Condition.
-
URL File Extension: Allows you to control access based on the file extension in the URL of the request. For configuration information, see Section 3.5.18, URL File Extension Condition.
-
Condition Extension: (Conditional) If you have loaded and configured an authorization condition extension, this option specifies a condition that is evaluated by an outside source. This outside source returns either true or false. See the documentation that came with the extension for information about what is evaluated.
-
Data Extension: (Conditional) If you have loaded and configured an authorization data extension, this option specifies the value that the extension retrieves. You can then select to compare this value with an LDAP attribute, a Liberty User Profile attribute, a Data Entry Field, or another Data Extension. For more information, see the documentation that came with the extension.
-
-
To add multiple conditions to the same rule, either add a condition to the same condition group or create a new condition group. For information on how conditions and condition groups interact with each other, see Section 3.1.4, Using Multiple Conditions.
-
In the section, select , , .
-
Permit: Allows the user to access the resource.
-
Redirect: Specify the URL to which you want users redirected when they meet the conditions of this policy.
-
Deny: Select one of the following:
Display Default Deny Page: Displays a generic message, indicating that they have insufficient rights to access the resource.
Deny Message: Allows you to provide a customized message that is displayed to users who are denied access.
Redirect to URL: Allows you to specify a URL that users are redirected to when they are denied access. For example:
http://www.novell.com
-
Action Extension (Permit): Select an action from the list of permit extensions. This action permits access to the resource and performs the additional action that the extension is designed to perform. If an action extension is not available, see Section 1.4, Adding Policy Extensions for information on uploading, configuring, and importing extensions.
-
Action Extension (Deny): Select an action from the list of deny extensions. This action denies access to the resource and performs the additional action that the extension is designed to perform. If a deny extension is not available, see Section 1.4, Adding Policy Extensions for information on uploading, configuring, and importing extensions.
-
-
(Conditional) If you have installed an action obligation extension, you can click in the section, and select the action. This causes the extension to perform whatever action it is designed to perform whenever a user matches the conditions of this rule. This type of action is usually always configured in addition to a permit or deny action. If the obligation option is not available, see Section 1.4, Adding Policy Extensions for information on uploading, configuring, and importing extensions.
-
To save the rule, click .
-
To add another rule, click or to save the policy, click , then click .
-
For information on how to assign the policy to a protected resource, see
Assigning an Authorization Policy to a Protected Resource
in the Novell Access Manager 3.1 SP1 Access Gateway Guide.
3.2.2 Sample Policy Based on Organizational Rules
The following sections describe a scenario with an organizational division, then describe two types of policies that enforce the requirements of the scenario:
Company Scenario
Suppose that the company LDAP directory has the following organization.
- ou=sales,o=acme
- ou=dev,o=acme
- ou=hr,o=acme
Suppose that this company has the following configuration and requirements:
-
Under each branch of the tree, the system administrator has created the users who work in these departments.
-
Each department has its own Web resources, and other departments must be denied access to these resources.
With this type of configuration, you can use the LDAP context condition to create authorization policies or you can create role policies that are used in conjunction with authorization policies.
LDAP Context Policies
With such an organization, you can create a policy that either allows or denies access based on the LDAP context of the user’s DN. You can use the LDAP context of the user DN to separate the users into their departments and then grant access based on the context match. You need to create protected resources for the Web resources of the department, create a policy for each protected resource, and assign a policy to the protected resources.
The following procedure explains how to configure such a policy for the sales department.
-
Click > > , specify a name for the policy, select as the type, then click .
-
For , click , then select .
-
Fill in the following fields:
LDAP Credentials: Select .
If/If Not: Select .
Comparison: Select .
Mode: Select
Value: Select. In the text box, type the following value:
ou=sales,o=acme
Result on Condition Error: Select .
-
In the section, select .
Your policy should look similar to the following:
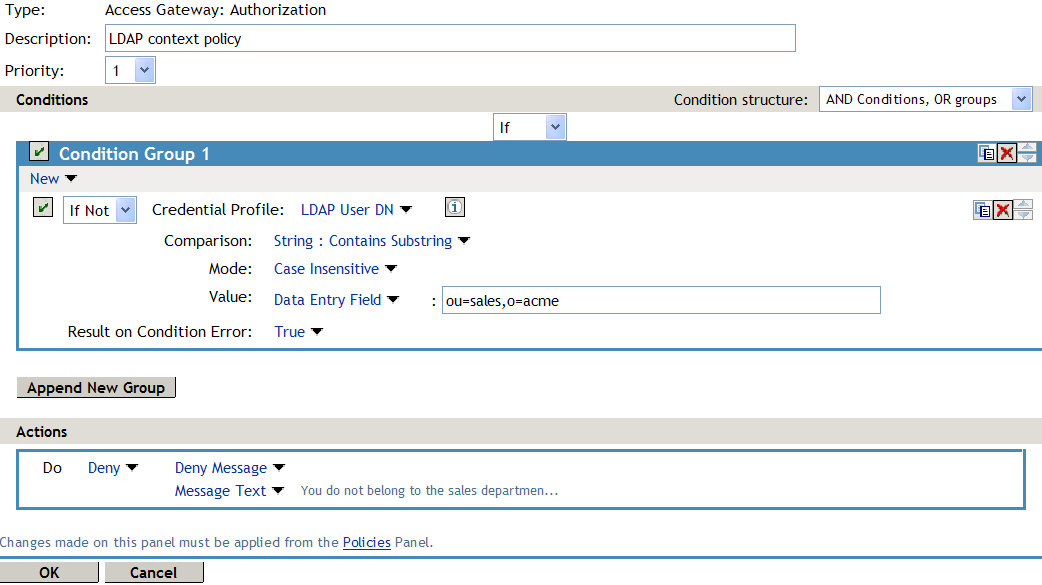
This sets up the condition so that the following occurs:
-
When the user does not belong to the sales department, the user is denied access.
-
When the user belongs to the sales department, the user is granted access.
-
When an error occurs evaluating the conditions in the rule, the user is denied access.
-
-
Assign the policy to the protected Web resources of the sales department (see
Assigning an Authorization Policy to a Protected Resource
in the Novell Access Manager 3.1 SP1 Access Gateway Guide). -
Repeat these steps for the other two departments, changing the field to match the appropriate department.
Role Policies with Authorization Policies
Because of the company’s organization, you need to create three role policies, one for the sales users, one for the development users, and one for the human resource users. You can then use these roles as conditions in authorization policies to allow and deny access. The first time you use roles in an authorization policy, there is extra setup because you must create the role policies. However, after the role policies are created, you can use them in multiple authorization policies.
The following instructions explain how to use the Sales role to create a policy that controls access to a protected resource. For instructions on how to create the Sales role, see Creating a Role by Using the Location of the User Objects.
You need to decide on the type of Authorization policy you want to create. For example, you can create a Deny policy that denies access to everyone who does not match the condition (in this case, the Sales role). Or you can create a two-rule policy that allows access to everyone that matches the condition. The first rule grants access to everyone who has the Sales role, and the second rule denies access to everyone who did not match the conditions of the first rule. (Other methods are also possible.) Because the proposed Deny policy is very similar to the LDAP Context Policies example, the following procedures explain how to create the two-rule policy.
-
In the Administration Console, click > > .
-
Specify a name for the policy, select as the type, then click .
-
(Optional) Provide a description for the rule.
-
In , click , and select .
-
Fill in the following fields:
If/If Not: Select .
Roles: Select.
Comparison: Select .
Mode: Select
Value: Select then select
Result on Condition Error: Select .
-
Under , select , then click OK.
These steps create the Permit rule and set up the condition so that the following occurs:
-
When the user does not match the condition because the user does not belong to the Sales role, the policy engine moves to the next rule in the policy.
-
When the user does match the condition because the user belongs to the Sales role, the user is granted access.
-
If an error occurs when evaluating the condition of the policy, the user does not match the condition and the policy engine moves to the next rule in the policy.
-
-
In the , click .
This second rule is for denying access to everyone who does not match the condition in Rule 1. Processing of the policy stops when a user matches a rule; therefore all users who match Rule 1 are granted access and the policy engine does not evaluate the second rule.
-
Set the to be 2 or greater.
You want the Permit rule to be processed first, so it should have a priority of 1. The Deny rule needs to be processed last, so it needs a lower priority than the Permit rule.
-
Leave the empty.
The section is left empty so that everyone who does not match the conditions of the Permit rule is denied access to the resource.
-
In the section, select and either accept the default action or select one of the other actions.
-
Click twice.
-
Click on the Policies page.
-
Assign the policy to the protected Web resources of the sales department (see
Assigning an Authorization Policy to a Protected Resource
in the Novell Access Manager 3.1 SP1 Access Gateway Guide).
3.2.3 Sample Workflow Policy
One of the common workflow problems that an Authorization policy can solve is what to do with users who are denied access to resource. Most of the time they have a legitimate reason for trying to access the resource and need contact information to request access to the resource. You can add this contact information to a Web page and redirect the users to this page when the policy denies the user access.
To create such a workflow, you need to create an HTML page with the necessary information for making the request for access. It can be as simple as a contact name or it can be an actual form that the user submits to the organization that controls access to the resource.
You then need to create an Authorization policy that redirects the denied users to this page. The following sample policy uses a role for the access condition, but the same workflow can be created using any of the other conditions available for an Authorization policy. For this example, assume that the user is granted a Master role if the user is a member of the Master group. The organization that controls access to the resource is the owner of the Master group and can add and delete members from the group. When the owner of the Master group receives a request for access to the resource, the owner can evaluate the user, and if the user meets their standards, the owner adds the user to the Master group.
You can use the Master group to create an Access Manager Role policy. This policy for the Master role should look similar to the following:
Figure 3-7 A Role Policy with an LDAP Group Condition
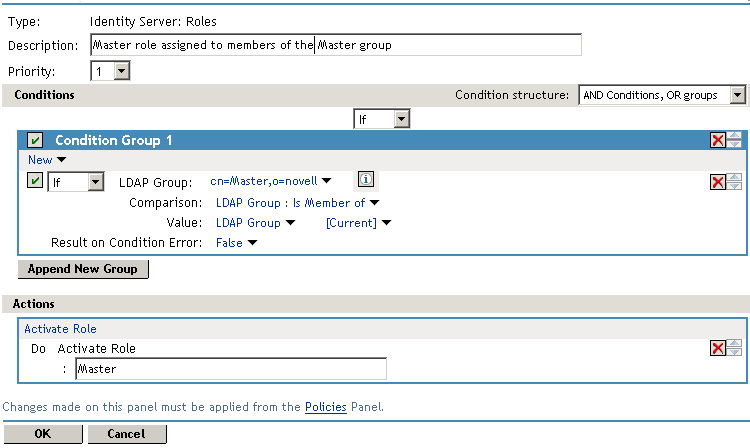
This rule grants the user the Master role if the user belongs to the cn=Master,ou=dev,o=novell LDAP group. If the user doesn’t belong to this group or if an error occurs trying to get the data, the user is not assigned the role. This occurs because both the condition and the evaluate to False, which prevents the Action from being applied.
After creating the Role policy, apply the changes and enable the Role for the Identity Server.
You can then use this role to create an Authorization policy that contains two rules. The first rule grants access to the users who have the Master role (and are therefore members of the Master group). This rule should look similar to the following:
Figure 3-8 A Permit Rule with a Role Condition
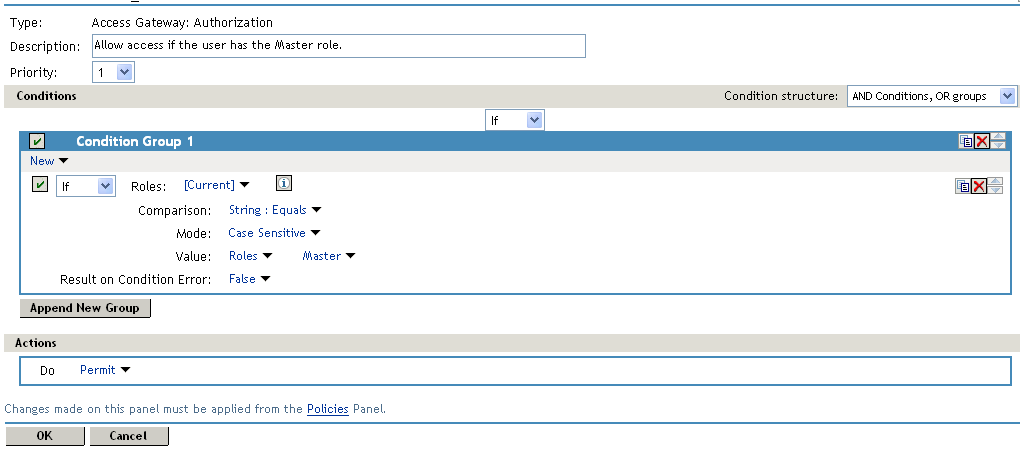
This rule permits users who are assigned the Master role to have access to the resource. If the user does not match the condition or if an error occurs accessing the user’s role information, the user is sent to the next rule because both the condition and the evaluate to False.
The second rule in the policy should deny access to those who are not assigned the Master role and should redirect them to the page where they can request access. You can do this with a rule that checks to see if they are assigned the Master role. In this type of rule, the condition needs to be an condition.
Figure 3-9 A Deny Rule with a Redirect URL
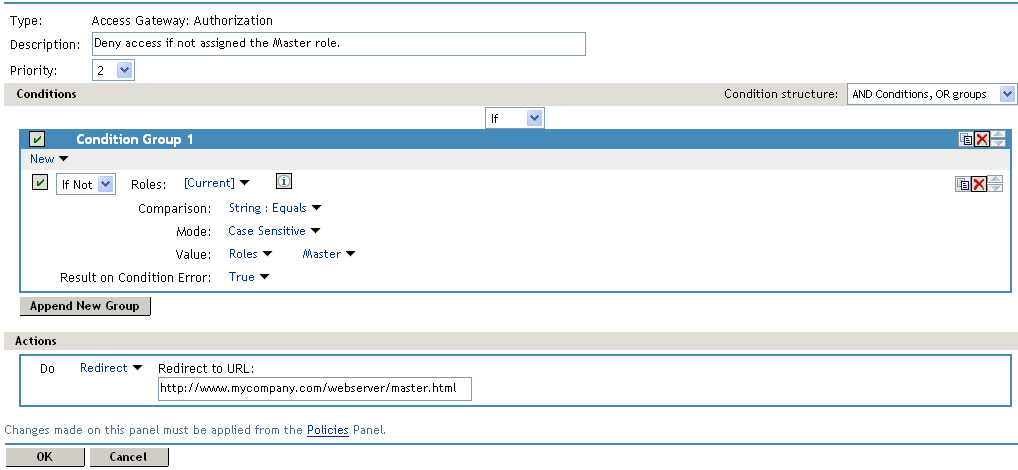
With an condition, the condition evaluates to True when the user does not match the condition. With such a rule, you want the to also evaluate to True. If there is an error obtaining role information for the user, you don’t want the rule to assume that the user had the Master role. You want the rule to assume that the user had no roles, or in other words, you want the error condition to evaluate to True.
Because the condition evaluated to True, the Action is applied to the user. The value specified in the text box should specify the page that contains the information on how to request access.
This redirect rule could be the only rule in the Authorization policy, because the users who are assigned to the Master role do not match the rule and are thus allowed access. Having the first rule that grants access because they have the Master role just makes the logic of the policy clearer.
If you create the first rule that grants users with the Master role access, you can use a general Deny rule for the second rule. It should look similar to the following.
Figure 3-10 A General Deny Rule
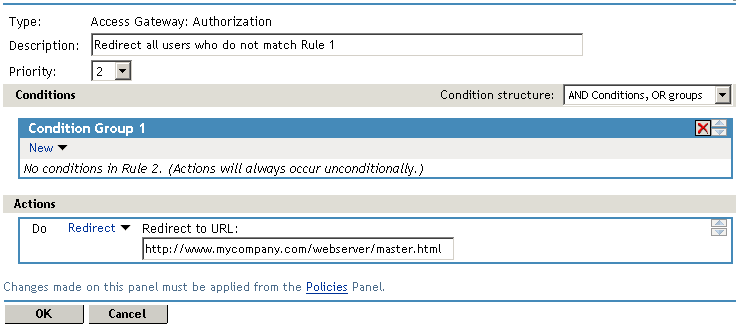
A general Deny rule has no conditions, so it matches everyone that does not match the first rule in the policy. You can add more rules to this policy to tighten security so that not all users are redirected to the site that contains the information on how to request access. For this type of policy, the last rule would be a general Deny rule with no conditions and without a redirect. The rules between Rule 1, which granted access to people assigned to the Master role, and the last rule, which denies everyone, should be rules that identify the types of users who have legitimate reasons for requesting access, and these rules should contain the redirect action.
After you have saved the Authorization policy, you need to assign it to the protected resource or resources that require the Master role, then update the Access Gateway.