7.14 Managing NFS Server
This section discusses the following topics:
7.14.1 Starting and Stopping NFS Server
To start NFS Server: At the system console, specify
load xnfs
To stop NFS Server: At the system console, specify
unload xnfs
7.14.2 NFS Server Load Time Options
7.14.3 NFS Server Console Commands
The following table lists the NFS Server console parameters and their description.
7.14.4 Export Options
The NFS Server uses the exports file located in sys:\etc. The export file lets you export a path and specify export options and trusted hosts for the exported path.
You can upgrade the export files existing in NetWare 5.1 and NetWare 6 by executing the upgrade utility, as specified in Upgrading Export Files from NetWare 5.1 / NetWare 6.
The syntax for exporting a pathname is
/volumename[/dir1[/dir2...]] [/[-anon][-deny][-nwmode][-ro|-rw][-root]
Pathname Export Guidelines
-
Always prefix the pathname with a slash (/). For example, /nssvol.
-
The pathname can have up to 256 characters. It cannot be blank.
-
Do not use an exclamation mark (!) in the pathname because it indicates a disabled path, and will not be exported.
-
When exporting a path, the volume name is not case sensitive. However, any directory names in the path should exactly match the directory names that exist in the NFS (UNIX) name space.
To view the name as it displays in the NFS (UNIX) name space, use NWAdmin, browse to the volume and to the folder, then select Details. You can view the name of the folder as it exists in every name space in the details.
Alternately, on the Server Console, specify the following to get the UNIX namespace information:
xnfs getinfo /volumename[/dir1[/dir2...]]
-
When you do not specify any option, the export is not a valid one and the path will not be exported. It is mandatory to provide options.
-
Use iManager or other Language (i18N) enabled editors to export paths in languages other than English.
-
For more information on using the export options, see Export Option Examples, and Export Options Usage Guidelines.
Updating the Exports List
To update the exports list after manually modifying the exports file, execute the following command on the server console:
xnfs share refresh
Alternately, unload and reload xnfs.nlm.
The following table explains the various export options:
IMPORTANT:In the table, the term host refers to the IP address or the DNS name of the server.
Export Option Examples
Here are a few examples of using the export options:
In the example, nssvol is the NSS volume name and dir1, dir2, dir3 and dir4 are directories under nssvol that are exported using NFS Server with varying export options.
-
To export the pathname with read-only rights without root and anonymous access (default):
/nssvol/dir1 -ro
-
To export the pathname with read-write and root access to all clients:
/nssvol/dir2 -rw -root
-
To export the pathname with read-only and root access to all clients:
/nssvol/dir1 -ro -root
-
To export the pathname with read-only to host1 and read-write and root access to host2:
/nssvol/dir2 -ro=host1 -rw=host2 -root=host2
-
To export the pathname with read-write access to all clients and enable anonymous access only for host6 and host7:
/nssvol/dir3 -rw -anon=host6:host7
-
To export the pathname with read-write and root access to host1 and host3, only read-write access to host2, read-only root access to host4, and anonymous access for all clients:
/nssvol/dir4 -rw=host1:host2:host3 -ro=host4 -root=host1:host3:host4 -anon
Export Options Usage Guidelines
-
Prefix all options with a hyphen (-). Do not put a space between the hyphen (-) and the first letter of the options.
For example: - ro is incorrect, but -ro is correct.
-
Do not use double quotes (" ") to separate the options.
-
Use the colon (:) to separate multiple hosts when specifying the same option for the hosts.
For example, to give read-only access to host1 and host2, use the following format:
/nssvol -ro=host1:host2
The following is incorrect:
/nssvol -ro=host1 -ro-host2
-
Do not specify the same option globally as well as for a client.
For example, the following syntax is incorrect:
/nssvol -ro -ro=host1
-
When you specify the -ro, -rw, -root or -anon options for individual clients, these options override the global permissions for that client.
For example, in
/nssvol -ro -rw=host1
host1 has read-write access even though other clients continue to have the global permission of read-only, and in
/nssvol -rw -ro=host1
host1 has read-only access even though other clients continue to have the global permissions of read-write.
-
When you repeat the same entries with multiple options, then the later option overrides the previous option.
For example, in
/nssvol -ro=host1 -rw=host1
host1 has read-write access.
-
When you export a parent directory, the client can also mount the subdirectories. However, both the parent directory and subdirectory cannot be exported at the same time. When a subdirectory is already exported, you cannot export the parent directory and vice-versa.
For example, when the exports file has the following two entries
/nssvol/dir1 -rw=host1 -root=host4:host5
/nssvol -rw -root
then you cannot export /nssvol (the parent directory) because /nssvol/dir1, (the subdirectory) is already exported.
For more information on NFS Server, see Section 7.4, NFS Server.
7.14.5 Managing NFS Server Using iManager
You can perform the following administrative tasks using the iManager:
Meet the following requirements for NFS Server Administration gadget to be installed in iManager.
-
The Apache Web Server is selected during NetWare 6.5 install.
-
iManager 2.5 is selected during the NetWare 6.5 install.
For more information about installing iManager 2.5, refer to the Installing Novell iManager section in the Novell iManager 2.5 Installation Guide.
7.14.6 Administering NFS Server
-
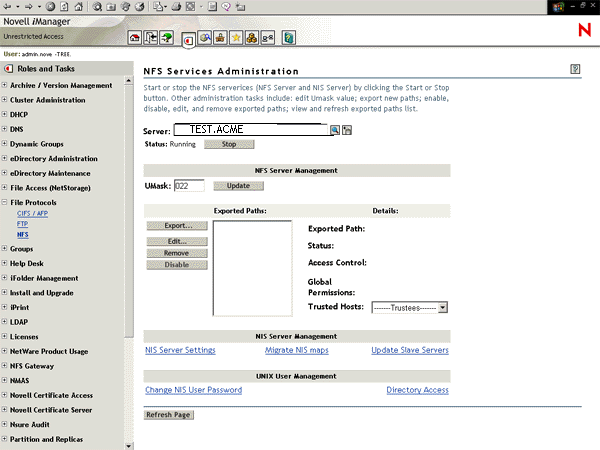
In iManager, click File Protocols > NFS Server to view the NFS Services Administration page.
Figure 7-10 NFS Services Administration Page
-
Click the Object selector to select the server on which you have to administer the NFS Server.
-
: Click Stop or Start as required.
The Stop button displays when the NFS Server is running. The Start button displays when the NFS Server is not running.
-
: Specify the umask value and click Update. Specify octal digits in the value range 000 to 777.
The default value = 022. Umask refers to the file mode creation mask for default UNIX permissions.
-
: Displays all valid enabled and disabled exported paths in the exports file located at sys:\etc.
Command-line shared entries, prefixed with (Shared) are also displayed. These entries are typically exported cluster enabled paths in Active/Active cluster configuration and correspond to the command line share entries present in the load script of cluster resources.These entries cannot be modified. If you stop and start NFS Server either from user interface or the Server console, then the shared entries are not available. Share them afresh using the command line.
elect an exported path in the Exported Paths list to perform operations such as exporting a new path, editing, enabling or disabling, removing, and refreshing the exported paths.
-
: Click , or as required.
For more details, see Section 7.15.1, iManager-Based Management for NIS Server.
-
: Click or as required.
For more details, see Section 7.15.1, iManager-Based Management for NIS Server.
7.14.7 Managing the Exported Paths
-
In the Exported Paths list of the NFS Services Administration page, view the list of exported paths.
-
Select a path in the Exported Paths list to view path details such as the Exported path, Access Control Mode, Global Permissions, and Trusted hosts.
-
Select a path in the Exported Paths list to manage the exported paths.
Command-line shared entries, prefixed with (Shared) are also displayed. These entries are typically exported cluster-enabled paths in Active/Active cluster configuration and correspond to the command line share entries present in the load script of cluster resources. These entries cannot be modified. If you stop and restart NFS Server either from the user interface or the Server console, then the shared entries are not available. Share them afresh using the command line.
You can perform operations such as exporting a new path, viewing or modifying, enabling or disabling, refreshing, and removing the exported paths.
Exporting a New Path
Click Export to display the Export Options page, where you can export a new path. For details, refer to Exporting a New Path.
Editing Path Properties
Click to display the page, where you can view or modify the properties of an exported path. For details, refer to Editing Exported Path Properties.
Removing a Path
Click to remove the exported path.
This removes the path from the sys:/exports file, and saves and refreshes the changes on the server side.
7.14.8 Exporting a New Path
-
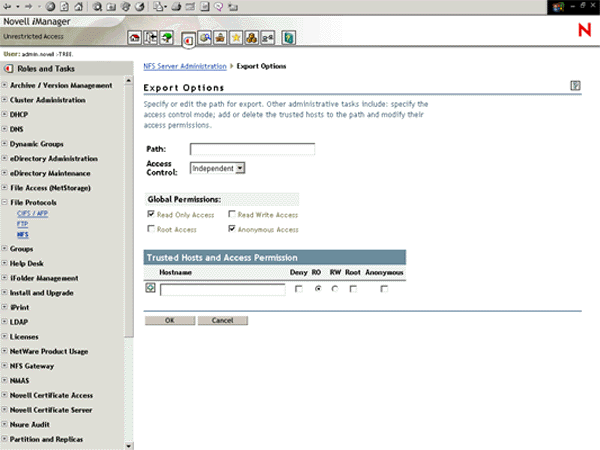
In the page, click to display the page.
Figure 7-11 Export Options Page
-
In the Path field, specify the path in the format /volumename[/dir1[/dir2...]].
-
In the Access Controls field, select the Independent or NetWare modes of access control mode from the drop-down list.
Default mode = Independent.
For more information on Independent and NetWare modes of access, see File Access Modes.
-
In the Global Permissions section, assign the required access permissions to the trusted host. The default permissions, Read Only access and Anonymous access, are selected by default.
When you add a trusted host for the exported path and give it RO/RW, Root, or Anonymous access in the Trusted Hosts table, then the corresponding global access check box is disabled (deselected). If there are no trusted hosts with this access, the global access permissions are restored.
-
Select to give read/write access to the trusted hosts. This access is denied by default.
-
Select access to give root access to the trusted hosts. This access is denied by default.
-
Deselect access to deny anonymous access to the trusted host. This access is given by default.
-
-
In the Trusted Hosts and Access Permissions section, specify the hostname that you want to make a trusted host for the exported path.
The trusted hostname cannot have null or special characters. The trusted hostname can have up to 256 characters.
You can specify trusted hostnames in the following formats:
-
Individual hosts based on complete or short DNS name or IP address.
-
The IP address. For example,
aaa.bbb.ccc.ddd.
-
Complete or short DNS name. For example,
xyz or xyz.us.acme.com
-
-
A complete DNS domain, or a subnet based on network number.
-
DNS domain is distinguished from a complete DNS hostname by a prefixed dot (.). For example, to trust all the hosts in the us.acme.com DNS domain, specify
.us.acme.com
-
The network or subnet component is prefixed by an at sign (@). For example, to trust all hosts in the 129.144.255 network, specify
@129.144.255
If the network prefixes are not byte-aligned, the syntax allows a mask length to be specified explicitly following a slash (/) delimiter. For example, to mask the 22 leftmost contiguous significant bits in the corresponding IP address (for example, for a subnet with net number 129.144.132 and net mask 255.255.252.0), specify
@129.144.132/22
-
-
-
Click the Add symbol () to add the host to the trusted host list.
-
Select the , (Read-Only), (Read-Write), , or check boxes as required.
After this, you can add another host to the trustee list.
-
Click to save the modifications and return to the NFS Server Administration page, or click to cancel the modifications and return to the NFS Server Administration page.
This updates the etc/exports file on the server and refreshes the NFS Server. When you specify access permissions, the default permissions given in the All row are unchecked.
7.14.9 Editing Exported Path Properties
-
In the NFS Server Administration page, click Edit after selecting the path from the Exported Paths list.
This displays the Exports Options page, where you can view and modify the properties of the exported path.
-
In the Path field, browse or edit to modify the pathname.
-
Update the access control mode. You can do this by selecting NetWare or Independent as required from the Access Control Mode drop-down list.
-
Update access permissions for the trusted hosts. For information on assigning access permissions, refer Step 4.
-
Add the trusted hosts. For information on adding trusted hosts, refer Step 5.
-
Click the Add symbol () beside the text box to add the host to the trusted host list.
-
Click the symbol (X) beside the text box to delete the trusted host.
-
Click to save the modifications and return to the NFS Server Administration page, or click to cancel the modifications and return to the NFS Server Administration page.