7.1 Accessing and Managing Server Volumes and Partitions
The Volume Management page is the home page for Novell® Remote Manager.
You can access this page by clicking the icon  () link in the header frame or the link under in the navigation frame.
If a Traditional NetWare® volume does not have long name space support installed, it is not accessible in the volume listing. The volume can be mounted or dismounted; however, if the long name space has been removed, the Volume Information page and options such as the Volume Inventory are not available and the volume is unavailable for file system browsing via Novell Remote Manager.
The Volume Management page provides a list of the server's volumes and access to the server's DOS partitions. For procedures that you can do from this page, see the following sections:
7.1.1 Browsing the Server's File System
Using Novell Remote Manager, you can view the file system on volumes or DOS partitions; browse directories and files; view and change attributes of volumes, directories, and files; delete, create, or rename directories; and delete or rename files.
Viewing or changing attributes on a Novell Storage Services™ (NSS) volume is not supported. However, you can view or change attributes of directories or files on an NSS volume.
The file size column for a directory lists the size of all files in that directory and any subdirectories.
The following table describes the actions you need to take to accomplish these tasks from the Volume Management page.
Table 7-1 Tasks and Procedures for Navigating the Server’s File System from the Volume Management Page
7.1.2 Mounting and Dismounting Volumes
You can mount and dismount volumes by clicking the link in the status column for a given volume on the Volume Management page. You are asked to confirm your choice before the volume dismounts.
You can also click the or link displayed next to the volume on the Server Disk Partition Operations page.
If you choose to dismount volume sys:, the icons used by Novell Remote Manager (which reside in sys:\login) might not display correctly. When you remount volume sys: and reload the page, the icons display correctly again.
7.1.3 Viewing Information about Volumes and Performing Specific Actions on Them
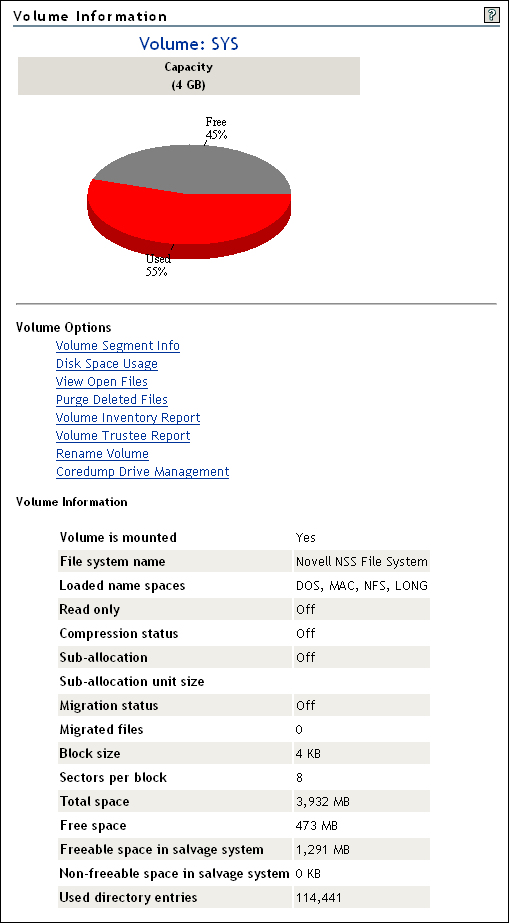
The Volume Information page contains the following details about a volume.
-
Volume mount status
-
File system type
-
A list of name spaces loaded
-
Read only status
-
File compression status
-
Suballocation status
-
Migration status and files migrated
-
Block size
-
Sectors per block
-
Total space and free space
-
FAT blocks
-
Amount of space in the salvage system that is freeable and non-freeable
-
The directory size
-
Amount of space dedicated to directory entry tables and the number directory entries in use
Figure 7-1 Example Volume Information Page
From this page you can perform the following actions:
Viewing Volume Segment Information
If you need to get information about how the partition is laid out for a particular volume, you can get this information from the Partition Segment Information page. This page shows you the volume segment number, the partition type, the partition ID, segment size, starting sectors, ending sectors, and device ID numbers. From this page you can also access the Volume Segments page for each Partition ID or view the Device ID information where you can activate or deactivate a device.
To view volume segment information:
-
Click .
-
On the Volume Management page, click the icon
 to left of the volume name that you want to check.
-
Click the link.
Monitoring Disk Space Usage
If your server is constantly running out of disk space or getting close to it, you can view the disk space usage to find out which users are using the most space and the files that they have rights to.
When monitoring disk space usage, you can perform the following tasks:
Viewing Disk Space Usage for Each User on a Volume
-
On the Volume Management page, click the icon
to left of the volume name that you want to check.
-
On the Volume Information page, click the link.
A list of users and the space that they have in use is shown. The disk space restriction is also shown. The restriction size is unlimited for all users unless a disk space restriction for a user has been set.
To sort the disk space usage information in a way that is most helpful to you, click the icon  in the heading that you want the information sorted by. The default sort is alphabetical by username.
Adding a User Space Restriction for a User on a Volume
-
On the Volume Management page, click the icon
to left of the volume name that you want to check.
-
On the Volume Information page, click the link.
A list of users and the space that they have in use is shown. The disk space restriction is also shown. The restriction size is unlimited for all users unless a disk space restriction for a user has been set.
-
Click the icon next to the field, then browse to and select the User object that you want to set the restriction for, or type the user's fully distinguished name in the field.
-
Click the button.
-
Specify the value you want to set the restriction to in the field, then click .
Changing or Deleting a User Space Restriction for a User on a Volume
-
On the Volume Management page, click the icon
to left of the volume name that you want to check.
-
On the Volume Information page, click the link.
A list of users and the space that they have in use is shown. The disk space restriction is also shown. The restriction size is unlimited for all users unless a disk space restriction for a user has been set.
-
Click the link applicable to user that you want to change or delete.
-
Click the button or specify the new value you want to set the restriction to in the field, then click .
Viewing the Space in Use in a Directory
-
On the Volume Management page, click the volume name link that the directory resides on.
-
From the directory listing, click the icon
 to the left of the directory or subdirectory you want to view.
-
Under the heading, view the information in the field.
Viewing Information about Open Files and Performing Actions on Them
When you want to perform some operations, such as backing up a server or bringing the server down, you might want to know which files are open before you perform these operations. You can quickly see and access this information on the (Volumes) page in Novell Remote Manager.
To view how many files are open, look in the column in the table. The totals for each volume and the entire server are displayed.
To view a list of all open files for a volume, click the link for that volume that in the column in the table, or click the to left of the volume name that you want to manage, then click the link.
On the page that displays, you can view which connections and users have the file open. Clicking a filename link displays a specific file information page where you can view information about the file (such as owners, effective rights, lock information) and perform various actions (such as close a file for multiple connections or send a message to the user of the open file). For specific instructions, see the following procedures:
HINT:You can also perform these tasks on the Connection Manager page. See Clearing Specific Connections and Sending Messages to Users.
Closing Multiple Connections to a Single File
-
Locate the file you want to close connections for, and then click the filename link.
-
Select the connections that you want to close.
-
Click .
Sending a Message to a Specific User of a Open File
-
Locate the open file.
-
Click the : name link applicable to the open file.
-
In the field on the Connection Information page, type the message that you want to send to the user.
-
Click .
Purging Deleted Files or Directories and Its Content
When your users delete files from the server, the files are retained and can be recovered (salvaged) until they have been purged. The server starts purging files if a volume starts to fill up; the oldest files that have been deleted are automatically purged. If you do not want files to be recovered after deletion, you can set the parameter value to .
If your server is running out of disk space or you want to immediately purge files that have been deleted, you can easily do so on each volume from the Volume Information page.
To immediately purge all files that have been deleted from a volume:
IMPORTANT:Files that have been purged can no longer be recovered.
-
On the Volume Management page, click the icon
to left of the volume name that you want to manage.
-
On the Volume Information page, click the link.
To immediately purge specific files that have been deleted from a directory or all files from a specific directory:
IMPORTANT:Files that have been purged can no longer be recovered.
-
On the Volume Management page, click the volume name link where the file was deleted.
-
In the Volume directory list, click the icon
to left of the directory name where the file was deleted.
-
On the Directory Information page, find the field, then click the link.
-
Do one of the following:
-
Locate the file that you want to purge, and click the button next the file name.
-
Click the button to purge all the files in the directory.
-
Click the link for each directory that you want to purge.
-
Salvaging Deleted Files
When your users delete files from the server, they are retained and can be recovered (salvaged) until they have been purged. If a user accidentally deletes a file and wants to recover it, use the following procedure before the file is purged.
-
On the Volume Management page, click the volume name link where the file was deleted.
-
From the directory list, click the icon
to left of the directory name where the file was deleted.
-
On the Directory Information page, find the field, then click the link.
-
Locate the file that you want to salvage, then click the button next to the file name.
Viewing and Changing Trustee Assignments and Inherited Rights Filters
Your eDirectory rights govern your access to directories and files on NetWare partitions or NSS partitions or pools. For more information on trustee assignments and Inherited Rights Filters, see Trustee Assignments and Targets
in the Novell eDirectory 8.8 Administration Guide.
To see which users are trustees of which files and directories on a volume:
-
On the Volume Management page, click the icon
next to volume you are monitoring.
-
Click the link.
To view or change the trustee assignment of a directory or file:
-
Click .
-
Click the applicable volume name link.
-
Browse to the directory or file you want to view or change the assignment of.
-
Click the icon
to the left of the directory or file you want to view or change. Then do one of the following:
-
To change the Inherited Rights Filter: Click the link in the directory or file information table. Select or deselect the check box for the rights you want to set or change, then click .
Changing the Inherited Rights Filter does not grant rights; it only removes rights previously assigned at a higher level in the tree.
-
To add a trustee: Type the full distinguished name or bindery name of the User object you want to add in the field of the Trustee Information or browse to it and select it, then click .
-
To change a trustee's rights: Locate the User object name in the list of User objects under the , then click the link next to the username. Select or deselect the check box for the trustee right you want to change, then click .
-
To delete a trustee: Locate the User object name in the list of User objects under the , then click the link next to the username.
-
Creating a Logical Volume for Saving Core Dumps
Using Coredump Drive Management for creating a local partition space on your server frees you from needing to partition a large chunk of space that you might never use (on the server’s local partition or drive C:), and reduces the likelihood of not having enough space on the local FAT partition to take a core dump. Its dynamic nature lets you create local FAT partitions that are the correct size when you know the server is experiencing a problem, and lets you easily recover that space later.
Creating a Logical volume for saving core dumps requires fatfs.nlm to be loaded on the server (default). If you unload this NLM, the feature for creating a Logical volume for core dumps is not available.
To create the drive,
-
In Novell Remote Manager, click > .
-
On the Volume Management page, click the icon
to left of the volume name where you want to create the logical volume.
This functionality is available on the NSS file system only.
-
On the Volume Information page, click the link.
-
Click .
-
Complete the following fields:
Virtual Drive File Name
Type a name for the file. Be sure to use valid file naming conventions. The following characters are invalid or not recommended for use due to transport problem that might occur:
+ , : * ! % # $ ( ) ^
For additional restrictions, see the guidelines in
Naming NSS Storage Objects
in the NW 6.5 SP8: NSS File System Administration Guide.Size
Type the size in megabytes to allocate for the Core dump drive.
The default size recommendation is based on the amount of physical memory in the server. We recommend looking at previous core dumps taken from this server to get an idea of the size of file you might need and the space available on the volume.
Attributes (optional)
Zero Fill: Controls the formatting of the disk when the drive is created. If Zero Fill is selected, the file compresses more tightly. If it is not selected, the Core dump drive is created faster.
-
Click .
When a Core dump drive is created, it is automatically mounted as a volume and displays as a local volume with an assigned drive letter. Unlike other volumes on NetWare servers, core dumps can be written to the Core dump drive and the Core dump drive must be managed from this page rather than from the Volume Management page.
This functionality is available on the NSS file system only. The drive letter is assigned automatically as the next available drive letter on the server.
You can dismount or delete the volume using the or links on the Volume Management page.
7.1.4 Viewing Details of Directories or Files and Performing Specific Actions on Them
Viewing the details of directories or files not only give you information about them but you can also perform tasks associated with them.
To view the details about a directory, delete a directory and its contents, rename the directory, or create a subdirectory:
-
Click .
-
On the Volume Management page, click the volume name link, browse to the directory, then click the icon
to left of the directory name.
-
On the information page that is displayed, view the information or specify the information required for the applicable task (if required), then click the applicable button for the task you want to perform.
From this information page, you can perform the following tasks:
Inventorying Volumes or Directories
With this feature, you can inventory volumes, directories, or subdirectories as well as view graphs, profiles, reports, and key statistics about each of these items, including space usage trends. With a few clicks, you get available space trend graphs; profiles for file types; last accessed, last modified, creation time, and file size; and links to specific reports for each of these. You can also customize the scan to look for specific file information or scan for empty directories.
Generating this report can take a while, so the file is saved on the server so you can generate the report and view it later.
Generating an Inventory Report
To generate an inventory report for a volume or directory:
-
Click .
-
Browse to the volume name or directory you want inventory by clicking the volume or directory name link.
-
Click the link at the top of the page.
HINT:If you are viewing the Volume Information page, you can generate the same report by clicking the link on this page.
Generating a Customized Report
After generating an inventory report for a volume or directory, you can create a customized scan to report more specific information.
-
Click .
-
Browse to the volume name or directory you want to inventory, then click the volume name or directory name link.
-
Click the link at the top of the page.
-
In the generated report, click the or link.
-
Type the specific search criteria in each of the fields provided, and select the applicable check boxes.
-
Click .
Searching for and Deleting Empty Subdirectories
After generating an inventory report for a volume or directory, you can scan for empty subdirectories then delete them.
-
Click .
-
Browse to the volume name or directory you want to inventory, then click the volume name or directory name link.
-
Click the link at the top of the page.
-
In the generated report, scroll to the bottom of the report.
-
Click the button.
-
Select the applicable check box for the action you want to perform.
-
The button
-
The button
-
The specific check boxes for the files you want to delete
-
-
Click the button.
Viewing, Setting, Changing, or Removing Directory Space Restrictions
In environments such as a university, where you have set up a common work area and you want to limit the space that users or files in a directory or subdirectory can use, setting a Directory Space Quota can be useful.
In order to set or change this restriction, you must enable the User Space Restrictions and Directory Quotas attributes when you create it. If this is not done when you create it, you cannot set or change these attributes later using Novell Remote Manager.
HINT:You can change User Space Restrictions and Directory Quotas attributes on existing volumes using iManager.
Setting or Changing a Directory Space Quota for a Directory or Subdirectory
-
On the Volume Management page, click the volume name link that the directory resides on.
-
From the directory listing, click the icon
to the left of the directory or subdirectory you want to change.
-
Under the , click the link for the setting.
-
In the field next to the button, specify the value for the size (in kilobytes) that you want to set the restriction to, then click the button.
The maximum space available is shown.
Removing the Disk Space Restrictions
-
On the Volume Management page, click the volume name link that the directory resides on.
-
From the directory listing, click the icon
to the left of the directory or subdirectory you want to change.
-
Under the , click the link for the setting.
-
Click the button.
Viewing Details about Directories and Performing Actions on Them
-
On the Volume Management page, click the volume name link that the directory resides on.
-
From the directory listing, click the icon
to the left of the directory or subdirectory you want to view or change.
-
On the directory information page that is displayed, view the information or specify the information required for the applicable task, then click the applicable button (, , or ) for the task you want to perform.
For procedures on salvaging and purging directories and files, see Purging Deleted Files or Directories and Its Content and Salvaging Deleted Files.
Viewing Details about Files and Performing Actions on Them
This section covers the following tasks:
Viewing the Details about a File or Editing, Deleting, or Renaming a File
-
Click .
-
On the Volume Management page, click the volume, browse through the directories to the file, then click the icon
 to the left of the filename.
-
On the information page that is displayed, view the information or specify the information required for the applicable task, then click the applicable button (, , or ) for the task you want to perform.
The button is available only on simple text files or files with the extensions listed in the sys:login\nrmedit.txt file.
If you want to save the file with an ANSI or UTF-8 encoding, select the appropriate option and click .
Modifying the Date and Time for a Directory or File
When you upload a file using Novell Remote Manager, the file date and time are recorded as the date and time that the file was uploaded. You can modify this date and time back to the file's original date and time. To do so,
-
Click .
-
Click the applicable server volume or local partition drive.
-
Click the or icon to the left of the directory or filename. If the file is on a DOS partition, click the link in the file listing.
-
Click the link.
-
Modify the items that you want to change, then click .
If the file is a Novell executable file, select the check box for restoring the original date. If desired, you can further modify the date and time and save the new settings.
Viewing Individual Files
If your browser is set up to recognize a certain file extension (for example, .txt), you can browse to and click a file of that type to view it directly in Novell Remote Manager. Otherwise, you can download any file to your local machine by clicking the filename and then saving it to a local workstation and opening it there. (This also applies to the files on the server's DOS partition.)
Changing File or Directory Access Rights Attributes
Your Novell eDirectory™ rights govern your access to directories and files on NSS or NetWare partitions. These rights also regulate your ability to copy files to and from any given directory. To access the server's DOS partition, change, or upload files to the server, you must have Supervisor right to the Server object.
When you browse through files and directories on the server's DOS partition, be aware that setting the Shareable attribute on a DOS file does not have any effect unless SHARE is loaded in DOS.
To view or change attributes of a directory or file:
-
Click .
-
Click the volume name link.
-
Browse to the directory or file you want to view or change the attributes of. View the attributes in the Attribute column.
-
To change the attributes, click the directory or file link under the column.
-
Select or deselect the check box for the attribute you want to set, then click .
Uploading a File to the Server
If you have rights to write to the current directory that you are viewing via Novell Remote Manager, you can use the button to copy a file from your local machine or any other mapped drive to that directory. You can upload only one file at a time. The file's date and time are changed when performing this task.
For instructions on changing the file date and time after an upload, see the procedure for Modifying Directories or Files Date and Time under Viewing Details of Directories or Files and Performing Specific Actions on Them.
Downloading a File from the Server to a Local Workstation
When you are browsing the server's file system via Novell Remote Manager, you can download any file to your local machine by clicking the filename and then saving the file to your local workstation. (This also applies to the files on the server's DOS partition.)
-
Click the link in the navigation frame.
-
On the Volume Management page, browse to or search for the file that you want to download.
-
Right-click the filename link.
-
Save the target file to your local workstation.
Searching for Files
You can search for files at the volume or subdirectory level. This feature is especially helpful when searching for files that are mentioned in documents where no search path was given or an incorrect path was specified. It is also helpful when searching for file types that you want to remove or change the location of.
-
Click the link in the navigation frame.
-
On the Volume Management page, browse to the volume or directory you want to search by clicking the volume or directory name link.
-
Click the link.
-
Specify the filename or extension you want to search for.
-
Click .
In the display results, you can
-
Click the filename link to view or download the file.
-
Click the icon
to view information about the file, change trustees, or rename or delete the file.
If the file is a simple text file or a file with an extension listed in the sys:login.nrmedit.txt file, you can also edit the file by clicking the button.
-
Delete, copy, or move selected files.
Searching for Text in Files
In the past, searching for files that contains specific text has been difficult if not impossible. Now, you can do a GREP-type search (it accepts GREP wildcard characters) through the files in the current directory as well as subdirectories.
-
Click the link in the navigation frame.
-
On the Volume Management page, browse to the volume or directory you want to search in by clicking the volume or directory name link.
-
Click the link.
-
Specify the content, filename, or extension you want to search for and select if you want to match the case.
-
(Optional) If you want to search all subdirectories as well, select the Search Subdirectories check box.
-
Click .
If the search instructions are valid, the results are displayed on a page with the search instructions. You can click the filename in the results list to view or download it. If nothing is found, no files are listed under the search instructions.
If the search instructions are not valid, the page showing the directory you wanted to search is returned.
Accessing the Server's Local Partitions and Performing Actions on Them
With Novell Remote Manager, you can access the server's local partitions in addition to the network partitions and volumes, including all devices that are registered as a local device with a FAT partition and have media loaded. This means that floppy drives that have a disk loaded appear in the local server partition list.
Renaming a File on the Server's Local Partitions
-
Click .
-
Click the applicable drive letter under the heading.
-
Browse to the applicable file.
-
Click the link for the file.
-
Type the new filename in the field, then click .
Deleting a File on the Server's Local Partitions
-
Click .
-
Click the applicable drive letter under the heading.
-
Browse to the applicable file.
-
Click the link for the file, then click on the returned deletion message.