9.3 CIFS and Cluster Services

Novell Cluster Services can be configured either during or after OES 11 SP3 installation. In a cluster, Novell CIFS for OES 11 SP3 is available only in Active/passive mode, which means that CIFS software runs on all nodes in the cluster. When a server fails, the cluster volumes that were mounted on the failed server fail over to that other node. The following sections give details about using Novell CIFS in a cluster environment:

9.3.1 Prerequisites

Before setting up Novell CIFS in a cluster environment, ensure that you meet the following prerequisites:

9.3.2 Using CIFS in a Cluster Environment

Keep in mind the following considerations when you prepare to use CIFS in a cluster.

  • Novell CIFS is not cluster-aware and is not clustered by default. You must install and configure Novell CIFS on every node in the cluster where you plan to give users CIFS access to the shared cluster resource.

  • Novell CIFS runs on all nodes in the cluster at any given time.

  • Novell CIFS is started at boot time on each node in the cluster. A CIFS command is added to the load script and unload script for the shared cluster resource. This allows Novell CIFS to provide or not to provide access to the shared resource through Virtual server IP.

NOTE:In CIFS, all the nodes should have similar server configuration, such as contexts and authentication mode.

The following process indicates how CIFS is enabled and used in a cluster environment:

  1. Creating Shared Pools: To access the shared resources in the cluster environment through the CIFS protocol, you create the shared pools either by using the NSSMU utility, the iManager tool, or the Novell Linux Volume Manager utility.

    For requirements and details about configuring shared NSS pools and volumes on Linux, see Configuring and Managing Cluster Resources for Shared NSS Pools and Volumes in the OES 11 SP3: Novell Cluster Services for Linux Administration Guide.

    For details on creating a pool using Novell Linux Manager using the nlvm create pool command, see NLVM Commands in the OES 11 SP3: NLVM Reference.

  2. Creating a Virtual Server: When you cluster-enable an NSS pool, an NCS:NCP Server object is created for the virtual server. This contains the virtual server IP address, the virtual server name, and a comment.

  3. Creating a CIFS Virtual Server: When you cluster-enable an NSS pool and enable that pool for CIFS by selecting CIFS as an advertising protocol, a virtual CIFS server is added to eDirectory. This is the name the CIFS clients use to access the virtual server.

  4. Configuring Monitor Script: Configure resource monitoring to let the cluster resource failover to the next node in the preferred nodes list.

    When rcnovell-cifs monitor is invoked, it does the following:

    • Returns the status of CIFS, if CIFS is already running.

    • Starts a new instance of CIFS and returns status, if CIFS is not running (dead/etc.).

    Each time the monitor script detects that the CIFS service is down and starts the service, a message in the following format is logged in the /var/log/messages file:

    CIFS: Monitor routine, in novell-cifs init script, detected CIFS not running,starting CIFS
    

    For more information, see Configuring a Monitor Script for the Shared NSS Pool in the OES 11 SP3: Novell Cluster Services for Linux Administration Guide

    IMPORTANT: Set the number of Maximum Local Failures permitted to 0. This ensures that if the CIFS server crashes, cluster services will trigger an immediate failover of the resource.

  5. Loading the CIFS Service: When you enable CIFS for a shared NSS pool and when Novell CIFS is started at system boot, the following line is automatically added to the cluster load script for the pool's cluster resource:

    novcifs --add --vserver=virtualserverFDN --ip-addr=virtualserverip
    

    For example, novcifs --add '--vserver=".cn=CL-POOL-SERVER.o=novell.t=VALTREE."' --ip-addr=10.10.10.10

    This command is executed when the cluster resource is brought online on an active node. You can view the load script for a cluster resource by using the clusters plug-in for iManager. Do not manually modify the load script.

  6. Unloading the CIFS Service: When you CIFS-enable for a shared NSS pool, the following line is automatically added to the cluster unload script for the pool's cluster resource:

    novcifs --remove --vserver=virtualserverFDN --ip-addr=virtualserverip 
    

    For example, novcifs --remove '--vserver=".cn=CL-POOL-SERVER.o=novell.t=VALTREE."' --ip-addr=10.10.10.10

    This command is executed when the cluster resource is taken offline on a node. The virtual server is no longer bound to the Novell CIFS service on that node. You can view the unload script for a cluster resource by using the clusters plug-in for iManager. Do not manually modify the unload script.

  7. CIFS Attributes for the Virtual Server: When you CIFS-enable a shared NSS pool, the following CIFS attributes are added to the NCS:NCP Server object for the virtual server:

    • nfapCIFSServerName (read access)

    • nfapCIFSAttach (read access)

    • nfapCIFSComment (read access)

    The CIFS virtual server uses these attributes. The CIFS server proxy user must have default ACL access rights to these attributes, access rights to the virtual server, and be in the same context as the CIFS virtual server.

    NOTE:If the CIFS server proxy user is in a different context, the cluster administrator should give access to these virtual server attributes for the proxy user.

9.3.3 Example for CIFS Cluster Rights

This section describes the rights management in cluster. It explains the rights required in CIFS and explains with an example.

In a cluster, each cluster node can have an assigned CIFS Proxy User identity that is used to communicate with eDirectory. As a best practice, the CIFS Proxy User is in the same eDirectory context as the NCP Server object. Typically, this context is the OU where you create the cluster and its cluster resources. If Common Proxy User is selected, the proxy user is always created in the same context as cluster node.

When you add CIFS as an advertising protocol for a cluster pool resource (enabling CIFS on shared NSS pool), the NCS:NCP Server object for the cluster resource will be treated as a CIFS virtual Server object. Following CIFS specific attributes are added to the CIFS virtual server object:

  • nfapCIFSServerName (read access)

  • nfapCIFSAttach (read access)

  • nfapCIFSShares (read access)

  • nfapCIFSComment (read access)

The CIFS proxy user must have default ACL access rights to these attributes and be in the same context as the CIFS virtual server object.

You can grant these rights plus the inherit right at the OU level of the context that contains the cluster. This allows the rights to be inherited automatically for each CIFS Virtual Server object that gets created in the cluster when the CIFS Proxy User is in the same eDirectory context. If the CIFS Proxy Users are not in the same context as the CIFS Virtual Server object, you can set the rights at a higher OU level that includes the contexts for proxy users and the contexts for the CIFS Virtual Server objects. You can alternatively grant the rights for each CIFS Proxy User on the CIFS attributes on every CIFS Virtual Server object. To simplify the rights configuration, you can create an eDirectory group with members being the CIFS Proxy Users of the nodes in the cluster, and then grant the rights for the group.

The following sample use case explains the rights management in clusters.

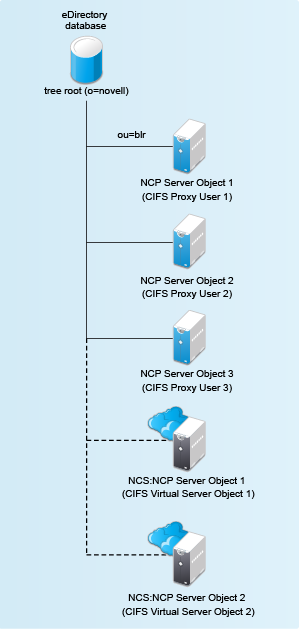
The CIFS proxy user 1, CIFS proxy user 2, and CIFS proxy user 3 have rights to read the eDirectory CIFS attributes under ou=blr ( CIFS Virtual Server Object 1 and CIFS Virtual Server Object 2). Hence if these virtual servers are hosted in any of these three nodes, the configuration is read by the CIFS service in the corresponding node.

Granting Rights to CIFS Proxy Users Over Cluster Resources

  1. Set up the cluster and add nodes to it.

  2. Install Novell CIFS on each node.

  3. Configure a clustername_CIFS_PROXY_USER_GROUP in eDirectory and add the CIFS Proxy user of each node in the cluster as a member.

  4. Grant the group the eDir read, write, compare, and inherit rights for the CIFS attributes at the cluster OU level.

  5. Configure a pool cluster resource and enable CIFS to create the CIFS Virtual Server object for the resource.

  6. Verify that the CIFS Proxy User on each node is able to read the CIFS attributes and CIFS works as intended.