3.8 Specifying Configuration Information
When the server reboots, you are required to complete the following configuration information:
3.8.5 Specifying Novell Customer Center Configuration Settings
OES 11 SP3 requires that the SLES 11 SP4 base be updated prior to installing and configuring OES 11 SP3 services. If not, some OES services, such as Novell FTP, will not function properly after the installation and will need to be configured again after the SLES patches are applied.
Therefore, when you are entering the Novell Customer Center configuration information, it is critical that you enter either your purchased SLES 11 SP4 code or the 60-day evaluation code available with your SLES 11 SP4 download.
-
On the Novell Customer Center Configuration configuration page, select all of the following options, then click .
Option
What it Does
Configure Now
Proceeds with registering this server and the SLES 11 SP4 and OES 11 SP3 product in the Novell Customer center.
Hardware Profile
Sends the information to the Novell Customer Center about the hardware that you are installing SLES 11 SP4 and OES 11 SP3 on.
Optional Information
Sends optional information to the Novell Customer Center for your registration. For this release, this option doesn’t send any additional information.
Registration Code
Makes the registration with activation codes mandatory.
Regularly Synchronize with the Customer Center
Keeps the installation sources for this server valid. It does not remove any installation sources that were manually added.
-
After you click , the following message is displayed.

Wait until this message disappears and the Manual Interaction Required page displays.
-
On the Manual Interaction Required page, note the information that you will be required to specify, then click .
-
On the Novell Customer Center Registration page, specify the required information in the following fields, then click :
Field
Information to Specify
Email Address
The email address for your Novell Login account.
Confirm Email Address
The same email address for your Novell Login account
SUSE Linux Enterprise Server 11 SP4 (optional)
Specify your purchased or 60-day evaluation registration code for the SLES 11 SP4 product.
If you don’t specify a code, the server cannot receive any updates or patches.
Open Enterprise Server 11 SP3 (optional)
Specify your purchased or 60-day evaluation registration code for the OES 11 SP3 product.
If you don’t specify a code, the server cannot receive any updates or patches.
System Name or Description (optional):
Specify a description to identify this server.
-
When the message to complete the registration displays, click .
-
After you click , the following message is displayed with the Manual Interaction Required screen.
Wait until this message disappears and the Novell Customer Center Configuration page displays.
-
Select to download any updates that are available for the server, then click .

-
Continue with Updating the Server Software.
3.8.6 Updating the Server Software
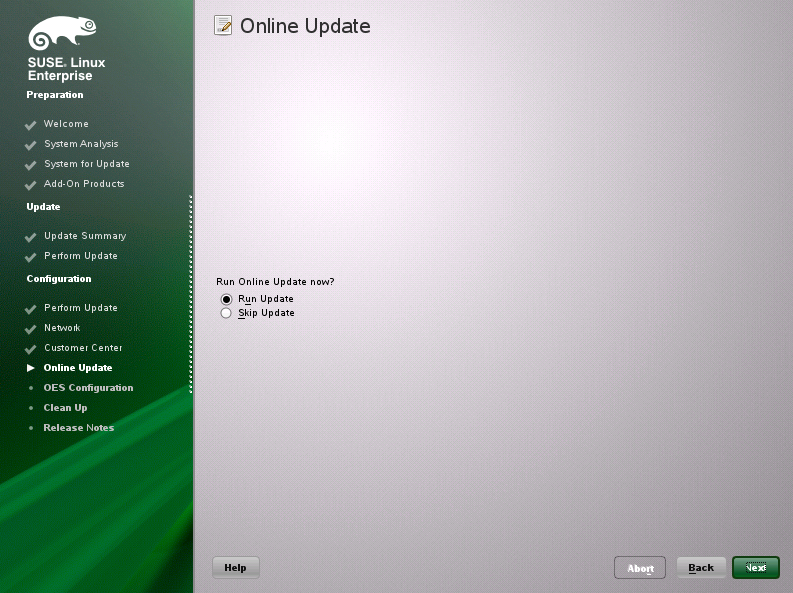
When you have a successful connection to the Internet and have registered the server in the Novell Customer Center, the server displays the Online Update page. You must run the online update now for a successful OES installation.
-
On the Online Updates page, click > .
-
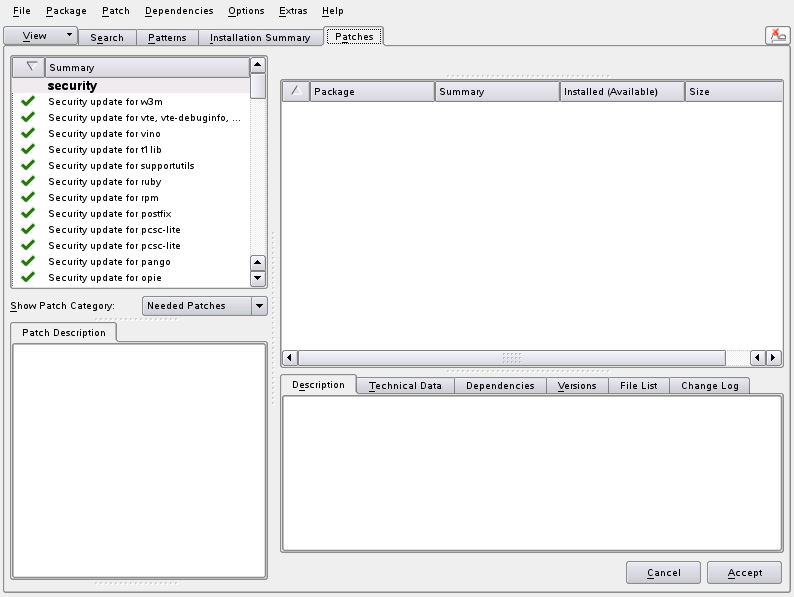
On the page that shows that updates are available, click .
The check marks that are shown on the summary portion of the page are the patches that will be installed on your system after clicking .
-
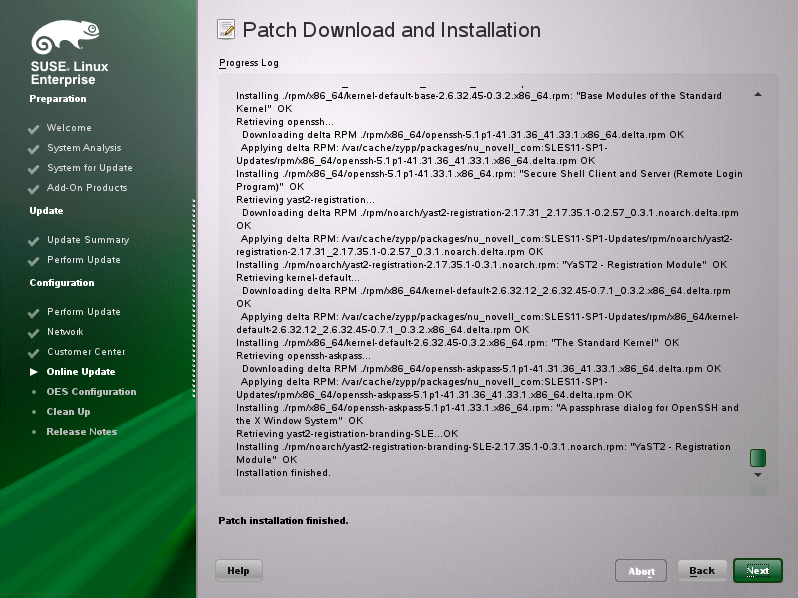
When you see the following message, click .
-
In the pop-up that informs you about the kernel update, click .
The system reboots before continuing the installation.
-
Continue with Specifying Service Configuration Settings.
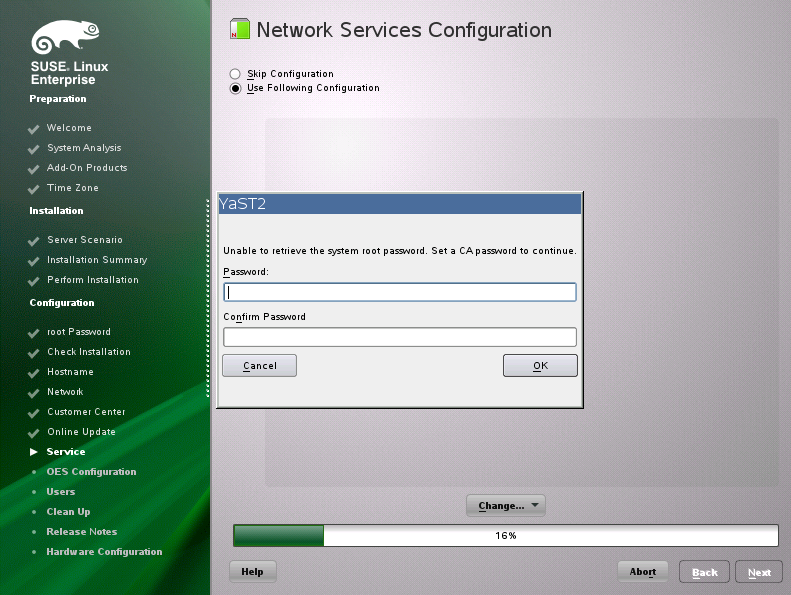
3.8.7 Specifying Service Configuration Settings
Because the server was rebooted during the installation, the default settings for CA management lost the root password as indicated by the red text under .
-
Reset the password for root.
-
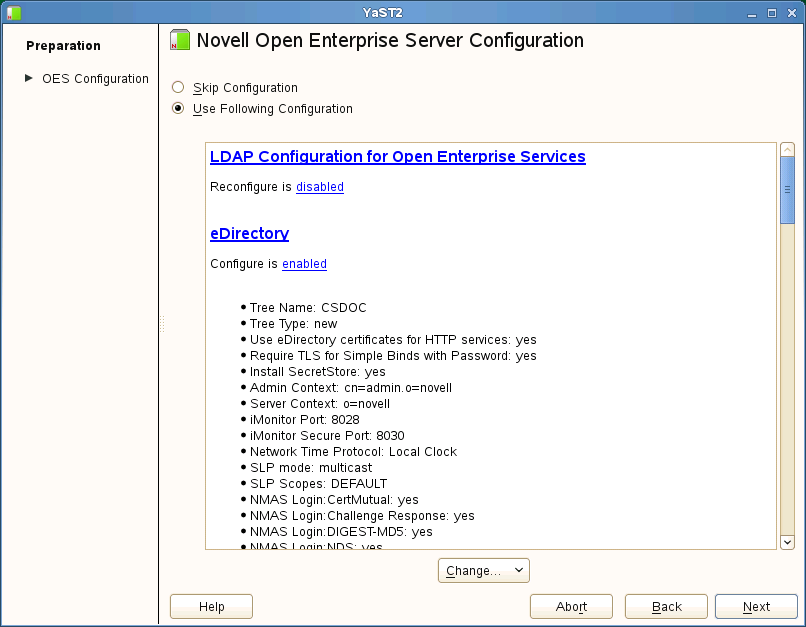
Observe the settings on the Installation Settings page.
-
CA Management: This indicates the certificate that is used by the Apache web server if another certificate is not specified.
By default, OES creates and installs a replacement eDirectory certificate later in the installation process. We recommend that you accept the eDirectory certificate option because it is much more secure than the certificate that is proposed.
Alternatively, you can install a third-party certificate.
In all cases, do not disable the configuration at this point because the services that use Apache will not work if you do.
For more information about OES certificate management, see
Certificate Management
in the OES 11 SP3: Planning and Implementation Guide. -
OpenLDAP Server: Do not enable this option. On OES servers, NetIQ eDirectory LDAP server replaces the SLES 11 SP4 OpenLDAP server.
-
-
If you are not installing a third-party certificate, click .
or
If you are installing a third-party certificate, click and refer to the information about Certificate Authority Management on SLES. See in the “Managing X.509 Certification” in the SUSE LINUX Enterprise Server 11 Security Guide. Then return to these instructions to continue your OES installation.
-
If you did not select the NetIQ eDirectory pattern for this server, continue with Specifying LDAP Configuration Settings.
Otherwise, skip the next section and continue with Specifying eDirectory Configuration Settings.
3.8.8 Typical and Custom OES Configuration
Beginning with OES 11 SP3, you can configure OES in two methods: Typical Configuration and Custom Configuration. The Typical Configuration is also called as Express Install. It helps to install OES 11 SP3 with minimal user intervention and the Custom Configuration is the detailed usual method to configure OES.
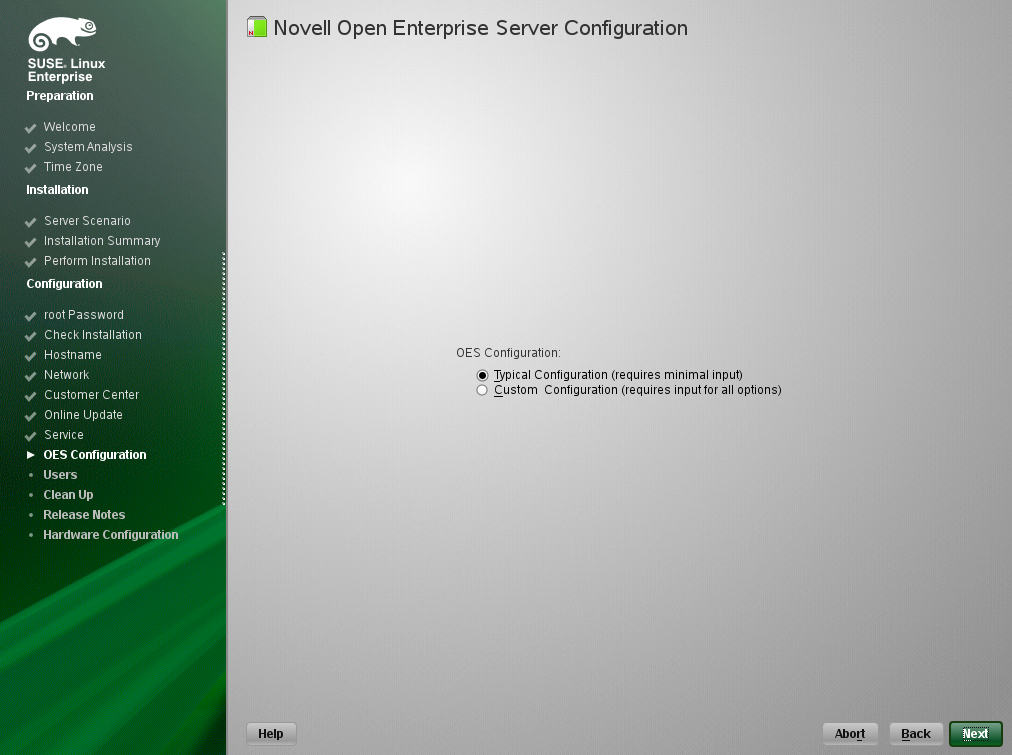
Typical Configuration
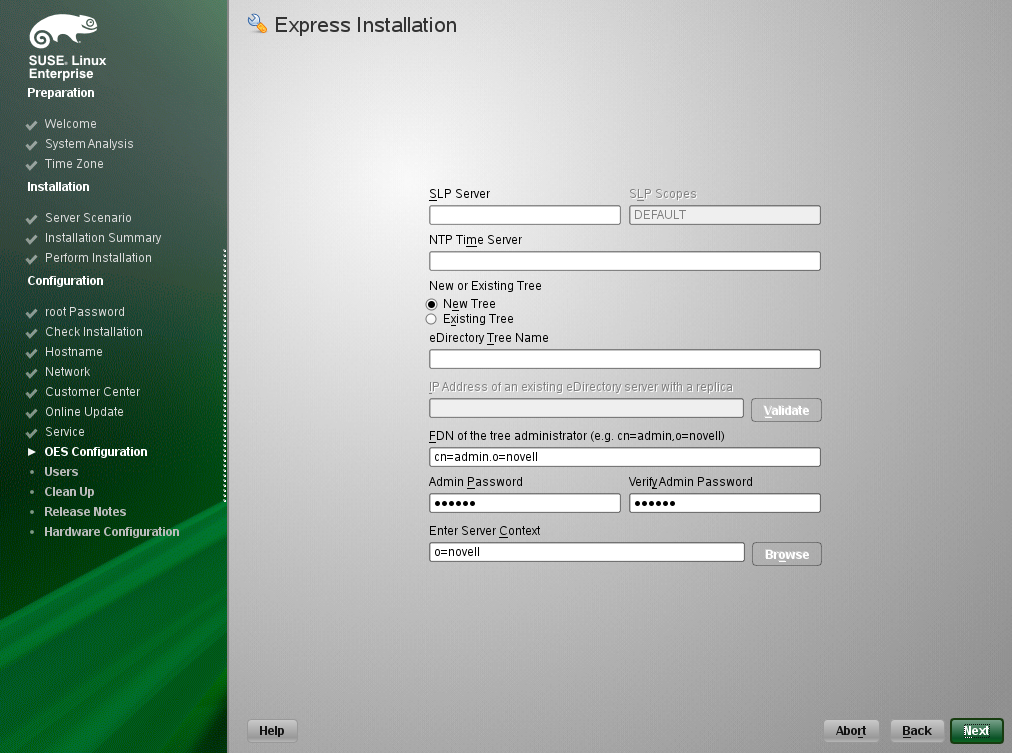
In the OES Configuration screen, if you have chosen to configure OES using Typical Configuration, you only need to provide the following minimum configuration details:
-
SLP Server and SLP Scopes: In these fields, specify the host name or the IP address of the server where the SLP agent is running and the SLP scopes. If you don't enter any SLP details, multicast SLP mode is chosen by default.
NOTE:If you would like to use the current server as the DA server, click and choose the custom configuration instead of typical configuration.
-
NTP Time Server: Specify the IP address or the host name of the Network Time Protocol (NTP) server.
-
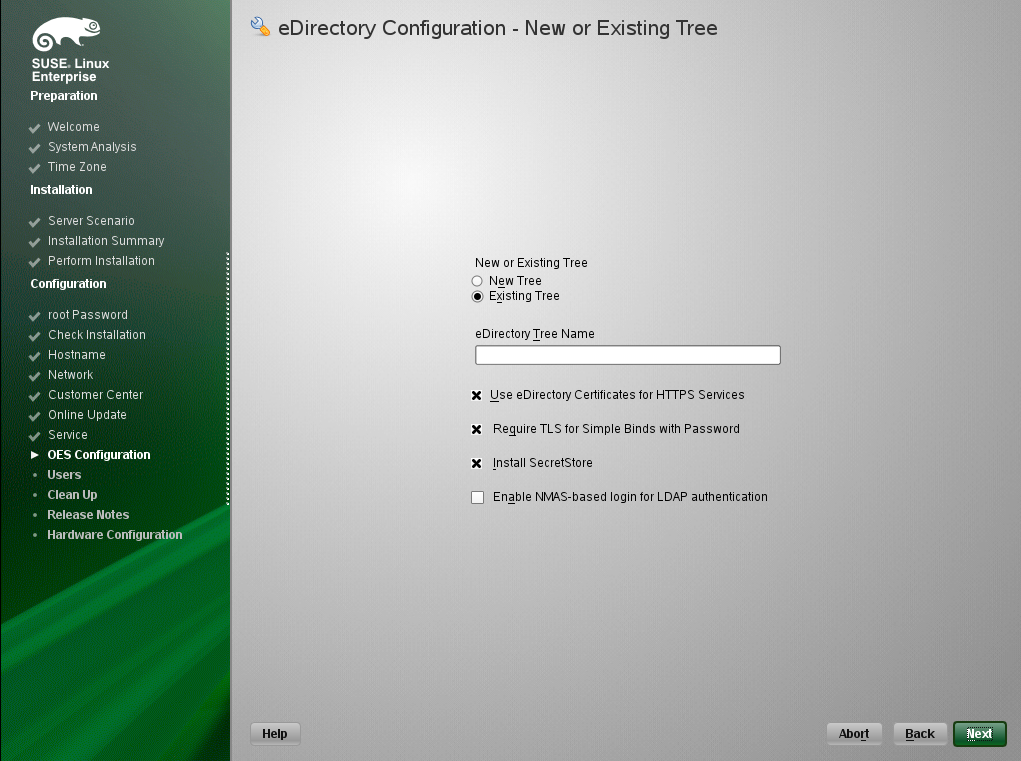
New or Existing Tree: If you would like to configure OES using an existing eDirectory tree, choose else .
-
eDirectory Tree Name: Provide the eDirectory tree name.
-
IP Address of an existing eDirectory Server with a replica: If you have chosen to configure OES using an existing tree, this field is enabled to provide the IP address of an existing eDirectory serer.
IMPORTANT:Ensure that you verify the status of the eDirectory tree using the button. If the validation is unsuccessful, do not proceed further with the OES configuration until the eDirectory server is up and running.
-
FDN of the tree administrator: Specify the fully distinguished name of the administrative user.
-
Admin Password and Verify the Admin Password: In these two fields, specify the eDirectory administrative passwords.
-
Enter Server Context: Specify the location of the server context in the eDirectory tree.
-
After providing all these details, click . OES will be installed and configured without any user intervention.
Custom Configuration
This is the normal method of installing and configuring OES by providing every configuration detail that OES requires instead of using the default configuration details. Custom configuration is explained in detailed in Section 3.8.9, Specifying LDAP Configuration Settings, Section 3.8.10, Specifying eDirectory Configuration Settings, Section 3.8.11, Configuring OES Services, and Section 3.8.12, Configuration Guidelines for OES Services.
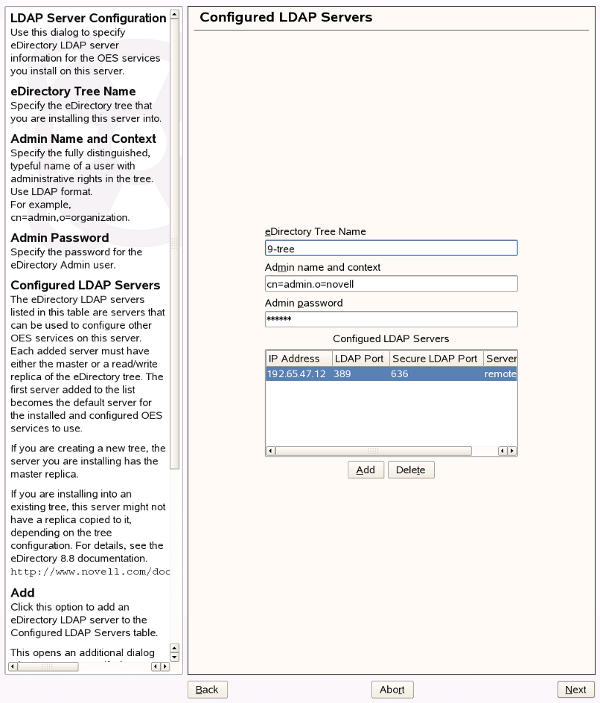
3.8.9 Specifying LDAP Configuration Settings
Many of the OES services require eDirectory. If eDirectory was not selected as a product to install on this server but other OES services that do require LDAP services were installed, the LDAP Configuration service displays, so that you can complete the required information.
To specify the required information on the Configured LDAP Server page:
-
In the field, specify the name for the existing eDirectory tree that you are installing this server into.
-
In the field, specify the name and context for user Admin in the existing tree.
-
In the field, specify a password for the Admin user in the existing tree.
-
Add the LDAP servers that you want the services on this server to use. The servers that you add should hold the master or a read/write replica of eDirectory. Do the following for each server you want to add:
-
Click .
-
On the next page, specify the following information for the server to add, then click .
-
IP address
-
LDAP port and secure LDAP port
-
-
-
When all of the LDAP servers that you want to specify are listed, click .
-
Verify that the Novell Open Enterprise Server Configuration page displays the settings that you expected, then click .
-
Continue with Configuring OES Services.
3.8.10 Specifying eDirectory Configuration Settings
When you specify the eDirectory configuration settings, you can specify information to create a new tree and install the server in that new tree, or you can install the server into an existing tree by specifying the information for it. Use the following instructions as applicable:
Specifying SLP Configuration Options
-
On the eDirectory Configuration - SLP page, specify the SLP options as desired.
You have the following options for configuring SLP:
-
Use Multicast to Access SLP: This option allows the server to request SLP information by using multicast packets. Use this in environments that have not established SLP DAs (Directory Agents).
IMPORTANT:If you select this option, you must disable the firewall for SLP to work correctly. Multicast creates a significant amount of network traffic and can reduce network throughput.
-
Configure SLP to use an existing Directory Agent: This option configures SLP to use an existing Directory Agent (DA) in your network. Use this in environments that have established SLP DAs. When you select this option, you configure the servers to use by adding or removing them from the SLP Directory Agent list.
-
Configure as Directory Agent: This option configures this server as a Directory Agent (DA). This is useful if you plan to have more than three servers in the tree and want to set up SLP during the installation.
-
DASyncReg: This option causes SLP, when it starts, to query the Directory Agents listed under Configured SLP Directory Agents for their current lists of registered services. It also causes the DA to share service registrations that it receives with the other DAs in the SLP Directory Agent list.
-
Backup SLP Registrations: This option causes SLP to back up the list of services that are registered with this Directory Agent on the local disk.
-
Backup Interval in Seconds: This specifies how often the list of registered services is backed up.
-
-
Service Location Protocols and Scope: This option configures the scopes that a user agent (UA) or service agent (SA) is allowed when making requests or when registering services, or specifies the scopes a directory agent (DA) must support. The default value is DEFAULT. Use commas to separate each scope. For example, net.slp.useScopes = myScope1,myScope2,myScope3.
-
Configured SLP Directory Agents: This option lets you manage the list of hostname or IP addresses of one or more external servers on which an SLP Directory Agent is running.
-
-
Click and confirm your selection if necessary, then continue with Selecting the NetIQ Modular Authentication Services (NMAS) Login Method.
Specifying Synchronizing Server Time Options
eDirectory requires that all OES servers are time-synchronized.
-
On the eDirectory Configuration - NTP page, click .
-
In the text box, specify the IP address or DNS hostname of an NTP server, then click .
For the first server in a tree, we recommend specifying a reliable external time source.
When you install multiple servers into the same eDirectory tree, ensure that all servers point to the same time source and not to the server holding the master replica.
For servers joining a tree, specify the same external NTP time source that the tree is using, or specify the IP address of a configured time source in the tree. A time source in the tree should be running time services for 15 minutes or more before connecting to it; otherwise, the time synchronization request for the installation fails.
-
If you want to use the server’s hardware clock, select .
For servers joining a tree, the installation does not let you proceed if you select this option. You must specify the same external NTP time source that the tree is using, or specify the IP address of a configured time source in the tree that has been running time services for 15 minutes or more.
-
Continue with Specifying SLP Configuration Options.
For more information on time synchronization, see Implementing Time Synchronization
in the OES 11 SP3: Planning and Implementation Guide.
Creating a New eDirectory Tree and Installing the Server in It
-
On the eDirectory Configuration - New or Existing Tree page, select .
-
In the field, specify a name for the eDirectory tree that you want to create.
On OES servers, services that provide HTTPS connectivity are configured to use one of the following certificates:
-
An eDirectory certificate issued by the Novell International Cryptographic Infrastructure (NICI)
-
A third-party server certificate
-
The YaST self-signed common server certificate created in Step 2
Self-signed certificates provide minimal security and limited trust. Unless you have invested in a third-party certificate, we recommend that you use the eDirectory certificates instead.
By default, the check box is selected. This means that the existing server certificate and key files (YaST or third-party) will be replaced with eDirectory server certificate and key files.
The default YaST server certificate and key files are:
-
Key file: /etc/ssl/servercerts/serverkey.pem
-
Certificate file: /etc/ssl/servercerts/servercert.pem
The eDirectory server certificate and key files are:
-
Key file: /etc/ssl/servercerts/eDirkey.pem
-
Certificate file: /etc/ssl/servercerts/eDircert.pem
For more information, see
Certificate Management
in the OES 11 SP3: Planning and Implementation Guide. -
-
On the eDirectory Configuration - New Tree Information page, specify the required information:
-
The fully distinguished name and context for the user Admin on the existing server
-
The password for user Admin on the existing server
-
-
Click .
-
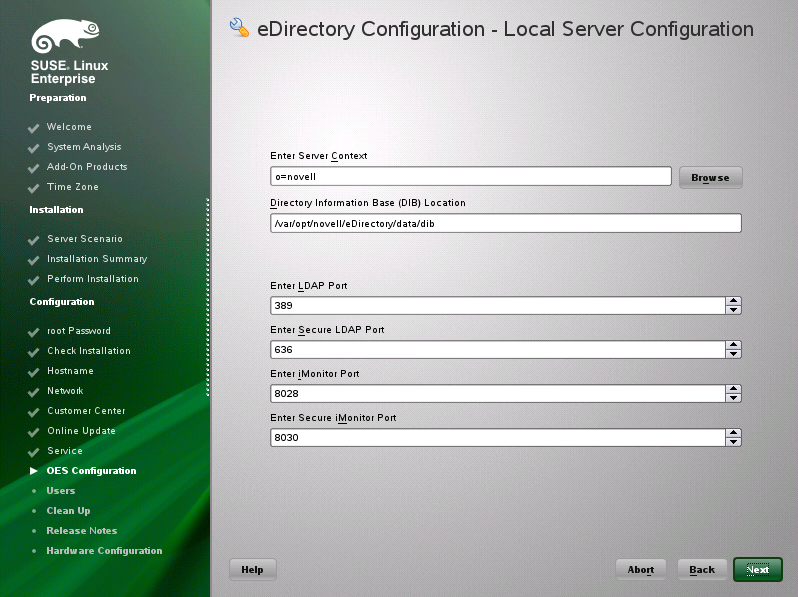
On the eDirectory Configuration - Local Server Configuration page, specify the following information:
-
The context for the server object in the eDirectory tree
-
A location for the eDirectory database
The default path is /var/opt/novell/eDirectory/data/dib, but you can use this option to change the location if you expect to have a large number of objects in your tree and if the current file system does not have sufficient space.
-
The ports to use for servicing LDAP requests
The default ports are 389 (non-secure) and 636 (secure).
IMPORTANT:The scripts that manage the common proxy user introduced in OES 11 SP3 require port 636 for secure LDAP communications.
-
The ports to use for providing access to the iMonitor application
The default ports are 8028 (non-secure) and 8030 (secure).
-
-
Click . Then continue with Specifying Synchronizing Server Time Options.
Installing the Server into an Existing eDirectory Tree
-
On the eDirectory Configuration - New or Existing Tree page, select .
-
In the field, specify a name for the eDirectory tree you want to join.
On OES servers, services that provide HTTPS connectivity are configured to use either of the following:
-
An eDirectory certificate issued by the Novell International Cryptographic Infrastructure (NICI)
-
The YaST self-signed common server certificate created in Step 2
Self-signed certificates provide minimal security and limited trust. We recommend that you use the eDirectory certificates instead.
By default, the check box is selected. This means that the existing YaST server certificate and key files will be replaced with eDirectory server certificate and key files.
The default YaST server certificate and key files are:
-
Key file: /etc/ssl/servercerts/serverkey.pem
-
Certificate file: /etc/ssl/servercerts/servercert.pem
The eDirectory server certificate and key files are:
-
Key file: /etc/ssl/servercerts/eDirkey.pem
-
Certificate file: /etc/ssl/servercerts/eDircert.pem
For more information on certificate management, see
Certificate Management
in the OES 11 SP3: Planning and Implementation Guide.-
Select to enforce the use of a single-secure password for all Novell and partner products. The Secure Password Manager of the NMAS module manages this universal password implementation.
-
-
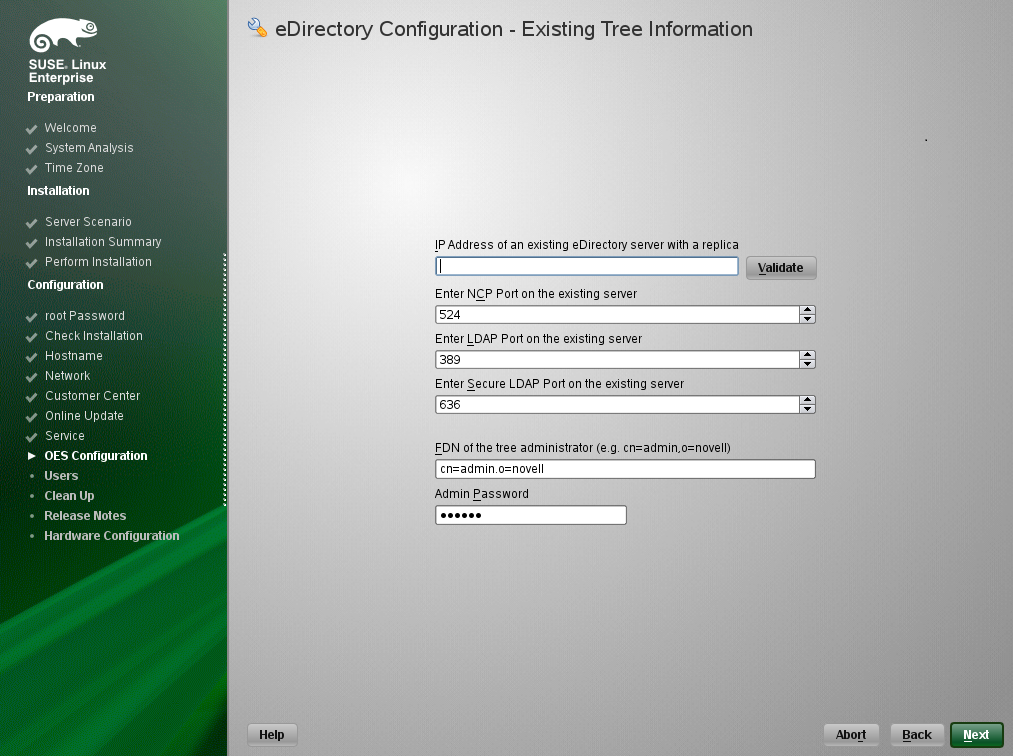
On the eDirectory Configuration - Existing Tree Information page, specify the required information:
-
The IP address of an existing eDirectory server with a replica.
IMPORTANT:Ensure that you verify the status of the eDirectory tree using the button. If the validation is unsuccessful, do not proceed further with the OES configuration until the eDirectory server is up and running.
-
The NCP port on the existing server
-
The LDAP and secure LDAP port on the existing server
-
The fully distinguished name and context for the user Admin on the existing server
-
The password for user Admin on the existing server
-
-
Click .
-
On the eDirectory Configuration - Local Server Configuration page, specify the following information:
-
The context for the server object in the eDirectory tree
-
A location for the eDirectory database
The default path is /var/opt/novell/eDirectory/data/dib, but you can use this option to change the location if you expect to have a large number of objects in your tree and if the current file system does not have sufficient space.
-
The ports to use for servicing LDAP requests
The default ports are 389 (non-secure) and 636 (secure).
IMPORTANT:The scripts that manage the common proxy user introduced in OES 11 SP3 require port 636 for secure LDAP communications.
-
The ports to use for providing access to the iMonitor application
The default ports are 8028 (non-secure) and 8030 (secure).
-
-
Click . Then continue with Specifying Synchronizing Server Time Options.
Selecting the NetIQ Modular Authentication Services (NMAS) Login Method
-
On the page, select all of the login methods you want to install.
IMPORTANT:The NMAS client software must be installed on each client workstation where you want to use the NMAS login methods. The NMAS client software is included with the Novell Client software.
The following methods are available:
-
CertMutual: The Certificate Mutual login method implements the Simple Authentication and Security Layer (SASL) EXTERNAL mechanism, which uses SSL certificates to provide client authentication to eDirectory through LDAP.
-
Challenge Response: The Challenge Response login method works with the Identity Manager password self-service process. This method allows either an administrator or a user to define a password challenge question and a response, which are saved in the password policy. Then, when users forget their passwords, they can reset their own passwords by providing the correct response to the challenge question.
-
DIGEST-MD5: The Digest-MD5 login method implements the Simple Authentication and Security Layer (SASL) DIGEST-MD5 mechanism as a means of authenticating the user to eDirectory through LDAP.
-
NDS: The NDS login method provides secure password challenge-response user authentication to eDirectory. This method is installed by default and supports the traditional NDS password when the NMAS client is in use. Reinstallation is necessary only if the NDS login method object has been removed from the directory.
-
Simple Password: The Simple Password NMAS login method provides password authentication to eDirectory. The Simple Password is a more flexible but less secure alternative to the NDS password. Simple Passwords are stored in a secret store on the user object.
-
SASL GSSAPI: The SASL GSSAPI login method implements the Generic Security Services Application Program Interface (GSSAPI) authentication. It uses the Simple Authentication and Security Layer (SASL), which enables users to authenticate to eDirectory through LDAP by using a Kerberos ticket.
For more information about installing and configuring eDirectory, see “Installing or Upgrading NetIQ eDirectory on Linux in the NetIQ eDirectory 8.8 SP8 Installation Guide.
For more information on these login methods, see the online help and
Managing Login and Post-Login Methods and Sequences
in the Novell Modular Authentication Services 3.3.4 Administration Guide. -
-
Click . Then continue with Specifying OES Common Proxy User Information.
Specifying OES Common Proxy User Information
For an OES service to run successfully, you need to use a separate proxy account to configure and manage each service. However, using multiple proxy user accounts means more overhead for the administrator. To avoid this overhead, the common proxy user has been introduced. Each node in a tree can have a common proxy user for all of its services. This enables administrators to configure and manage multiple services with just one proxy user.
NOTE:Two nodes in a tree cannot have the same common proxy user.
For information about this option, see Common Proxy User
in the OES 11 SP3: Planning and Implementation Guide.
-
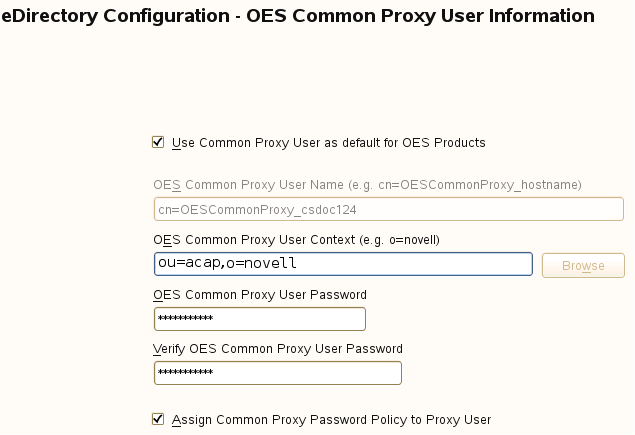
On the OES Common Proxy User Information page, specify the configuration settings for this user, then click .
-
Use Common Proxy User as Default for OES Products: Selecting this option configures the common proxy user for the following services: CIFS, DNS, DHCP, iFolder, NetStorage, and NCS. Optionally, you can specify that LUM uses it.
-
OES Common Proxy User Name: For a host, the common proxy user's name is OESCommonProxy_hostname. You cannot specify any other name than what is given by the system. This restriction prevents possible use of the same common proxy user name across two or more nodes in a tree. For more information, see
Can I Change the Common Proxy User Name and Context?
in the OES 11 SP3: Planning and Implementation Guide. -
OES Common Proxy User Context: Provide the FDN name of the container where the common proxy needs to be created. By default, this field is populated with the NCP server context. For example, ou=acap,o=novell. Where ou is the organization unit, acap is the organization unit name, o is the organization, and novell is the new organization name. For an existing tree, click and select the container where the Common Proxy User must be created.
-
OES Common Proxy User Password: You can accept the default system-generated password or specify a new password for the common proxy user.
NOTE:If you choose to provide your own password, it should conform to the policy that is in effect for the common proxy user. If the password contains single (') or double (") quotes, OES Configuration will fail. These characters have to be escaped by prefixing \. For example, to add a single quote, escape it as nove\'ll. The system-generated password will always be in conformance with the policy rules.
-
Verify OES Common Proxy User Password: If you specified a different password, type the same password in this field. Otherwise, the system-generated password is automatically included.
-
Assign Common Proxy Password Policy to Proxy User: The initial common proxy password policy is a simple password policy created with default rules. If desired, you can modify this policy after the installation to enforce stricter rules regarding password length, characters supported, expiration intervals, and so forth.
IMPORTANT:We recommended against deselecting the option. If deselected, the common proxy user inherits the password policies of the container, which could lead to service failures.
-
-
Continue with Configuring OES Services.