If you are a system administrator who needs to upgrade multiple OES 2 or OES 11 servers, it can be time-consuming and inconvenient to repeat the process of swapping installation discs and providing necessary upgrade information. You can now use AutoYaST to upgrade an OES 2 (64-bit) or OES 11 server to OES 11 SP1 with no user intervention. Ensure to use the integrated OES 11 SP1 ISO (OES11-SP1-addon_with_SLES11-SP2-x86_64-DVD.iso) for the upgrade.
IMPORTANT:Information mentioned in this section is critical. Failing to abide might result in loss of data or the OES server becoming unrecoverable. Before performing these procedures in a live environment, it is strongly recommended to try them on a test environment to familiarize with the unattended upgrade process.
Identify the 64-bit OES 2 SP2, OES 2 SP3 or OES 11 server that you want to upgrade, and ensure that the latest patches are applied before starting the upgrade. Ensure that you meet all the OES 11 SP1 upgrade requirements specified in Section 5.3, Meeting the Upgrade Requirements.
Ensure that you have the eDirectory replica server IP address and eDirectory credentials.
Ensure that the replica server is reachable over the network.
Ensure that the correct eDirectory replica server's IP address is present in the eDirectory install configuration file (for OES 2 SP2, the file name is edir2_sp2, for OES 2 SP3, it is edir2_sp3 and for OES 11, it is edir11) at /etc/sysconfig/novell/ as shown below:
CONFIG_EDIR_REPLICA_SERVER=" <specify the eDirectory Replica IP> "
Download the OES11-SP1-addon_with_SLES11-SP2-x86_64-DVD.iso, remove the add_on_products.xml and then remaster the ISO. Use the remastered ISO for the upgrade. For more information, see Section 5.6.2, Remastering the Integrated ISO without the add_on_products.xml.
Create an answer file that provides the eDirectory password. For more information, see Section 5.6.3, Creating an Answer File to Provide the eDirectory and DSfW Passwords.
For a truly unattended OES 11 SP1 upgrade from OES 2 or OES 11, use the remastered integrated ISO (OES11-SP1-addon_with_SLES11-SP2-x86_64-DVD.iso) that does not have the add_on_products.xml file.
To remaster the ISO:
Download the OES11-SP1-addon_with_SLES11-SP2-x86_64-DVD.iso and loop mount it under any directory using the following command.
mount -o loop OES11-SP1-addon_with_SLES11-SP2-x86_64-DVD.iso /mnt/autoupgrade
It gets mounted in read-only mode.
Copy the autoupgrade folder to another location, and then delete the add_on_products.xml file.
cp -r /mnt/autoupgrade /tmp
Remaster the OES11-SP1-addon_with_SLES11-SP2-x86_64-DVD.iso without the add_on_products.xml file.
mkisofs -R -b boot/x86_64/loader/isolinux.bin -c boot.cat -no-emul-boot -boot-load-size 4 -boot-info-table -o /tmp/SLES11-with-OES11-SP1.iso /tmp/autoupgrade
During an AutoYaST upgrade, the system requires user input only to provide the eDirectory and DSfW passwords. Even this intervention can be eliminated with the help of an answer file.
WARNING:During the answer file creation, no validation is performed on the passwords you enter. On entering a wrong password, the upgrade will fail, and the server that you are upgrading will become unrecoverable.
To create an answer file use any one of the following methods:
Direct Generation of the Answer Key File
Log in to your OES 2 (64-bit) machine as a root user and execute the following command:
yast2 /usr/share/YaST2/clients/create-answer-file.ycp <eDirectory password> [<DsfW Administrator Password for a DsfW server upgrade>]
NOTE:This method is not recommended as the passwords are stored in the y2log file in clear text.
Exporting the Passwords to Variables
In the terminal window, type the following commands:
export OES_EDIR_DATA=<specify eDirectory Administrator Password>
export OES-DSFW_DATA=<specify the DsfW Administrator Password for a DsfW server upgrade>
yast2 /user/share/yast2/clients/create-answer-file.ycp
Using the GUI on OES 11 SP1 and above
In the terminal window, type the following command:
yast2 /usr/share/yast2/clients/create-answer-file.ycp
In the YaST2 dialog, provide the eDirectory and DSfW passwords, then click .
NOTE:DSfW password should be specified only if you are upgrading a DSfW server.
Once you have successfully generated the answer key file using any of the above stated methods, copy it from the current working directory to /opt/novell/oes-install/.
HINT:To invoke help for creating the answer key file, in the terminal window, type yast2 create-answer-file.ycp --help.
Ensure that you have met all the requirements listed in Section 5.6.1, Prerequisites.
Use the remastered integrated iso (OES11-SP1-addon_with_SLES11-SP2-x86_64-DVD.iso) to boot the OES 2 or the OES 11 machine that you want to upgrade.
In the installation screen, select , and specify the following information:
autoupgrade=1 autoyast=relurl://oes/autoupgrade.xml netsetup=hostip hostip=<enter the host IP> netmask=<enter the netmask IP> gateway=<enter the gateway IP> netdevice=<If you have multiple Network Interface Cards (NIC), enter the NIC name through which you will access the installation source. For example, netdevice=eth1. This entry is not required if you have only one NIC.>
For example:
autoupgrade=1 autoyast=relurl://oes/autoupgrade.xml netsetup=hostip hostip=192.168.1.225 netmask=255.255.254.0 gateway=192.168.1.254
Press Enter.
The upgrade proceeds without any user intervention.
Ensure that you have met all the requirements listed in Section 5.6.1, Prerequisites.
Shut down the guest machine.
Open the guest machine's XML file at /etc/xen/vm, delete the boot loader entry, then save the file.
Use the following command to delete the guest machine:
xm delete <guest machine>
Use the following command to start the virtual manager GUI:
os=sles11; vm-install --vm-settings /etc/xen/vm/<guest>.xml --os-type $os --os-settings http://<the web server IP>/download/autoupgrade.xml
In the Operating System Installation screen, select the appropriate SLES 11 options as shown in the following image.
By default, the autoupgrade.xml path is populated for the AutoYaST file.
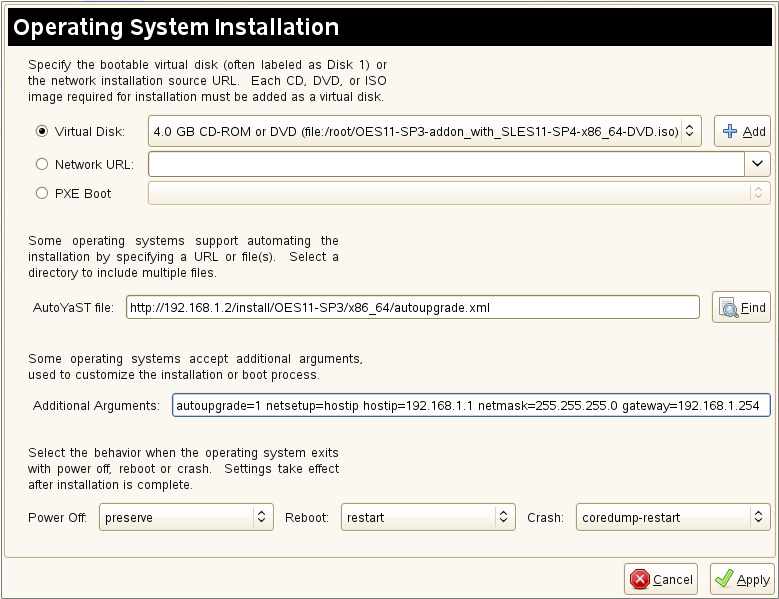
In the text box, specify the parameter information for the host IP, gateway IP, and netmask.
For example:
autoupgrade=1 netsetup=hostip hostip=192.168.1.225 netmask=255.255.254.0 gateway=192.168.1.254
Click .
The upgrade proceeds without any user intervention.
There is no validation for the passwords that you enter while creating the answer file. If you do not specify the correct passwords, the upgrade will not be successful and the server that you are upgrading will become unrecoverable.
For a Domain Services for Windows (DSfW) server upgrade, specify the DSfW Administrator password after the eDirectory password. For more information, see Section 5.6.3, Creating an Answer File to Provide the eDirectory and DSfW Passwords
If you have not created the answer file, you will be prompted for the eDirectory and DSfW administrator passwords.
If the eDirectory replica server's IP address is not present in the eDirectory install configuration file (for OES 2 SP2, the file name is edir2_sp2, for OES 2 SP3, it is edir2_sp3 and for OES 11, it is edir11) at /etc/sysconfig/novell/, you will be prompted for the same. For more information, see Section 5.6.1, Prerequisites.