5.5 Configuring Novell Cluster Services
After installing Novell Cluster Services, you use the tool in YaST to set up the cluster or to add a node to the cluster.
IMPORTANT:The YaST-based configuration is not used to modify the settings for an existing cluster. For information about modifying the settings for an existing cluster, see Section 8.9, Moving a Cluster, or Changing IP Addresses, LDAP Server, or Administrator Credentials for a Cluster.
If you are creating a new cluster, the Novell Cluster Services configuration does the following:
-
Creates a new Cluster object and a Cluster Node object in eDirectory.
-
Creates a special cluster partition for the Split Brain Detector (SBD) if you have a shared disk system.
If you are adding a server to an existing cluster, the Novell Cluster Services configuration does the following:
-
Creates a new Cluster Node object in eDirectory.
Use the following procedures to configure Novell Cluster Services on a node:
5.5.1 Sharing a Device to Use for the SBD Partition
If you plan to use shared storage in the cluster, the cluster needs a split-brain detector (SBD). You must create the SBD before you add a second node to the cluster.
You can create the SBD when you set up the cluster on the first node. In preparation, you must initialize the partition, and mark its device as shareable for clustering. If you plan to mirror the SBD, you must also initialize the partition that you want to use as the mirrored SBD, and mark its device as shareable for clustering. You need at least 20 MB for the SBD.
-
Log in as the root user on the server that will be the first node of the cluster, then open a terminal console.
-
At the console prompt, enter
nssmu
-
In the NSSMU, select and press Enter.
-
In the list, select the device that you want to use for the SBD.
-
If the device has not been initialized or if you want to delete the current partitioning structures on the device, press F3 to initialize the selected device.
WARNING:Initializing a disk destroys all of the data on it.
Wait for the page to refresh before continuing.
-
Press F6 to mark the device as shareable for clustering.
The value changes from to .
-
If you plan to mirror the SBD, repeat Step 4 through Step 6 for the second device.
-
Exit NSSMU.
-
Continue with Section 5.5.2, Opening the Novell Open Enterprise Server Configuration Page.
5.5.2 Opening the Novell Open Enterprise Server Configuration Page
-
Log in to the server as the root user.
-
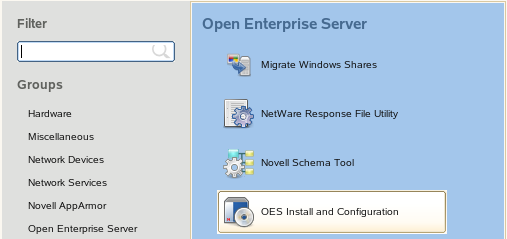
In YaST, select .
-
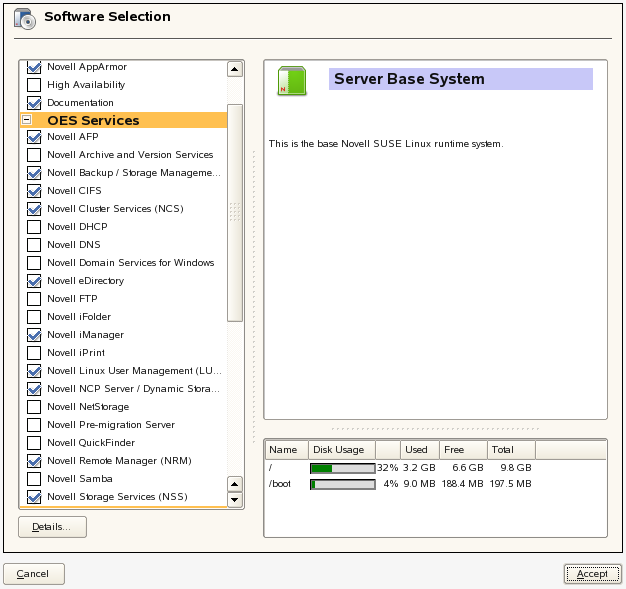
On the Software Selection page under , verify that the option is already installed as indicated by a blue check mark.
-
Click to proceed to the Novell Open Enterprise Server Configuration page.
-
Do one of the following:
-
Same Administrator: To use the same administrator credentials that were used to install Novell Cluster Services, continue with Section 5.5.4, Accessing the Novell Cluster Services Configuration Page in YaST.
-
Different Administrator: To use different administrator credentials than those used to install Novell Cluster Services, continue with Section 5.5.3, Using Different LDAP Credentials for the Cluster Configuration.
-
5.5.3 Using Different LDAP Credentials for the Cluster Configuration
You can use different user credentials to configure Novell Cluster Services than were used during the installation of OES Services on the server by reconfiguring the settings for the option.
For information about what rights are needed, see Section 5.3, Assigning Install Rights for Container Administrators (or Non-Administrator Users).
-
On the Novell Open Enterprise Server Configuration page under , click the link to enable re-configuration.
The sentence changes to .
-
Click the link to open the LDAP Configuration page.
-
Specify the following values:
-
Admin name and context: The user name and context (in LDAP form) of the container administrator user (or non-administrator user) who has the eDirectory rights needed to install Novell Cluster Services.
-
Admin password: The password of the container administrator (or non-administrator user).
-
-
Click .
The install returns to the Novell Open Enterprise Server Configuration page.
-
Continue with Section 5.5.4, Accessing the Novell Cluster Services Configuration Page in YaST.
5.5.4 Accessing the Novell Cluster Services Configuration Page in YaST
-
On the Novell Open Enterprise Server Configuration page under , locate the Novell Cluster Services link.
The configuration is currently disabled.

-
Click the link to enable configuration.
The sentence changes to .

-
Click the link to open the Novell Cluster Services Configuration page.
-
If you are prompted for credentials, specify the password of the specified Administrator user, then click OK.
If you did not specify a different administrator user in Section 5.5.3, Using Different LDAP Credentials for the Cluster Configuration, this is the Administrator user whose credentials you specified for eDirectory when the OES Services were installed on the server.
-
On the Novell Cluster Services Configuration page, continue with one of the following:
5.5.5 Configuring a New Cluster
Perform the following configuration for the first node that you configure for a cluster:
-
Go to the Novell Cluster Services Configuration page as described in Section 5.5.4, Accessing the Novell Cluster Services Configuration Page in YaST.
-
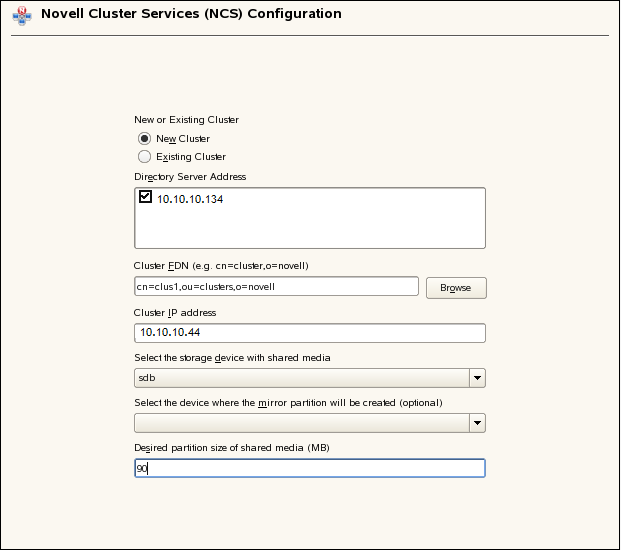
On the first configuration page, specify the following settings for a new cluster, then click :
New or Existing Cluster
Select to define a new cluster.
Directory Server Address
Select the check box next to one or multiple IP addresses of the LDAP server to use for LDAP communications.
The IP addresses shown are the LDAP servers available for this service to use. The LDAP servers must have a master replica or a Read/Write replica of eDirectory.
Cluster FDN
Specify the FDN (fully distinguished name) you will give the new cluster and the eDirectory context where the new Cluster object will reside. The name is case sensitive.
IMPORTANT:Use the comma format illustrated in the example. Do not use dots.
For example:
cn=cluster1,ou=clusters,o=mycompany
You must specify an existing context. Specifying a new context does not create a new context.
Cluster names must be unique. You cannot create two clusters with the same name in the same eDirectory tree.
Cluster IP address
The cluster IP address represents the cluster on the network. It is different than the server IP address. For example:
10.10.10.44
The cluster IP address provides a single point for cluster access, configuration, and management. A Master IP Address resource is created automatically during the Cluster Services installation. The cluster IP address is bound to the master node and remains with the master node regardless of which server is the master node.
The cluster IP address is required to be on the same IP subnet as the other servers in the same cluster, which is necessary for certain external network management programs to get cluster status alerts.
SBD Settings
A split-brain detector (SBD) is required if you plan to use shared disks in the cluster. For information about SBD requirements, see SBD Partitions.
If you need the SBD, you can create the SBD partition now, or you can create it manually at any time before you add a second node to the cluster.
IMPORTANT:To create the SBD partition now, you must have at least 20 MB of free space on a device that has been initialized and marked as shareable for clustering.
To create the SBD partition now:
-
Select the storage device with shared media: Select the shared device that you want to use for the SBD from the drop-down list.
The drop-down menu shows only devices that have been initialized and shared.
-
Select the device where the mirror partition will be created: If you want to mirror the SBD, select a different shared device from the drop-down list.
-
Desired partition size of shared media: Specify a size of 20 MB or greater to use for the SBD partition.
If you selected a device for the SBD mirror, the specified size is also used for the mirror segment.
To manually create the SBD partition later, you can use either of the following procedures:
-
-
On the Proxy User Configuration page, specify one of the following users as the NCS Proxy user, then click .
-
OES Common Proxy User: If the OES Common Proxy User is enabled in eDirectory, the check box is automatically selected and the and fields are populated with the credentials of the OES Common Proxy User.
-
LDAP Admin User: If the OES Common Proxy User is disabled in eDirectory, the check box is automatically deselected and the and fields are populated with the credentials of the LDAP Admin user. The fields are also automatically populated with the LDAP Admin credentials if you deselect the check box.
-
Another Administrator User: Deselect the check box, then specify the credentials of an existing administrator user.
You can reset the default settings by clicking to return to the Novell Cluster Services Configuration page, then clicking to continue again to the Proxy User Configuration page.
-
-
On the Configuration page from the drop-down box, select the IP address that Novell Cluster Services will use for this node.
Some servers have multiple IP addresses. This step lets you choose which IP address Novell Cluster Services uses.
-
On the Configuration page, select the check box to start Novell Cluster Services software on this node after configuring it, then click .
-
On the OES Server Configuration page, scroll down to the Novell Cluster Services entry to review the summary of the Cluster Services configuration, then click .
-
Continue through the setup process.
-
After the configuration is completed, click to exit the OES Configuration, then start Novell Cluster Services using one of these methods:
Setup Condition
Instructions
was enabled in Step 5
Novell Cluster Services starts automatically after the configuration completes.
was disabled in Step 5
Start Novell Cluster Services manually by using one of these methods:
-
Reboot the cluster server.
-
At a terminal console prompt, go to the /etc/init.d directory, then enter the following as the root user:
./novell-ncs start
-
At a terminal console prompt, enter the following as the root user:
rcnovell-ncs start
-
-
Continue with Section 5.6, Configuring Additional Administrators.
5.5.6 Adding a Node to an Existing Cluster
Perform the following configuration for each node that you add to an existing cluster:
-
If you have not previously configured the SBD partition for the cluster, create an SBD partition for the cluster by using one of the following procedures:
If you have a shared disk system attached to your cluster servers, an SBD partition is required and must be created before you configure the second node in the cluster.
IMPORTANT:An SBD partition requires least 20 MB of free space on a device that has been previously initialized and marked as shareable for clustering.
-
Go to the Novell Cluster Services Configuration page as described in Section 5.5.4, Accessing the Novell Cluster Services Configuration Page in YaST.
-
When you are prompted, enter the credentials of the LDAP administrator that is configured for the server.
This is either the LDAP administrator identity that was used when the OES Services were installed, or the identity configured after the install in Section 5.5.3, Using Different LDAP Credentials for the Cluster Configuration.
-
On the Novell Cluster Services Configuration page, select .
-
In the field, click to open the window, locate and select the existing Cluster object where you want to add this server as a node, then click .
The comma-delimited fully distinguished name (FDN) of the cluster is automatically populated in the field.
The option is available in OES 2 SP3 or later.
You can also specify the fully distinguished name (FDN) (the name and eDirectory context) of the cluster where you want to add this server.
IMPORTANT:Use the comma format illustrated in the example. Do not use dots.
-
Click .
-
On the Proxy User Configuration page, specify one of the following users as the NCS Proxy user, then click .
-
OES Common Proxy User: If the OES Common Proxy User is enabled in eDirectory, the check box is automatically selected and the and fields are populated with the credentials of the OES Common Proxy User.
-
LDAP Admin User: If the OES Common Proxy User is disabled in eDirectory, the check box is automatically deselected and the and fields are populated with the credentials of the LDAP Admin user. The fields are also automatically populated with the LDAP Admin credentials if you deselect the check box.
-
Another Administrator User: Deselect the check box, then specify the credentials of an administrator user.
You can reset the default settings by clicking to return to the Novell Cluster Services Configuration page, then clicking to continue again to the Proxy User Configuration page.
-
-
On the Configuration page from the drop-down box, select the IP address that Novell Cluster Services will use for this node.
Some servers have multiple IP addresses. This step lets you choose which IP address Novell Cluster Services uses.
-
On the Configuration page, select the check box to start Novell Cluster Services software on this node after configuring it, then click .
-
On the OES Server Configuration page, scroll down to the Novell Cluster Services entry to review the summary of the Cluster Services configuration, then click .
-
After the configuration is completed, click to exit the OES Configuration page, then start Novell Cluster Services using one of these methods:
Setup Condition
Instructions
was enabled in Step 9
Novell Cluster Services starts automatically after the configuration completes.
was disabled in Step 9
Start Novell Cluster Services manually by using one of these methods:
-
Reboot the cluster server.
-
At a terminal console prompt, go to the /etc/init.d directory, then enter the following as the root user:
./novell-ncs start
-
At a terminal console prompt, enter the following as the root user:
rcnovell-ncs start
-
-
Continue with Section 5.6, Configuring Additional Administrators.